DIY Cone Christmas Trees with popcorn, yarn, and paper
This post may contain affiliate links. Please read our Disclosure Policy.
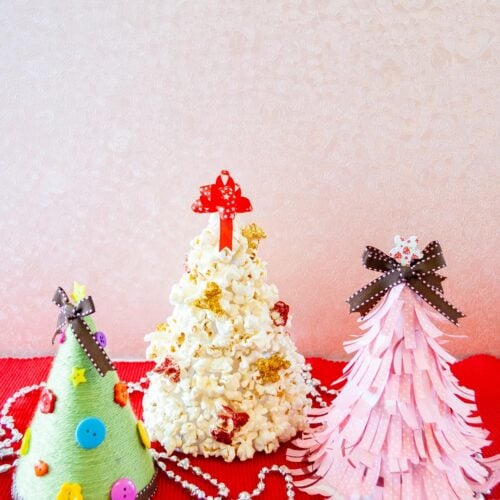
Get into the holiday spirit with these cute DIY Cone Christmas Trees! Create crafty magic using paper, popcorn, and yarn. Easy, fun, and perfect craft for holiday decorations!
Today I’m sharing how to make these 3 super cute Christmas trees made with cardstock, popcorn, yarn, and wrapping paper… And of course a lot of glue LOL.

Table of Contents
Diy Cone Christmas Trees: Popcorn, Yarn, and Paper
It’s the perfect time of year to let your imagination run wild and have fun with some do-it-yourself projects.
If you want to make your home look more festive without much effort, we have a simple and enjoyable crafting idea that will make you feel like Santa’s helper.
These trees are not your usual ordinary trees. Oh no, we’re making it more exciting with a special surprise. You will need wrapping paper, popcorn, and yarn for this fun craft.
This easy craft is super fun to make with friends, family, or even mischievous little helpers, as we celebrate the holiday season and bring out our holiday decorations.
These homemade cone-shaped Christmas trees are not only a fun way to decorate your home, but they also give you a chance to spend time with your family and have a good time together.
So, play your favorite holiday songs, get a hot chocolate (with lots of marshmallows), and let’s start making diy Christmas cone trees.
How to Make Diy Cone Christmas Trees

This is another craft you can easily make with kids. Great for motor skills, creativity, and of course a fun time with them.
Supplies:
- Cardstock
- Yarn
- Popcorns
- Decorative wrapping paper
- Buttons
- Ribbon
- Glue {I used hot glue, white glue and UHU glue… and Spray mount too!}
Tools:
- Scissors
- Ruler
- Hot glue gun and glue sticks
Instructions:
1. Print some cone patterns in different sizes and cut them with your scissors. They don’t need to be perfect.
You can get the free cone tree printable HERE.
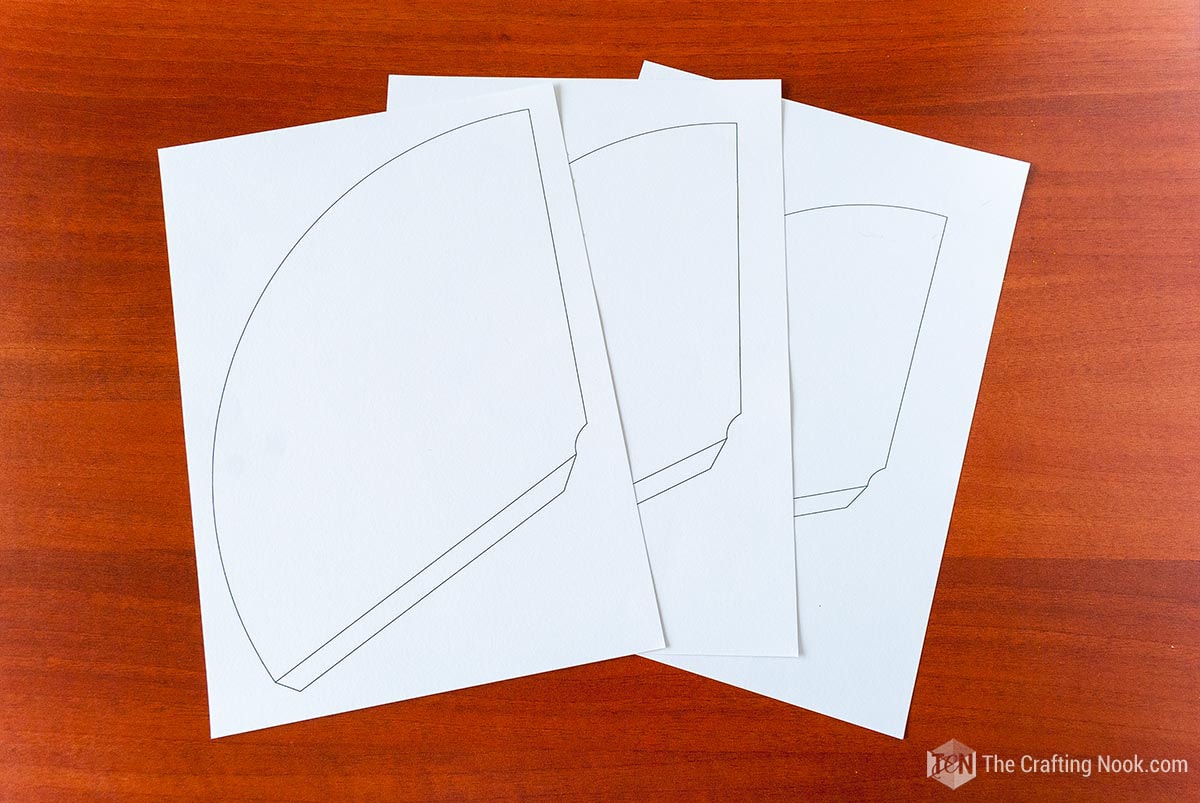
2. Assemble the paper cone gluing through the flap.
3. Once the glue is dry we are ready to start.
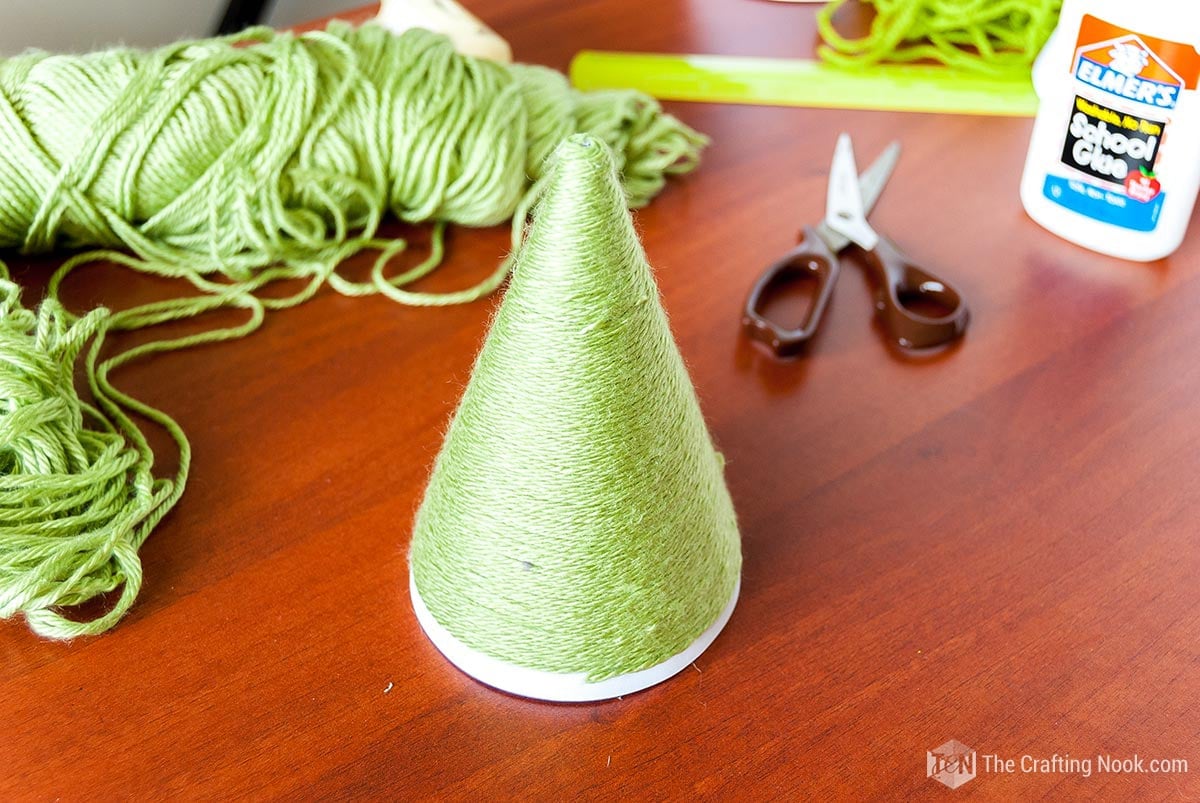
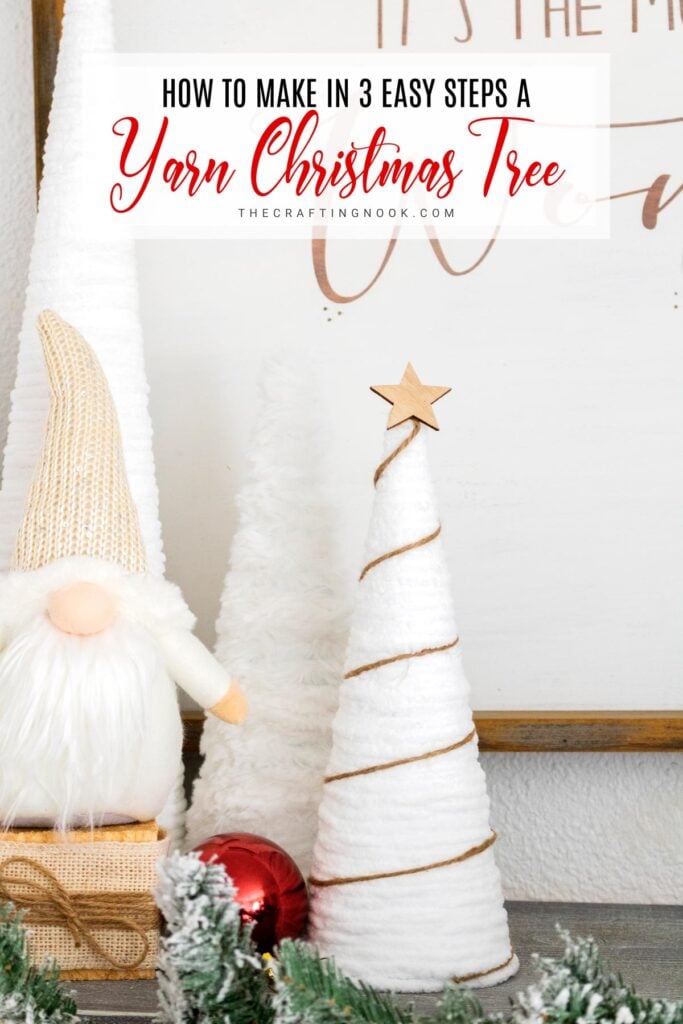
Yarn Cone Tree:

4. Start wrapping the cone tree from the top to the bottom using white glue or your favorite glue. I prefer white glue because when they dry the surface gets a little bit sturdier.

5. Leave a space of less than ½ inch (about 1 cm) at the bottom.
6. Wrap the left gap at the bottom with a cute ribbon.

7. Then decorate the tree with different button shapes and colors with hot glue. If you are minimalist you can leave as is. But when working with kids they love adding buttons.
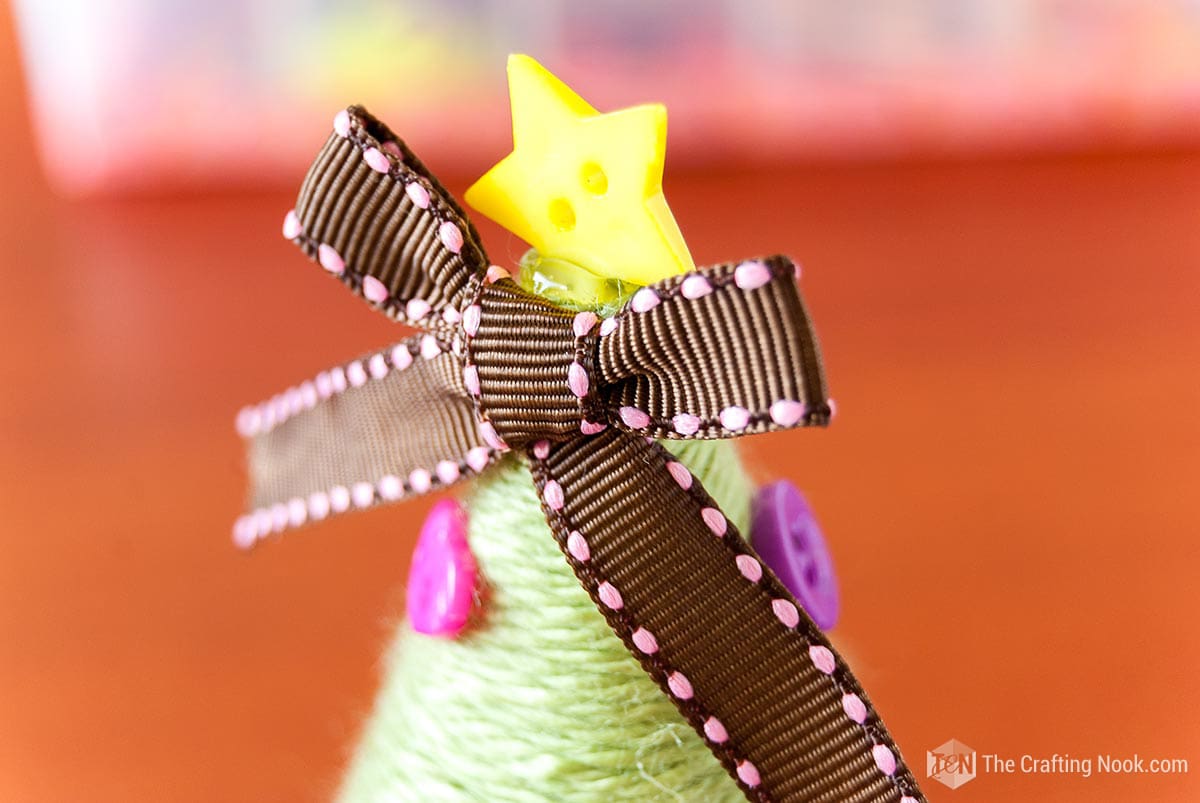
8. Make a cute bow with the same ribbon as the bottom.
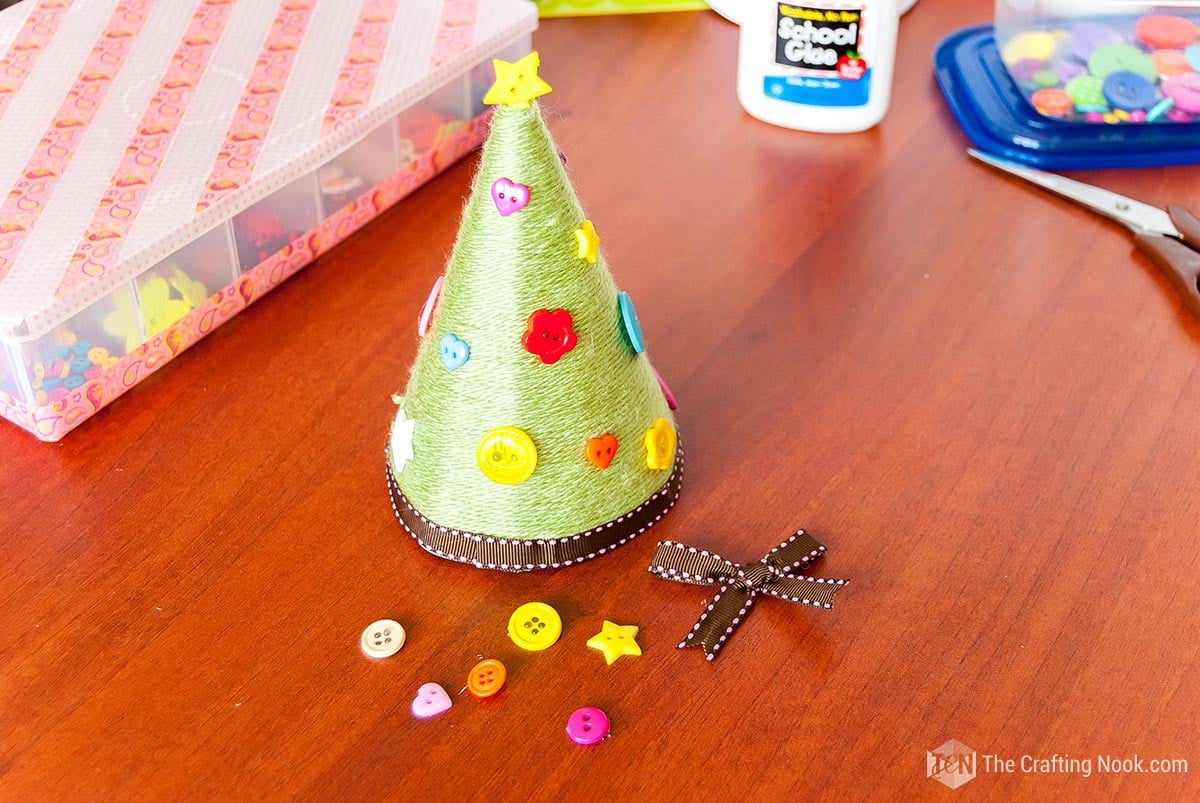
9. If you have a button star, glue it to the top of the tree and glue the bow right below it.
10. Yarn Cone Christmas Tree is finished.

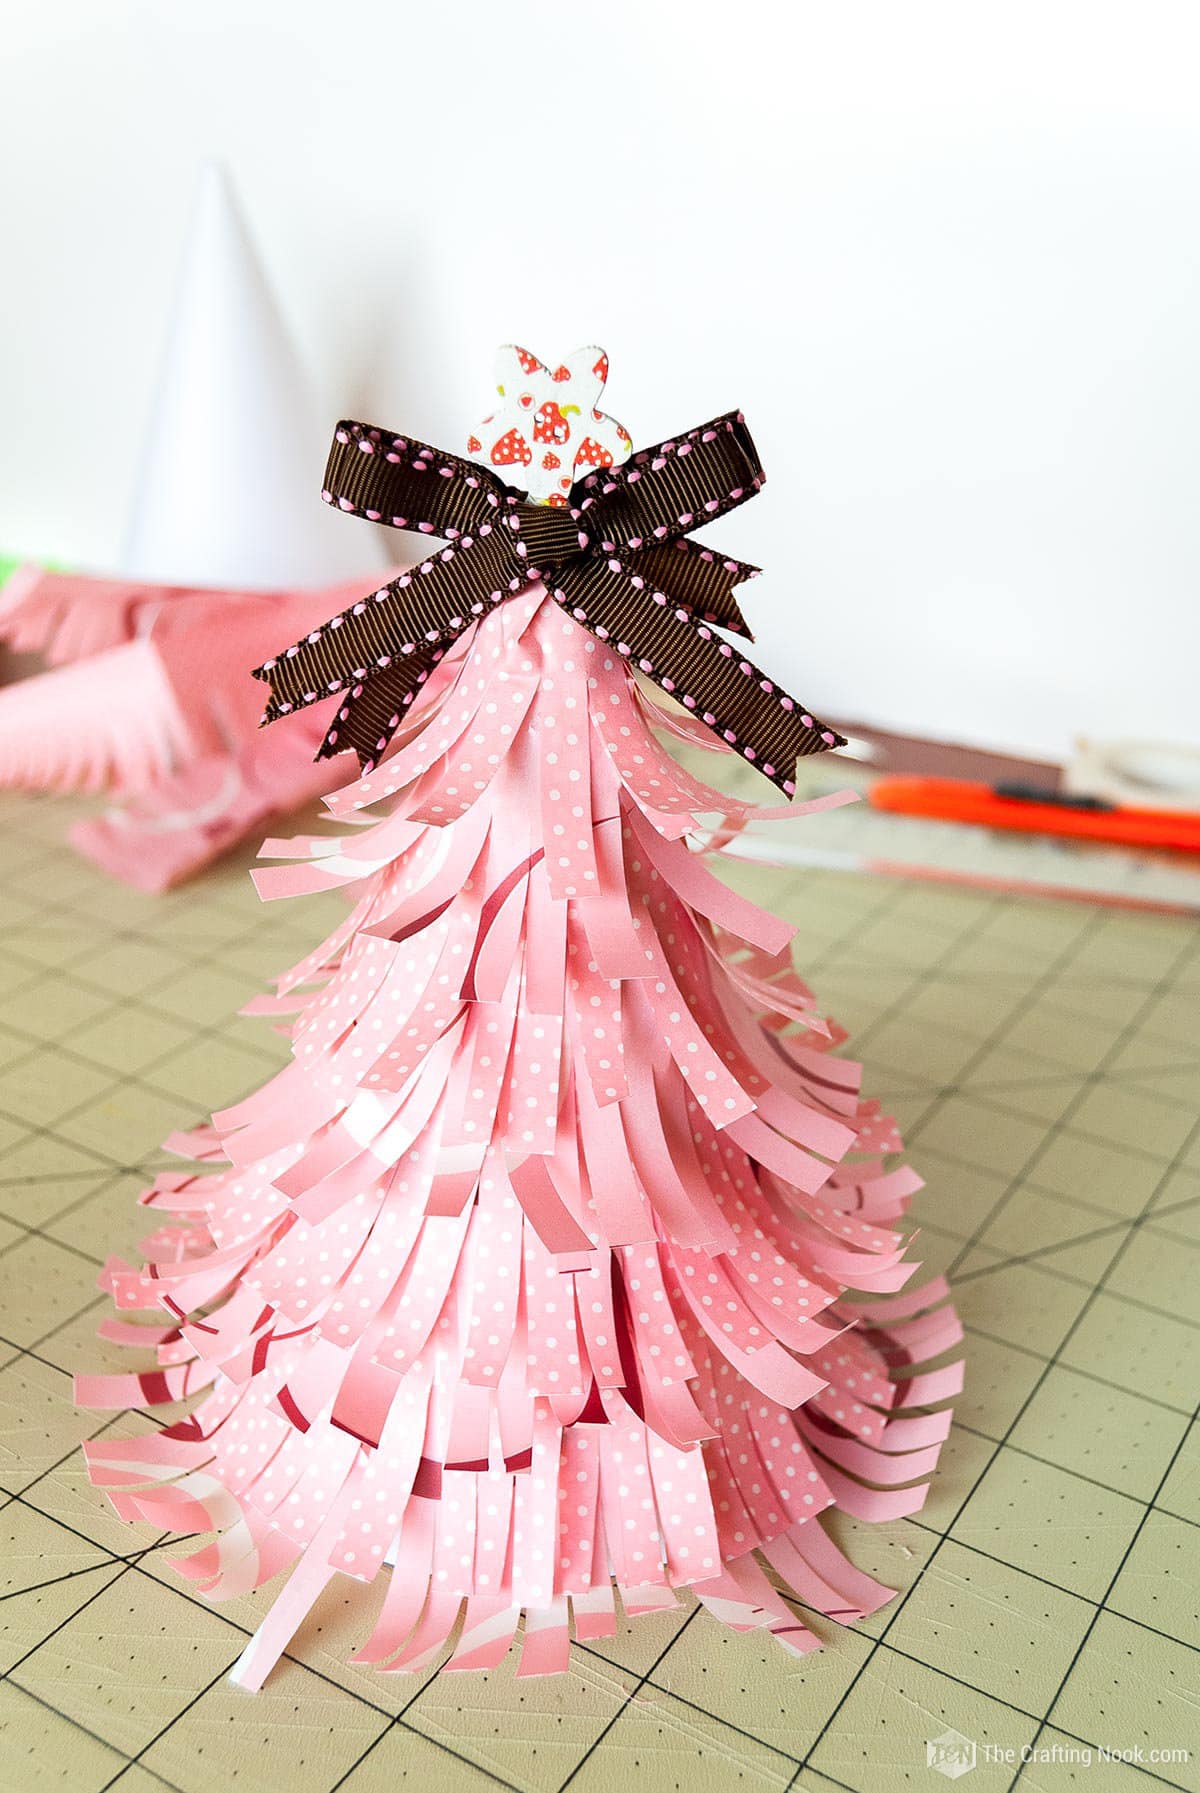
Wrapping paper Cone Tree:

1. Cut a few strips of cute wrapping paper about 2 inches wide. I used 2 different patterns for this. Each strip was about 20 inches long but you can use what you have.
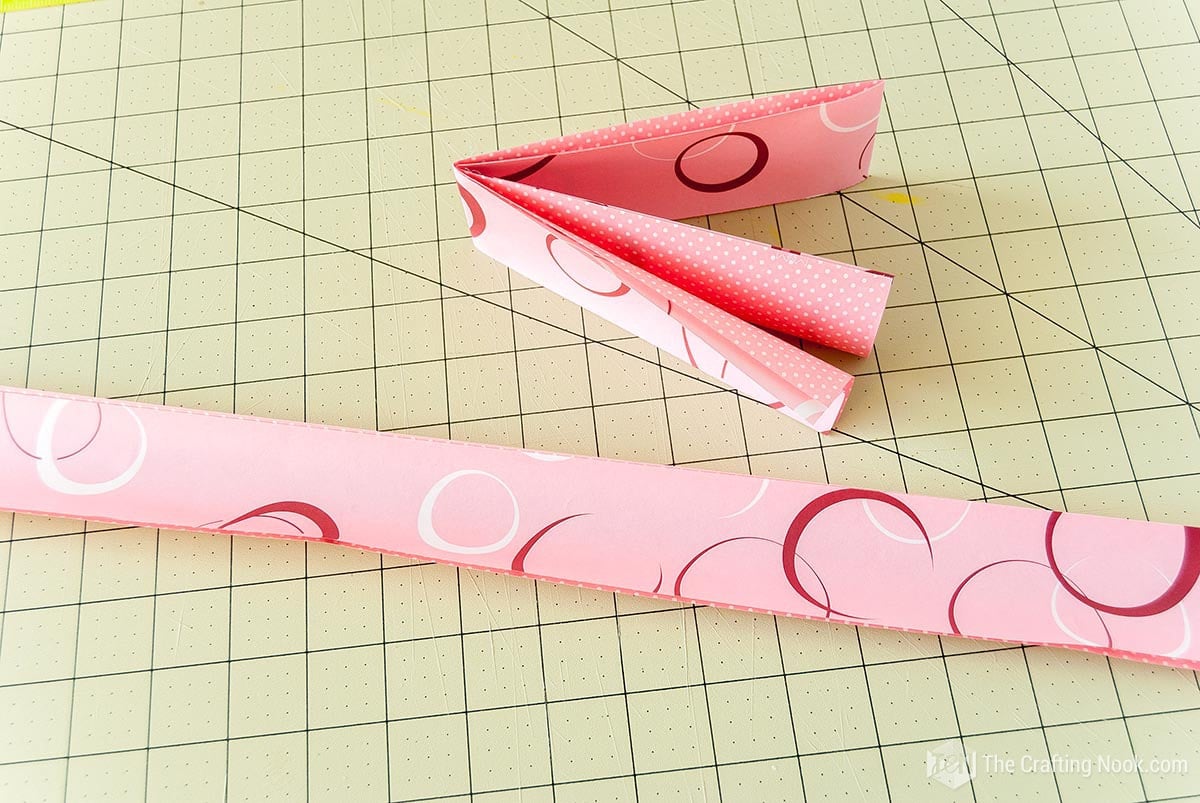
2. Then fold them together four times.


3. Make cuts all along the folded paper as if you were making a Hawaiian skirt leaving about 1/3 inch from the edge.

4. Carefully unfold the strips to get a fun strip of skirt-y paper.

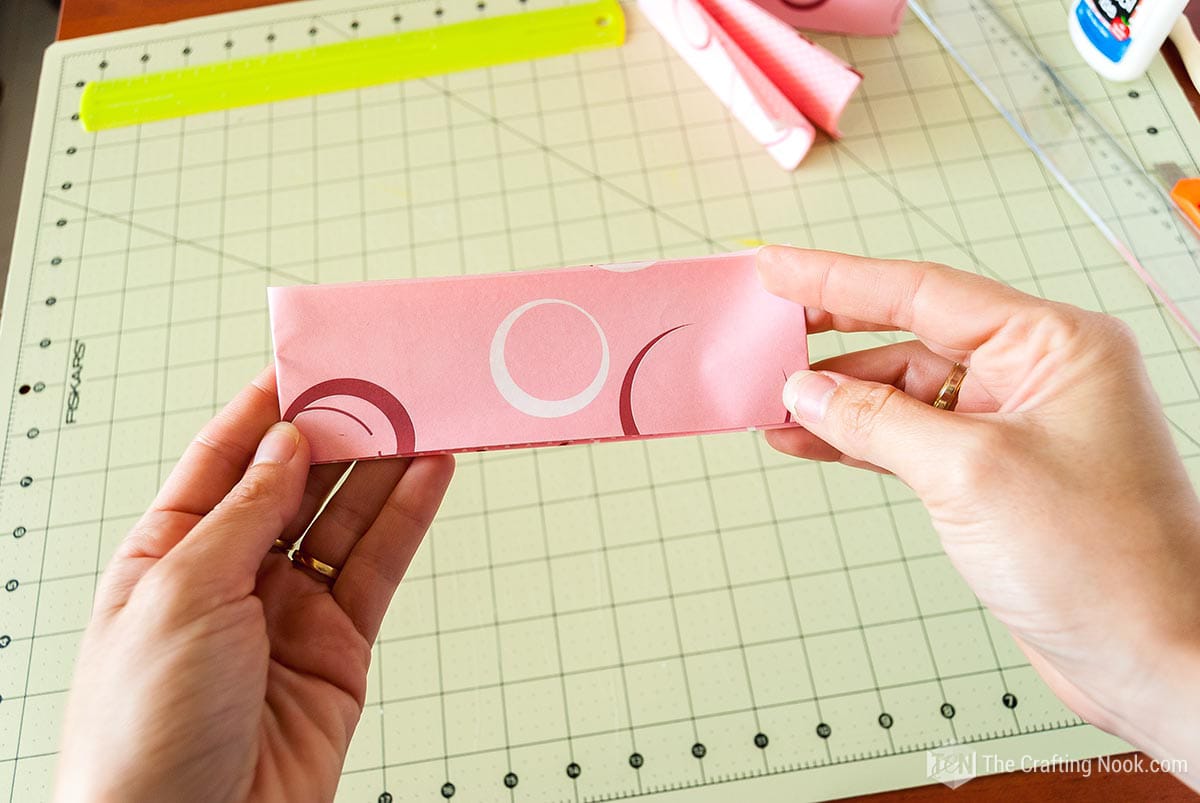
5. Next start to glue the paper from the bottom up. It’s easier.
6. Make sure you leave a few millimeters of the paper off the base of the cone.

7. In this process, I made some creases so the paper can wrap the cone evenly until it meets the other end.
8. Alternate the pattern on each row.
9. Overlap about 1/2 inch of each row repeating the same process described above.
10. Do this until you reach the tip of the cone.
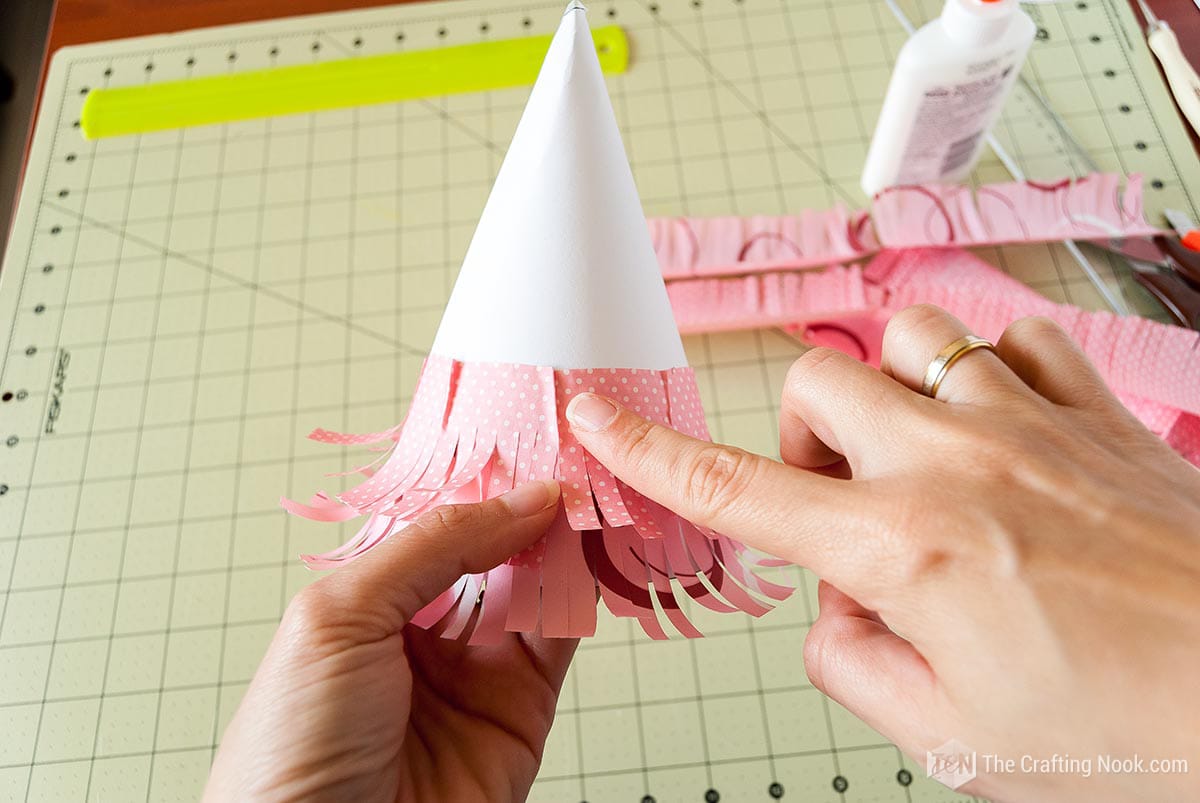
11. Then glue a button star and the bow. Or just decorate the top of the tree with your favorite ornament.
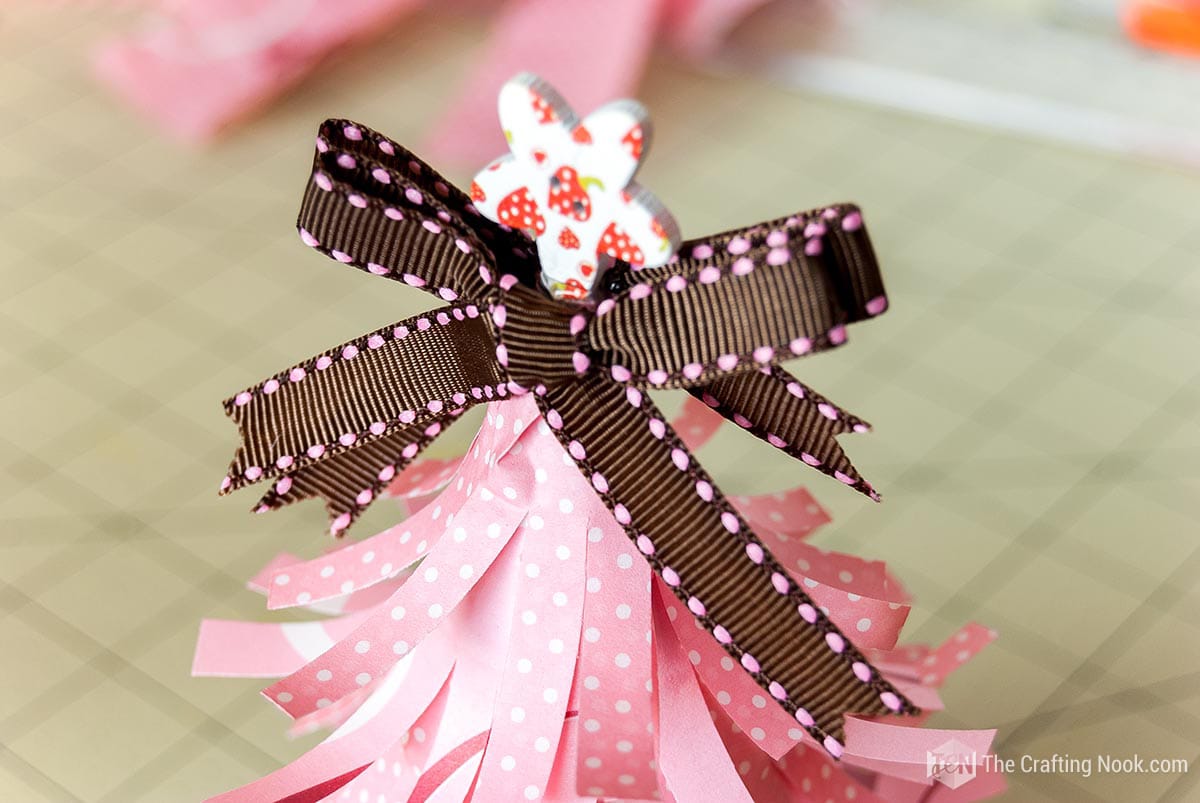
12. Woot we have the second tree!!! A gorgeous Paper Cone Christmas Tree
popcorn Cone Tree:

1. This one is super fun, especially for kids.
2. Pop your popcorn a day ahead and leave it uncovered overnight. This helps to get rid of too much moisture, making the decoration last longer.

3. Spreading glue small areas at a time, glue the popcorn from bottom to top.

4. Try gluing them as tight together as you can. Keep going until you reach the top.
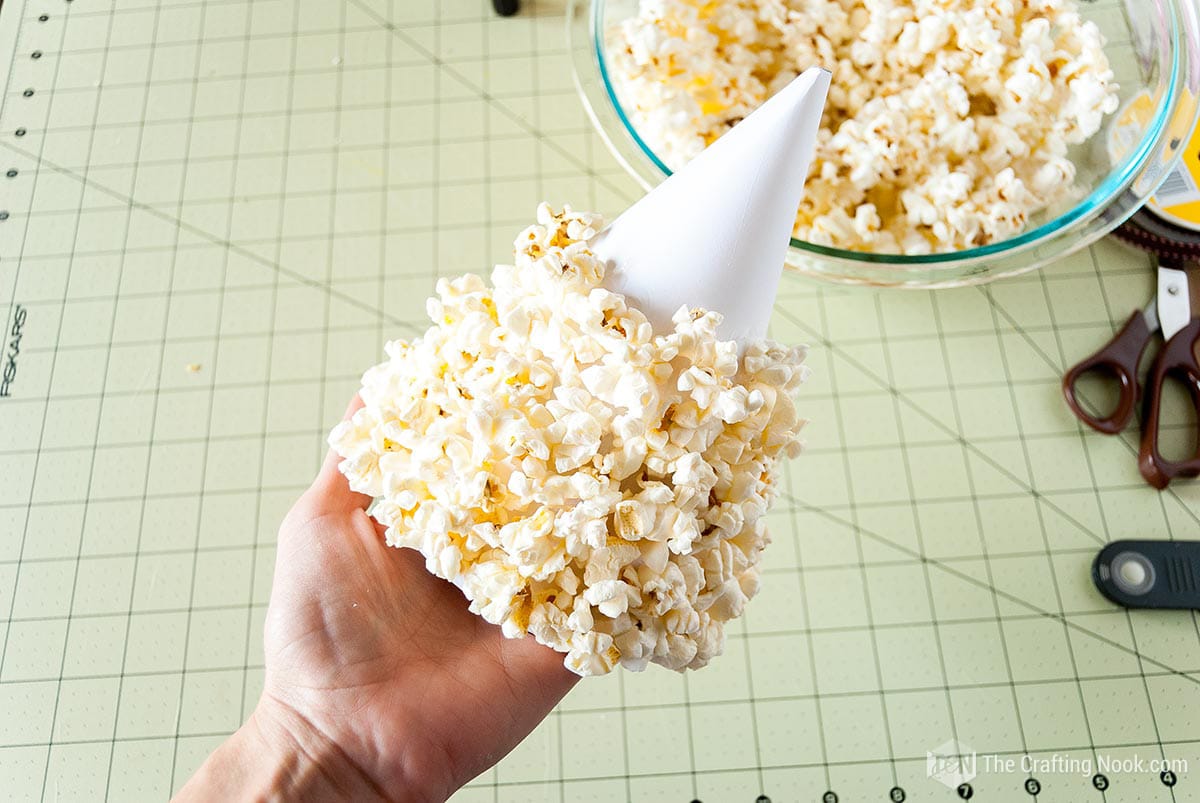
5. Make some of your popcorn look like ornaments. Add glue and glitter to the popcorn.
6. I sprayed some popcorn with the spray mount and added some gold and red glitter and glued them to the tree.
7. If you are working with kids, don’t use spraying glue, use white glue and let them glitter the popcorn, they just LOVE this.
8. Glue the glittery popcorn around the tree like you would put ornaments on your Christmas tree.

9. Make a cute ribbon bow and put it to the top of your tree or here again use your favorite type of ornament for the top of your tree.
10. Here you have it!!!! One super fun Popcorn Cone Christmas tree.

Tadaaaaaa!!!! All 3 done!!! Super easy and super fun. They are quite decorative too!
Crafting Tips
- To keep your popcorn fresh and crispy during the holiday season, pop your popcorn a day ahead and leave it uncovered overnight. This helps to get rid of too much moisture, making the decoration last longer.
- Try using different types of yarn, like boucle, eyelash, or metallic, instead of plain yarn. These special types of yarn make your cone trees look more fun.
- Make old buttons useful again by using them in your tree ornaments. Look through your collection of buttons or go to secondhand stores to find special shapes, colors, and sizes.
- Make your cone trees smell nice by spraying them lightly with a holiday-scented room spray or essential oil. Pine, cinnamon, or peppermint smells make a place feel warm and welcoming.
- You can add a small string of lights that run on batteries. Just weave the lights through the cone.
- You can use different-sized templates or change the length of the cone to make your decor look more interesting.
- Make a small skirt for your cone trees to make them look finished. Take a piece of colorful fabric and cut it into a circle or oval shape. Then, use glue or a few stitches to attach it to the bottom of your cone. This small thing makes your tree look even better.

Frequently Asked Questions
The time it takes to create a cone tree depends on how quick you can craft and how much detail you want. It usually takes between 30 minutes to an hour to take make one tree. But, if you keep practicing and gaining more experience, you might be able to finish them even faster.
Yes, definitely. Yarn can have different textures and sizes. You can use any yarn for this, but it’s better to use yarn that isn’t too thick so that the tree keeps its shape. Try using different types of yarn, such as shiny, soft, or glittery options, to make your project more fun and playful.
To make sure the cone trees stay steady, firstly use a sturdy cardstock. Then place them on a flat surface or connect them to a small round or square base made from cardboard or wood. Stick the bottom of the cone to the base using glue. This will make sure the tree stands up straight with a strong base.
To keep the cone trees, carefully take apart any removable decorations, like garlands or ornaments. Stack the ones than can be stacked. Fill them with paper or bubble wrap to keep the shape and put them in a strong box or container and keep them in a cool and dry place until the next holiday season.
Absolutely! DIY Cone Christmas Trees can be a fun and engaging activity for children, with adult supervision. You can assign simpler tasks like cutting wrapping paper or gluing popcorn, allowing them to contribute to the creative process and enjoy the holiday crafting experience.
More Christmas Projects To Try
If you enjoyed this DIY Cone Christmas Trees tutorial, you might also love these other Christmas project ideas too:

✂️ Tutorial
Diy Cone Christmas Trees with popcorn, yarn, and paper
Tools
- scissors
- Ruler
- Hot glue gun and glue sticks
Supplies
- Cardstock
- Yarn
- Popcorns
- Decorative wrapping paper
- Buttons
- Ribbon
- Glue {I used hot glue white glue and UHU glue… and Spray mount too!}
Instructions
- Print some cone patterns in different sizes and cut them with your scissors. They don’t need to be perfect.
- Assemble the paper cone gluing through the flap.
- Once the glue is dry we are ready to start.
YARN CONE TREE:
- Start wrapping the cone tree from the top to the bottom using white glue or your favorite glue. I prefer white glue because when they dry the surface gets a little bit sturdier.
- Leave a space of less than ½ inch (about 1 cm) at the bottom.
- Wrap the left gap at the bottom with a cute ribbon.
- Then decorate the tree with different button shapes and colors with hot glue. If you are minimalist you can leave as is. But when working with kids they love adding buttons.
- Make a cute bow with the same ribbon as the bottom.
- If you have a button star, glue it to the top of the tree and glue the bow right below it.
- Yarn Cone Christmas Tree is finished.
WRAPPING PAPER CONE TREE:
- Cut a few strips of cute wrapping paper about 2 inches wide. I used 2 different patterns for this. Each strip was about 20 inches long but you can use what you have.
- Then fold them together four times.
- Make cuts all along the folded paper as if you were making a Hawaiian skirt leaving about 1/3 inch from the edge.
- Carefully unfold the strips to get a fun strip of skirt-y paper.
- Next start to glue the paper from the bottom up. It’s easier.
- Make sure you leave a few millimeters of the paper off the base of the cone.
- In this process, I made some creases so the paper can wrap the cone evenly until it meets the other end.
- Alternate the pattern on each row.
- Overlap about 1/2 inch of each row repeating the same process described above.
- Do this until you reach the tip of the cone.
- Then glue a button star and the bow. Or just decorate the top of the tree with your favorite ornament.
- Woot we have the second tree!!! A gorgeous Paper Cone Christmas Tree
POPCORN CONE TREE:
- This one is super fun, especially for kids.
- Pop your popcorn a day ahead and leave it uncovered overnight. This helps to get rid of too much moisture, making the decoration last longer.
- Spreading glue small areas at a time, glue the popcorn from bottom to top.
- Try gluing them as tight together as you can. Keep going until you reach the top.
- Make some of your popcorn look like ornaments. Add glue and glitter to the popcorn.
- I sprayed some popcorn with the spray mount and added some gold and red glitter and glued them to the tree.
- If you are working with kids, don’t use spraying glue, use white glue and let them glitter the popcorn, they just LOVE this.
- Glue the glittery popcorn around the tree like you would put ornaments on your Christmas tree.
- Make a cute ribbon bow and put it to the top of your tree or here again use your favorite type of ornament for the top of your tree.
- Here you have it!!!! One super fun Popcorn Cone Christmas tree.
- Tadaaaaaa!!!! All 3 done!!! Super easy and super fun. They are quite decorative too!
What do you think have you done this before? I would love to hear other ideas!
Share and PIN ME!!!

Til’ next time…


FREE WORKBOOK
Keeping your Sweet Home Organized
Learn how to create intentional habits and simple routines to Keep Your Home Organized. Plus freebies, printables, exclusive content, and tips.
Disclaimer: By clicking on the “Yes” button above you are giving me your consent to collect and use your information according to the law and My Policy Privacy. Zero Spam I promise!
