DIY Custom Baby Onesie with Heat Transfer Vinyl
This post may contain affiliate links. Please read our Disclosure Policy.
Whether you’re making a DIY custom baby onesie for a new addition to the family, a baby shower gift, or just for fun, you can create your own customized design to fit any unique occasion with heat transfer vinyl. Learn how here!
I know it’s probably not weird for you at this point, that this post involves an owl, or is it? LOL. You know how much I love owls and I don’t see that changing any time soon.

My excuse today (as if I needed one LOL) is that one of my hubby’s cousins is pregnant with a baby girl and I got so excited about planning a special gift for her. I thought that a cute owl DIY Custom Baby Onesie would be a great gift for her baby shower.
Table of Contents
DIY Custom Baby Onesie with Heat Transfer Vinyl for A Baby Shower Gift
I must confess I didn’t do this alone with my lack of cool English idioms or phrases I asked my awesome friends from the Silhouette group to help me with a nice and fun sentiment that involves owls. THANK YOU, GIRLS!!!!
I loved right away “Look Hoots Here” Yayyyy! I started my project at once! Of course, a big part of my inspiration I owe it to Lauren from The Thinking Closet, she has the sweetest onesies ever!
I also wanted to add somehow the baby’s name and a fun twist, so I decided to use one of the hollow hearts from the owl and place it in the onesie butt LOL.

I think all newborns and babies look so cute with the diapers and with something that pops up in their little butt hahaha! And I added EMMA inside the heart! I got so excited that her baby will be called the same as my girl!
So, I could go on and, on this babbling, because I’m so excited about the new girl in the family! Sad that she’ll be so far but still a new baby girl Yayyyy!!!.
How to make this DIY Custom Baby Onesie
So, onto the craft, right?
Supplies:
- A Plain onesie – I love Gerber’s packs.
- Heat Transfer Vinyl – I love Cricut htv or silhouette htv.
- Cute shapes cut files – I used one from the silhouette store.
- Love and creativity!
- Optionally, if you don’t have cut machines, there are tons of places that could cut the HTV for you you just have to google it!
Tools:
- Cutting Machine {I have Silhouette Cameo}
- Regular Iron or heat press or easy press.
Instructions:
Applying heat transfer is really easy, you just need to make sure a few details are not missed and you can do this.
For example, when working with this type of htv, you need to mirror the image before cutting, and always place a piece of cloth or parchment paper between the htv and the iron.
Before we begin, be sure to follow us on Pinterest, Facebook, Instagram, and YouTube, and also sign up for our email list (at the end of this post), so you’ll never miss a post!
Step 1: Create the design
First, I created my design for the front and back of the onesie in my Silhouette studio.
The owl is from the silhouette store, you can find it here and search for “Owl Hearts” and you will see it.
Step 2: Cut the heat transfer vinyl design
Once the design is defined and in the right size, I flip the image (mirror it) and send it to the silhouette machine following the proper cut settings suggested.
I prefer using the mat because I cut the necessary HTV and I waste less material.

Step 3: Weed out the unwanted htv
Once the design is cut, using the hook or weeding tool, remove all the unwanted pieces of htv. Including all the surrounding HTV.

There you have the mirrored image is ready.
Cut it into two pieces: the heart and the owl.

Step 4: Press or Iron-on the design onto the onesie
Decide on the position of the owl on the onesie, place iron-on vinyl with the plastic backing up, and lay a t-shirt or piece of fabric on top of the design.
Iron in cotton settings pressing down firmly for about 40-60 seconds (time might vary between irons) until you are sure the vinyl is really stuck to the onesie.

If you peel away the plastic and the vinyl is not set, continue ironing for a few more seconds.

I let it cool for a few seconds and started peeling away the plastic very carefully.
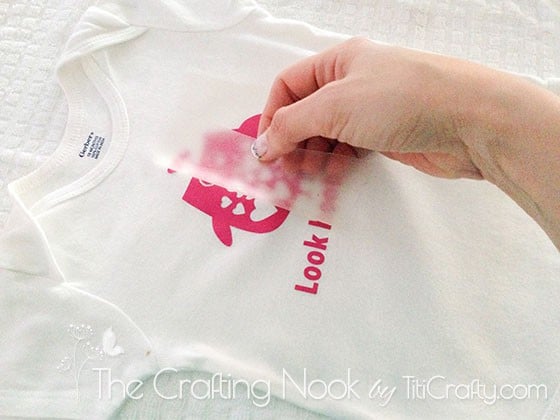
Then did the same process for the heart on the butt area… Not sure if I got it right but I tried, right? LOL

To wash it you can just machine wash and dry inside out (the lower the heat the better).

There you go! One adorable DIY Baby Onesie!


Isn’t it super cute??? Now I need to come up with a cute idea for the gift packing and send it to the US!!! So excited!!!
Any ideas for a gift-wrapping you want to share??? I would love to hear them all in the comments!


Frequently Asked Questions
HTV could last years under normal circumstances and usage. It will also depend on the HTV quality. Like any other product, it comes in different brands and quality and not all of them are good. I personally love Silhouette and Cricut’s.
But given that it’s good quality and good care, a T-shirt, for example, should last years without peeling off. Heat transfer vinyl is normally very durable and most of the time, a good quality vinyl will last longer than the t-shirt itself. It’s not recommended to throw an HTV in a dryer though.
HTV works best on cotton polyester or cotton/poly blends. Some synthetic fabrics, like acrylic, probably won’t work correctly because they will melt under the heat of iron. For more advanced crafters, you can apply HTV to mugs, baseball hats, school supplies, water bottles, patches, and even wood!
The quick answer is NO. Some designs, especially small designs that fit under your home iron, you can transfer with one press. But a heat press machine could be a great investment if you plan on making heat transfer vinyl designs regularly, it will help you transfer vinyl quickly and easily and give you a polished product in the end.
Yes, you can use a household iron for HTV designs. Iron for 40-60 seconds but check the work along the way to see that it isn’t too hot.
More Onesie Project Ideas to try
If you like this cute DIY Custom Baby Onesie tutorial, you might also love these other cute craft project ideas for kids too!

✂️ Tutorial

DIY custom baby onesie with Heat Transfer Vinyl
Tools
- Cutting Machine {I have Silhouette Cameo}
- Regular Iron or heat press or easypress.
Supplies
- A Plain onesie – I love Gerber’s packs.
- Heat Transfer Vinyl – I love cricut htv or silhouette htv.
- Cute shapes cut files – I used one from the silhouette store.
- Love and creativity!
- Optionally if you don’t have cut machines, there are tons of places that could cut the HTV for you you just have to google it!
Instructions
STEP 1: CREATE THE DESIGN
- First I created my design for the front and back of the onesie in my Silhouette studio.
- The owl is from the silhouette store, you can find it here and search for “Owl Hearts” and you will see it.
STEP 2: CUT THE HEAT TRANSFER VINYL DESIGN
- Once the design is defined and in the right size, I flip the image (mirror it) and send it to the silhouette machine following the proper cut settings suggested.
- I prefer using the mat because I cut the necessary HTV and I waste less material.
STEP 3: WEED OUT THE UNWANTED HTV
- Once the design is cut, using the hook or weeding tool, remove all the unwanted pieces of htv. Including all the surrounding HTV.
- There you have the mirrored image is ready.
- Cut it into two pieces: the heart and the owl.
STEP 4: PRESS OR IRON-ON THE DESIGN ONTO THE ONESIE
- Decide on the position of the owl on the onesie, place iron-on vinyl with the plastic backing up, and lay a t-shirt or piece of fabric on top of the design.
- Iron in cotton settings pressing down firmly for about 40-60 seconds (time might vary between irons) until you are sure the vinyl is really stuck to the onesie.
- If you peel away the plastic and the vinyl is not set, continue ironing for a few more seconds.
- I let it cool for a few seconds and started peeling away the plastic very carefully.
- Then did the same process for the heart on the butt area… Not sure if I got it right but I tried, right? LOL
- To wash it you can just machine wash and dry inside out (the lower the heat the better).
- There you go! One adorable DIY Baby Onesie!
Love y’all and hope you liked my quick craft today!!!
Some other cute Onesie projects I love from my favorite bloggers:
- Gender Neutral Onesies & Free Cut Files by The Thinking Closet.
- Baby Animal Onesies by Gingersnap Crafts.
- DIY Personalized Onesie by unOriginal Mom
¡Share and PIN ME!

Til’ next time…


FREE WORKBOOK
Keeping your Sweet Home Organized
Learn how to create intentional habits and simple routines to Keep Your Home Organized. Plus freebies, printables, exclusive content, and tips.
Disclaimer: By clicking on the “Yes” button above you are giving me your consent to collect and use your information according to the law and My Policy Privacy. Zero Spam I promise!
Wow that phrase is so adorable! I love the placement of her name right on the tushie! So cute, I’ll be pinning…but of course.
hahaha Thank you so much Sam, appreciate it! Glad you like it!
Hugs
I think the student has surpassed the master where onesies are concerned. This is SO adorable! And I love the pun. Off to pin and of course planning to feature you next week in my Reader’s Showcase. Gotta show off this gem to the whole world wide web!
You are too sweet, thanks for giving me such a lovely motivation. SO glad you like this one! I can’t wait to see the new Emma in it!!! I’m so honored that you want to feature my onesie on your showcase!!! WOOT WOOT can’t wait!… Love being over your blog! =D Hope you are having a wonderful weekend my friend.
XOXO lots!
Yay! Just wanted to let you know your onesie will be featured in my Summer 2015 Reader Showcase over at the blog. This link will be live by tomorrow: http://wp.me/p3gOqC-3wy Air high five, Camila!
WOOHOO so excited my friend!!!! I’m super honored top be showcased among such creative ladies! Love all the ideas!!! Checking them out!!!!
XOXO
What a super cute onesie! Love the owl design! I really need to get with the program and make one of these before our little newborn gets to be “too old”! Have a great weekend!
Oooh you will love to make onesies, it gets a little addictive. babies look so cute in them so I make them all the time!
Thanks so much for your visit, glad you liked my project.
Hugs