Felt Flowers DIY: A Step by Step guide to Felt Flowers 3 ways
Felt crafts are fun and easy. Learn how to make these cute felt flowers diy. These are great simple crafts you can use to decorate a room.
Don’t you love flowers? Come and take a look at my felt flowers’ tutorials for a fun DIY home decor project that will last for so many years! Learn how to make felt flowers following this easy and fun step by step.

Table of Contents
Easy and Cute Felt Flowers DIY Ideas
A felt flower is one of the easiest crafts to do for beginner and experienced crafters. Plus, they’re great for holiday wreaths, gift wrapping, and so much more.
This post may contain affiliate links. Please read our Disclosure Policy.
If you have ever wanted to try a felt project, don’t miss the DIY we’re sharing today, where we show you THREE ways to make felt flowers. The best part is that they’re all easy to do nd you can mix and match to create even more flowers.
Spring is around the corner and I can even smell it! Are you as excited as I am! Spring is usually my favorite season besides Christmas. Things start to look so pretty colorful. The fresh air, warm weather, and all the flowers started to bloom. It’s all kind of magical.
Why make Felt Flowers?
These kinds of flowers are super easy to make. There are so many ways and so different techniques that I hope my way makes it a little bit easy for you. You don’t need to be a pro crafter to make these. Just need I few supplies and your hands.
Imagination is the limit, so you don’t need to stick with what I say, or how I do it.
You can vary each type of flower with your own twist. That’s what I love the most about these flowers and about handmade, imperfections make things perfect and unique.

These diy felt flowers have a purpose, I made them to put them on a cute Spring Rustic felt flower Wreath, so you can take a look. It turned out so cute! But these could be used on headbands, hair clips, felt flower bouquets, garlands, and so much more. Creativity is the limit.
This cute project doesn’t involve sewing or stitching or any fancy tool. Just felt, glue, and your hands!
How to make felt flowers DIY
Thanks to a dear friend I decided to make some cute flowers. Since she’s kind of in love with the paper I decided to go for felt. Today I’m sharing with you how to make Felt flowers in three different ways. Hope you enjoy it!
I’ve always loved felt. It’s easy to work with, fairly inexpensive and comes in so many different colors. One of my favorite things to make out of felting flowers. Like I said earlier, you can hot glue them to a brooch, hair clip, or headband for a quick and easy hair accessory, use as a gift topper, or just give them as is.
My daughter and I get really excited over a few hand-made blossoms. Today, I’ll show you how to make the three kinds of felt flowers.
Supplies:
- Felt in different colors (approx. 8×12)
- Round-shaped guide (for perfect circles. I used a dish LOL)
Tools:
- Hot glue gun
- A pencil
- Sharp pair of scissors
Step-by-Step Instructions:
Before we begin, be sure to follow us on Pinterest, Facebook, Instagram, and YouTube, and also sign up for our email list (at the end of this post), so you’ll never miss a post!
1. Simple Felt Rosette 1 color
1. Start by tracing and cutting a felt circle. I used a soup dish as a guide. LOL.

2. Then with a pen trace a spiral from the edge towards the center.

3. Cut the spiral.

4. Starting at the outer end of the felt strip, fold the tip inwards and roll it on itself to secure well. You can use hot glue if you want to make sure it’s secure.

5. Start rolling up from the folded end. Place the rolled end upside down between your thumb and middle finger, roll it and add glue periodically till the whole flower is formed.


6. Place the rolled end upside down between your thumb and middle finger, roll it till the whole flower is formed.


7. Once your flower is rolled and ready, apply a generous amount of glue to the back and affix the small circle that you got at the inner end. Press them together well.


8. Cut any leftovers from the back cover.

There you go! You won’t get anything easier than this!

9. You can make variations of this flower. Wave along the edge of the circle and then the spiral to create a more Rose look.
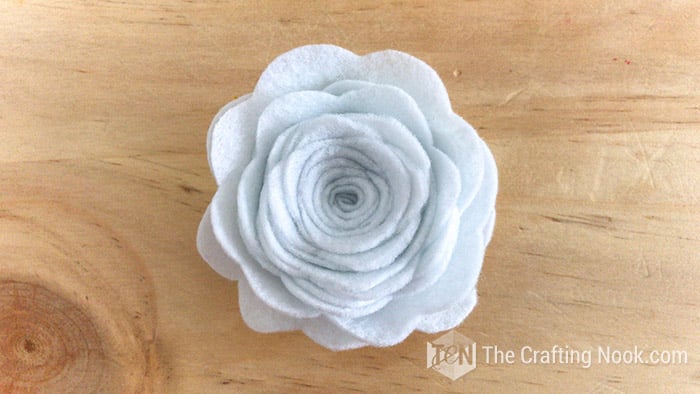
Or you can also add a cute center to your rosette… or do both LOL.
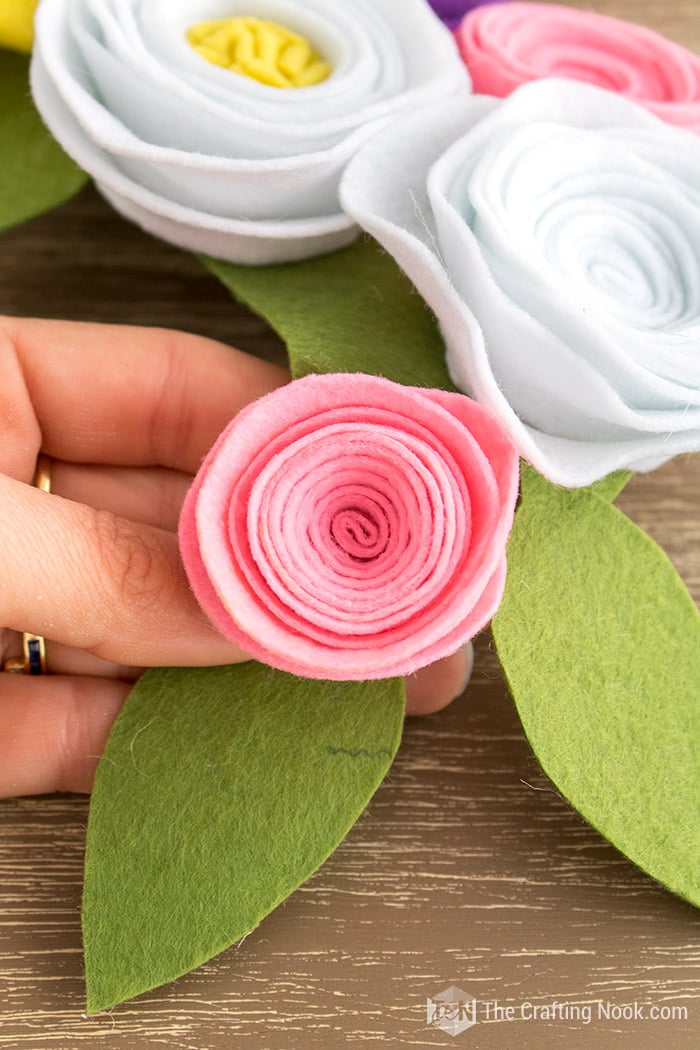
2. Felt Rossette with a cute center
1. Repeat the 2 first steps from the previous rosette but this time let’s try making the spiral without tracing it with the pencil.


2. Then cut a piece of felt 1 1/4” wide by any length (depending on how big you want your flower, I used 6-Inches).

3. Fold it in half lengthwise.

4. Cut little slits into the folded part of the felt.

5. You can create different effects on this part by varying how wide you cut the slits.
6. Roll your flower center up from one end (you can glue it along the way) till you like the size of the center.


7. Then cut out the tip of the outer end, insert it between the folded end of your center and roll it securing it well between your fingers. You can use hot glue if you want to make sure it’s secure.

8. Place the rolled end upside down between your thumb and middle finger, roll it till the whole flower is formed.


9. Once your flower is rolled and ready, apply a generous amount of glue to the back and affix the small circle that you got at the inner end. Press them together well.


10. Cut any leftovers from the back cover if needed.

There you go!!!! I’m loving how this turned out.

I made another in white with a smaller purple center.

This is how it turned out!
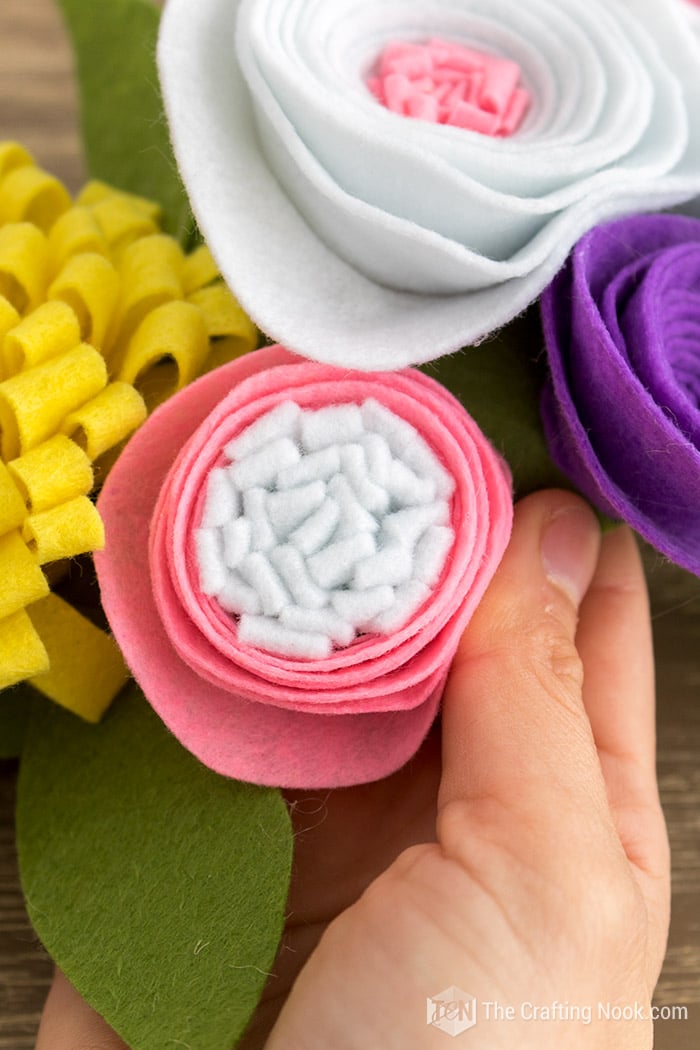
3. Easy Loopy Felt Flower:
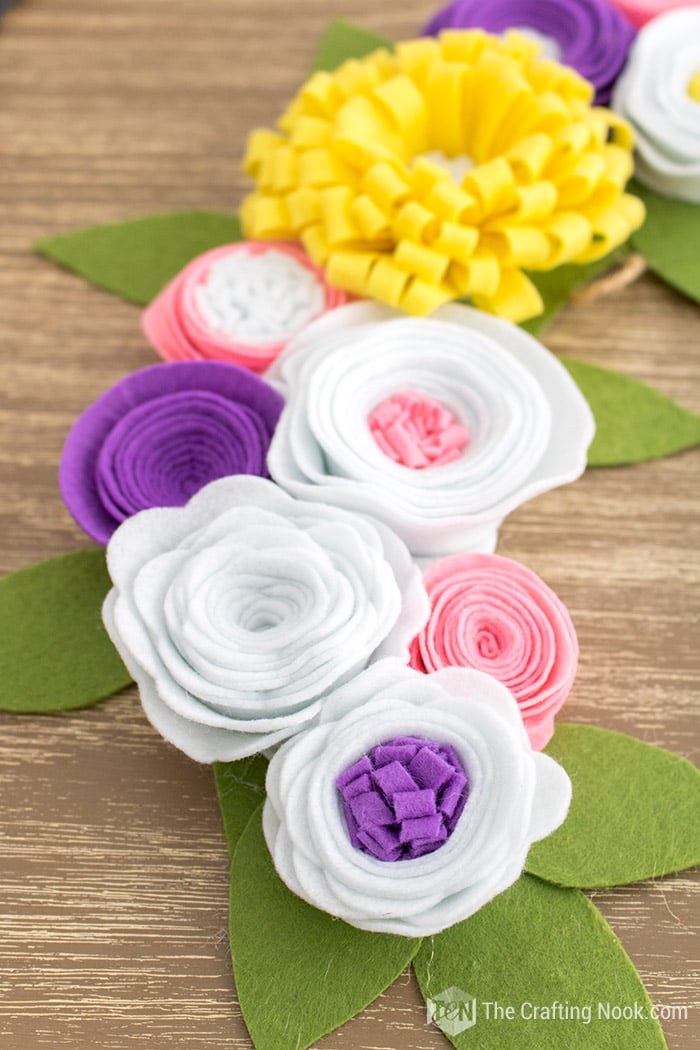
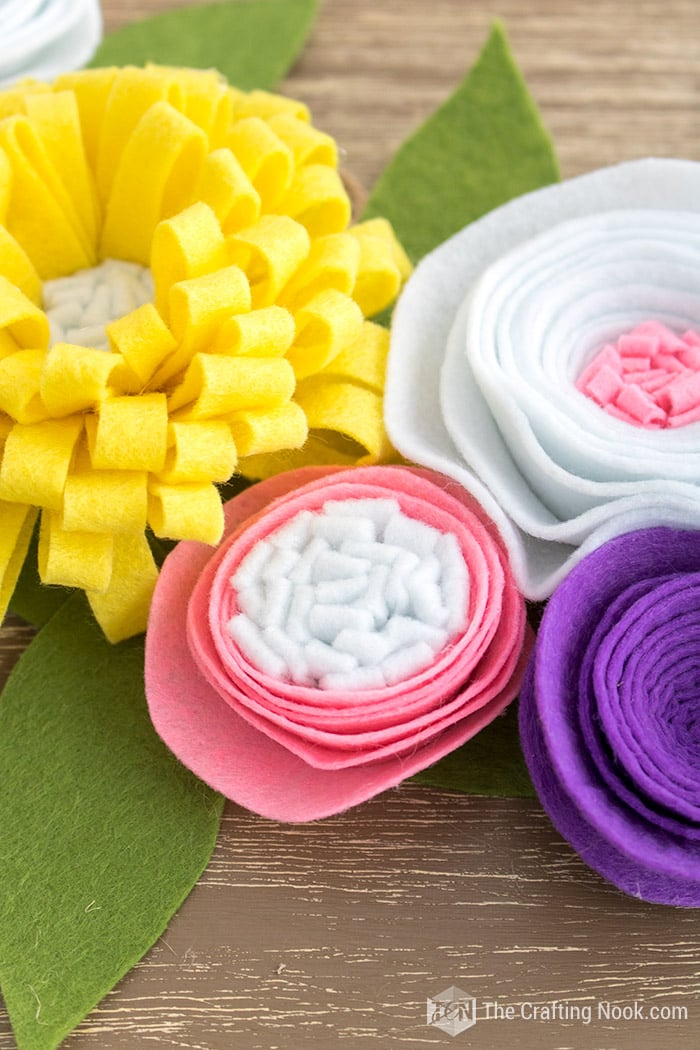
I made my own version of a daisy. White center, yellow petals. You can create them in any way you love.
1. Cut a piece of felt 3 1/4” wide by any length (depending on how big you want your flower, I used 25-Inches long).

2. Fold it in half lengthwise.

3. Cut little slits into the folded part of the felt towards the edge.

4. Here again, you can create different effects on this part by varying how wide you cut the slits or even cut the slits at different angles for the petal shapes.
5. Repeat this process with a piece of felt 1 1/4” wide by any length (depending on how big you want your center, I used 5-Inches long).

6. Roll your center up from one end (you can glue it along the way if you feel more comfortable) till you like the size or until the end.


7. Once you are happy with the size, glue the end to make sure it stays.


8. Right where the center ends, start rolling your flower up from one end and aligned to the base of the center until you are satisfied with the size or until the end of your piece.


9. Glue the end to secure it.

10. Cut a circle of felt large enough to cover the back of your flower.

11. Apply a generous amount of glue to the back and affix the circle. Press them together well.

There you go! Aren’t these so CUTE??? Loving my beautiful Felt Flowers so very much!

With this method, if you remove the white center and change the color you could get felt carnations or felt chrysanthemums.

This is why I love felt flowers so much!
Making the felt leaves.
1. Take a piece of green felt and hand-draw 2 curvy lines one against the other making sure the ends meet. On one of the ends make a small shape of a twig.

2. Draw and cut a few of these.

3. Using cardboard or another piece of green felt attach in a bunch of flowers and leaves as you like the best.
Imagination is the limit for your composition and color combinations of a cute bouquet.

In my case, I made them to decorate my Rustic Spring Wreath which you can check out right here!
Crafting Tips
- I’ve seen many people recommending using expensive wool felt available from shops like Etsy to make felt flowers. You’re welcome to do this, but for simple designs, expensive wool felt doesn’t really make a discernible difference in the finished product. Just make sure it isn’t poor quality felt that feels cheap in your hands and pulls apart easily.
- If you’re working with kids on this type of project who are not experienced with handling hot glue guns carefully, make sure you use a low-temperature glue gun and stay with them all the time until they handle it well.
- I recommend using a good sharp pair of scissors. But if you are working with kids then use snub-nosed, classroom scissors and be with them the whole time.
Hope you enjoyed this tutorial. If you did, don’t forget to subside to my blog and follow on all my social media channels to stay in the loop!

Frequently Asked Questions
To make your felt flowers you will need different colors of felt. You’ll also need a pair of scissors and a hot glue gun, fabric glue, or needle and thread.
Well, I’m tempted to say any kind, but actually, it will depend on the project. Since most of my projects are for my own home, I use normal felt (wool felt if I find it at a good price) I find in my local craft stores. Felt comes in a variety of qualities so if you are using it to sell products, I recommend higher quality for durability.
Some lightweight felt will be more stretching than the heavier ones, but compared to woven fabrics, felt tends to be quite stiffer and resistant. Felt doesn’t drape or flow, so it’s not the best choice for some fabric projects.
You can spray a light layer of starch on your felt, and using a buffer cloth, iron it as normal. Do this on both sides of the felt until you reach the desired stiffness.
More Flower Project Ideas to try
If you liked these Cute Felt Flowers diy Tutorial, you might also love these other Easy Craft projects too:
✂️ Tutorial

Felt Flowers DIY: Step by Step guide to Felt Flowers 3 ways
Tools
- Hot glue gun (low heat)
- A pencil
- Sharp pair of scissors
Supplies
- Felt in different colors approx 8×12
- Round-shaped guide for perfect circles. I used a dish LOL
Instructions
1. SIMPLE FELT ROSETTE 1 COLOR
- Start by tracing and cutting a felt circle. I used a soup dish as a guide. LOL.
- Then with a pen trace a spiral from the edge towards the center.
- Cut the spiral.
- Starting at the outer end of the felt strip, fold the tip inwards and roll it on itself to secure well. You can use hot glue if you want to make sure it’s secure.
- Start rolling up from the folded end. Place the rolled end upside down between your thumb and middle finger, roll it and add glue periodically till the whole flower is formed.
- Place the rolled end upside down between your thumb and middle finger, roll it till the whole flower is formed.
- Once your flower is rolled and ready, apply a generous amount of glue to the back and affix the small circle that you got at the inner end. Press them together well.
- Cut any leftovers from the back cover.
- There you go! You won’t get anything easier than this!
- You can make variations of this flower. Wave along the edge of the circle and then the spiral to create a more Rose look.
2. FELT ROSSETTE WITH A CUTE CENTER
- Repeat the 2 first steps from the previous rosette but this time let’s try making the spiral without tracing it with the pencil.
- Then cut a piece of felt 1 1/4” wide by any length (depending on how big you want your flower, I used 6-Inches).
- Fold it in half lengthwise.
- Cut little slits into the folded part of the felt.
- You can create different effects on this part by varying how wide you cut the slits.
- Roll your flower center up from one end (you can glue it along the way) till you like the size of the center.
- Then cut out the tip of the outer end, insert it between the folded end of your center and roll it securing it well between your fingers. You can use hot glue if you want to make sure it’s secure.
- Place the rolled end upside down between your thumb and middle finger, roll it till the whole flower is formed.
- Once your flower is rolled and ready, apply a generous amount of glue to the back and affix the small circle that you got at the inner end. Press them together well.
- Cut any leftovers from the back cover if needed.
3. EASY LOOPY FELT FLOWER:
- I made my own version of a daisy. White center, yellow petals. You can create them in any way you love.
- Cut a piece of felt 3 1/4” wide by any length (depending on how big you want your flower, I used 25-Inches long).
- Fold it in half lengthwise.
- Cut little slits into the folded part of the felt towards the edge.
- Here again, you can create different effects on this part by varying how wide you cut the slits or even cut the slits at different angles for the petal shapes.
- Repeat this process with a piece of felt 1 1/4” wide by any length (depending on how big you want your center, I used 5-Inches long).
- Roll your center up from one end (you can glue it along the way if you feel more comfortable) till you like the size or until the end.
- Once you are happy with the size, glue the end to make sure it stays.
- Right where the center ends, start rolling your flower up from one end and aligned to the base of the center until you are satisfied with the size or until the end of your piece.
- Glue the end to secure it.
- Cut a circle of felt large enough to cover the back of your flower.
- Apply a generous amount of glue to the back and affix the circle. Press them together well.
- The cute yellow felt flower is finished
- With this method, if you remove the white center and change the color you could get felt carnations or felt chrysanthemums.
MAKING THE FELT LEAVES.
- Take a piece of green felt and hand-draw 2 curvy lines one against the other making sure the ends meet. On one of the ends make a small shape of a twig.
- Draw and cut a few of these.
- Using cardboard or another piece of green felt attach in a bunch of flowers and leaves as you like the best.
- Imagination is the limit for your composition and color combinations of a cute bouquet.
Would you like another way to make super cute flowers? Check out my friend Karina’s Daisy paper flowers.
- DIY Gerber Daisy Paper Flower by Living and Crafting
- How to Make Paper Succulent Flowers by Abbi Kirsten Collections.
- How to make felt folded flowers by Apple Green Cottage.
- Paper Dahlia Template by Domestic Heights
Share and PIN ME

Til’ next time…


FREE WORKBOOK
Keeping your Sweet Home Organized
Learn how to create intentional habits and simple routines to Keep Your Home Organized. Plus freebies, printables, exclusive content, and tips.
Disclaimer: By clicking on the “Yes” button above you are giving me your consent to collect and use your information according to the law and My Policy Privacy. Zero Spam I promise!
