

DIY Hanging Diaper Stacker With Free Sewing Pattern

This post may contain affiliate links. Please read our Disclosure Policy.
I made this hanging diaper stacker long before The Crafting Nook existed. I had just had Emma, money was very tight, and I had seen a pretty diaper stacker in a store that I really wanted for her nursery. Buying one wasn’t in the budget, so I decided I would figure out how to make my own.
My mother-in-law had brought me some beautiful fabrics from Venezuela, so I already had something lovely to work with. I didn’t even own a sewing machine at the time. I designed the stacker myself and hand-sewed the whole thing while sitting in front of the TV after Emma was asleep.

Years later, after I started blogging, readers asked me how I had made it. The problem was that I had no process photos because blogging wasn’t even on my radar back then. So I recreated as many steps as I could using the finished diaper stacker and made diagrams in Illustrator for the parts I couldn’t photograph. That’s why this tutorial looks a little different from my newer sewing projects, but I’ve gone back through it carefully to make the construction much easier to understand.
Table of Contents
Why I Loved Having This Diaper Stacker
I originally wanted something that would keep diapers together, protected, and easy to grab without taking up dresser space.
A few things ended up working especially well:
- It hangs vertically, so it doesn’t take up much room.
- The large front opening makes it easy to grab a diaper during changes.
- The lining gives the inside a clean finish.
- A removable cardboard insert helps the bottom keep its shape.
- You can make it with fabrics that match the nursery.
- It can be sewn by machine or by hand. I hand-sewed the original because that was what I had available at the time.
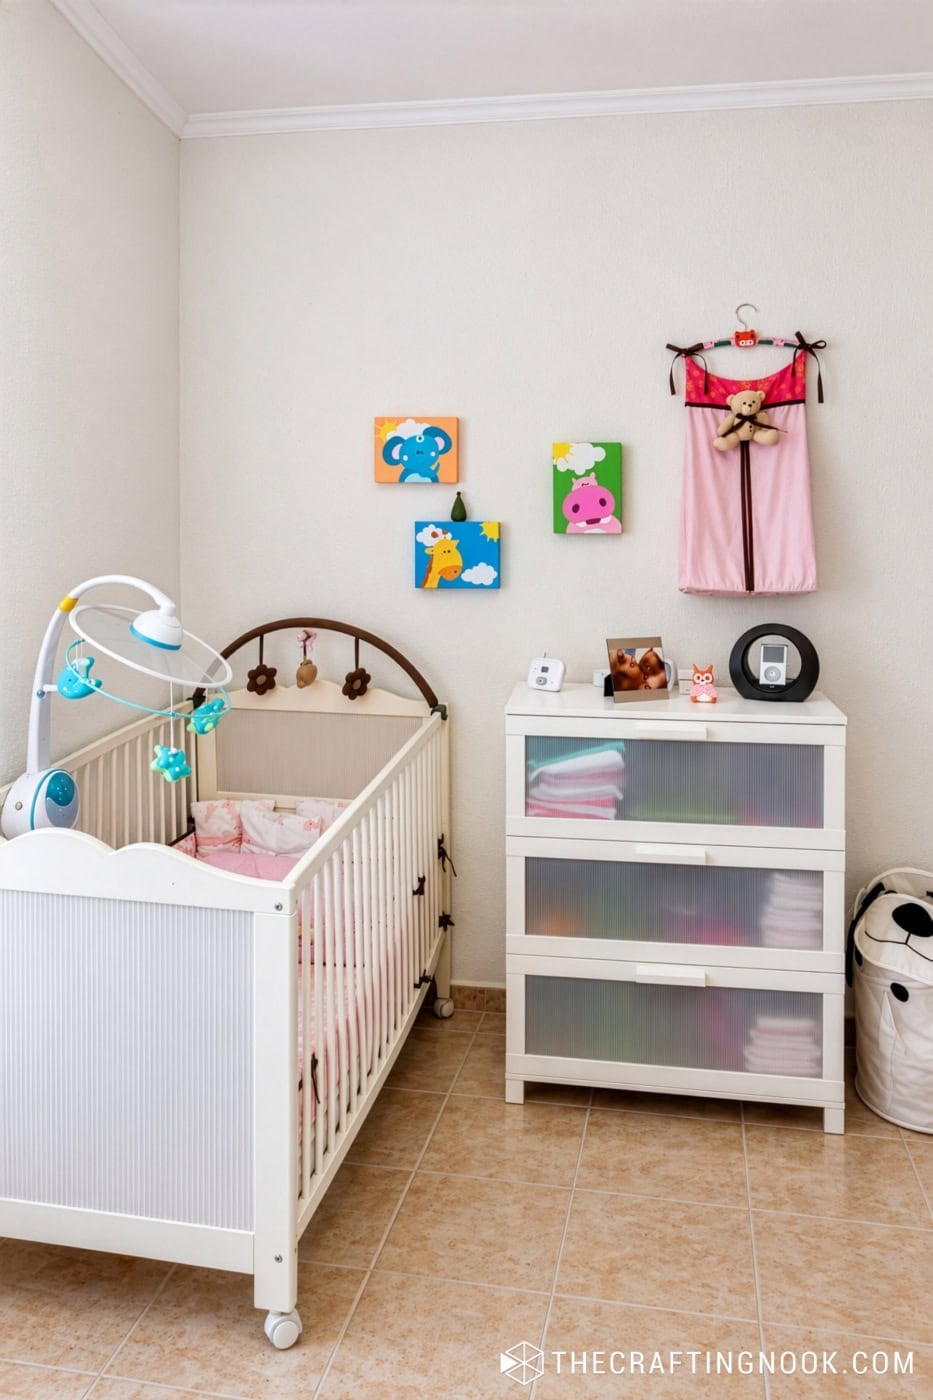
How to Make a Hanging Diaper Stacker
This handy diaper stacker is designed to hang from a crib or a wall for easy access to the diapers. There’s plenty of room for lots of disposable diapers or cloth diapers inside.
The full simplified tutorial is in the How-To Card below, but I’m going into more detail here because a few parts of the construction are much easier when you understand what each fabric layer is doing.
Supplies:
- Cotton fabric for the outer diaper stacker
- Coordinating fabric for the lining
- Contrasting or coordinating fabric for the top
- Fusible interfacing
- Ribbon, approximately 1/2 inch wide
- Small embellishment, optional
- Piece of cardboard
- Contact paper, optional
- Clothes hanger, optional
- Coordinating thread
Tools:
- Fabric Scissors
- Hand-sewing needle or sewing machine
- Ruler
- Measuring tape
- Fabric chalk or washable fabric marker.
- Straight pins
- Iron
I used three coordinating fabrics when I made mine, including the lining fabric. The original supply list called for approximately a yard of each, although the exact amount you need will depend on fabric width and how you arrange your pattern pieces.
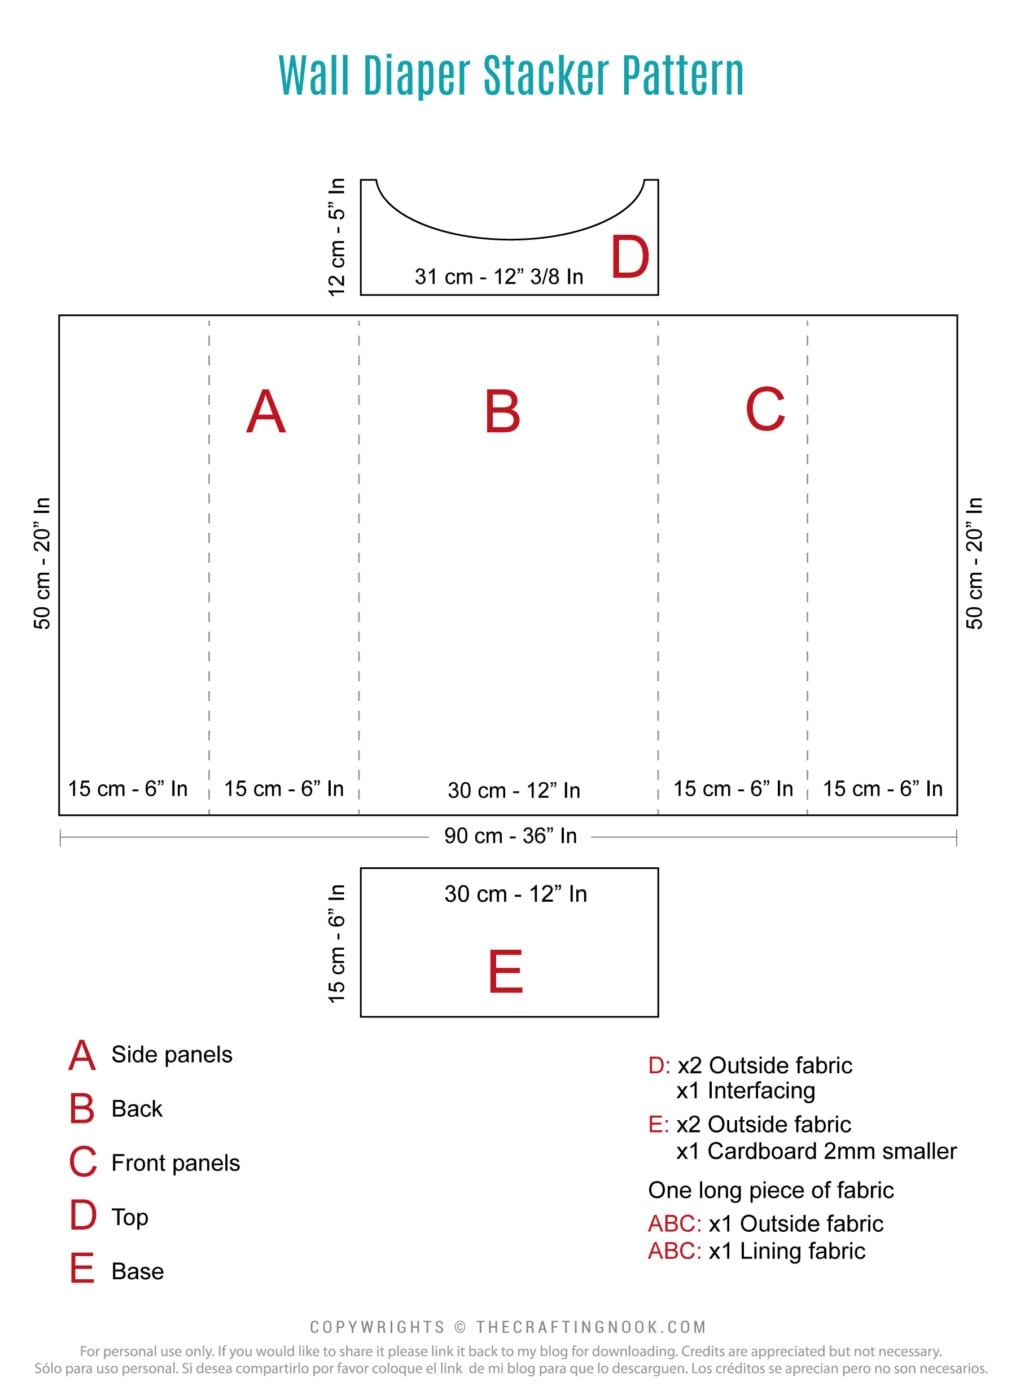
Free Diaper Stacker Sewing Pattern
You can download the printable diaper stacker pattern in either format:
Note
Important Seam Allowance Note: My original pattern was drafted in centimeters.
Add a 1 cm seam allowance, about 3/8 inch, around each pattern piece when cutting your fabric. Adding the 1 cm seam allowance gives you enough fabric to sew the pieces together comfortably.
I would mark the seam allowance directly onto the fabric before cutting, especially if you’re newer to sewing.
Understanding the Diaper Stacker Before You Start
The main body of the diaper stacker is cut from one long piece of fabric, not several pieces sewn together.
Think of that long piece as five sections:
Front → Side → Back → Side → Front
On my diagram, you’ll see those areas marked:
C → A → B → A → C
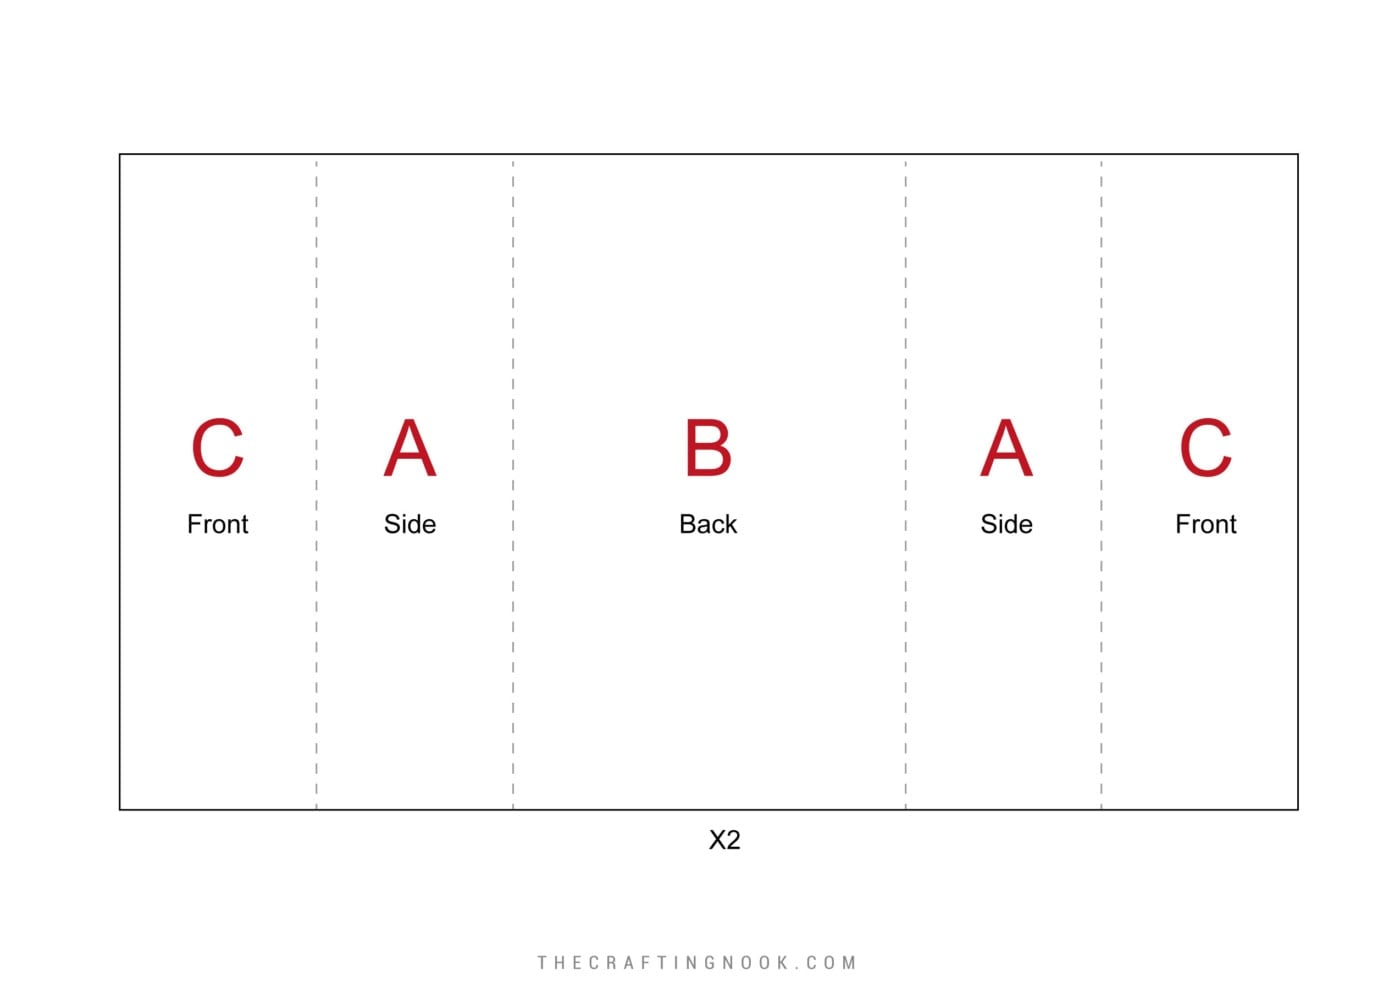
Those letters simply show where each part of the finished diaper stacker will be. They are not separate fabric pieces or seam lines.
The two narrow C sections become the front of the diaper stacker. They do not meet in the center, which creates the large opening where you reach in for the diapers.
You’ll cut this long body shape twice:
- one from the outer fabric
- one from the lining
The outer body and lining are joined along the two vertical edges of the front opening.
Once turned right side out, you have one long lined body that wraps around the rectangular base.
After that, you’ll add the reinforced bottom and finish the stacker with the decorative top.
So the project is really made from three main sections:
body + base + top
Once you can picture those three parts, the construction becomes much easier to follow.
Instructions:
Basically, the diaper stacker is like an oversized travel box of tissues.
I kept it as geometrical as possible to make it easier to understand, cut and assemble the pattern.
Step 1: Print the Pattern and Cut Your Fabric
Print and assemble the pattern first.
Use the pattern pieces to cut the body, base, and top.
Remember to add 1 cm / about 3/8 inch seam allowance around the pattern pieces before cutting.
For the body, cut:
- 1 long body piece from the outer fabric
- 1 matching long body piece from the lining
You will also need:
- 2 base pieces, one outer and one lining
- 2 top pieces
- interfacing for one top piece
I wanted the inside of mine to look finished when I reached in for a diaper, so I lined the entire body rather than leaving exposed seams inside.
Step 2: Join the Outer Body and Lining
Place the long outer body piece and the lining body piece right sides together.
Match the two short vertical edges that will become the sides of the front diaper opening.
Pin those two edges.
Sew one front edge from top to bottom using your 1 cm / 3/8 inch seam allowance.
Then sew the second front edge the same way.
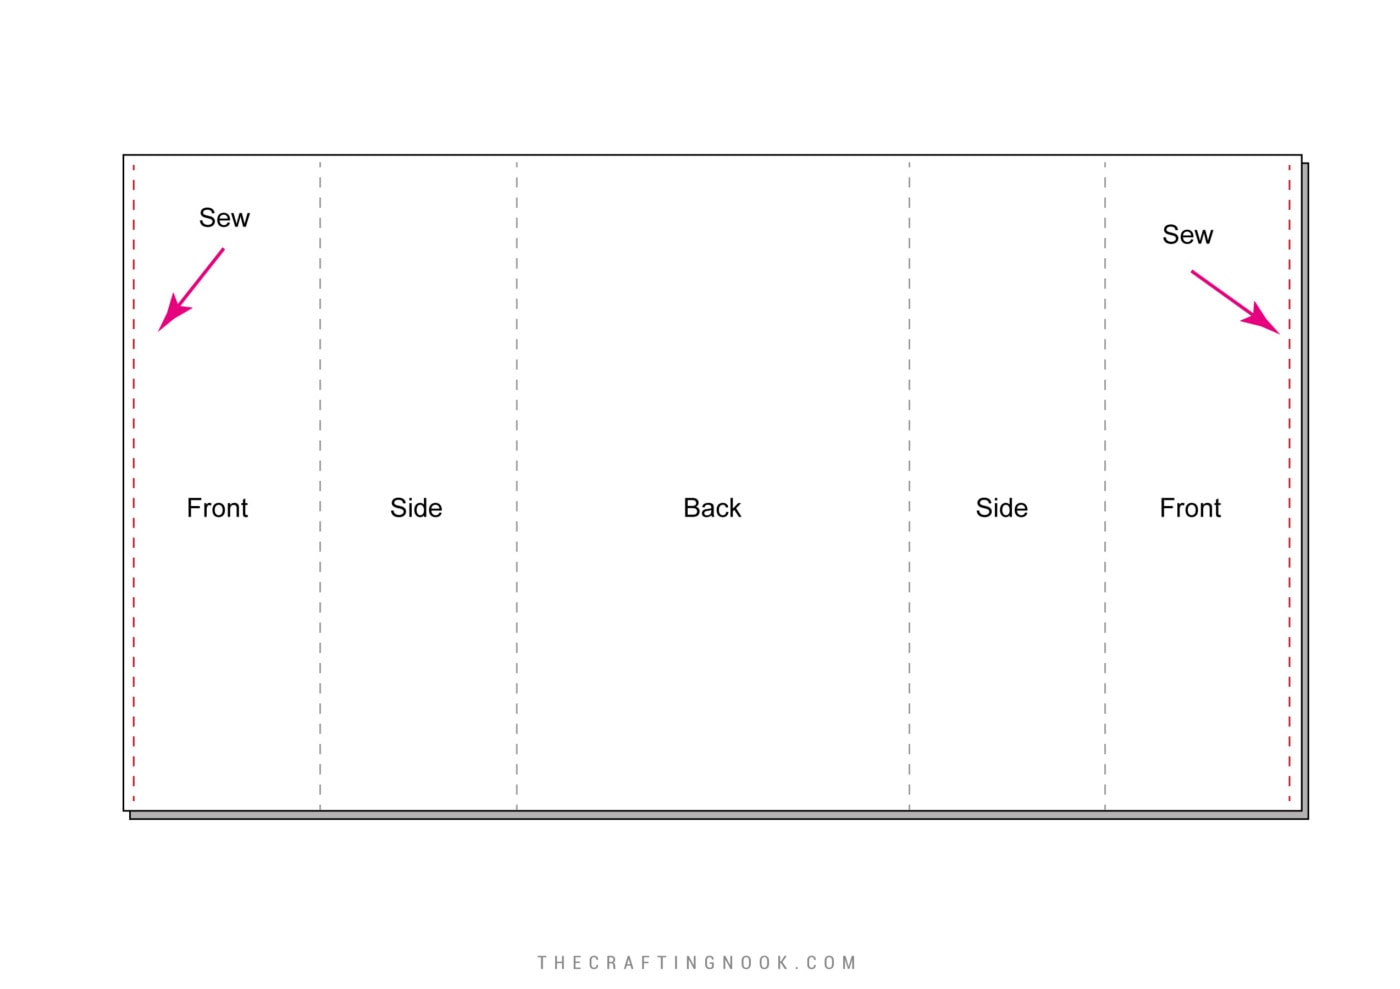
Do not sew the top or bottom edges.
Turn the body right side out and press the two finished front edges flat.
You should now have one long lined body piece.
The C-A-B-A-C markings on the pattern simply show where this long piece will wrap around the finished stacker:
Front → Side → Back → Side → Front
There are no seams between those sections.
Step 3: Prepare the Base
Now we’ll make the bottom of the diaper stacker.
You should have two rectangular base pieces:
- one from the outer fabric
- one from the lining
Take the lining base piece and fold one short edge toward the wrong side by approximately your seam allowance.
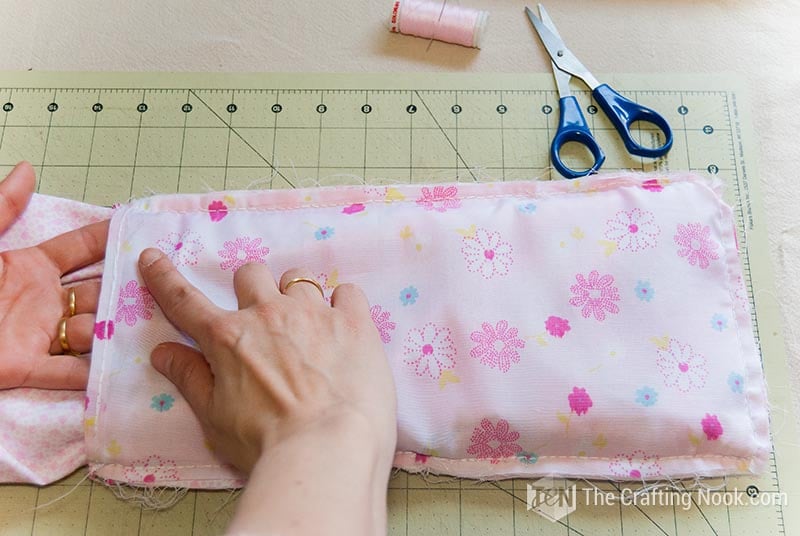
Press it and stitch it down to create a clean hem.
This hemmed edge will remain open inside the finished diaper stacker.
That opening has two jobs:
- It gives you somewhere to pull the entire stacker through when turning the base right side out.
- It allows you to remove the cardboard insert later before washing the stacker.
This little opening is important, so keep that hemmed lining edge free during the next steps.
Step 4: Wrap the Body Around the Outer Base
Place the outer base piece right side up.
Now begin positioning the bottom edge of the diaper stacker body around the rectangular base.
The body will wrap around the base in this order:
Front → Side → Back → Side → Front
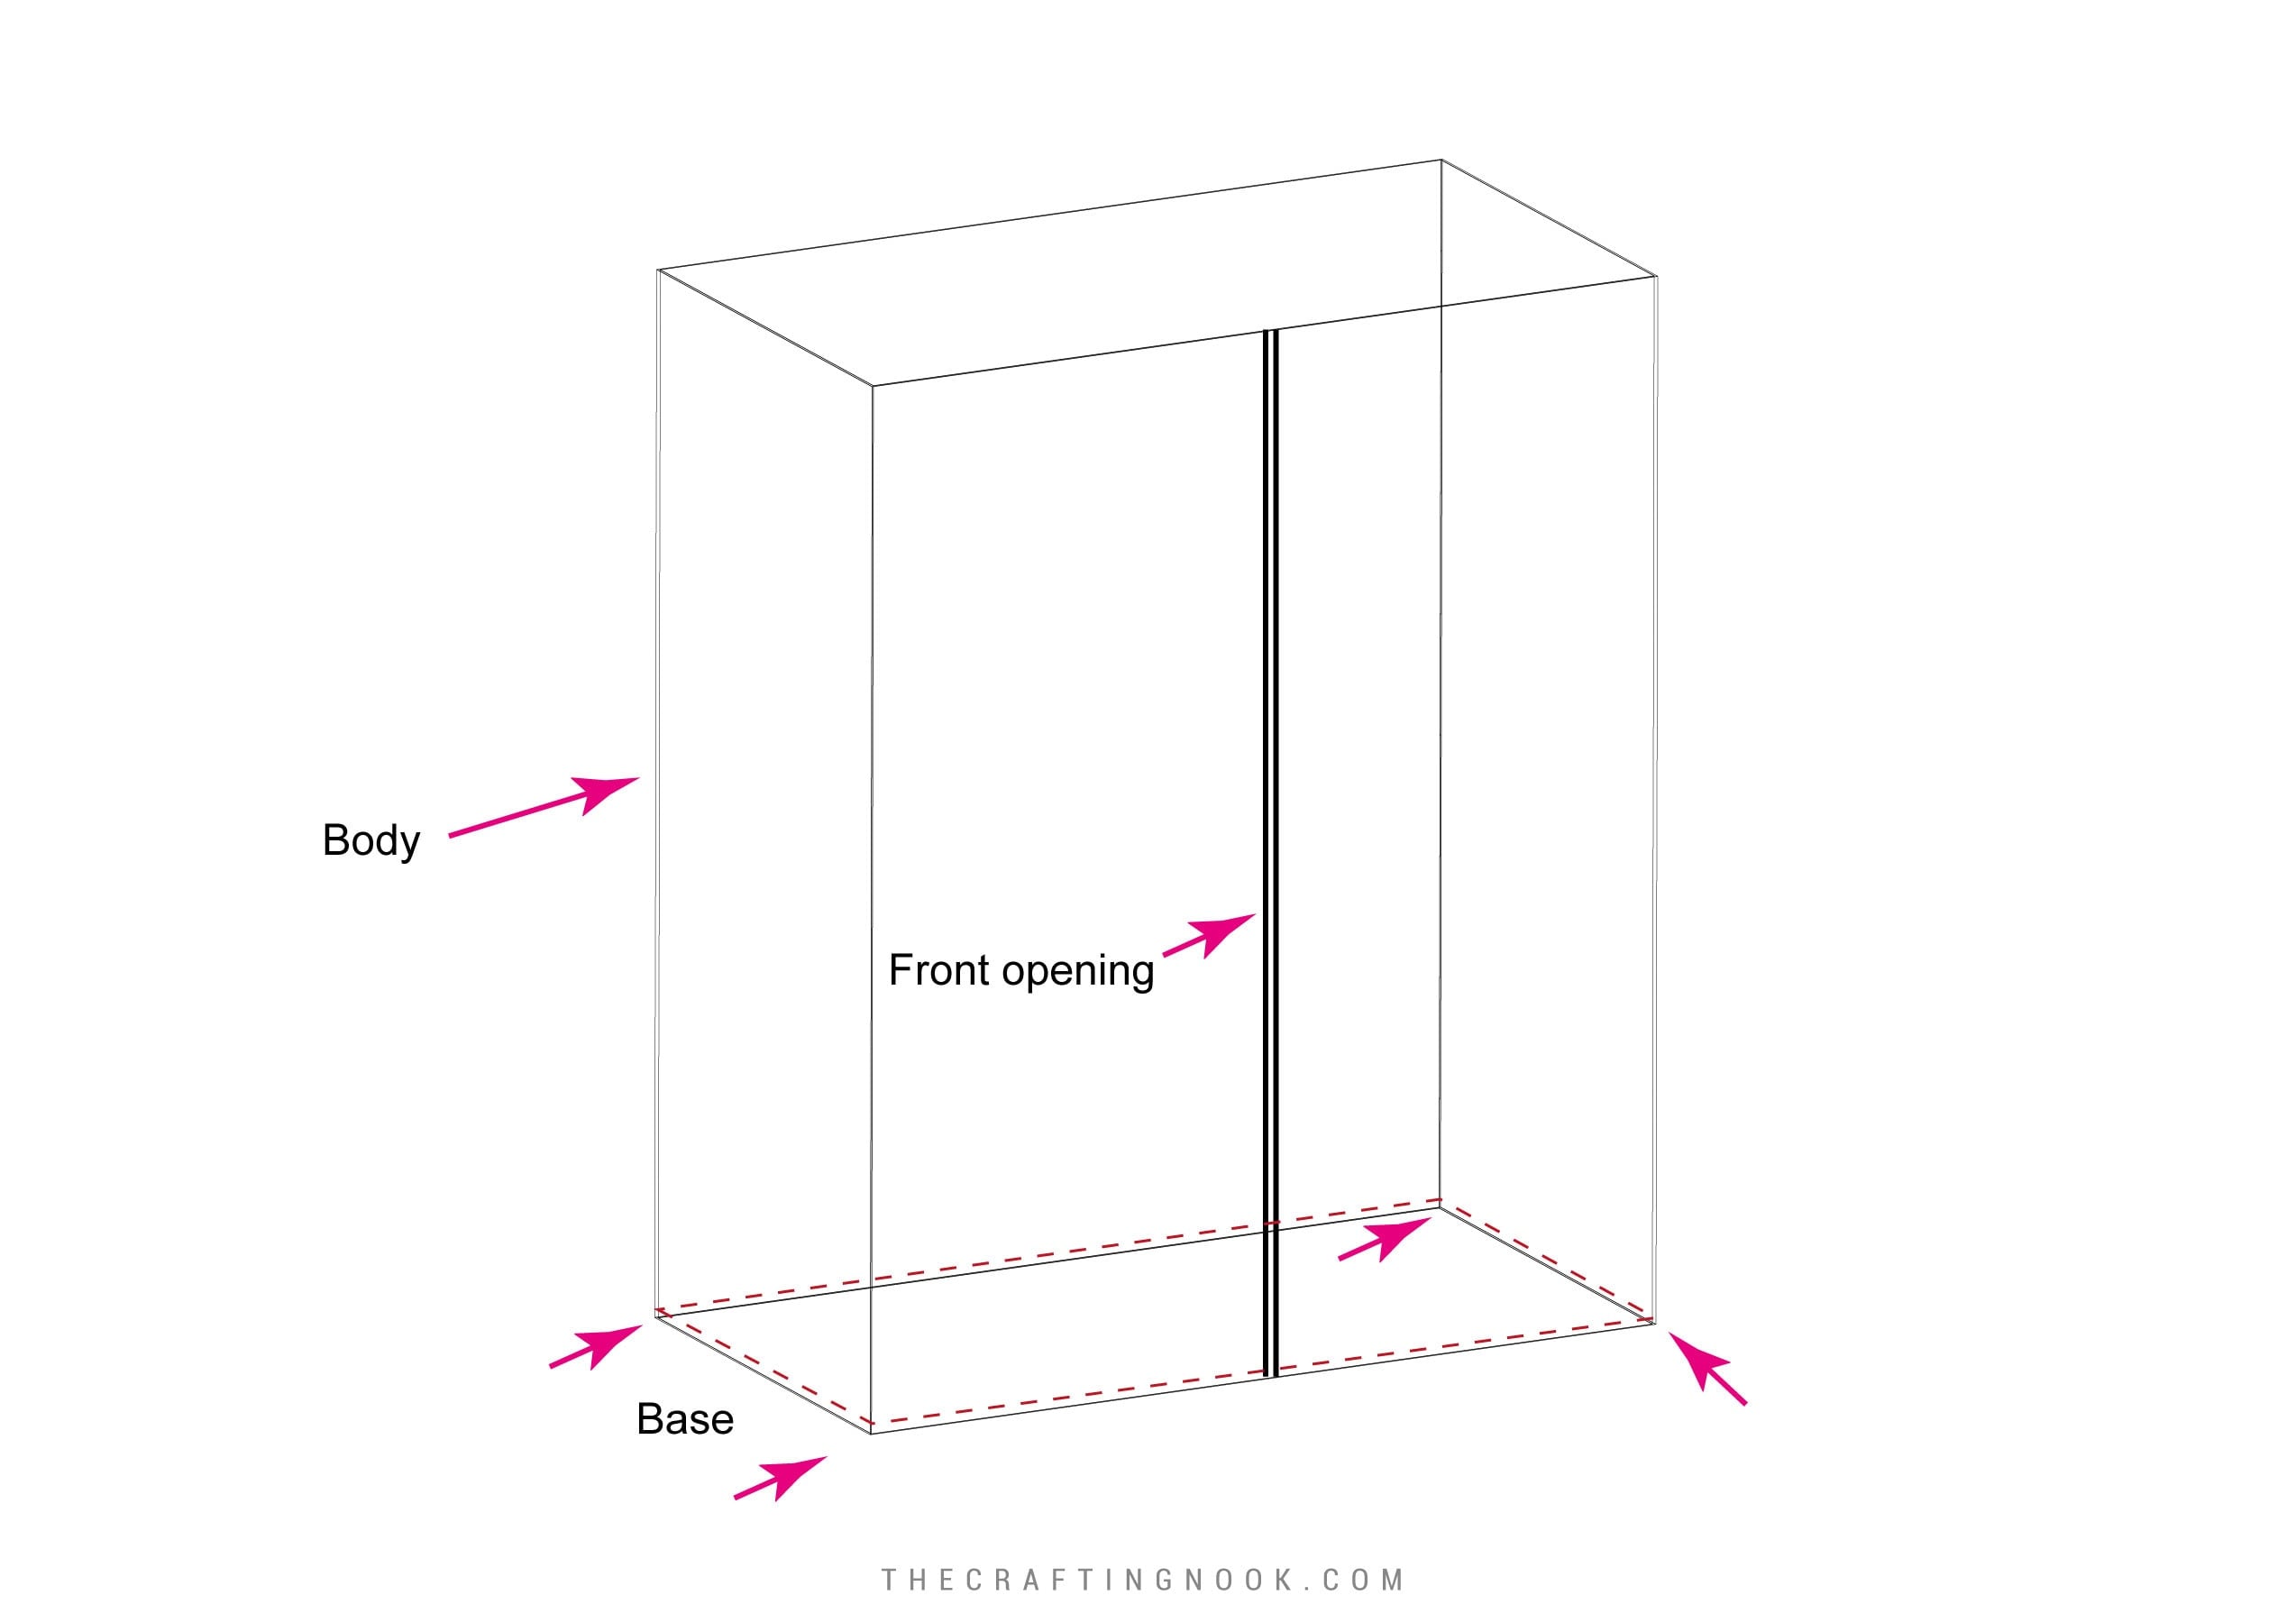
The approximate C-A-B-A-C divisions on the pattern help you see the front opening is in the center of the base and where the four corners should fall.
Match those section changes with the corners of the rectangular base and pin the body in place.
The two front edges should remain separated but closely together in the front, creating the large opening at the front of the diaper stacker.
Continue pinning the body all the way around the base.
Don’t worry if this looks awkward while you’re working. You’re taking one flat rectangular base and attaching it to a long fabric piece that is beginning to form a three-dimensional bag.
Step 5: Add the Lining Base
Place the lining base over the body with its right side facing down toward the body.
The diaper stacker body is now sandwiched between the two base layers.
Think of the layers like this:
Outer base
Diaper stacker body
Lining base
The right sides of both base fabrics should be facing toward the body in the middle.
Pin all three layers together around the edge.
Make sure the hemmed opening you created on the lining base is positioned toward the inside of the diaper stacker.
Step 6: Sew Around the Base
Start sewing along one of the long sides at the center.
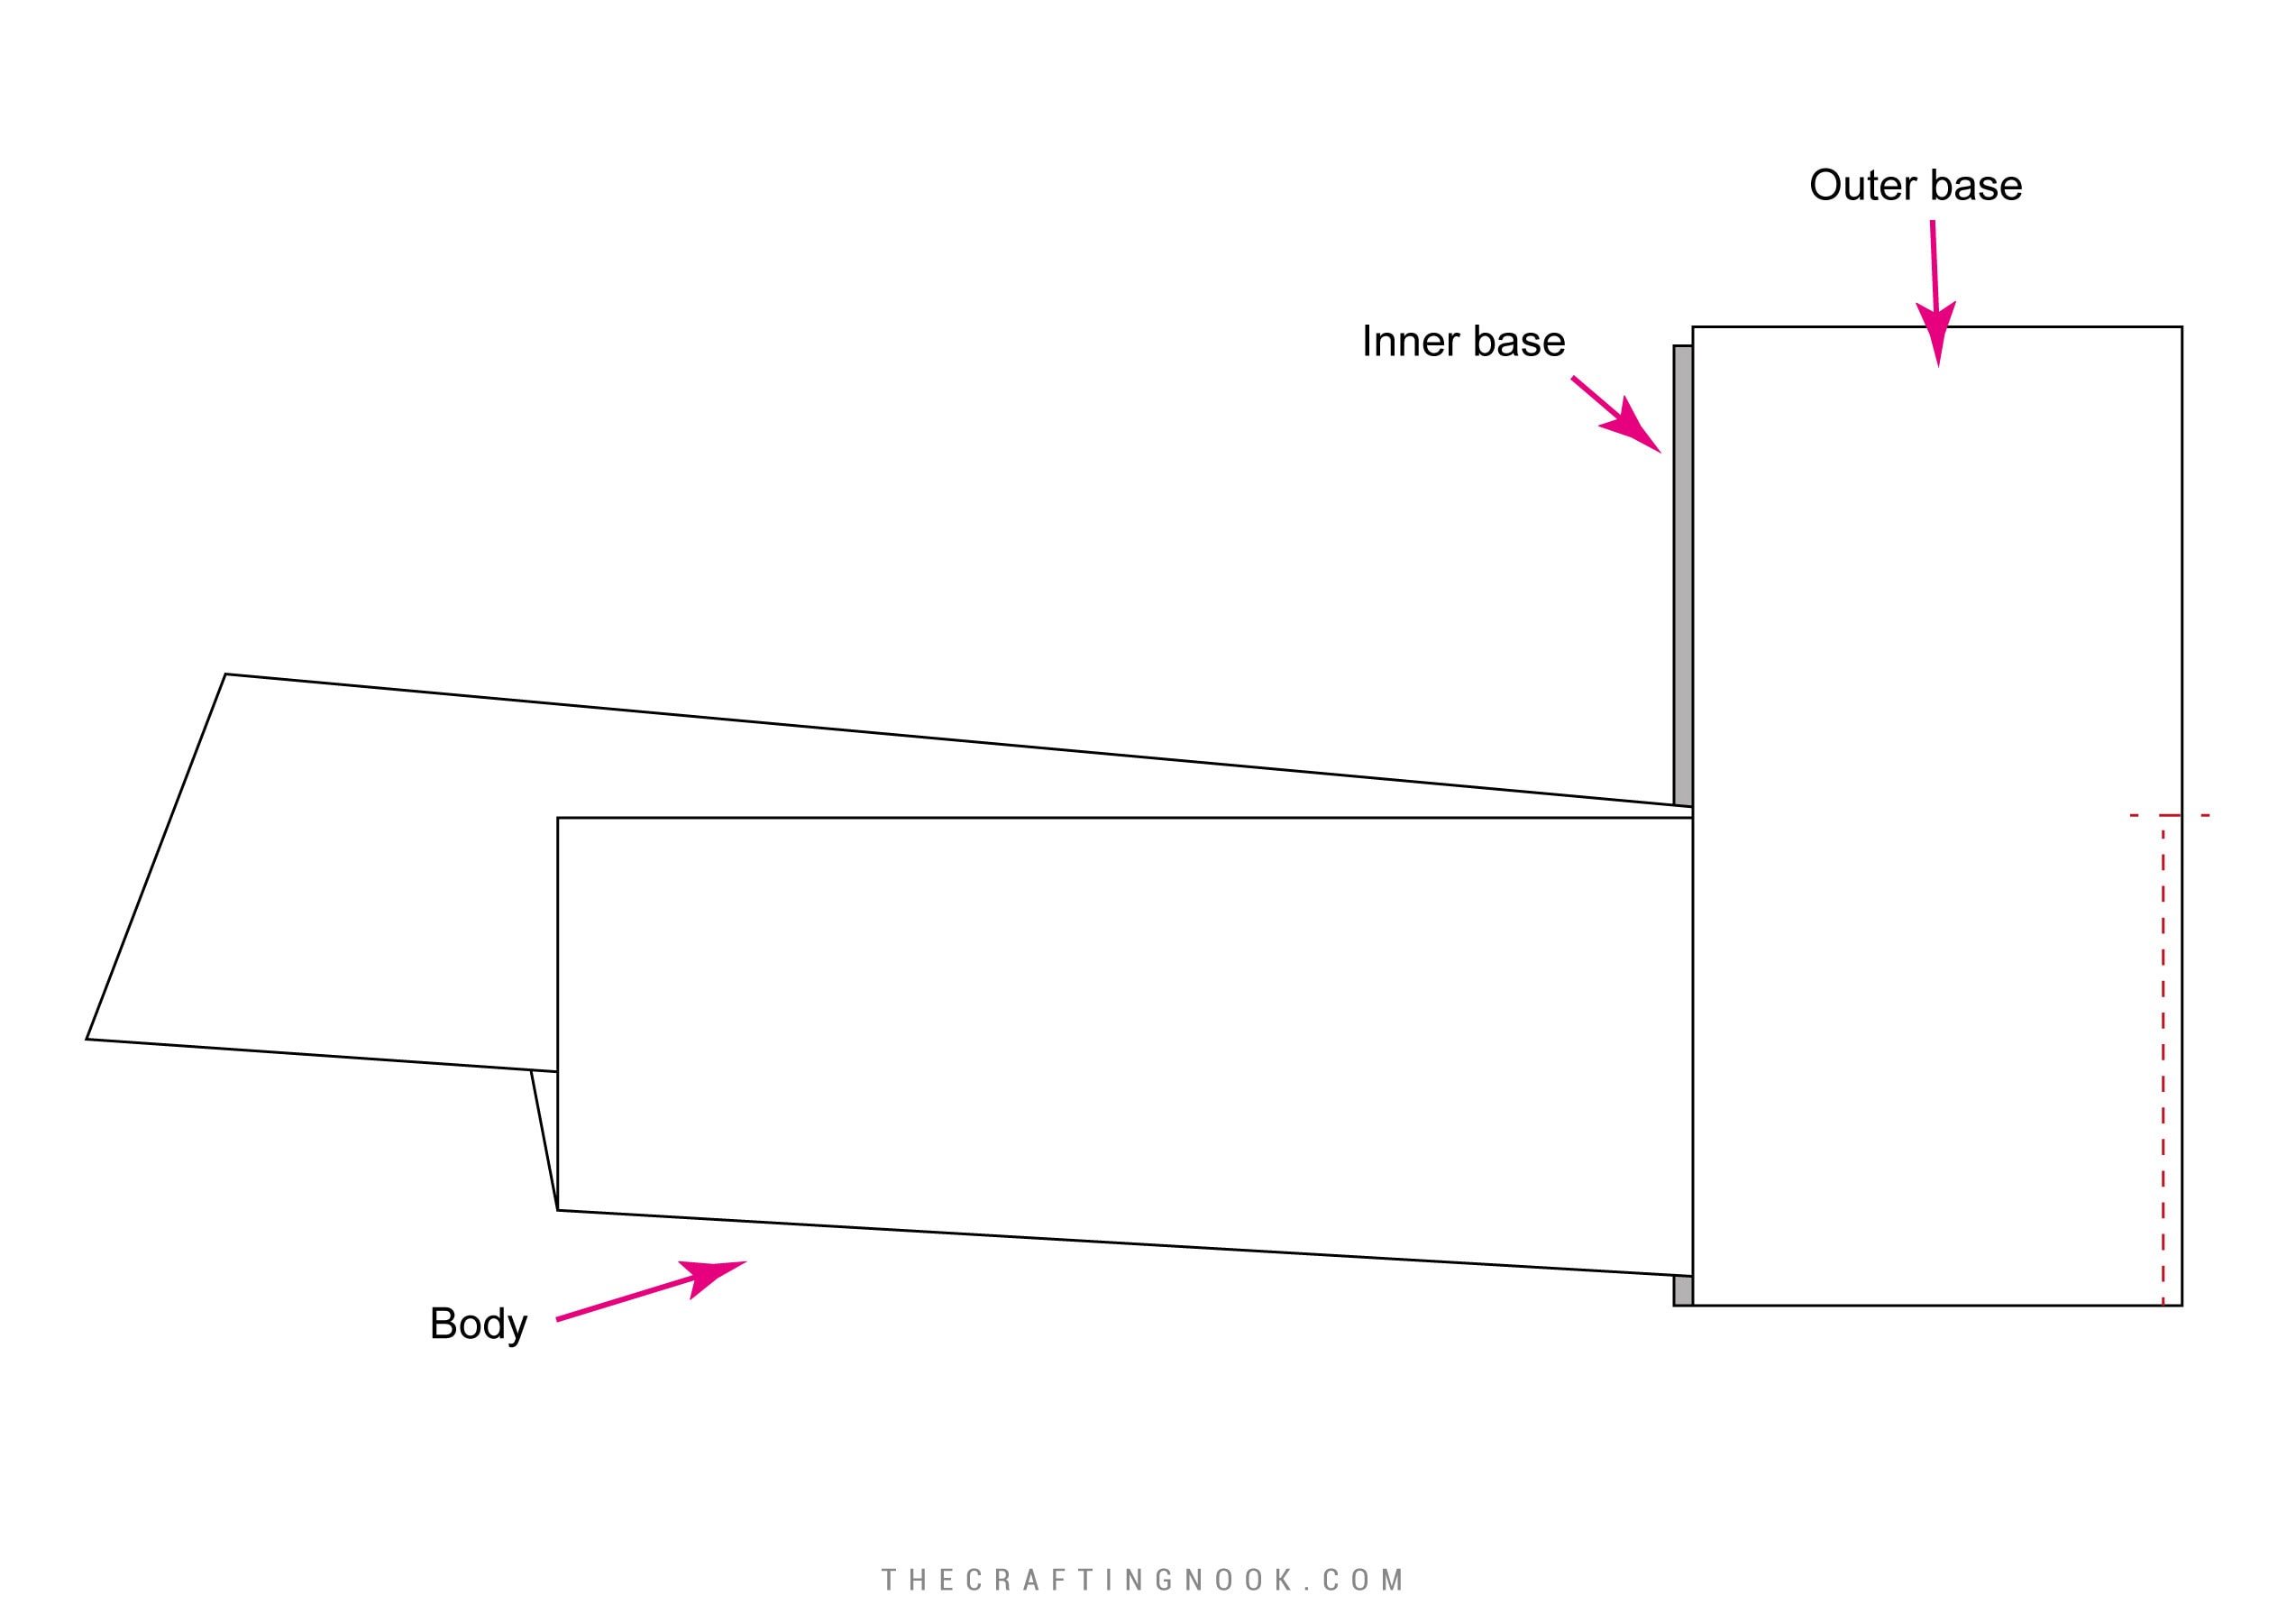
Use your 1 cm / 3/8 inch seam allowance.
As you sew around each corner, keep the loose body fabric pushed away from the needle so you don’t accidentally stitch through another part of the diaper stacker.
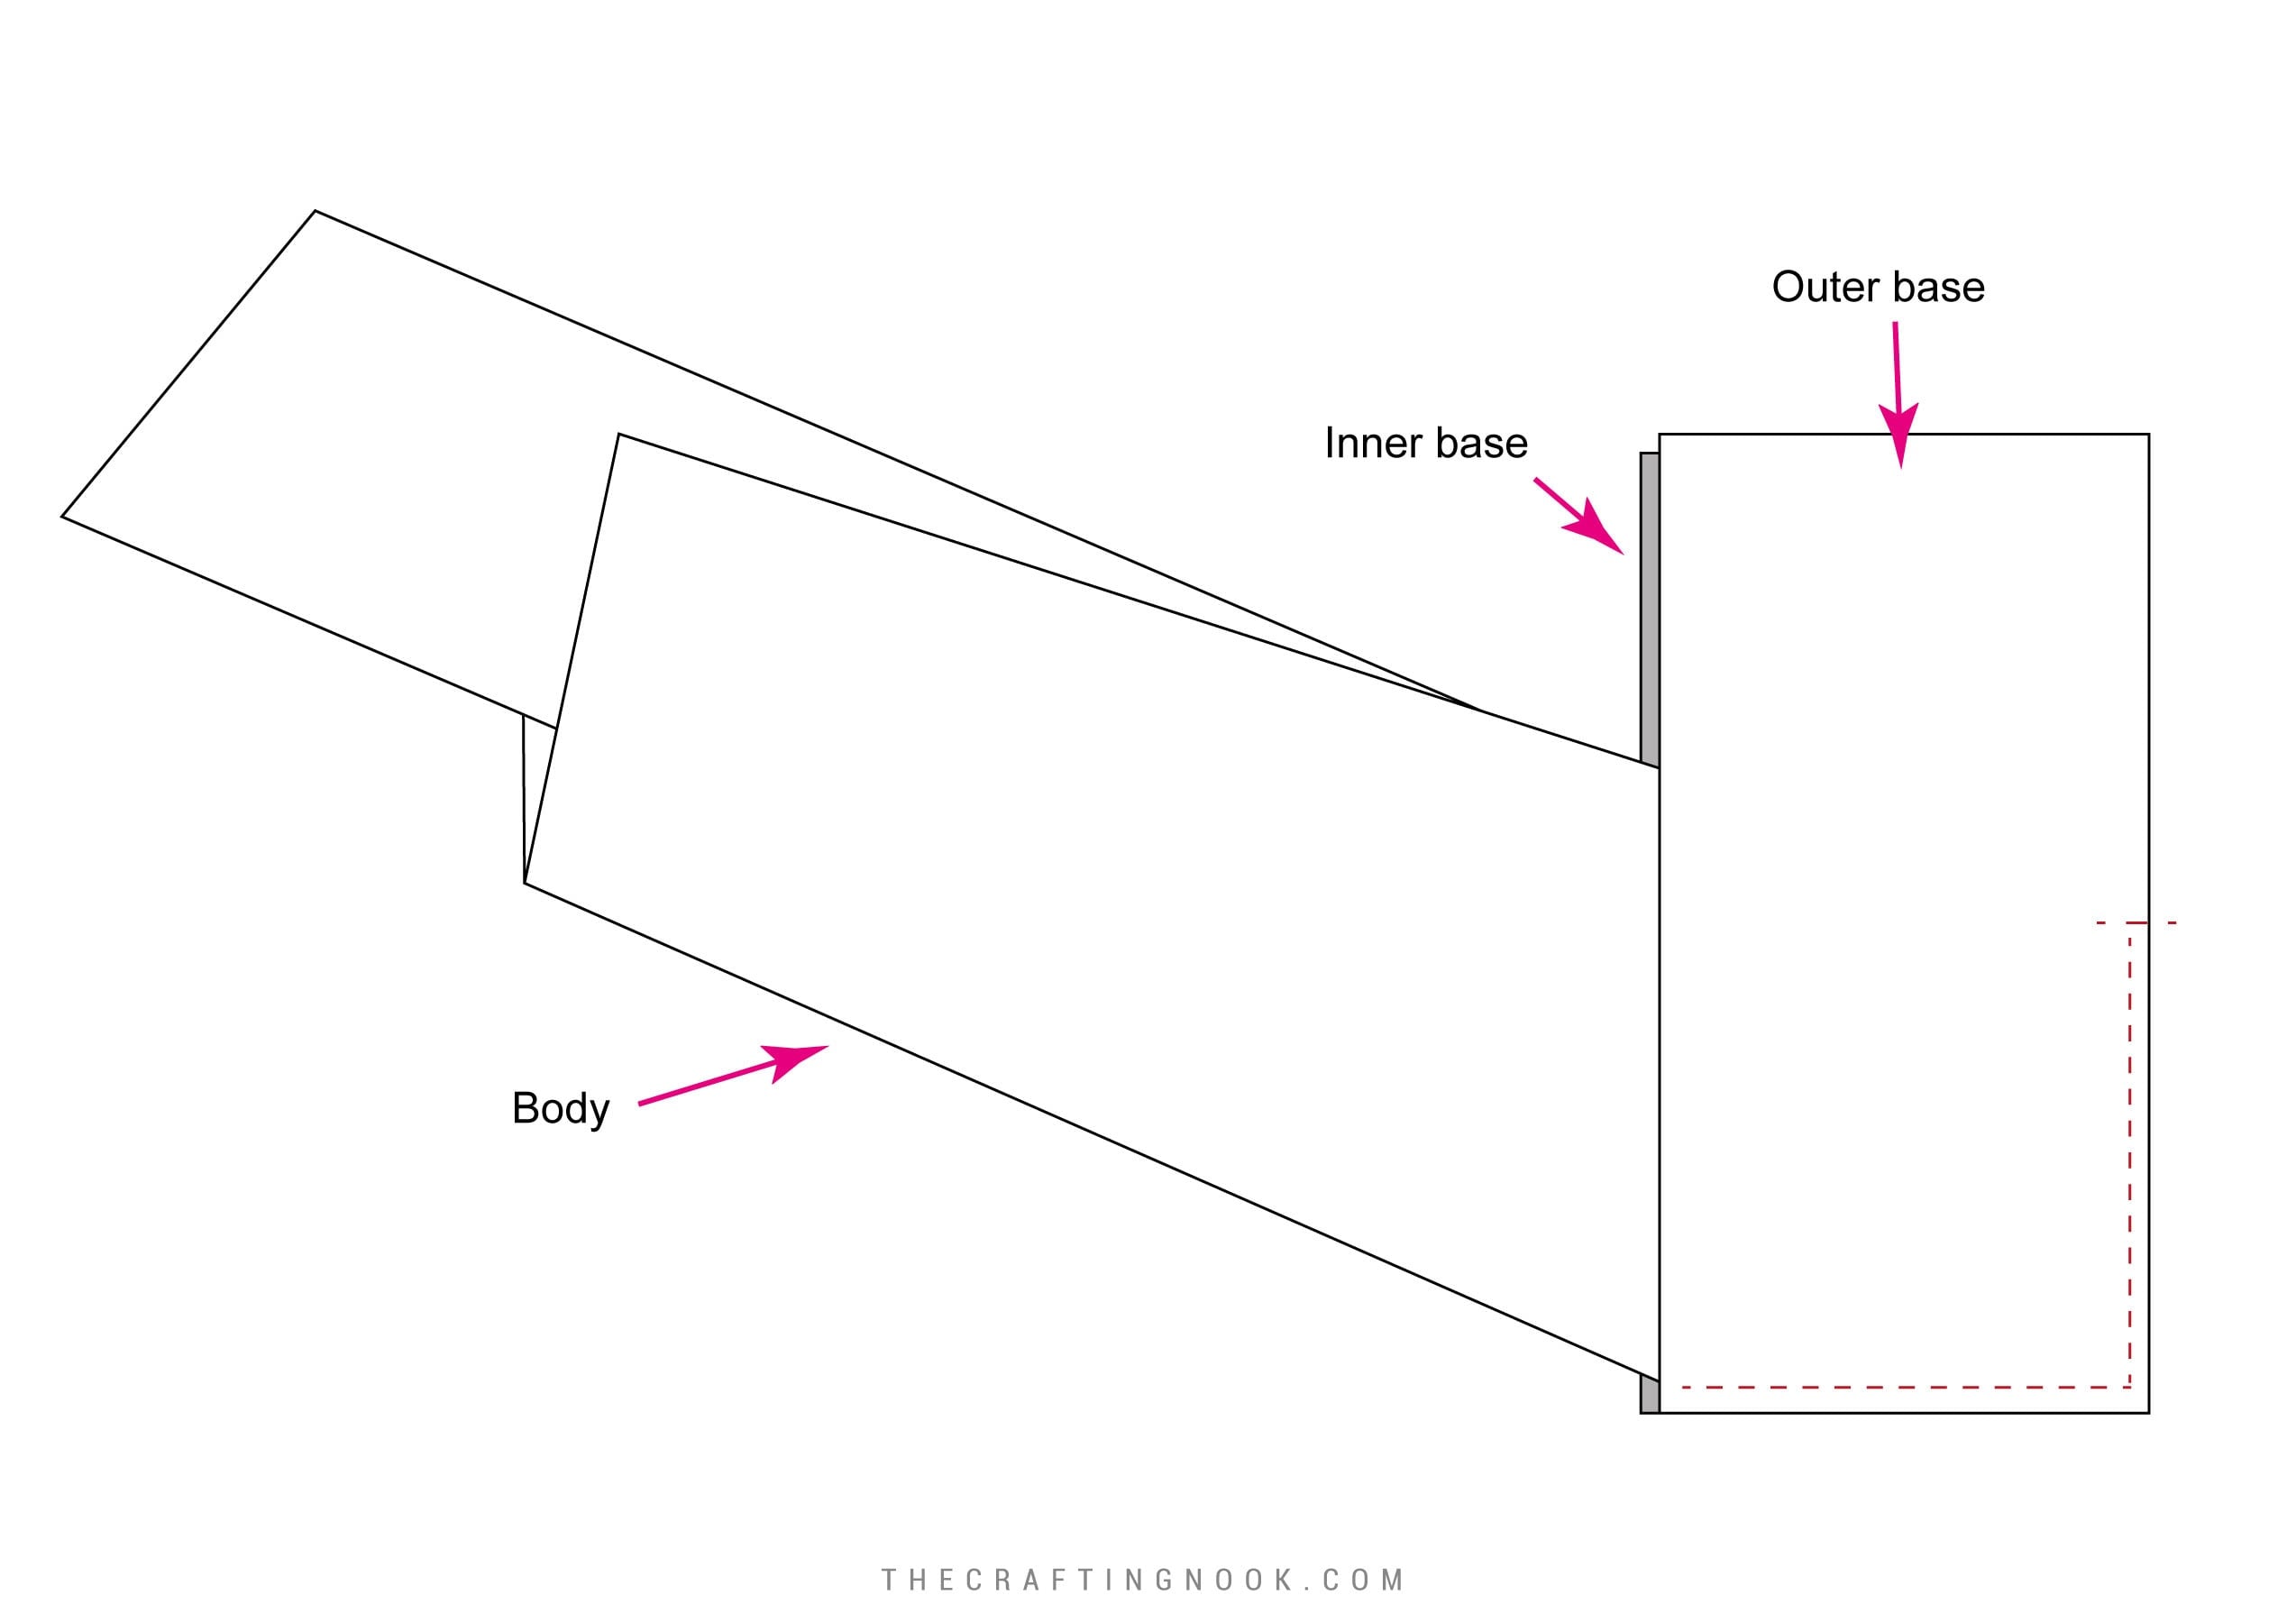
Continue sewing around the base.
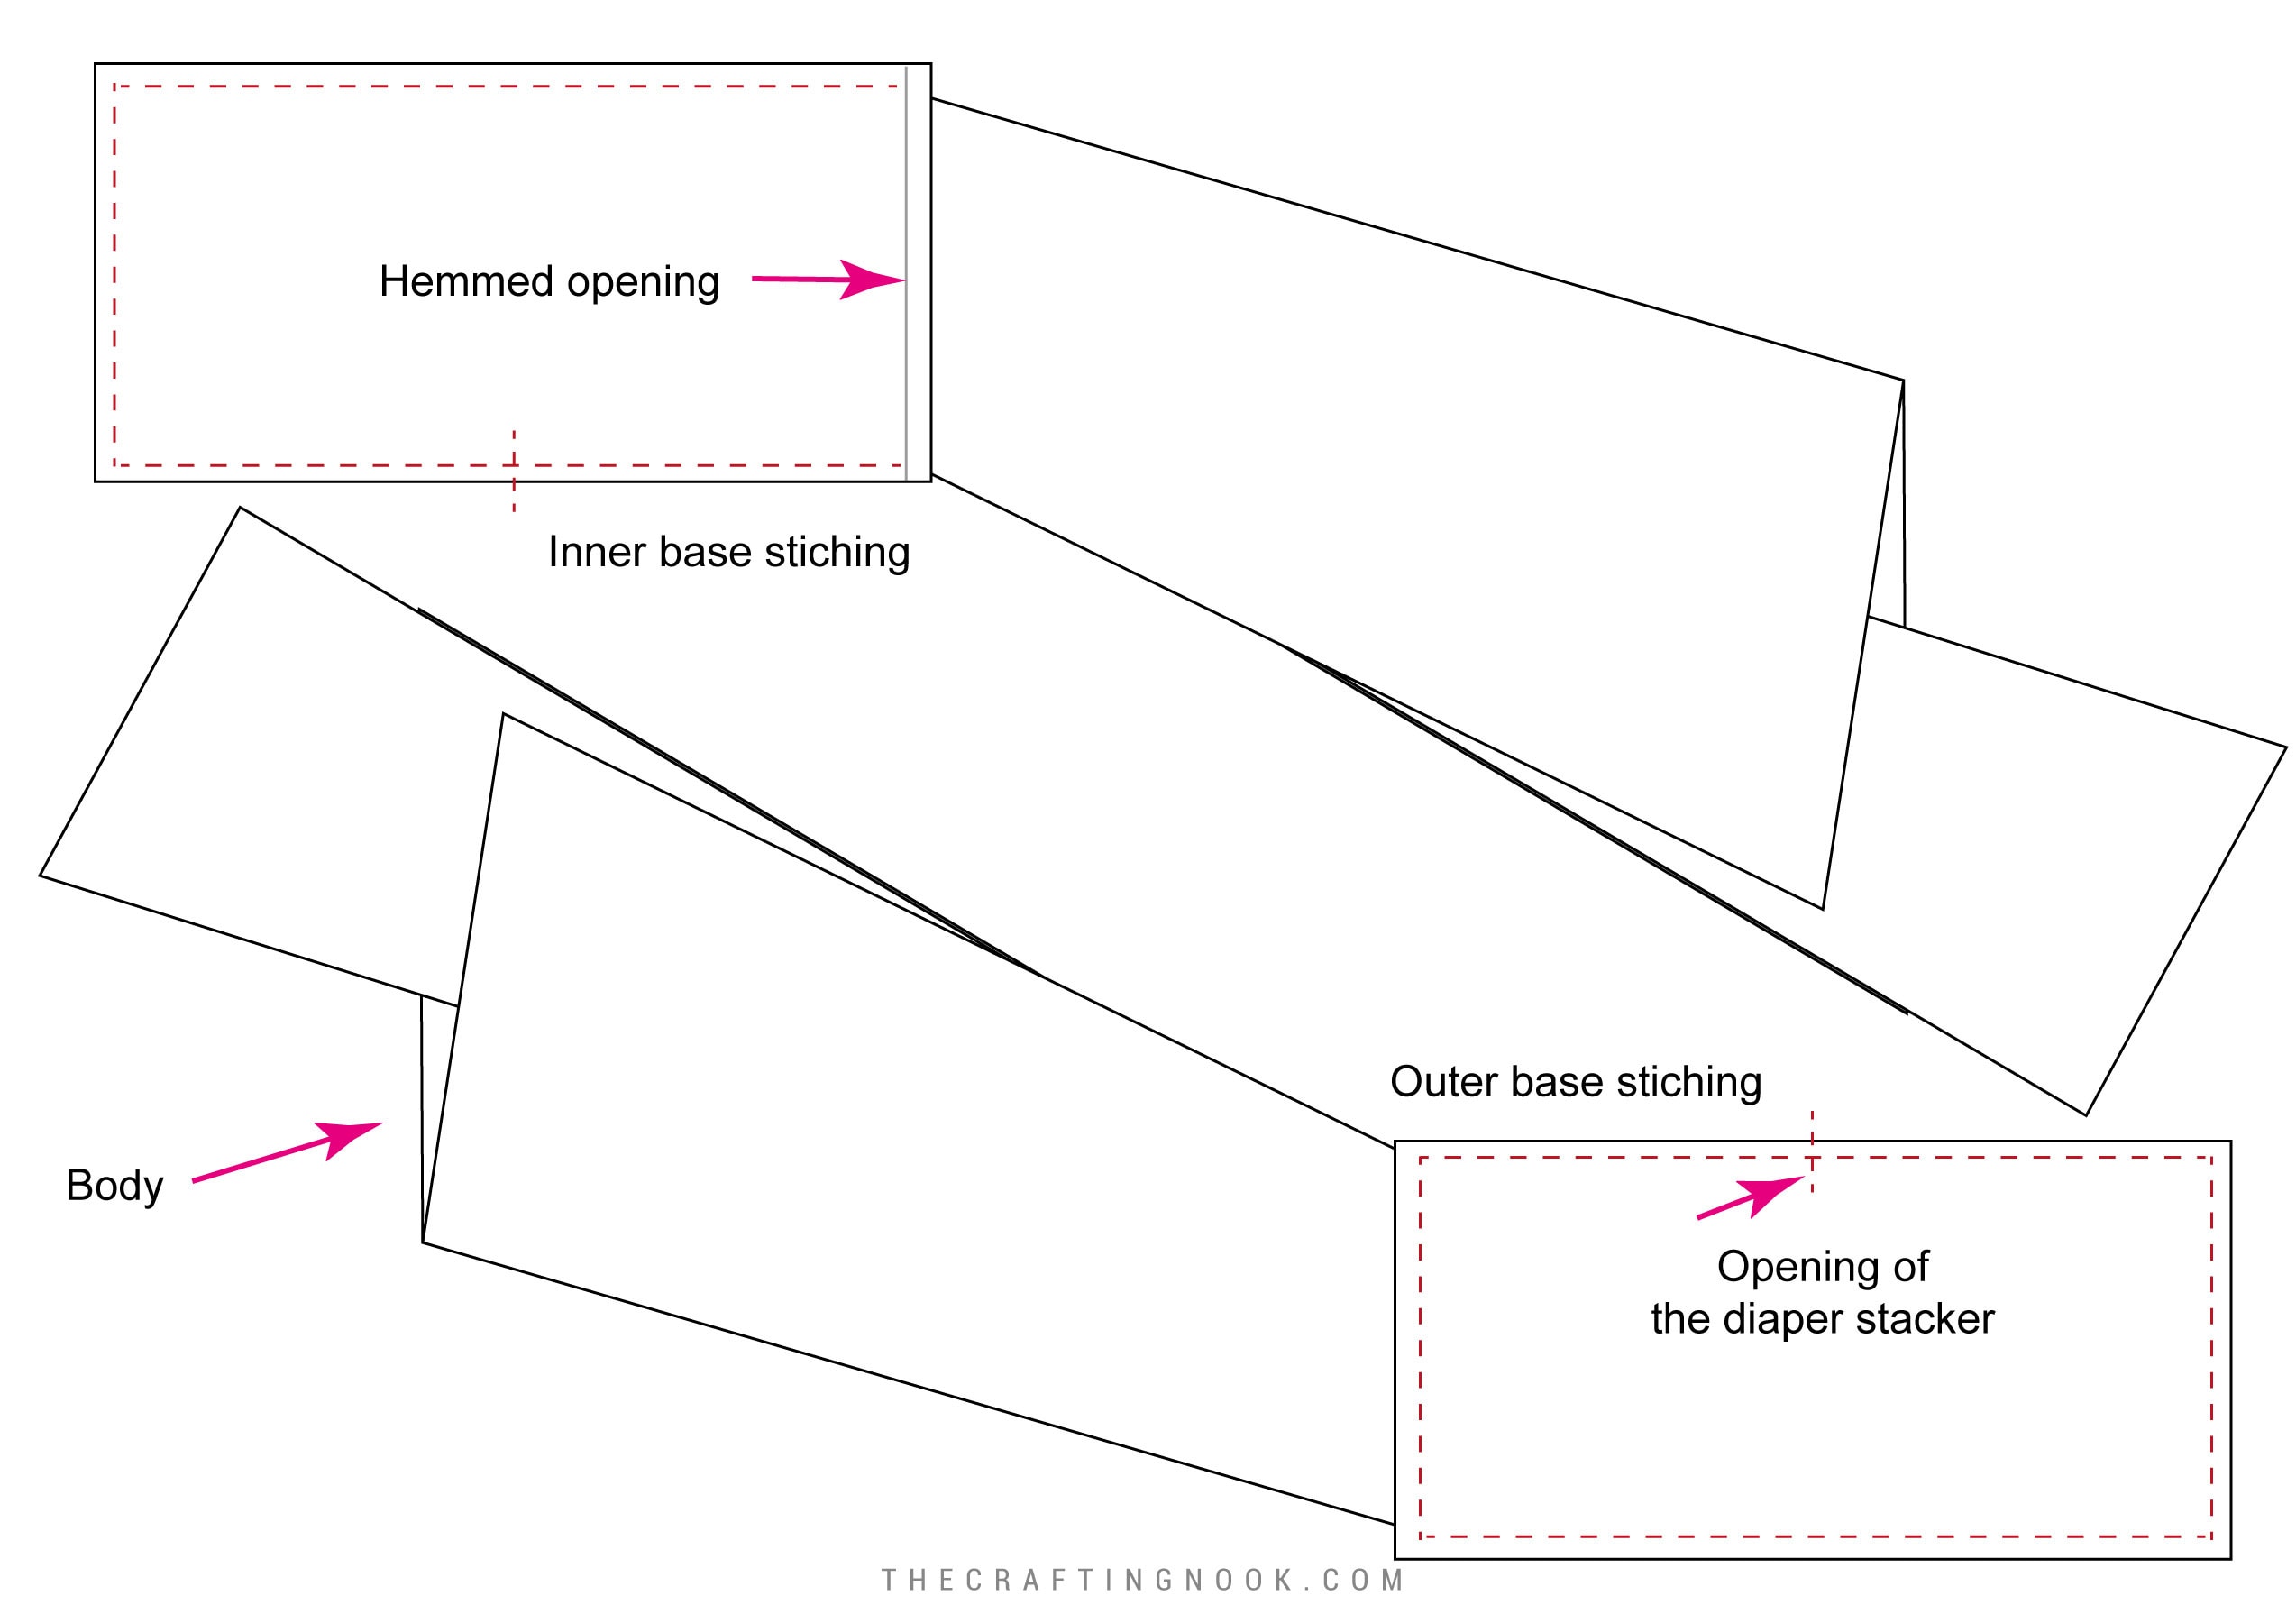
When you reach the short side with the hemmed lining opening, sew the body to the outer base fabric but keep that hemmed lining edge out of your stitching.

Step 7: Turn the Base Right Side Out
Once the base is sewn, reach through the opening you left in the lining.
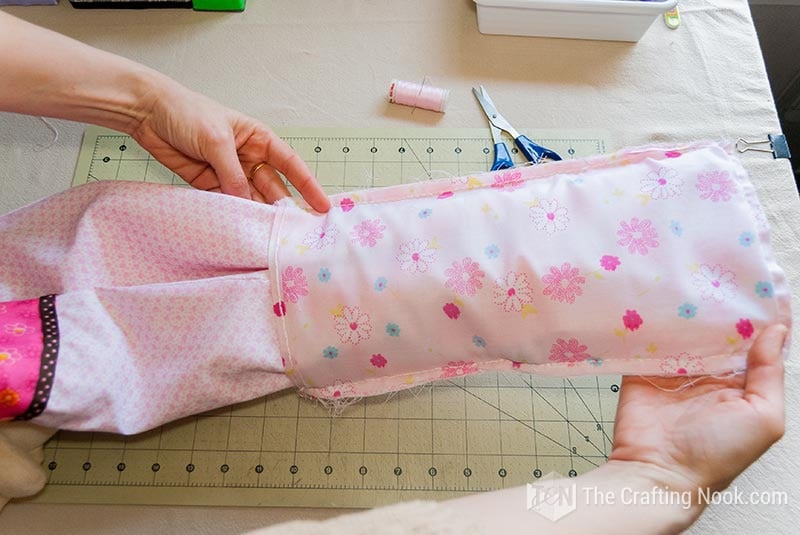
Slowly pull the diaper stacker body through that opening.

It may look like far too much fabric is trying to come through a small space. Go slowly and work a little fabric through at a time rather than pulling hard.
Once everything is through, push out the corners of the base and smooth the fabrics into place.

The raw seams should now be hidden between the outer base and lining.

Press the base carefully.
Step 8: Make the Removable Cardboard Base
Measure the inside of your finished base.
Cut a piece of cardboard slightly smaller than that measurement so it slides inside without bending or forcing the fabric outward.

I covered mine with contact paper.
You don’t have to do this, but I liked that it protected the cardboard and made it a little easier to slide in and out.
Insert the cardboard through the hemmed opening in the lining.

The cardboard gives the bottom some structure and helps keep the stacker from sagging when it is filled with diapers.
I originally used a few invisible stitches to keep the opening closed, but if I were making it again, I would leave the opening accessible.

That way the cardboard can be removed easily whenever you want to wash the diaper stacker.
Step 9: Make the Decorative Top
Apply fusible interfacing to the wrong side of one top piece according to the manufacturer’s instructions.
The interfacing makes the top a little sturdier because this section helps support the hanging ties.
Place the two top pieces right sides together.
Pin them.
Sew:
- both side edges
- the curved center edge
Do not completely close the two narrow upper points.
Those openings are where the ribbon ties will be inserted.
Step 10: Add the Hanging Ribbons
Cut two ribbon strips approximately 16 inches long.
Fold each ribbon in half.
Insert the folded end of one ribbon into one of the openings at the top.

Most of the ribbon should be inside the fabric at this point, with only the folded end extending slightly beyond the raw edge.
Sew across the opening several times to secure the ribbon.
Repeat on the other side.
I would reinforce these seams because the ribbons will support the weight of the stacker and the diapers inside.
Turn the top piece right side out.
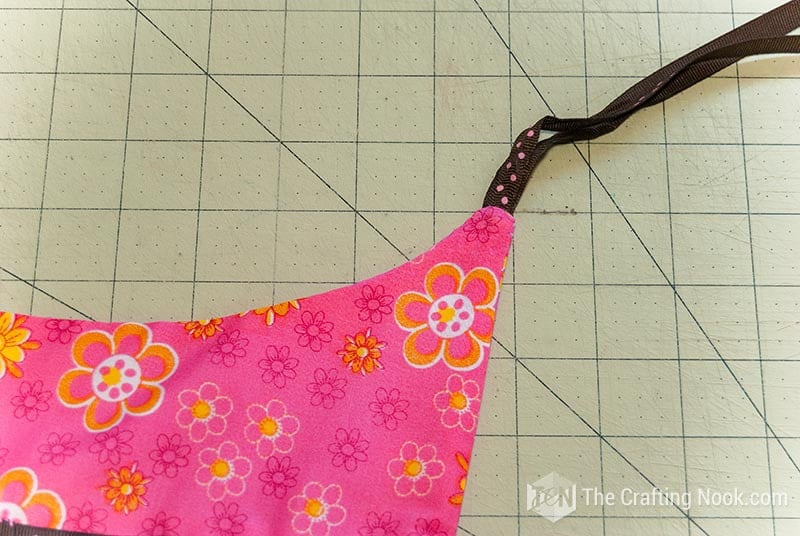
Gently push out the corners and press everything flat.
Step 11: Make the Side Pleats
The diaper stacker body is wider than the decorative top, so we need to shape the upper edge before joining them.
On one side of the body, fold the fabric inward to create a pleat similar to the side fold on a paper gift bag.

Repeat on the opposite side.
Try to make both pleats the same depth so the front opening remains centered.
Pin the pleats in place.
These folds give the diaper stacker its slightly boxed shape.
Step 12: Attach the Top to the Body
Fold the raw lower edge of the decorative top toward the inside by approximately your seam allowance and press it.
Slide the upper edge of the diaper stacker body inside the decorative top.

The decorative top should overlap the body enough to hide its raw upper edge.
Center the front opening beneath the curved section of the top and check that your two side pleats are even.
Pin everything securely.
Sew along the lower edge of the decorative top, catching the diaper stacker body inside as you stitch.
Continue around as needed so the body is securely attached to the top.
At this point, the main diaper stacker is finished.
Step 13: Add the Decorative Details
Now you can make it your own.
I stitched ribbon along the seam where the decorative top meets the body because I liked how it hid the visible stitching and tied the fabrics together.
Then I added matching ribbon around the edges of the front opening.
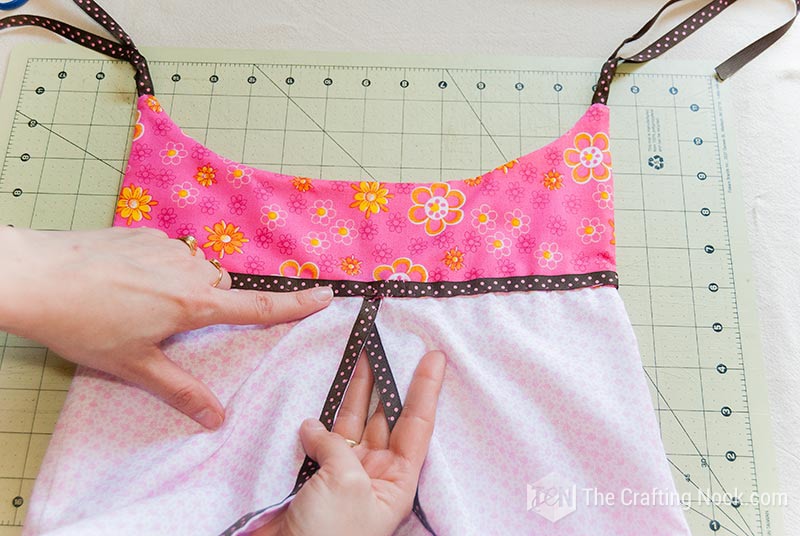
My last little detail was a teddy bear stitched to the center.
That bear became one of my favorite parts of the whole project.

You can add ribbon, appliqué, embroidery, fabric trim, or leave the front completely simple.
The final touch was a teddy bear stitched to the top of the opening.

What do you think… Isn’t it cute???

How to Hang Your Diaper Stacker
I made long ribbon ties so I could hang mine in different ways.

I ended up tying the ribbons to a decorated clothes hanger and finishing each one with a bow.

You could also attach it to another secure hanging point near the changing area.
I would keep a hanging organizer like this completely out of a baby’s reach, especially because of the long ribbons. As your baby grows and starts grabbing and pulling things, move it if necessary.

Done!!!

Crafting Tips
This isn’t a difficult sewing project once you understand the construction, but there are a few places where slowing down helps.
- Look at the body as one long piece. The C-A-B-A-C markings show the different sections of the finished stacker. They are not separate pieces that need to be sewn together.
- Press as you go. Even though I hand-sewed my original, pressing the seams made a big difference in how neatly everything sat.
- Use the pattern divisions to line up the base corners. This helps the body wrap around the rectangular base evenly.
- Use plenty of pins around the base. This is the fiddliest section of the project.
- Keep the lining opening accessible. Being able to remove the cardboard makes washing much easier.
- Reinforce the ribbon ties. These stitches carry the weight of the finished organizer.
- Don’t rush the turning step. Work the fabric through the base opening gradually so you don’t stretch or pull your seams.
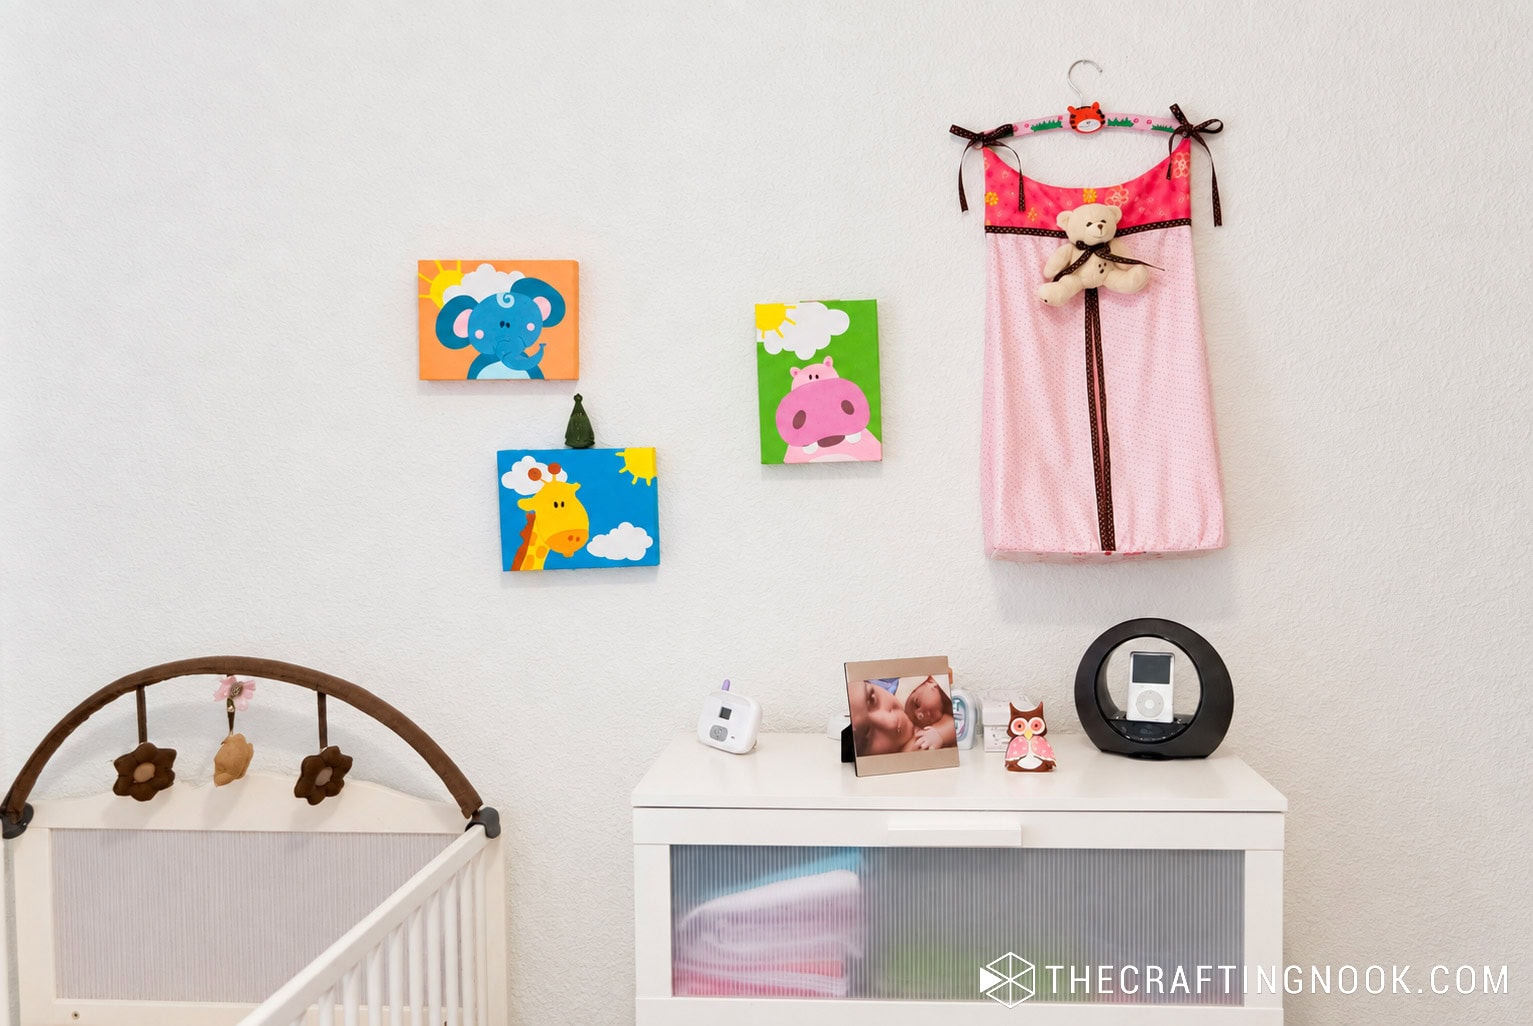
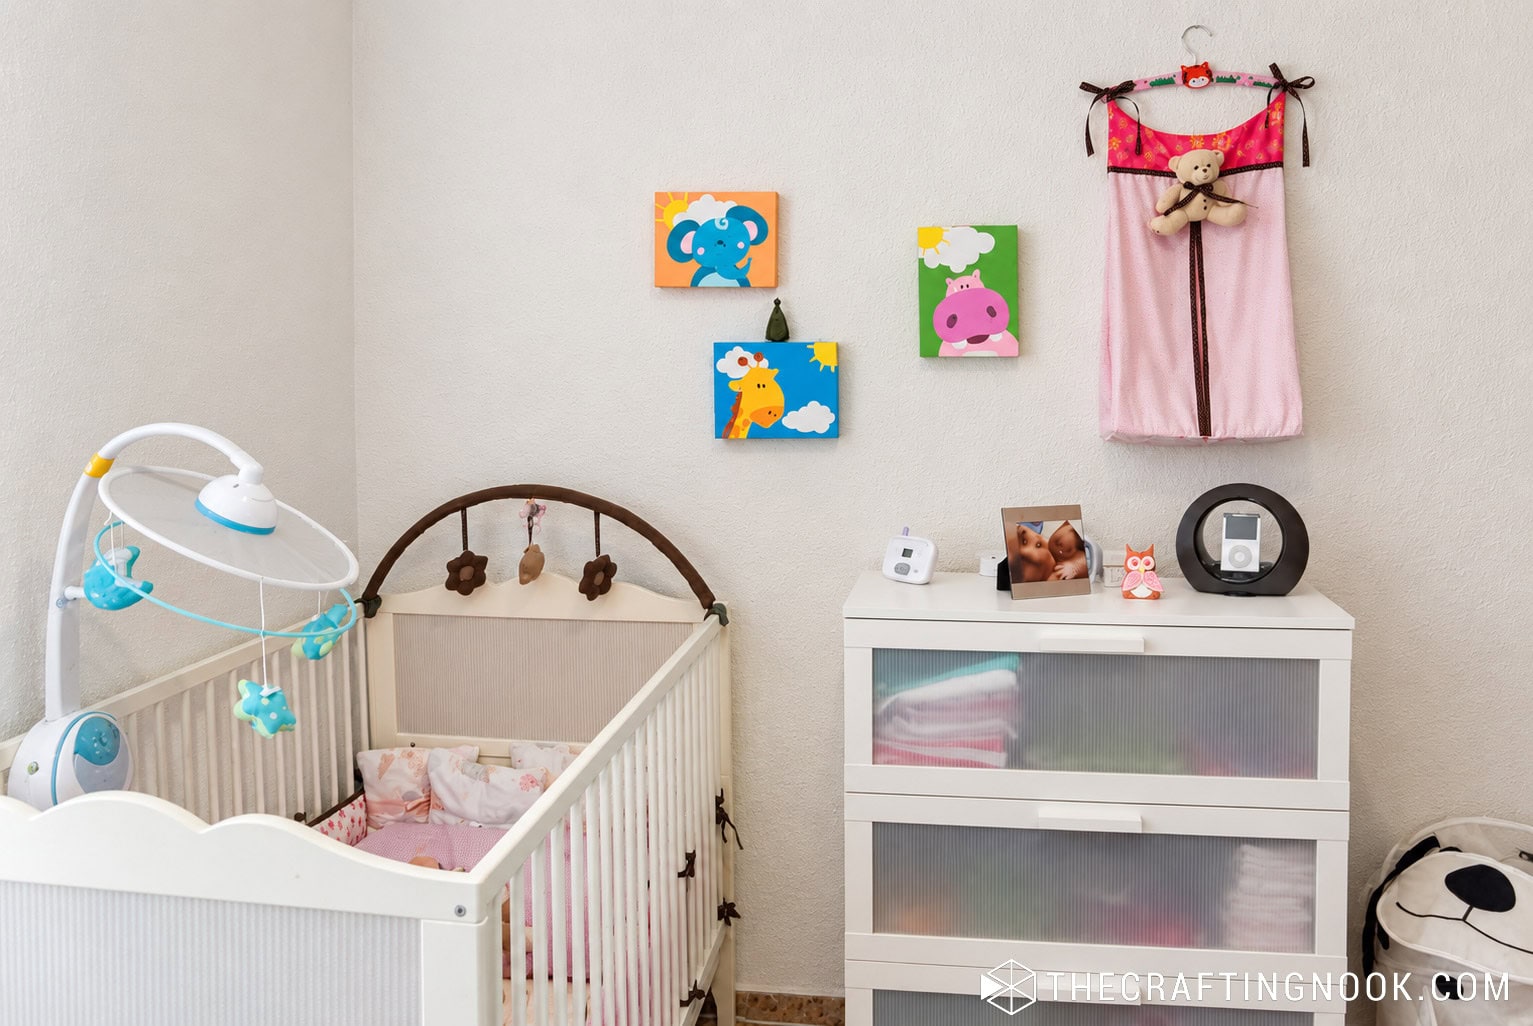
However, you can ask any question you may have in the comments or email me. That’s how my little girl’s bedroom looks now!… I Love it!
Simple Ways to Change the Design
You can easily make this diaper stacker look completely different without changing the construction.
Use one fabric throughout for a cleaner look or combine two or three coordinating prints like I did.
You could also add a small pocket to the outside for lightweight nursery items.
Embroidery or an appliqué with the baby’s name or initials would also be really pretty.
And if you prefer a very simple style, skip the ribbon trim and teddy bear entirely.
What Else Can You Store in It?
Once you’re past the diaper stage, the organizer can still be useful.
I would use it for lightweight things like:
- bibs
- burp cloths
- washcloths
- small blankets
- soft toys
- extra changing-table supplies
I wouldn’t use it for heavy items because the design was made specifically with diapers and lightweight baby supplies in mind.
How to Wash the Diaper Stacker
Remove the cardboard insert before washing.
If your fabrics are machine washable, the fabric portion can be washed according to the fabric manufacturer’s instructions.
Pay attention to any decorations you added too. My teddy bear, ribbons, and other trims may need gentler washing than plain cotton fabric.
I would personally use a gentle cycle or hand wash if the finished stacker has several decorative details.
Frequently Asked Questions
Yes. I only hand-sewed mine because I didn’t own a sewing machine when Emma was born. A sewing machine will make the project much faster.
Yes, but I wouldn’t describe it as one of my quickest beginner sewing projects.
The basic sewing is simple, but attaching the lined base takes a little patience.
If you’re newer to sewing, read through the base section before starting it. Once you understand how the body and base layers fit together, it becomes much easier.
No. The main body is one continuous piece of outer fabric and one matching piece of lining.
The Front-Side-Back-Side-Front markings simply show how that long piece wraps around the finished diaper stacker.
The pattern shows the basic pieces and measurements.
Add 1 cm, about 3/8 inch, around each pattern piece when cutting so you have enough fabric for the seams.
The cardboard helps the bottom stay flat and prevents the fabric from sagging under the weight of the diapers.
You can, and I originally secured my opening with a few invisible stitches.
I now think leaving the opening accessible is more practical because you can remove the cardboard before washing.
A Little Story Behind This One
Looking at this diaper stacker now takes me straight back to those first months with Emma.
We had recently moved, money was tight, I didn’t own a sewing machine, and I couldn’t simply go buy everything I wanted for her nursery.
But I had those pretty fabrics my mother-in-law had brought me from Venezuela. So I sat down, figured out the shape, made my own pattern, and slowly stitched the whole thing together by hand.
It certainly isn’t the most technically perfect thing I’ve ever sewn. But I still love it, and I still have it. It’s
And I’m glad I didn’t let not having the right machine or the perfect supplies stop me from making something I wanted for my baby.
If you make your own diaper stacker using my pattern, I’d love to see it. Leave a comment below or tag me on Instagram so I can take a peek.
More Sewing Projects to Try
If you enjoyed this cute Wall Hanging Diaper Stacker, you might also love these sewing projects for kids too:

✂️ Tutorial

DIY Wall Hanging Diaper Stacker Tutorial

Tools
- Sewing machine or hand-sewing needle
- Fabric Scissors
- Ruler
- Measuring tape.
- Fabric marker
- Straight pins
- Iron
Supplies
- Outer fabric
- Lining fabric
- Contrasting fabric for the top
- Fusible interfacing
- 1/2-inch-wide ribbon
- Cardboard
- Contact paper optional
- Embellishment optional
- Coordinating thread
Instructions
- Print the diaper stacker pattern and add **1 cm / about 3/8 inch seam allowance** around each pattern piece before cutting.
- Cut one long body piece from the outer fabric and one matching body piece from the lining. Cut the base and top pieces as indicated on the pattern.
- Place the outer body and lining right sides together. Sew along the two vertical edges of the front opening. Turn right side out and press.
- Hem one short edge of the lining base piece. This opening will be used for turning the stacker and inserting the removable cardboard.
- Wrap the bottom edge of the body around the outer base, using the Front-Side-Back-Side-Front pattern divisions to line up the four corners.
- Place the lining base right side down over the body so the body is sandwiched between the two base layers.
- Sew around the base, keeping the hemmed lining opening free.
- Pull the diaper stacker through the lining opening and turn everything right side out.
- Cut a cardboard rectangle slightly smaller than the finished base. Cover it with contact paper if desired and slide it through the lining opening.
- Apply interfacing to one top piece.
- Sew the two top pieces right sides together around the sides and curved edge, leaving the two ribbon openings unsewn.
- Cut two 16-inch ribbon strips and fold them in half. Insert one into each top opening and stitch securely.
- Turn the top right side out and press.
- Make one inward pleat on each side of the diaper stacker body.
- Fold the lower edge of the top inward, slide the upper edge of the body inside, pin, and stitch the top securely to the body.
- Add ribbon trim, appliqué, embroidery, or another embellishment if desired.
- Tie the finished diaper stacker securely to a hanger or another appropriate hanging point.
Notes
Other Diaper Stackers from my favorite bloggers:
- Hanging Diaper Bag by Sew 4 Home.
- DIY T-Shirt Diaper Stacker by 3 Winks Designs.
If you loved this Diaper Stacker tutorial, don’t forget to PIN and share it with friends!

Til’ next time…

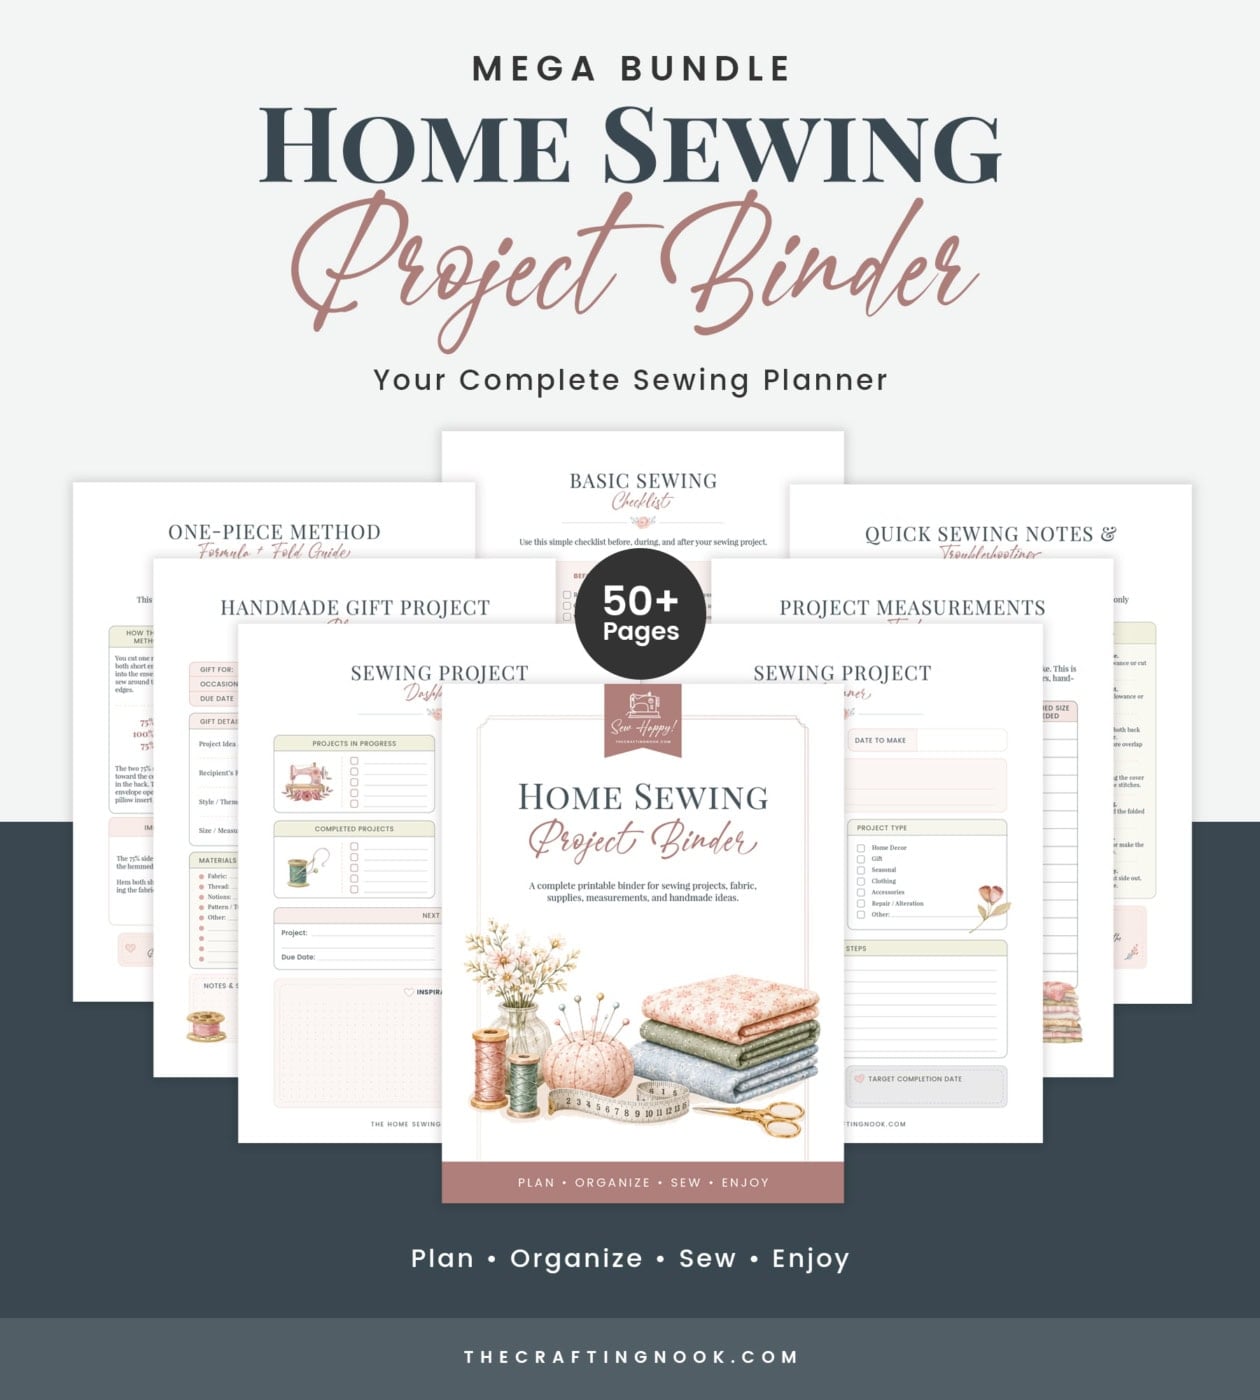
The Home Sewing Project Binder
Keep Your Sewing Projects Organized
If you are working on more sewing projects, my Printable Sewing Binder gives you one place to keep measurements, fabric information, project notes, supply lists, and plans. It is especially useful when you want to repeat a project later but cannot remember which fabric, needle, measurements, or adjustments you used the first time.
beautifully done!
I just finished a diaper stacker for my niece. I saw yours with the ties 1/2 way through and almost did that, but I already had too much work in my topper since I painted the fabric to go with her nursery. Wanted to show you a picture, but don’t see how to do that.
Hi Lisa!!!
Awwww you are so so sweet to stop by and share with me! I would LOVE to see yours. You can now attach the photos here in this mail titicrafty@gmail.com! Who knows I might use your ideas too when I have a second child. LOVE LOVE that you wanted to share your creation with me!!!
Can’t wait!
I just love it Cami!! Fabulous!Thanks for partying with me last week! Can’t wait to party with you again tomorrow evening at The DIY Dreamer… From Dream To Reality!
Woohoooo Christine! So glad you liked it!!! I’m very happy! I’ll be there it is in my weekly schedule!
Thank you so much for stopping by!
Hugs
Cami
Very cute, Camila!! Such a great tutorial too. Thank you for sharing at Simply Create Link Party.
Thank you so much Melissa! It’s always fun linking up with you!!!
Hugs
Cami
Beautiful diaper bag! Thanks for linking at All Things Pretty! You’re one of the features this week! Hope you’ll come back and share again and grab a button.
Yayyyyyy Thankks, it is so cool, I’m Honored!!!. I already linked up my newest creation!
have a lovely week!
Hugs
Cami!
This seems like such a cute idea but the whole thing is in Spanish. Thanks for sharing @ Seasons of a Homemaker. Please share with friends so we can enjoy a big party!!Abbi
Hello Abigail, Thank you so much for stopping by and for hosting such a lovely Party!.
Yes I write some posts in English and some in Spanish I have a very divided audience. I have activated the Google Translator on my blog and I’ve seen is very accurate, not perfect but good enough to understand. Anyway I’m always open to translate when people ask me to. So just let me know and I’d be happy to!
Hope you have a lovely week
Hugs
Cami
Absolutely gorgeous work!love it! Thanks so much for sharing great tutorial!Have a wonderful weekend!Hugs from Portugal
Thank you so much Ana, happy to have you here! It looks so cute on a baby’s bedroom! =D
Have a wonderful week Ana, hope to see you around soon!
Hugs
Cami
Very cute. Visiting from the The Pin Junkie link party.
Jamie
http://www.huckleberrylove.com
Thank you so much Jamie! I’m going your way now!!!
Hugs
Cami