DIY Merry Christmas Vinyl Decals Gift Jar
This post may contain affiliate links. Please read our Disclosure Policy.
Get into the Christmas spirit with these DIY Merry Christmas vinyl decals for Gift Jars! Using vinyl and Silhouette Cameo, create personalized and charming gifts. Let’s spread some joy together this season!
I can’t believe Christmas is approaching and I’m already thinking about gifts and decorations! Christmas is my favorite holiday. It’s absolutely special and full of hope, faith, best wishes, happiness, and love all around.

Table of Contents
DIY merry christmas vinyl decals Gift Jar
There are so many ways in which I can think of Christmas and all of them make me smile. This year I decided to start with gift ideas and I so love how this merry Christmas vinyl decals gift jar turned out.
This project is part of a team challenge called Silhouette Challenge and this month’s one was projects under $5. The thing is that this one didn’t actually cost me a penny since I already had everything at home. I recycled a jar and used scraps of vinyl, paper, twine, and washi tape.
I filled this Christmas gift jar with bath salts. This jar can be filled it with anything but some friends suggested bath salts and I thought, what a GREAT idea.

I love giving something that people can actually enjoy for a long time and I thought it was perfect! You can always fill the jar with cookies, chocolates, or anything you want, creativity is the limit! LOL.
I recently shared a post on how to make roses bath salts and man, let me tell you, It’s SO GOOD! The scent, the skin, everything is awesome. I used the same recipe but didn’t color it because I wanted it white so de jar decoration would pop up more!
Everyone that has seen it, says looks like snow and I so love it.
This project is simple to make, doesn’t take too long and you can make so many different designs!
how to make Merry Christmas Vinyl Decals Gift Jar
Supplies:
- Old Jar
- Vinyl in 3 different colors {I used White, Gold, and red Vinyl}
- Transfer paper
- Twine strip
- Washi tape or duct tape – I used a yellow one to go with the gold
- Bath salts, candies, cookies, or whatever you want to fill the jar with.
- Labels for the lid – You can download my free Christmas Bath Salts labels HERE
- Cutting file of your choice – You can get the design I used for this tutorial HERE
Tools:
- Cutting Machine – Silhouette or Cricut will do.
- Craft knife
- Ruler
- Weeding tool
- Scrapper
- Scissors
*You can actually use ANY vinyl shape found at your local craft store if you don’t have a cutter machine. There are many places where you can buy some designs that are not too expensive. But for the sake of this tutorial, we are using a Silhouette Cameo machine
Instructions:
The Design
Wash and dry well your jar and lid.
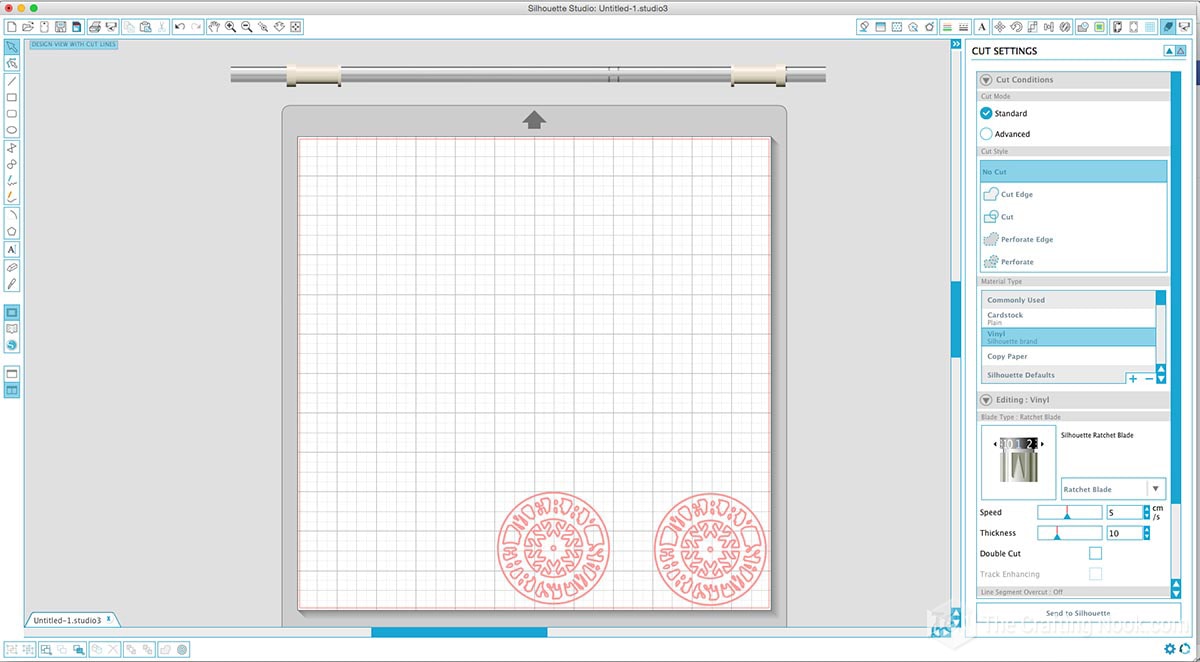
Firstly decide on the design and size of your decal. Place it in the Silhouette Studio design space.
You can snag the Merry Christmas stickers cut files HERE!
Since we are using 2 colors and we want to decorate 2 sides of the jar, one side will be Merry Christmas in Red and the Snowflake in Gold. The other one is in the opposite scheme.
So duplicate the design and on the mat, place 2 pieces of vinyl, one red and one gold.
Put them in the right place according to the silhouette studio positioning.
Set the material to vinyl and set the knife to the suggested settings and hit Cut.


Once the design is cut, using the weeding tool peel away the negative space, so all that remains on the vinyl backing is our design.


As we mentioned we want the snowflake in the other color. So what we do is separate the snowflake from the rest of the design doing a delicate cut on each snowflake end where it connects with the Merry Christmas part.
SIDE NOTE: For the downloadable files I already did the separation to make it easier for you.


Then using a transfer paper, carefully extract the snowflake from both designs and then replace them with the other color by aligning them carefully in each design.


Remove carefully the transfer tape.
Then cut bigger pieces of transfer paper and apply them to each design and smooth it down using a scraper tool.

The Jar
Time to apply the designs to the jar.
Make sure the jar really dry and dust-free.

Lift the transfer paper off the liner.
Place the vinyl decal design where you want it and carefully use the scraper to go from the center to the edges to transfer the vinyl to the jar.
Make sure you don’t leave bubbles or creases behind.

Then carefully peel the transfer paper off and make sure that all the vinyl is stuck down on the jar.
If something is coming back, place it back and rub again the vinyl firmly and try lifting it again.

Do the same with the other side of the jar or on another jar.

That’s It! There you have your decorated Jar.
But we are not done yet! Now we will work on the lid! Yay!
the Jar Lid
Cut a piece of white vinyl bigger than the lid so you can cover the side of the lid.
You can alternatively paint the lid with a 2-in-one prime and white paint if you have it.

Remove the backing and place it centered on the lid.
Make cuts all around the vinyl that will be on the sides.

Start sticking each strip. they will overlap each other. That’s ok.

Add your washi tape {duct tape, ribbon} along the side to hide the overlapping vinyl.
Press well so the washi tape gets even and well stuck.

Cut the edge excess.

There you go!

Now you have a white base to decorate it as you like.
I decided to use some cute labels I designed and you can get them for free if you want to!

You can download HERE too.
NOTE: You can adjust the size of the labels in your printer settings. Or you can upload them to your cutting machine and do a print and cut to the right size.

Apply the label to the center of the lid.
And now we have a super cute lid!

I used some cute Christmas tags that I already had, you can use any tag you love. I cut it and made a hole to

Insert the tag in a strip of twine and wrap it around the jar’s neck.

Your gift jar is ready to ROCK!!!!
What to put inside the Christmas Vinyl Decal Gift jar
Pretty much anything you want that fits in it.
I used my Homemade Roses Bath Salts recipe to fill it. You can check the tutorial out if you want to make it too. The only thing I changed is that I didn’t use food coloring because I wanted it to be white.

TADAAAAA!!!!! WOOT WOOT!!!
Crafting Tips
- Test the cut on a small vinyl piece first. This helps make sure that the blade is set to the right depth and position for accurate and neat cuts.
- Don’t have a scrapper? Use a credit card or similar tool to press the transfer tape onto the vinyl design to get rid of air bubbles and make sure it goes on smoothly. Gently remove the transfer tape at a slanted angle to release it smoothly.
- Make sure your vinyl decals stay safe by putting a clear, waterproof covering on top. It keeps your things from getting scratched, or losing color, and helps them last longer.
- When aligning multiple layers of vinyl, lightly mark the placement on the backing sheet with a pencil or removable tape. It acts as a guide for perfect alignment during application.
- When applying vinyl to a curved surface like this jar, use a hairdryer or heat gun to warm up the vinyl slightly. It makes it more pliable and improves adhesion to the contour.
- Don’t limit yourself to traditional vinyl! Explore different materials like holographic or glitter vinyl for extra festive flair. Just ensure your cutting machine is compatible.
- Before working on your final project, practice on scrap vinyl and test different techniques. It helps build confidence and allows you to perfect your skills.
My first Christmas gift is officially ready, what do you think???

Washing and Care for the Decal Jar
Although heavy-duty vinyl is usually very strong, it’s better to wash the gift jar by hand to keep the decals in good condition. Don’t clean it by rubbing it hard. Don’t use Dishwasher machine.
Gently clean the area of the decal with a gentle soap and soft sponge, then gently dry by patting with a towel or paper towel.


Frequently Asked Questions
When making gift jars, it’s better to use strong high quality vinyls called permanent vinyl. This will make sure the decals stays on well and lasts a long time. Select a type of vinyl that is made for outdoor use to ensure it withstands handling and washing.
It’s really important to prepare the surface correctly. Make sure the jar is free from dirt and moisture before putting on the vinyl. Smooth surfaces are the most effective, so you should think about using glass or plastic jars that don’t have any rough or bumpy areas. Put the plastic covering on firmly and press down hard. You might want to use a clear protective coating to make sure it stays safe.
Yes, you can use transfer tape again and again. After sticking on a design, gently remove the sticker’s protective layer and keep it for later. But remember, the stickiness of the transfer tape may decrease after each use, so it’s a good idea to have a new piece of tape ready.
If you are having problems with cutting, first check the condition and depth of the blade. Make sure it is clean and correctly set. Make sure to check your settings in the Silhouette Studio software and ensure that the machine is calibrated correctly. If you continue to experience problems, look at the user manual or contact Silhouette’s customer support.
I recommend to wait for at least 24 hours before manipulating, washing or giving the jar, so that the vinyl adhesive can fully dry. This allows it to stick well to the surface for a long time.
More Silhouette Cameo Projects to Try
If you enjoyed this fun diy Merry Christmas vinyl decals gift jar tutorial, you might also love these other Silhouette Cameo Projects too:


Want to Check Out even More Silhouette Projects?
My Silhouette Challenge buddies and I are all sharing projects on our blogs today, so peruse the projects below for a wealth of Silhouette inspiration!
1. Adventures in All Things Food // 2. unOriginal Mom // 3. Small Stuff Counts // 4. Alayna’s Creations // 5. Single Yet Married Mom // 6. Comfort and Yum // 7. Cutesy Crafts // 8. The Crafting Nook // 9. Whatcha Workin’ On? // 10. Architecture of a Mom // 11. Havalah // 12. Create & Babble // 13. A Time For Seasons
✂️ Tutorial

DIY Merry Christmas Vinyl Decals Gift Jar
Tools
- Cutting Machine – Silhouette or Cricut will do.
- Craft knife
- Ruler
- Weeding tool
- Scrapper
- scissors
Supplies
- Old Jar
- Vinyl in 3 different colors {I used White Gold, and red Vinyl}
- Transfer paper
- Twine strip
- Washi tape or duct tape – I used a yellow one to go with the gold
- Bath salts candies, cookies, or whatever you want to fill the jar with.
- Labels for the lid – You can download my free Christmas Bath Salts labels HERE
- Cutting file of your choice – You can get the design I used for this tutorial HERE
Instructions
THE DESIGN
- Wash and dry well your jar and lid.
- Firstly decide on the design and size of your decal. Place it in the Silhouette Studio design space.
- DIY merry christmas vinyl decals Gift Jar template on the silhouette studio app
- You can snag the Merry Christmas stickers cut files HERE!
- Since we are using 2 colors and we want to decorate 2 sides of the jar, one side will be Merry Christmas in Red and the Snowflake in Gold. The other one is in the opposite scheme.
- So duplicate the design and on the mat, place 2 pieces of vinyl, one red and one gold.
- Put them in the right place according to the silhouette studio positioning.
- Set the material to vinyl and set the knife to the suggested settings and hit Cut.
- Once the design is cut, using the weeding tool peel away the negative space, so all that remains on the vinyl backing is our design.
- As we mentioned we want the snowflake in the other color. So what we do is separate the snowflake from the rest of the design doing a delicate cut on each snowflake end where it connects with the Merry Christmas part.
- Then using a transfer paper, carefully extract the snowflake from both designs and then replace them with the other color by aligning them carefully in each design.
- Remove carefully the transfer tape.
- Then cut bigger pieces of transfer paper and apply them to each design and smooth it down using a scraper tool.
THE JAR
- Time to apply the designs to the jar.
- Make sure the jar really dry and dust-free.
- Lift the transfer paper off the liner.
- Place the vinyl decal design where you want it and carefully use the scraper to go from the center to the edges to transfer the vinyl to the jar.
- Make sure you don’t leave bubbles or creases behind.
- Then carefully peel the transfer paper off and make sure that all the vinyl is stuck down on the jar.
- If something is coming back, place it back and rub again the vinyl firmly and try lifting it again.
- Do the same with the other side of the jar or on another jar.
- That’s It! There you have your decorated Jar.
- But we are not done yet! Now we will work on the lid! Yay!
THE JAR LID
- Cut a piece of white vinyl bigger than the lid so you can cover the side of the lid.
- You can alternatively paint the lid with a 2-in-one prime and white paint if you have it.
- Remove the backing and place it centered on the lid.
- Make cuts all around the vinyl that will be on the sides.
- Start sticking each strip. they will overlap each other. That’s ok.
- Add your washi tape {duct tape, ribbon} along the side to hide the overlapping vinyl.
- Press well so the washi tape gets even and well stuck.
- Cut the edge excess.
- There you go!
- Now you have a white base to decorate it as you like.
- I decided to use some cute labels I designed that you can download HERE too.
- Apply the label to the center of the lid.
- And now we have a super cute lid!
- I used some cute Christmas tags that I already had, you can use any tag you love. I cut it and made a hole to
- Insert the tag in a strip of twine and wrap it around the jar’s neck.
- Your gift jar is ready to ROCK!!!!
Notes
SIDE NOTE: For the downloadable files I already did the separation to make it easier for you.
NOTE: You can adjust the size of the labels in your printer settings. Or you can upload them to your cutting machine and do a print and cut to the right size.
Share and PIN ME!!!

Would this be a gift you would love to get??? What else? Tell me all about your favorite gifts in the comments!
Til’ next time…


FREE WORKBOOK
Keeping your Sweet Home Organized
Learn how to create intentional habits and simple routines to Keep Your Home Organized. Plus freebies, printables, exclusive content, and tips.
Disclaimer: By clicking on the “Yes” button above you are giving me your consent to collect and use your information according to the law and My Policy Privacy. Zero Spam I promise!