DIY Wall Hanging Diaper Stacker
This post may contain affiliate links. Please read our Disclosure Policy.
This cute wall-hanging diaper stacker is a nice touch, a simple and easy diaper organizer, and the perfect solution for a small nursery. Learn how to make it.
When Emma was born, I always had in mind that I wanted a convenient place to keep diapers clean and free of dust.

Table of Contents
Hanging Diaper Stacker as A cute and decorative diaper storage solution
At first, since I was in a new country, I had no supplies to make anything myself, so I used a few organizer storage units from IKEA to keep diapers in place but I didn’t like that the diapers were exposed to dust. And inside a dresser drawer worked but it wasn’t what I was going for.
My budget back then was very tight, we were barely making ends meet, so I had to work with what I had. Although cute crafts and making things myself has always been my passion, the problem was getting the supplies.
A few months later, I got some nice fabric that my mother-in-law sent me and my first thought was, “I’ll finally make a wall diaper stacker”.
I had seen one so pretty in a shop and also looked online and saw this cute baby diapers stacker bag they could hang from a door hook, from the crib, or on the side of a changing table. My mind was made, I was so eager to make one just like those.
I had no sewing machine so I set out to do it with my hands. Hand sewing is more time-consuming for sure but I found it kind of therapeutic and relaxing.
I remember just turning on my TV and sewing while watching/listing to some TV shows.
It was a very special project and I wanted to make things for my baby girl with my own hands.
Please bear with me here as I do my best to explain this project process. I wasn’t blogging yet when I made it but I got several requests to share the tutorial so I’m doing the best I can. Feel free to ask questions if anything is not clear.
How to Make This Diaper Stacker
This handy diaper stacker is designed to hang from a crib or a wall for easy access to the diapers. There’s plenty of room for lots of disposable diapers or cloth diapers inside.
This cute diaper stacker is the perfect solution to have in your nursery decor close to your changing table or crib as your diaper organizer and keep them within easy reach.
Supplies:
- Cute fabrics you like – in my case I used 3 different fabrics including the lining for the inside of the diaper stacker. Approx. a yard of each
- Interfacing 1/4 yard
- Ribbon approximately 1/2 inch wide.
- Embellishment (cute details like plush bear, anything you like)
- Piece of cardboard.
- Contact paper
- A clothes hanger.
- Matching threads and needle
Tools:
Instructions:
Before we begin, be sure to follow us on Pinterest, Facebook, Instagram, and YouTube, and also sign up for our email list (at the end of this post), so you’ll never miss a post!
Basically, the diaper stacker is like an oversized travel box of tissues.
I kept it as geometrical as possible to make it easier to understand, cut and assemble the pattern.
Step 1. Prep Work: the Diaper Stacker Pattern
So the first thing I did was create my diaper stacker pattern to understand and know exactly the pieces I need to cut.
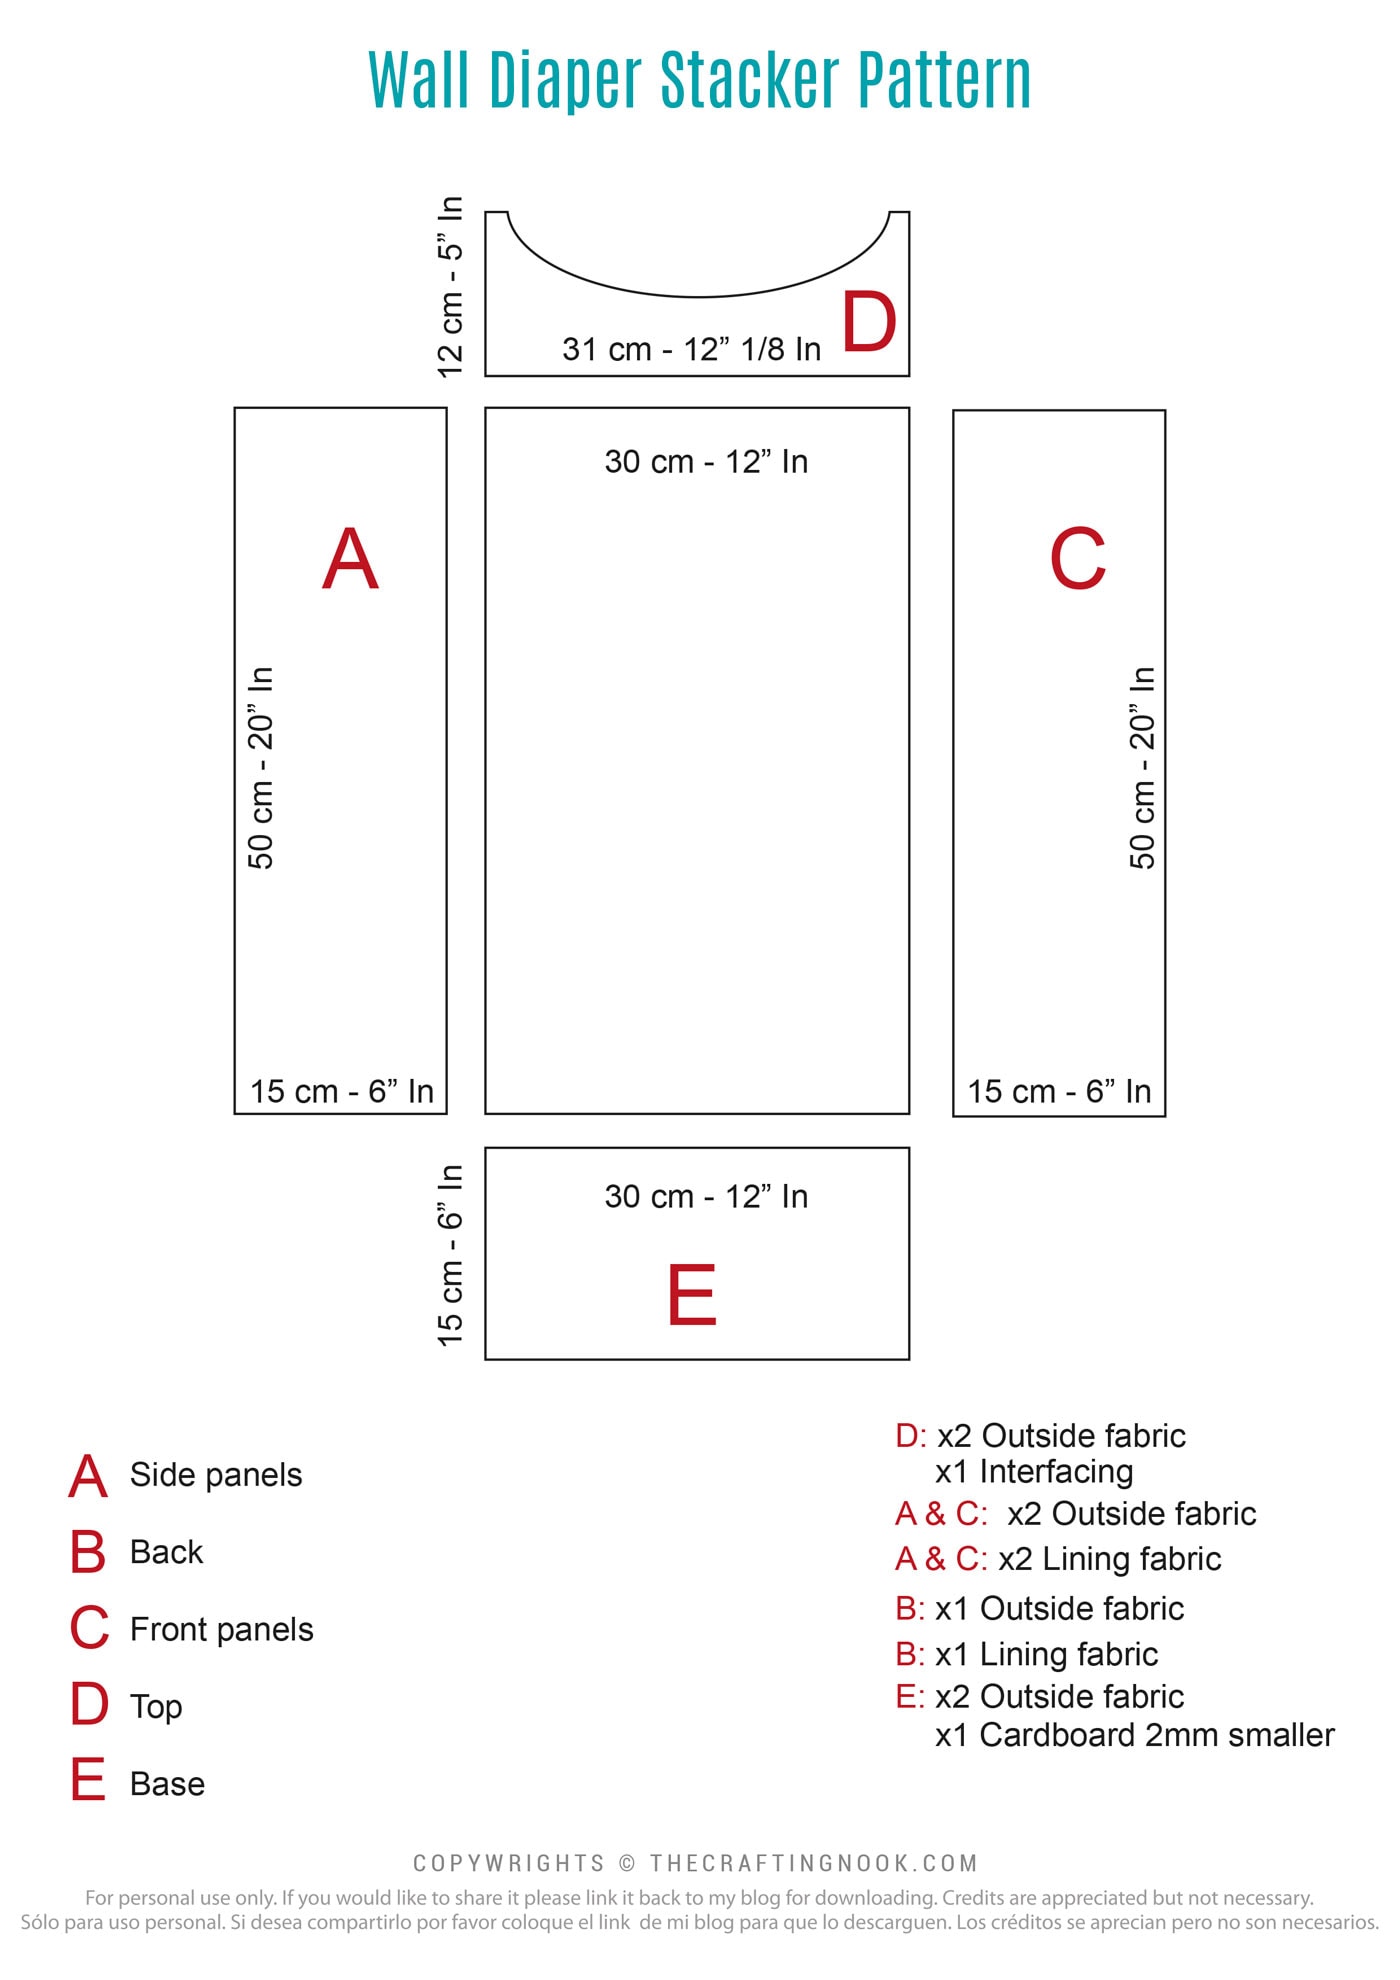
I’m sharing the free diaper stacker sewing pattern download for you. Just remember that this is for personal use only and no commercial use is allowed.
You can snag the DIY Diaper Stacke Pattern A4 HERE.
Or you can grab the DIY Diaper Stacke Pattern Letter HERE.
I always leave about 1/8 inch on each side for seam allowance.
The following is basic.
I decided I wanted it to be lined inside so that when opening it and taking the diaper, it would look nice on the inside too.
Also, I wanted to have a hidden seam as much as possible. So the whole pattern {except for the top} is all double cut.
I cut all my diaper stacker pieces and got ready to start.
Step 2: Sew The Body
I first sewed the main parts of the body (front, back, and both sides) of both the main fabric and the lining. In my case, it was the same fabric.
The front pieces should be the first and last to sew as shown in the chart below.

We need to make this with interior and exterior pieces to build the body.
Then I put these lining and outer fabric layers right side together and sewed the side edges.

I turned it inside out and ironed it.
Step 3: Attaching the Body to the Base
This part is the tricky one. Use the help of pins.
On one side of the base, the shorter sides, I left it open to insert a piece of cardboard to give strength to the base and remove it when I want to wash the bag.
With the base pieces already cut, I took the body of the diaper bag to sew them together.
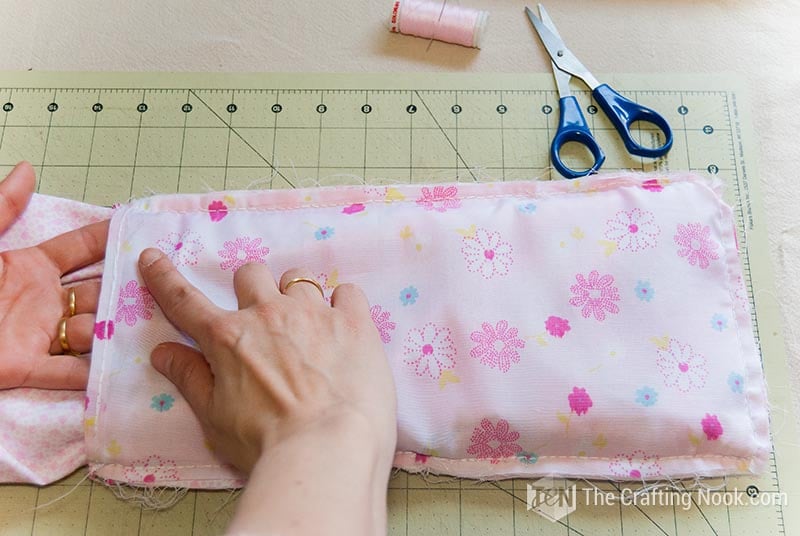
Make a hem on one short side of the lining fabric piece.
Center raw edges of both ends to the base right sides together and pin in place.
The body would be sandwiched between both fabrics of the base.
It should look like a sandwich: fabric base-body-lining fabric base.
Pin in place around the edge of the base. The best way is to let the body corner seams must coincide with the corners of the base.

Make sure that the opening of the base (lining fabric) goes inside the bag with the lining fabric. These two pieces should be right sides together.
Start sewing from the middle of the long side of the base where your diaper stacker opening is.

As you stitch through the corner, move your body fabric away so you don’t accidentally stitch it.
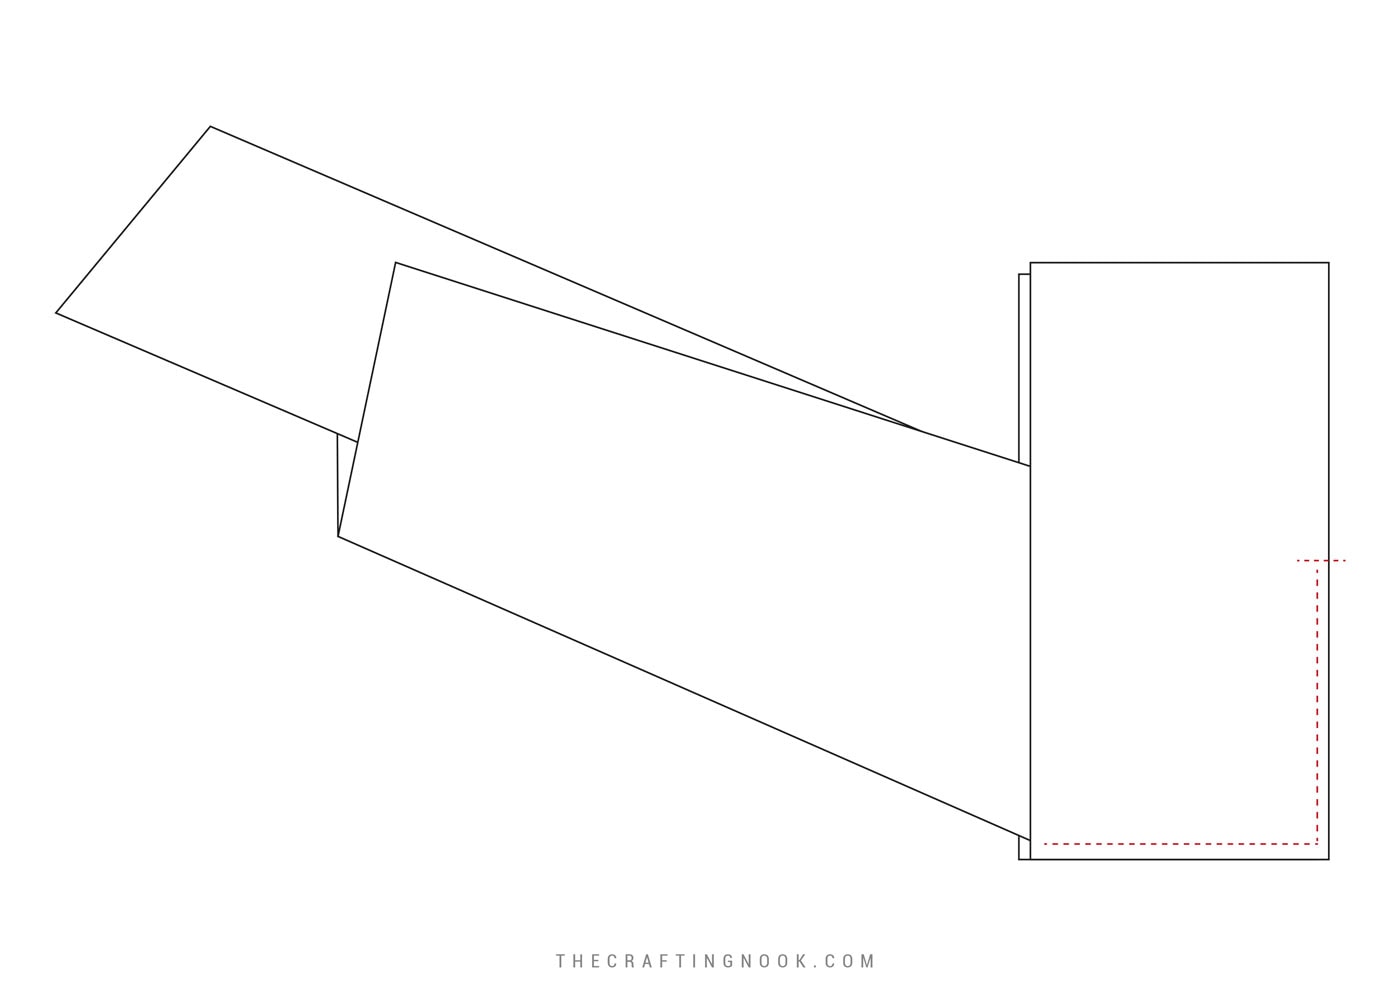
When you hit the side that is supposed to have the cardboard opening, sew only the body with the main fabric and leave the lining fabric out.


The whole fabric from the body will be coming out from the opened side of the base.
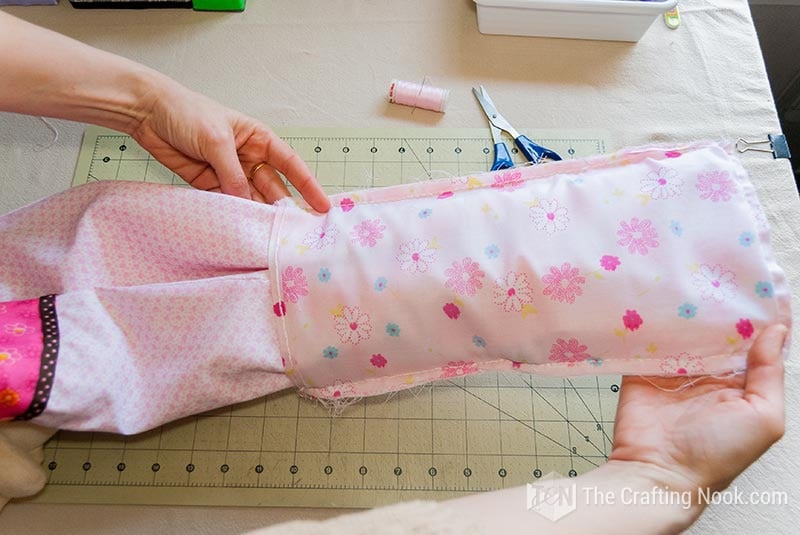
Right there you should be able to turn it inside out.


Then I cut a rectangle of cardboard to the same side of the base and I wrapped it in contact paper so it would last longer.

I inserted it through the opening on the base.

And I made some invisible stitches to secure the opening. But this is totally optional since you might want to remove it to wash the diaper stacker.

The body and base are finished.
Step 4: Assembling The Top.
Apply the interfacing to one top portion piece following the manufacturer’s instructions. This is to make it slightly sturdier than the rest.
Pin the top pieces right sides together. Stitch both sides and the curvy. Do NOT stitch or close the 2 peaks on top because that’s where the hanger ribbon will be serged.
I cut 2 strips of ribbon of about 16 inches each and folded them in half.

Then inserted the folded end of the strip inside the top through the opening we left before until it was about 1/8 inch out.
Stitched several times to reinforce it and be able to handle the weight of all the diaper packs with diapers inside.
Then I turned it inside out and ironed it.
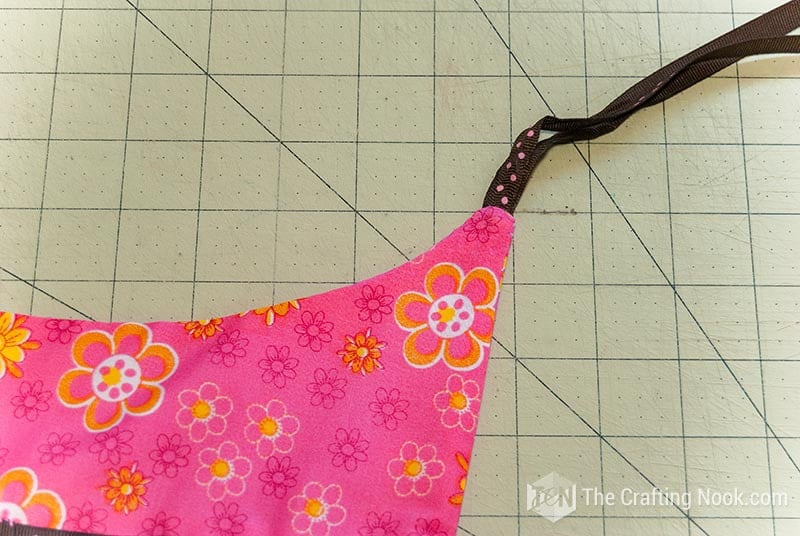
With the iron, I marked the top’s bottom edge hem (only fold mark).
Then make a pleat on each side of the body folding it inward (this is what I did) as a gift bag.

Insert the body through the opening of the top piece about 1/8 inch. Sew diaper stacker top from side to side.

Now the diaper stacker is done.
Just need the embellishments.
Step 5: Adding some Decorations
I stitched the ribbon to the top’s stitches to hide the visible seam. Topstitch along the outer seamed edge only of the ribbon.
I loved it so much that I decided to do the same in the edges of the opening of the diaper stacker.
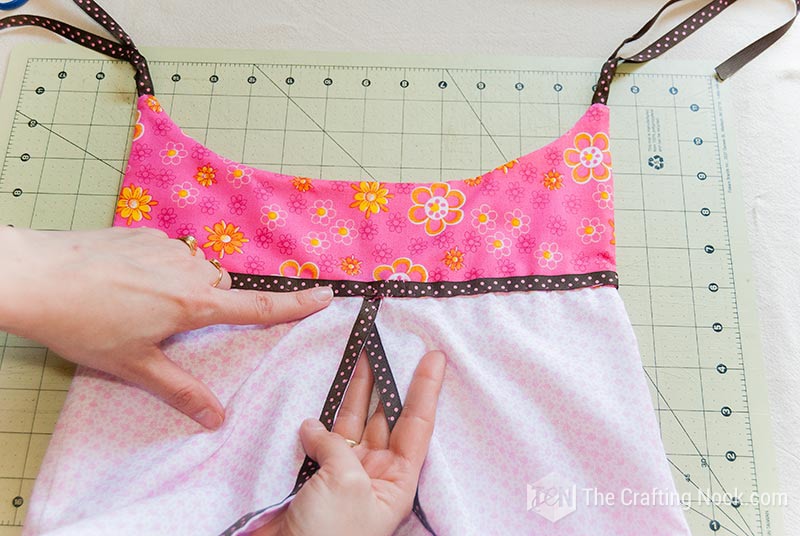
The final touch was a teddy bear stitched to the top of the opening.

What do you think… Isn’t it cute???


To hang it you have 2 options: Hanging it from the crib or from a hanger.
I used a cute and decorated hanger I found in a store. It would have been great if the tiger were a bear but that’s what I found.

I tied the stacker to the hanger with the strips of ribbon. and made a cute bow on both sides.

And here you have it. The Diaper stacker is attached to the hanger.

Done!!!
Not only is it a handy way to keep diapers right where you need them cute fabrics and an applique make it a pretty addition to your nursery decor.
This diaper stacker sewing pattern is a perfect place to store diapers for easy access during diaper changes.

Not sure if all these instructions are clear enough, I’m not a perfect sewer and my English is far from perfect but I wanted to try at least to share it with you. It would have been a lot easier if I would have taken pictures while I was making it but I wasn’t blogging then.
However, you can ask any question you may have in the comments or email me. That’s how my little girl’s bedroom looks now!… I Love it!
Crafting Tips
- Add pockets to the outside of the diaper stacker for storing small items like pacifiers, baby lotion, or diaper cream. These pockets can be made from coordinating fabrics and stitched onto the exterior for added functionality.
- Sew a hidden pocket on the backside of the diaper stacker to store items like emergency cash, spare keys, or a small notebook. This discreet addition can be a lifesaver in unexpected situations.
- Place a scented sachet or pouch filled with dried lavender or chamomile inside the diaper stacker to keep the diapers smelling fresh and to add a calming aroma to the nursery.
- Personalize the diaper stacker even more by adding a monogram or the baby’s initials using fabric appliqué or embroidery. This not only adds a decorative element but also makes it a special keepsake for the family.
- You can also use this diaper stacker as a versatile storage solution and making it suitable for organizing other baby essentials, such as bibs, burp cloths, or small toys. This maximizes its utility and ensures it remains useful as the baby grows.


What do you think? Not bad to be hand-sewed, right???
Frequently Asked Questions
Diaper Stackers are a great way to store your baby’s diapers while adding some design to your nursery. You can make Diaper Stackers in a variety of colors and patterns to match any boy or girl theme for your nursery and can be made to lean on tables or hung on the wall.
This sewing tutorial is great for all levels. It’s easy enough for beginners and super fun and quick to make even if you’re already an expert! This particular tutorial was made sewing by hand but if you have a sewing machine, you can totally use it.
Absolutely! As long as the fabric you choose is washable, your diaper stacker will be totally washable. If you decorated them then follow washing instructions from the material used, or if like in this case, you add the bear make sure you remove it and also remove the cardboard from the base.
More Sewing Projects to Try
If you enjoyed this cute Wall Hanging Diaper Stacker, you might also love these sewing projects for kids too:
✂️ Tutorial

DIY Wall Hanging Diaper Stacker Tutorial
Tools
- Sewing Machine *Optional
Supplies
- Cute fabrics you like in my case I used 3 different fabrics including the lining for the inside of the diaper stacker. Approx. a yard of each
- Interfacing 1/4 yard
- Ribbon approximately 1/2 inch wide.
- embellishment cute details like plush bear, anything you like
- Piece of cardboard.
- Contact paper
- A clothes hanger.
- Matching threads and needle
- Scissors
- Ruler and measuring tape
- Fabric chalk or marker.
Instructions
PREP WORK: THE DIAPER STACKER PATTERN
- Create or download the pattern guide. I’m sharing the free diaper stacker sewing pattern download for you. Just remember that this is for personal use only and no commercial use is allowed.
- Transfer the pattern to the fabric leaving about 1/8 inch on each side for seam allowance.
- The following is basic.
- I cut all my diaper stacker pieces and got ready to start.
SEW THE DIAPER STACKER BODY
- I first sewed the main parts of the body (front, back, and both sides) of both the main fabric and the lining. In my case, it was the same fabric.
- The front pieces should be the first and last to sew as shown in the chart below.
- We need to make this with interior and exterior pieces to build the body.
- Then I put these lining and outer fabric layers right side together and sewed the side edges.
- I turn it inside out and irone it.
ATTACHING THE BODY TO THE BASE
- This part is the tricky one. Use the help of pins.
- On one side of the base, the shorter sides, I left it open to insert a piece of cardboard to give strength to the base and remove it when I want to wash the bag.
- With the base pieces already cut, I took the body of the diaper bag to sew them together.
- Make a hem on one short side of the lining fabric piece.
- Center raw edges of both ends to the base right sides together and pin in place.
- The body would be sandwiched between both fabrics of the base.
- It should look like a sandwich: fabric base-body-lining fabric base.
- Pin in place around the edge of the base. The best way is to let the body corner seams must coincide with the corners of the base.
- Make sure that the opening of the base (lining fabric) goes inside the bag with the lining fabric. These two pieces should be right sides together.
- Start sewing from the middle of the long side of the base where your diaper stacker opening is.
- As you stitch through the corner, move your body fabric away so you don’t accidentally stitch it.
- When you hit the side that is supposed to have the cardboard opening, sew only the body with the main fabric and leave the lining fabric out.
- The whole fabric from the body will be coming out from the opened side of the base.
- Right there you should be able to turn it inside out.
- Then I cut a rectangle of cardboard to the same side of the base and I wrapped it in contact paper so it would last longer.
- I inserted it through the opening on the base.
- And I made some invisible stitches to secure the opening. But this is totally optional since you might want to remove it to wash the diaper stacker.
- The body and base are finished.
ASSEMBLING THE TOP.
- Apply the interfacing to one top portion piece following the manufacturer’s instructions. This is to make it slightly sturdier than the rest.
- Pin the top pieces right sides together. Stitch both sides and the curvy. Do NOT stitch or close the 2 peaks on top because that’s where the hanger ribbon will be serged.
- I cut 2 strips of ribbon of about 16 inches each and folded them in half.
- Then inserted the folded end of the strip inside the top through the opening we left before until it was about 1/8 inch out.
- Stitched several times to reinforce it and be able to handle the weight of all the diaper packs with diapers inside.
- Then I turned it inside out and ironed it.
- With the iron, I marked the top’s bottom edge hem (only fold mark).
- Then make a pleat on each side of the body folding it inward (this is what I did) as a gift bag.
- Insert the body through the opening of the top piece about 1/8 inch. Sew diaper stacker top from side to side.
- Now the diaper stacker is done.
- Just need the embellishments.
DECORATING THE HANGING DIAPER STACKER
- I stitched the ribbon to the top’s stitches to hide the visible seam. Topstitch along the outer seamed edge only of the ribbon.
- I loved it so much that I decided to do the same in the edges of the opening of the diaper stacker.
- The final touch was a teddy bear stitched to the top of the opening.
- What do you think… Isn’t it cute???
- To hang it you have 2 options: Hanging it from the crib or from a hanger.
- And here you have it. The Diaper stacker is attached to the hanger.
Other Diaper Stackers from my favorite bloggers:
- Hanging Diaper Bag by Sew 4 Home.
- DIY T-Shirt Diaper Stacker by 3 Winks Designs.
If you loved this Diaper Stacker tutorial, don’t forget to PIN and share it with friends!

Til’ next time…


FREE WORKBOOK
Keeping your Sweet Home Organized
Learn how to create intentional habits and simple routines to Keep Your Home Organized. Plus freebies, printables, exclusive content, and tips.
Disclaimer: By clicking on the “Yes” button above you are giving me your consent to collect and use your information according to the law and My Policy Privacy. Zero Spam I promise!

beautifully done!
I just finished a diaper stacker for my niece. I saw yours with the ties 1/2 way through and almost did that, but I already had too much work in my topper since I painted the fabric to go with her nursery. Wanted to show you a picture, but don’t see how to do that.
Hi Lisa!!!
Awwww you are so so sweet to stop by and share with me! I would LOVE to see yours. You can now attach the photos here in this mail titicrafty@gmail.com! Who knows I might use your ideas too when I have a second child. LOVE LOVE that you wanted to share your creation with me!!!
Can’t wait!
I just love it Cami!! Fabulous!Thanks for partying with me last week! Can’t wait to party with you again tomorrow evening at The DIY Dreamer… From Dream To Reality!
Woohoooo Christine! So glad you liked it!!! I’m very happy! I’ll be there it is in my weekly schedule!
Thank you so much for stopping by!
Hugs
Cami
Very cute, Camila!! Such a great tutorial too. Thank you for sharing at Simply Create Link Party.
Thank you so much Melissa! It’s always fun linking up with you!!!
Hugs
Cami
Beautiful diaper bag! Thanks for linking at All Things Pretty! You’re one of the features this week! Hope you’ll come back and share again and grab a button.
Yayyyyyy Thankks, it is so cool, I’m Honored!!!. I already linked up my newest creation!
have a lovely week!
Hugs
Cami!
This seems like such a cute idea but the whole thing is in Spanish. Thanks for sharing @ Seasons of a Homemaker. Please share with friends so we can enjoy a big party!!Abbi
Hello Abigail, Thank you so much for stopping by and for hosting such a lovely Party!.
Yes I write some posts in English and some in Spanish I have a very divided audience. I have activated the Google Translator on my blog and I’ve seen is very accurate, not perfect but good enough to understand. Anyway I’m always open to translate when people ask me to. So just let me know and I’d be happy to!
Hope you have a lovely week
Hugs
Cami
Absolutely gorgeous work!love it! Thanks so much for sharing great tutorial!Have a wonderful weekend!Hugs from Portugal
Thank you so much Ana, happy to have you here! It looks so cute on a baby’s bedroom! =D
Have a wonderful week Ana, hope to see you around soon!
Hugs
Cami
Very cute. Visiting from the The Pin Junkie link party.
Jamie
http://www.huckleberrylove.com
Thank you so much Jamie! I’m going your way now!!!
Hugs
Cami