DIY Stenciled Christmas Table Runner Pattern + Cut File
This post may contain affiliate links. Please read our Disclosure Policy.
Learn how to create a festive and super cute table runner with this Stenciled Christmas Table Runner pattern. Let’s get crafty, snag our free cut file and pattern for a jolly touch to your holiday decor!
The holiday season is around the corner, and a great way to make your Christmas dining table look nice is by making your own festive table runner.

Table of Contents
Cute DIY Stenciled Christmas Table Runner Pattern
This project is fun and simple, and it’s great for people who enjoy crafting and want to add a personal touch to their decorations.
You can make this cute holiday table runner with fabric, a silhouette cameo, fabric paint, and freezer paper. It’s easy to do and your guests will be amazed by it.
Now, get a warm cup of chocolate drink, relax, and allow your mind to be creative. This tutorial will show you all the steps to something special that will make your home look even more festive during the holidays
But wait, there’s more. We have a little surprise for you – a free design file that you can download and use as a stencil plus the free pattern. It’s like having someone help you create a beautiful design.

So, get your things ready, put on some festive music, let your imagination run wild, and let’s begin this happy crafting adventure.
How to Make a Stenciled Christmas Table Runner
This cute table runner is a simple project and not hard at all to make. If you don’t have a silhouette Cameo, you can use any kind of Christmas stencil you like.
Supplies:
- 24 x 60 inches of fabric {60 x 150 cm}.
- Freezer paper
- Green fabric paint.
- Gold Sharpie.
- Green satin ribbon.
- Snap buttons.
Tools:
- Sewing machine
- Cutting machine – Silhouette Cameo or Cricut.
- Ruller
- Fabric erasable marker or chalk
- Scissors and/or rotary cutter
- Home iron
Instructions:
1. Firstly and most importantly wash your fabric before starting this project. Your fabric could shrink.
2. Once dry, iron it, and let’s get to work.
3. Cut your fabric to the right measurements following the below pattern design.
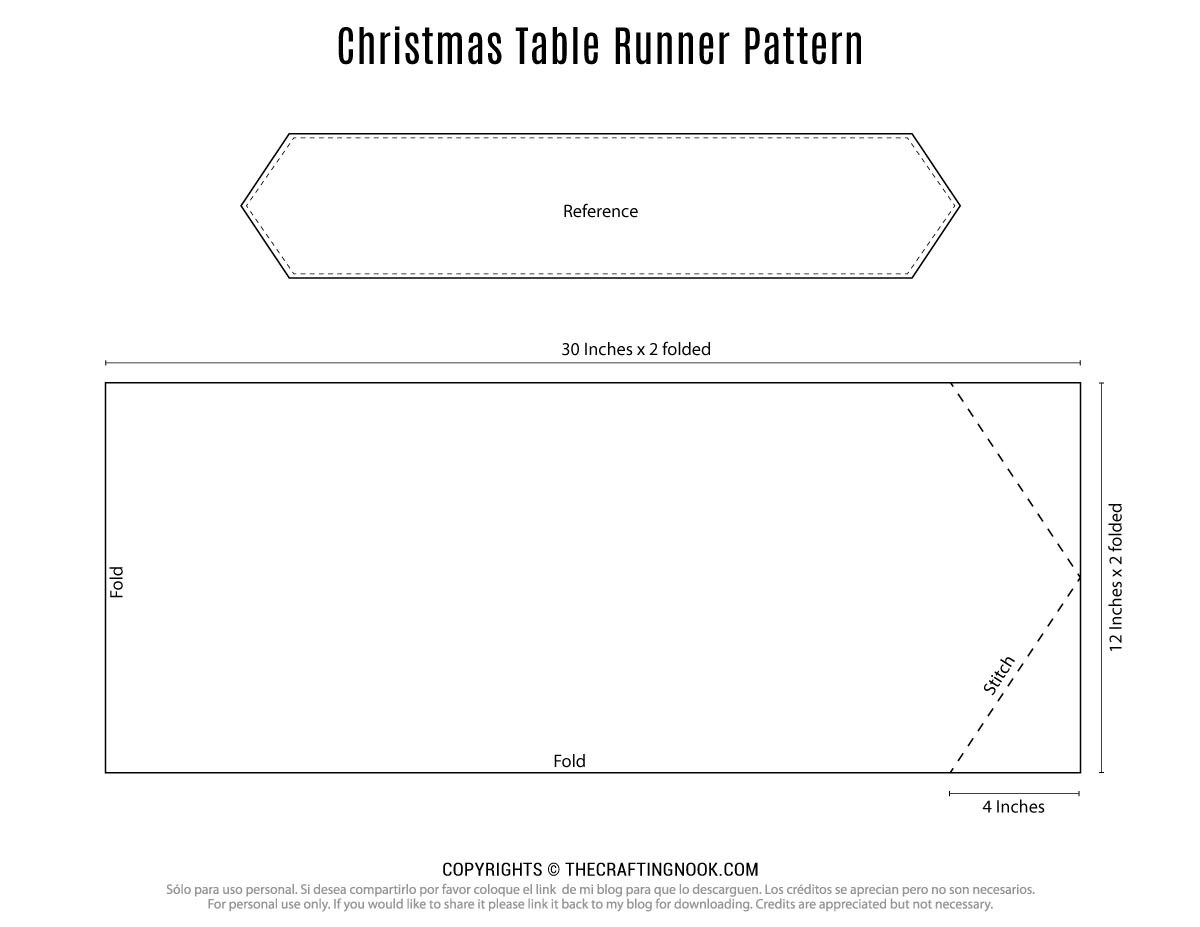
You can snag the Free Christmas Table Runner Pattern HERE
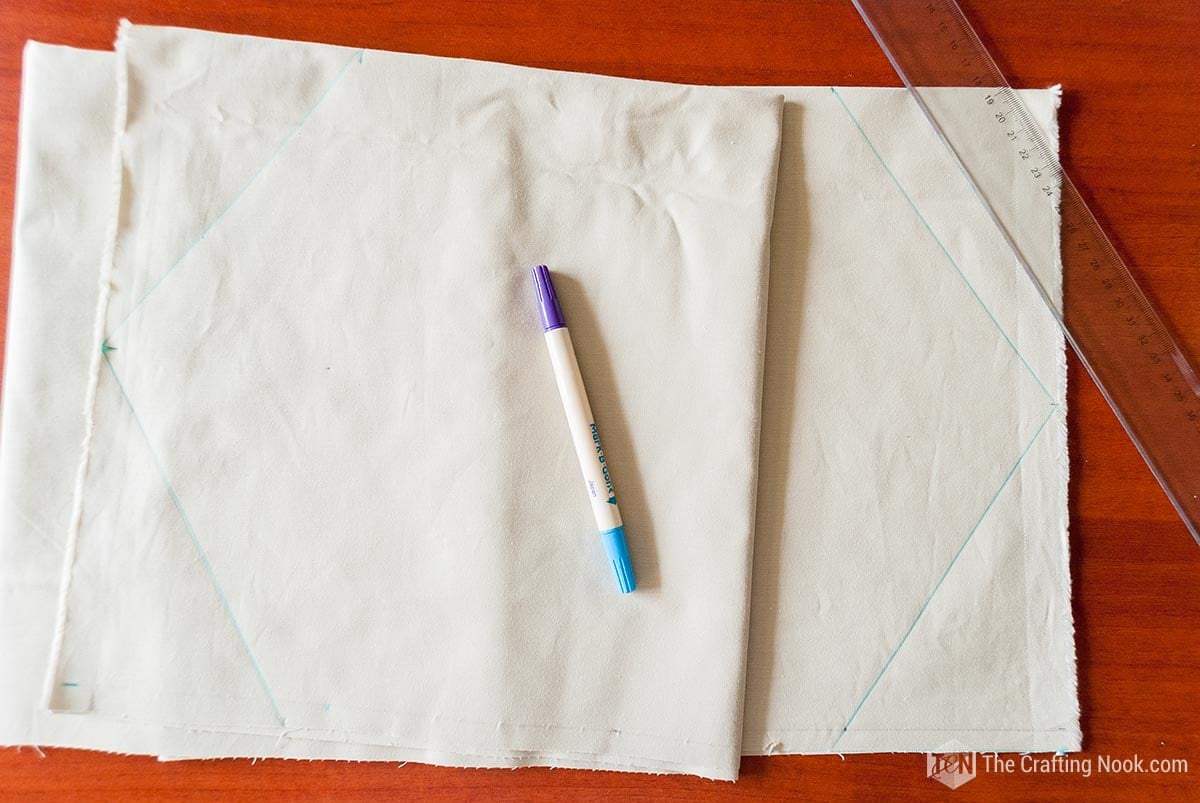
4. Fold the fabric in half lengthwise.

5. Draw a triangle shape to the end of the fabric on both ends.
5. Measure 4 inches from the edge on both sides and draw a line to the center of the short edge.
6. Before cutting the fabric, let’s paint our Christmas tree decor.
7. I made this cute curvy Christmas tree design in Silhouette Studio that you can snag down below.
8. Set the size you want the design to be. I decided to use almost the whole area of my silhouette mat.
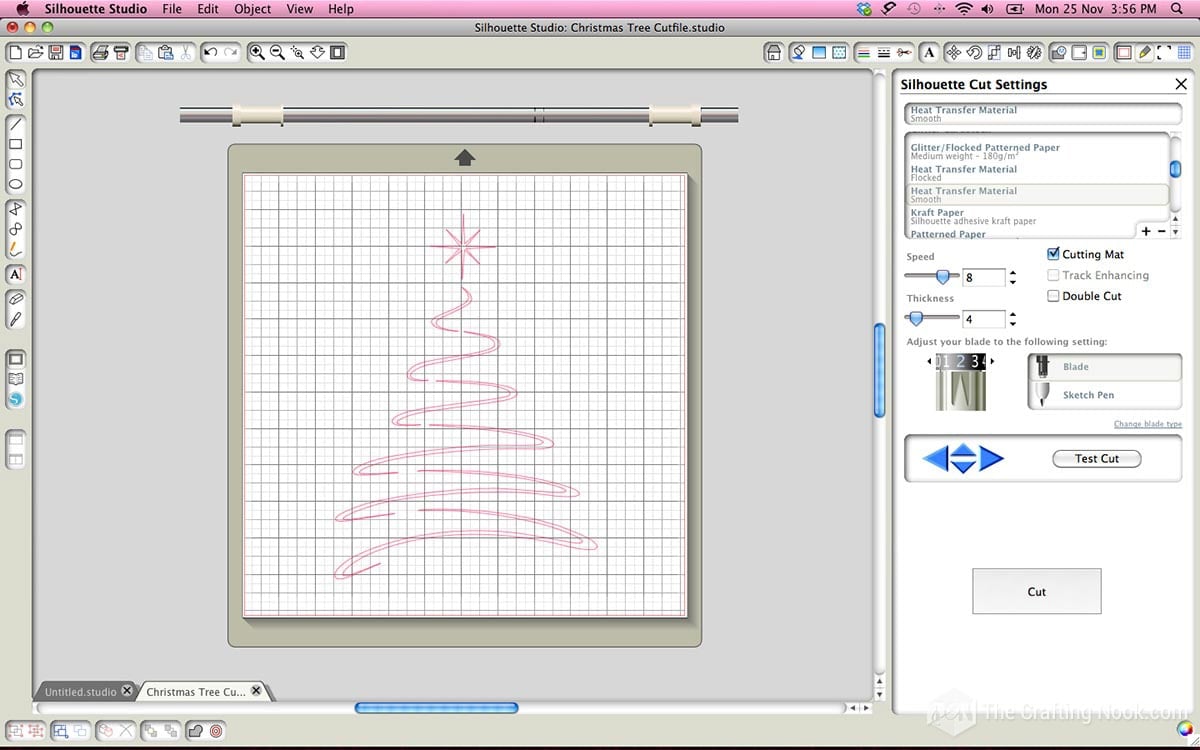
You can get the Cut free File HERE.
9. Choose your cutting machine settings. You can use either plain paper or heat transfer material. Both will cut well freezer paper.
10. Cut 2 12×12 pieces of freezer paper and place one at a time on the sticky mat with the wax side facing up.
10. Load your mat to the cutting machine and send it to cut.
IMPORTANT NOTE: For this particular design you don’t need to mirror the image because it doesn’t make any difference. BUT if you decide to add text to it then don’t forget to mirror your design before sending it to cut.
11. Once the design has been cut, weed out the inner pieces of the Christmas tree and star.
12. Remove the freezer paper stencil from the mat and load the second piece and send it to cut.
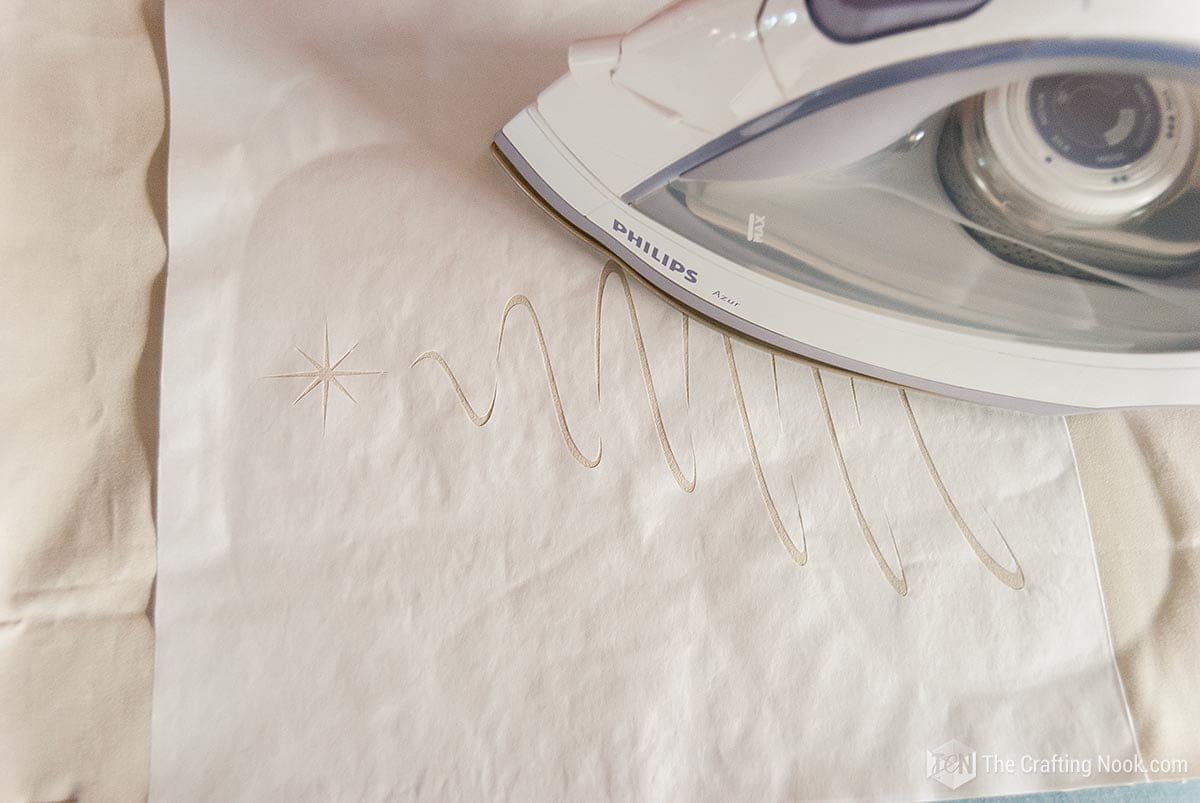
13. Once you have both stencils, place them over the fabric with the wax side facing the fabric on both short ends of the table runner.
14. Make sure you leave enough space from the drawing lines so you don’t sew over the design later.
15. Iron on your freezer paper stencils at high temperature (no steam) pressing hard until you see it well-adhered.
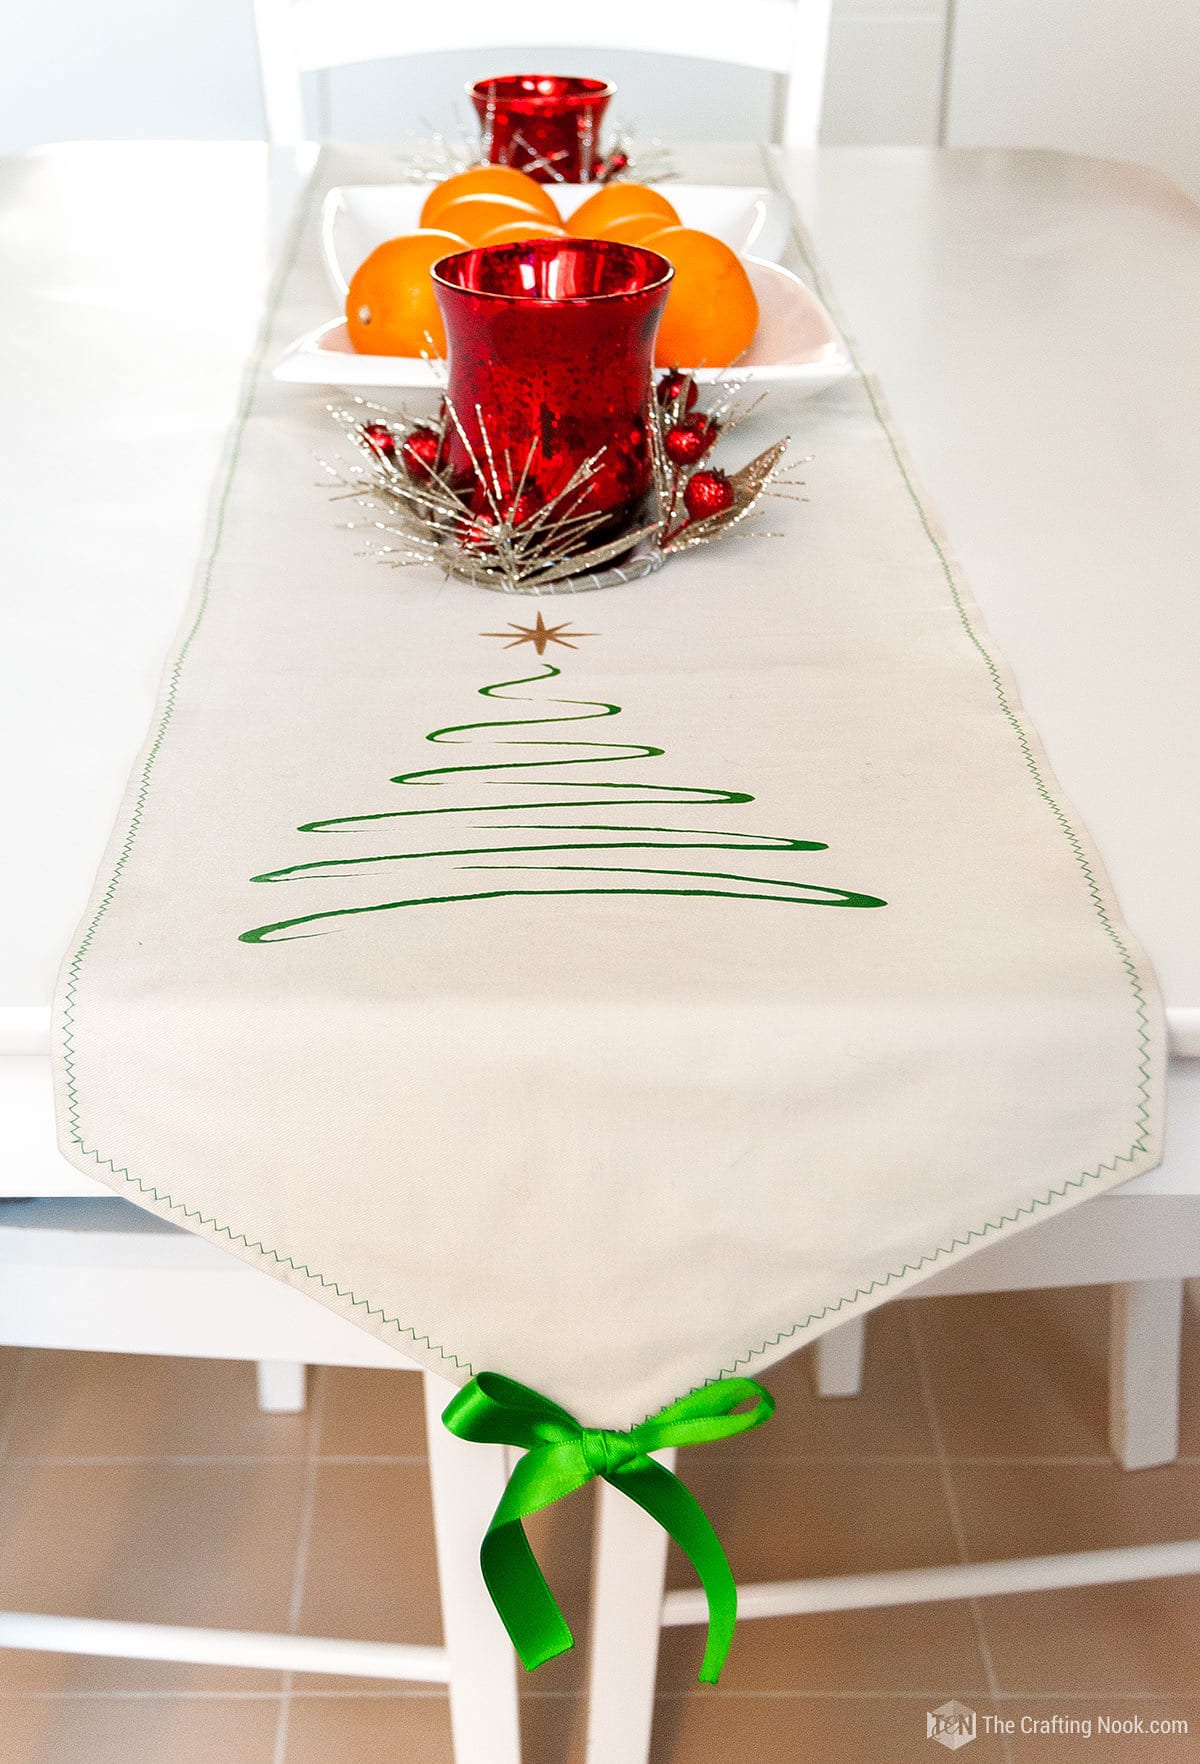
16. Paint the design. I painted green the tree and yellow the star.
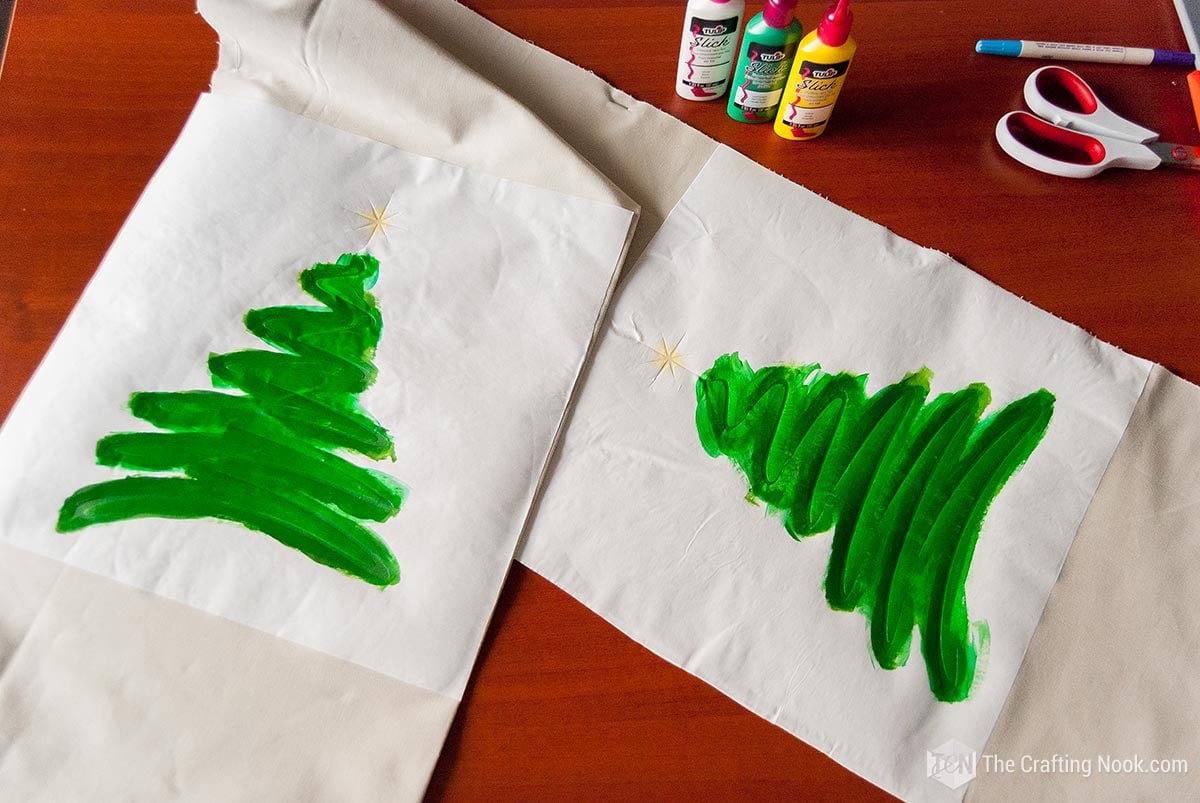
17. Let it dry for 30 minutes and peel the freezer paper off carefully.
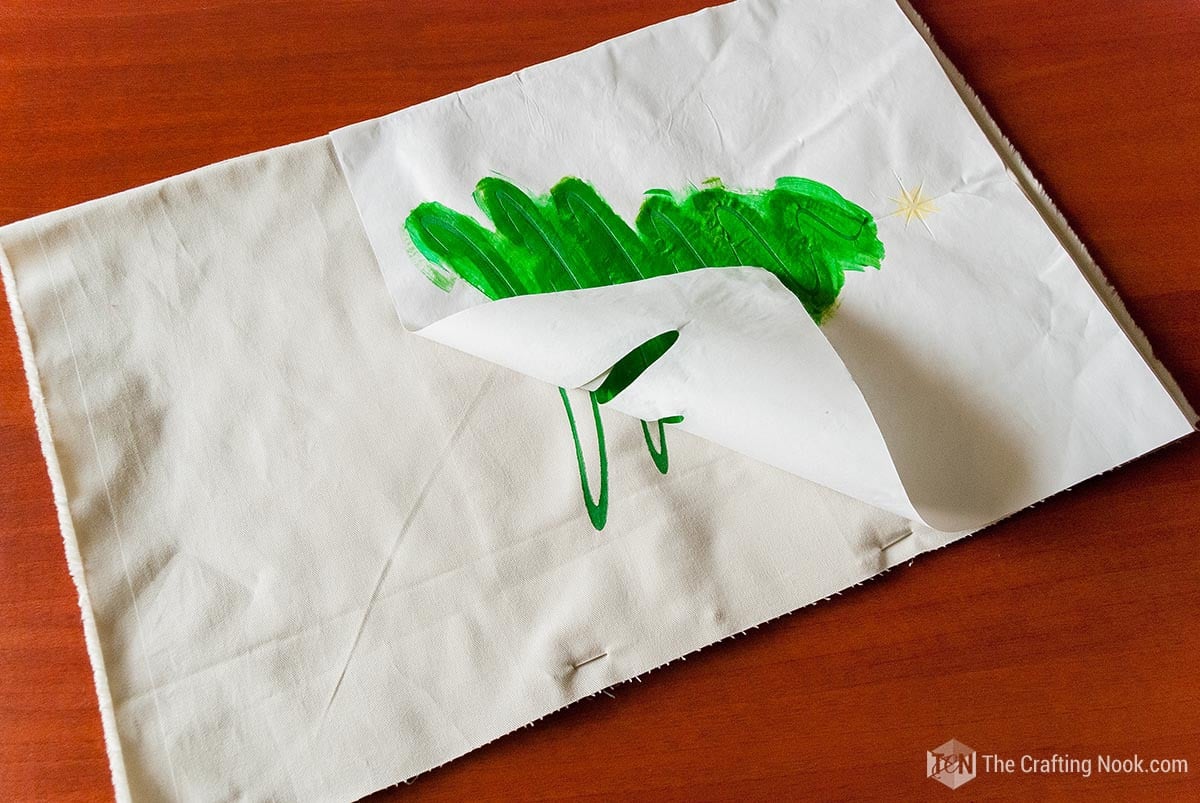
18. Let it dry completely for a couple of hours. Fabric paint tends to dry fast but since we are sewing letter is best to make sure the paint is really dry.
19. When the design is dry place a sheet of parchment paper and iron the design to lock the paint on the fabric.
20. There you have it! A cute Christmas tree design on your soon-to-be table runner!

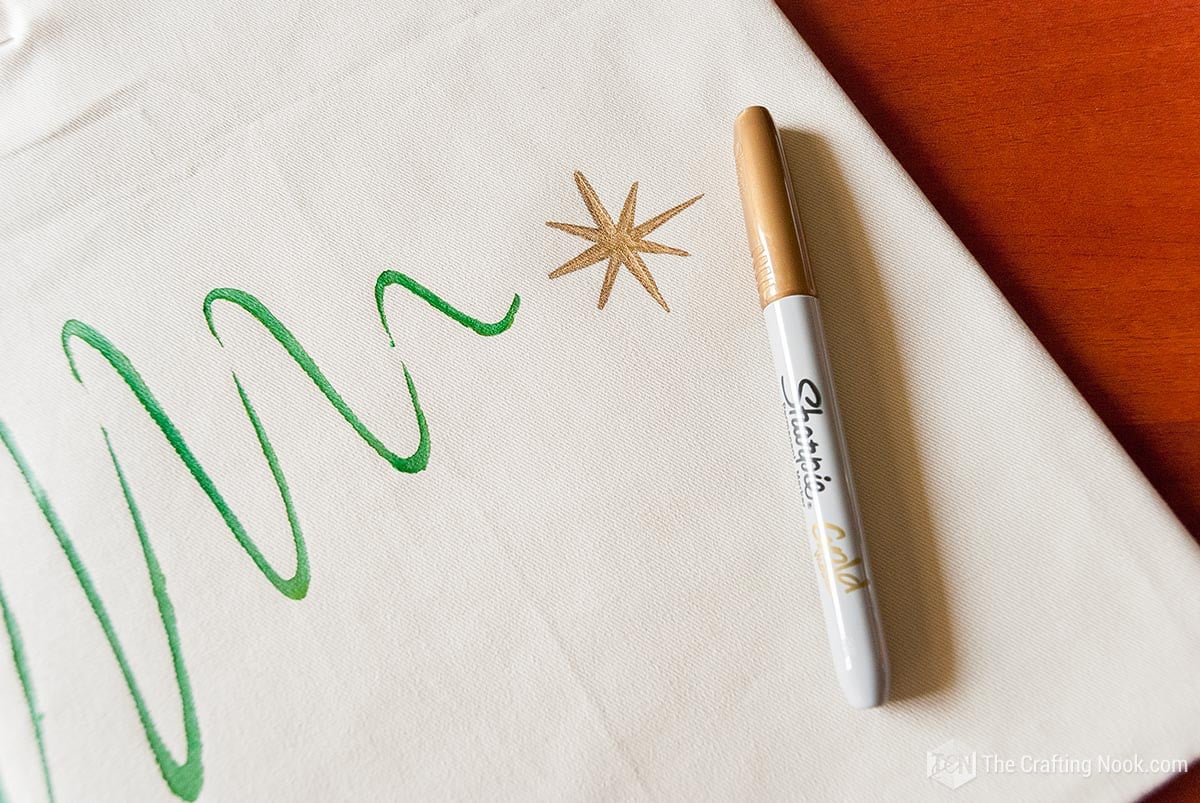
21. As you can see, in my case, my stars failed because the yellow paint was not strong enough. But there’s a fix, if this happens to you. Use a gold Sharpie and paint the star. It ended up looking even better.
22. Now let’s sew.
23. Place the fabric’s right sides together following the traced line of the triangles and the long side leaving about 3-4 inches open to turn it over.
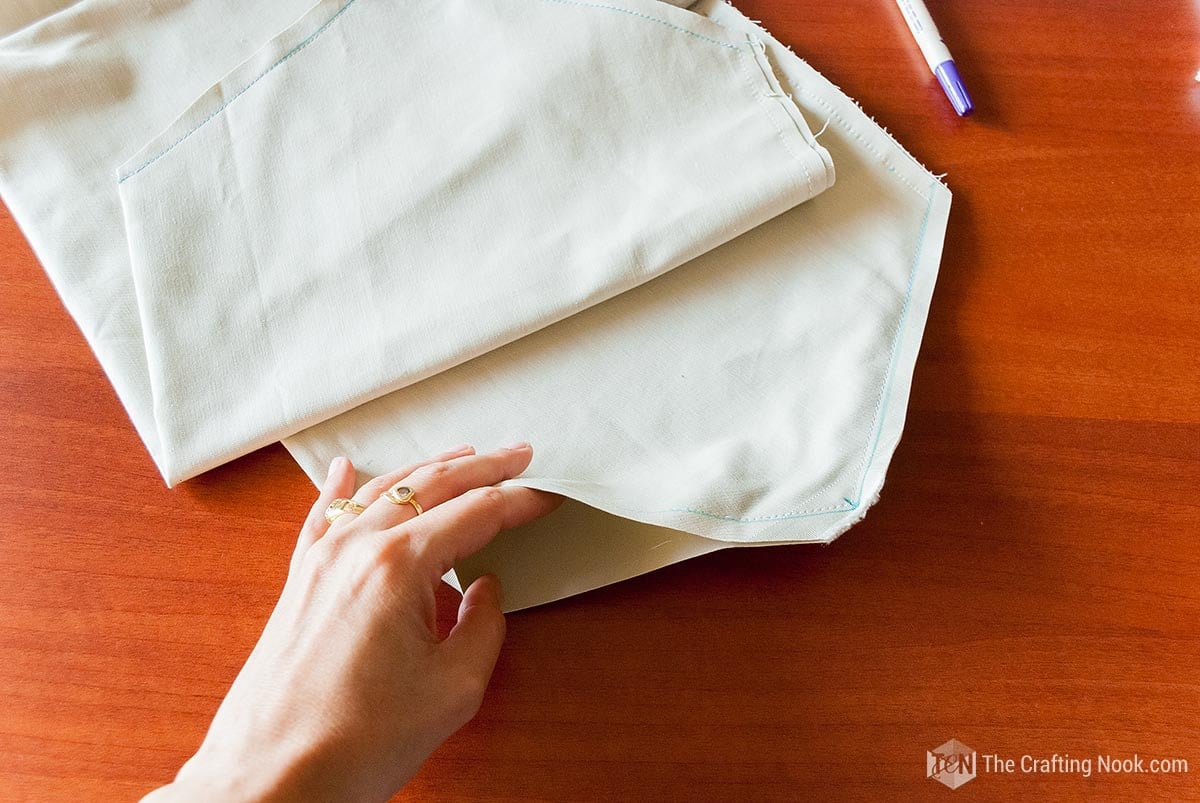
24. Turn the table runner inside out and iron it to get rid of creases,
25. Fold the edges of the opened pag like this:

26. Stitch the table runner all along the edges with a zig-zag stitch using a green thread to match the tree.
27. Now you have the table runner almost ready.


28. The final touch is a removable ribbon bow.

29. Make 2 cute ribbon bows and make some stitches on the back of the bows to avoid ruining them with use.
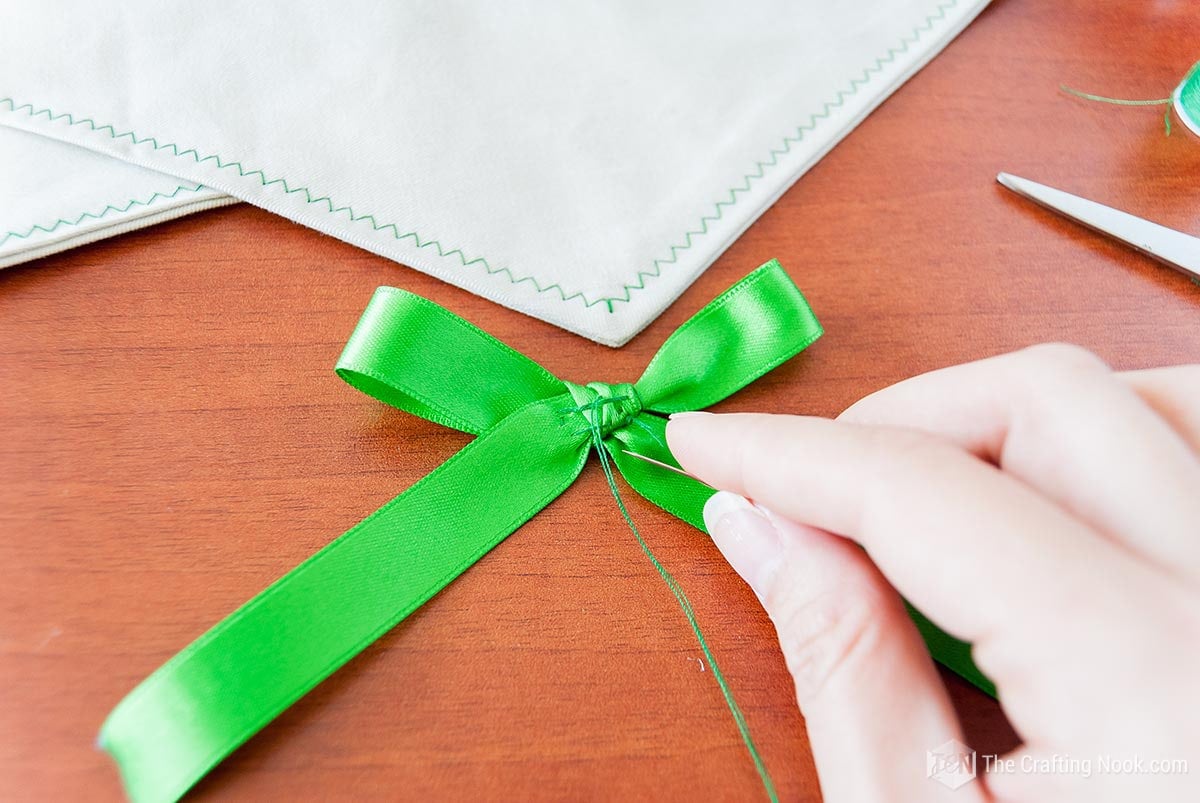
30. Then sew the snap buttons.

32. One part on the bow and the other on the tip of the table runner and join them!

33. Snap the bw in place and look how cute!!!
34. Remove the bows every time you are going to wash the table runner.

35. Tadaaaaaa. There you have it!!! A simple but super cute Christmas table runner!
Crafting Tips
- Make sure the cutting mat is clean before putting the freezer paper on it. This helps make sure that the cut is even and accurate, stopping any tears or mistakes in your stencil.
- Try cutting a piece of scrap paper before cutting the freezer paper. It’s a good idea to test it out first. This lets you adjust your blade settings and make sure the cut is right, so you don’t waste freezer paper.
- To paint, move the brush gently up and down in a dabbing motion, like when you dab a sponge on something. Instead of brushing the paint across the stencil, try using a sponge or stencil brush to dab the paint on. This method helps to make sure that paint doesn’t get outside the edges of the stencil and keeps your design looking neat and tidy.
- Before you start your stenciling project, it is important to wash and iron your fabric to get rid of any dirt or wrinkles. This helps get rid of any extra material or folds that might get in the way of the stenciling process and makes sure the surface is flat and neat for your design.
- After you finish making your design with stencils, use heat to make sure the fabric paint stays. You can find how to do this in the instructions from the manufacturer. This usually means using an iron to make sure the paint on the fabric stays vibrant and lasts a long time. Heat-setting helps the paint stick better to the fabric, making it stronger and able to withstand washing.
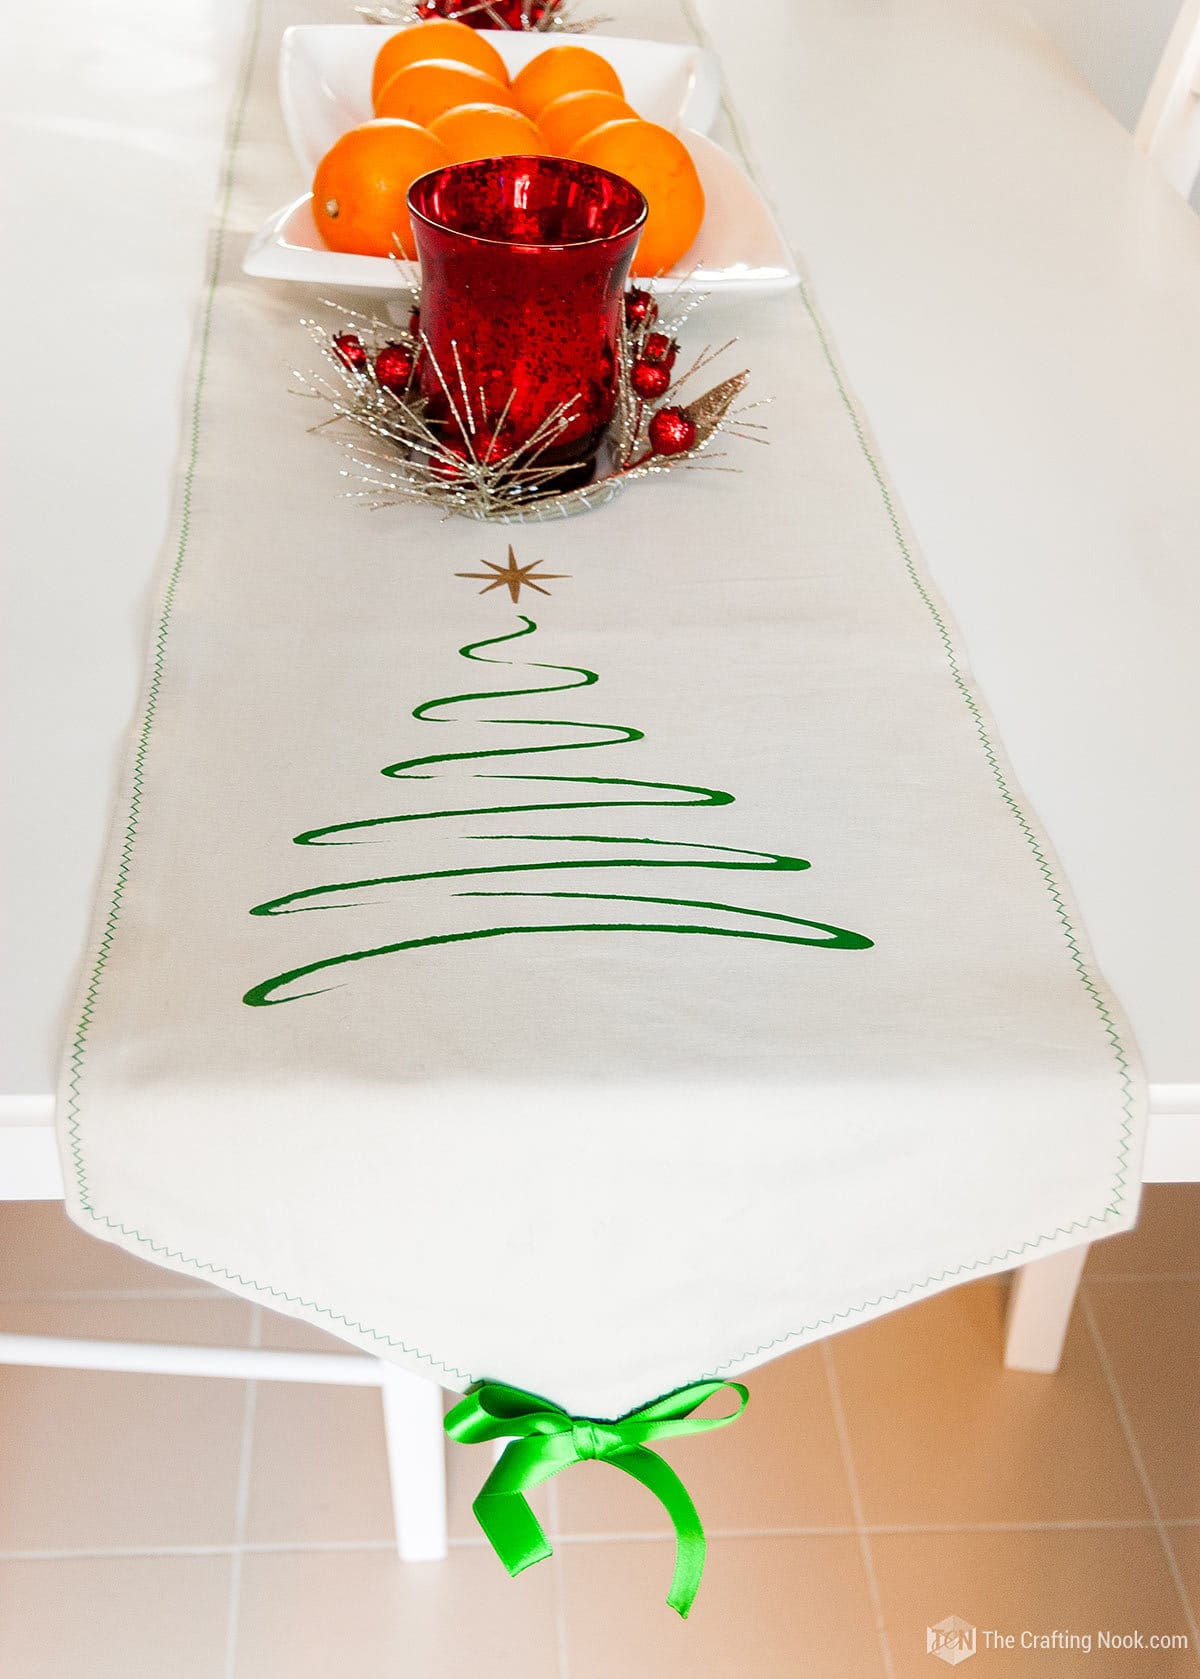


What do you think about this beautiful table runner??? How does it look on our table???
Frequently Asked Questions
Nope This project is meant to be enjoyable and easy for people who like to do crafts, no matter how skilled they are. With a silhouette cameo machine, sewing machine and a free cut file, along with some basic materials, you can easily make a lovely table runner without requiring expert crafting abilities.
One option is not adding any painted design. Another is buying pre-made stencils on your local craft store and lastly, you can buy adhesive stencils in shops like Etsy sometimes even custom designs.
Yes, of course. While the rustic fabric is what I used but you can choose any fabric that you like and goes well with your holiday decorations. Make sure the fabric is good for stenciling and can handle fabric paint without the colors spreading or smearing.
Well, this design is free to download here in this tutorial. However, you can find free cut files for stencils in various places online. Crafting websites, blogs, and communities often offer a wide range of free cut files for different projects, including Christmas-themed designs. Simply search for “free Christmas table runner cut file” to find options that suit your style.
Absolutely, just make sure to follow the instructions of the fabric paint manufacturer for washing and taking care of it. Making the fabric paint heat-resistant, as mentioned before, helps it become easier to wash and more long-lasting. Make sure to read and follow the instructions for the fabric paint you are using to get the best outcomes.
More Christmas Projects to Try
If you enjoyed this DIY Christmas Table Runner pattern tutorial, you might also love these other Christmas project ideas too:


✂️ Tutorial

DIY Stenciled Christmas Table Runner Pattern + Cut File
Tools
- Sewing Machine
- Cutting Machine – Silhouette Cameo or Cricut
- Ruller
- Fabric erasable marker or chalk
- scissors
- Home iron
Supplies
- 24 x 55 inches of fabric {60 x 140 cm}.
- Green fabric paint.
- Gold Sharpie.
- Green satin ribbon.
- Snap buttons.
- Freezer paper
Instructions
- Firstly and most importantly wash your fabric before starting this project. Your fabric could shrink.
- Once dry, iron it, and let’s get to work.
- Cut your fabric to the right measurements.
- Fold the fabric in half lengthwise.
- Draw a triangle shape to the end of the fabric on both ends.
- Measure 4 inches from the edge on both sides and draw a line to the center of the short edge.
- Before cutting the fabric, let’s paint our Christmas tree decor.
- I made this cute curvy Christmas tree design in Silhouette Studio. You can get the Cut free File HERE.
- Set the size you want the design to be. I decided to use almost the whole area of my silhouette mat.
- Choose your cutting machine settings. You can use either plain paper or heat transfer material. Both will cut well freezer paper.
- Cut 2 12×12 pieces of freezer paper and place one at a time on the sticky mat with the wax side facing up.
- Load your mat to the cutting machine and send it to cut.
- Once the design has been cut, weed out the inner pieces of the Christmas tree and star.
- Remove the freezer paper stencil from the mat and load the second piece and send it to cut.
- Once you have both stencils, place them over the fabric with the wax side facing the fabric on both short ends of the table runner.
- Make sure you leave enough space from the drawing lines so you don’t sew over the design later.
- Iron on your freezer paper stencils at high temperature (no steam) pressing hard until you see it well-adhered.
- Paint the design. I painted green the tree and yellow the star.
- Let it dry for 30 minutes and peel the freezer paper off carefully.
- Let it dry completely for a couple of hours. Fabric paint tends to dry fast but since we are sewing letter is best to make sure the paint is really dry.
- When the design is dry place a sheet of parchment paper and iron the design to lock the paint on the fabric.
- There you have it! A cute Christmas tree design on your soon-to-be table runner!
- As you can see, in my case, my stars failed because the yellow paint was not strong enough. But there’s a fix, if this happens to you. Use a gold Sharpie and paint the star. It ended up looking even better.
- Now let’s sew.
- Place the fabric’s right sides together following the traced line of the triangles and the long side leaving about 3-4 inches open to turn it over.
- Turn the table runner inside out and iron it to get rid of creases,
- Fold the edges of the opened gap
- Stitch the table runner all along the edges with a zig-zag stitch using a green thread to match the tree.
- Now you have the table runner almost ready.
- The final touch is a removable ribbon bow.
- Make 2 cute ribbon bows and make some stitches on the back of the bows to avoid ruining them with use.
- Then sew the snap buttons.
- One part on the bow and the other on the tip of the table runner and join them!
- Snap the bw in place and look how cute!!!
- Remove the bows every time you are going to wash the table runner.
- Tadaaaaaa. There you have it!!! A simple but super cute Christmas table runner!
Notes
Share and PIN ME!!!

Til’ next time…


FREE WORKBOOK
Keeping your Sweet Home Organized
Learn how to create intentional habits and simple routines to Keep Your Home Organized. Plus freebies, printables, exclusive content, and tips.
Disclaimer: By clicking on the “Yes” button above you are giving me your consent to collect and use your information according to the law and My Policy Privacy. Zero Spam I promise!