DIY Paper Cut Snowman Shadow Box
Create your own adorable DIY Paper Cut Snowman Shadow Box with this super easy and fun tutorial. Perfect for a festive touch to your winter decor!
I’m so super excited about Christmas this year. Maybe it’s because I’m getting on it early so I get to share with you my creations and I get to enjoy Christmas decorations longer.

Table of Contents
Christmas Paper Cut Snowman Shadow Box
Not sure if you might remember but I made back when I was starting blogging some cute layered Christmas cards that I truly adored and I thought it would be fun to make one of them as a 3D Snowman Framed Christmas Art with Some “real snow” in it! I must confess I’m so excited about how it turned out!
This post may contain affiliate links. Please read our Disclosure Policy.
This is a super cute and easy craft to make and kids love it. My girl always asks me to shake it and she always laughs about it LOL. Not sure what she finds so amusing but if she loves it and is happy I’m happy!
This project is another step closer to having my holiday Season Mantel ready! I’m really close!!! So stay tuned to see how it turned out!

How to Make a Paper Cut Snowman Shadow Box
Before we begin, be sure to follow us on Pinterest, Facebook, Instagram, and YouTube, and also sign up for our email list (at the end of this post), so you’ll never miss a post!
Supplies:
- A squared 3D or Shadow box frame – I used one from Ikea named Ribba
- This fun Shadow box designs Printable Templates
- Styrofoam balls or faux snow
- Thick heavy-duty foam double-sided adhesive tape
- Lots of love!
Tools:
- Scissors and/or craft knife
- Ruler
- Optionally, a cutting machine like a Silhouette machine or Cricut but it’s not a must.

Instructions:
1. First start by printing the backing art and the layering pieces sheet.
It is critical that you print both sheets with the exact same proportions otherwise they won’t match, For example, if the backing fits the page at 98%, then the second needs to fit at 98%.
I’m sharing 2 sets of printables, one at 12×12 and another one adapted to letter size. You can choose the one you like best.


You can snag your free snowman shadow box printable templates HERE
*Please keep in mind that these free printable digital files are for personal use only and no commercial use is allowed.
2. Use heavyweight cardstock to print the arts, if it’s matte coated even better because the colors turn out amazing.
3. Once you got them printed, cut the backing to fit into the frame.
4. Then cut all your snowman pieces.

If you have a cutting machine, you can always use the print and cut feature for this. I didn’t do it to show that anyone can make this kind of craft and still have lots of fun!
5. Then cut pieces of foam double-sided tape. Since I wanted more separation between layers I doubled each piece of the tape.

6. Stick the layer as precisely as possible on top of the first layer.

7. Then add the second and third layers (or more if it’s the case) again as precisely as possible so it looks like only one layer when looking at it from the front.
It doesn’t have to be perfect just so you can’t see parts of the previous layer.

8. Set the design aside.
9. Get your shadow box frame and remove the backing and the passepartout.
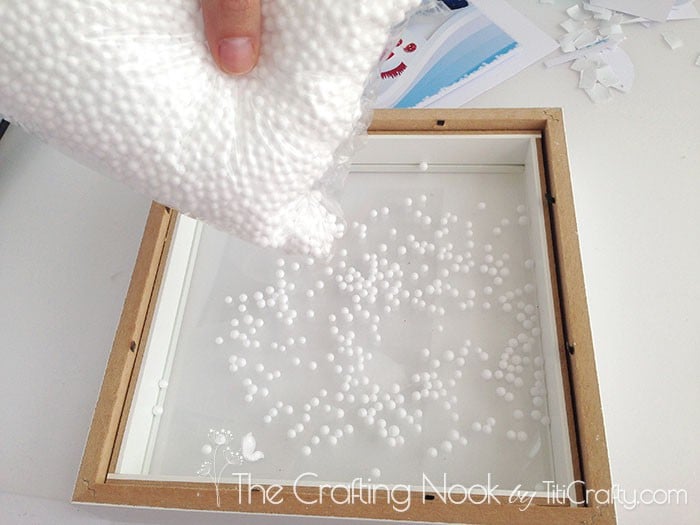
10. Then add a small amount of styrofoam balls or faux snow inside the frame. Not too much, it would take a bit of trial and error to see how much you need depending on the size of your frame.
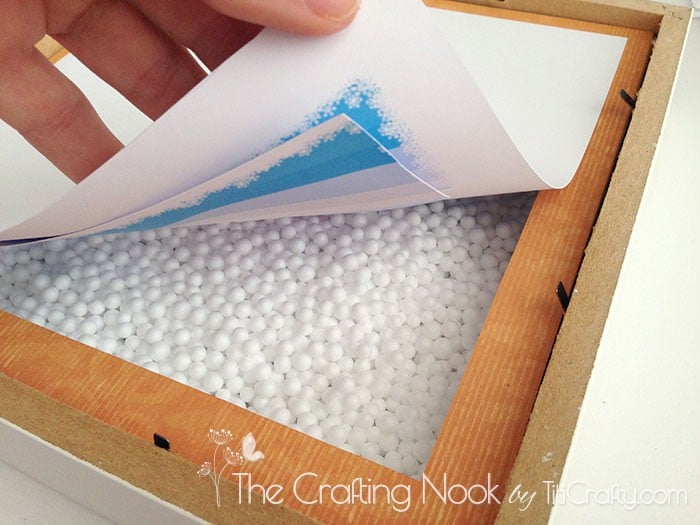
11. Make a thinner passe-partout with white cardstock and place it right before the art. This is optional.
12. Now, place your layered snowman art facing down the glass on top of the faux snow and the custom passe-partout.
13. Close the frame back.

There you go!!!

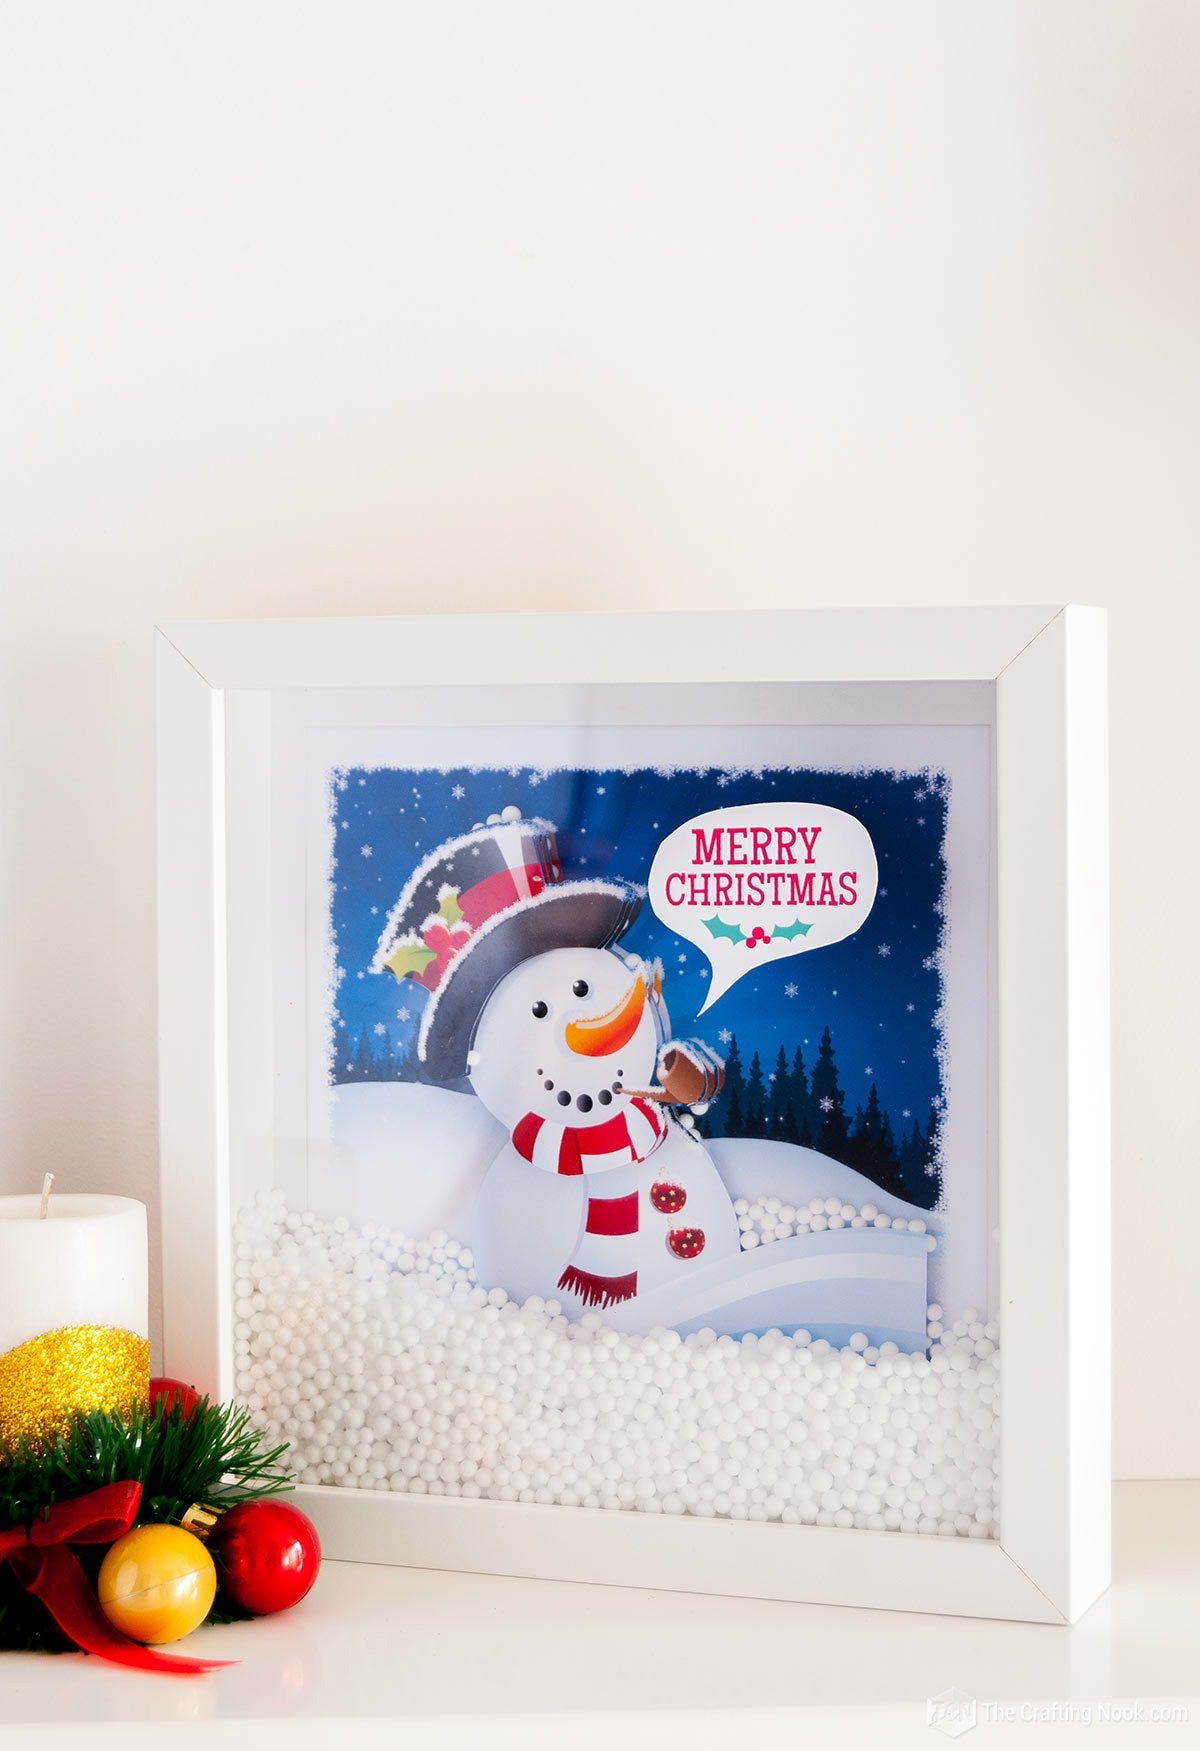
14. Shake your shadow box a little bit so all the faux snow goes down to the base. Some will get stuck around the layers which makes it so much prettier.

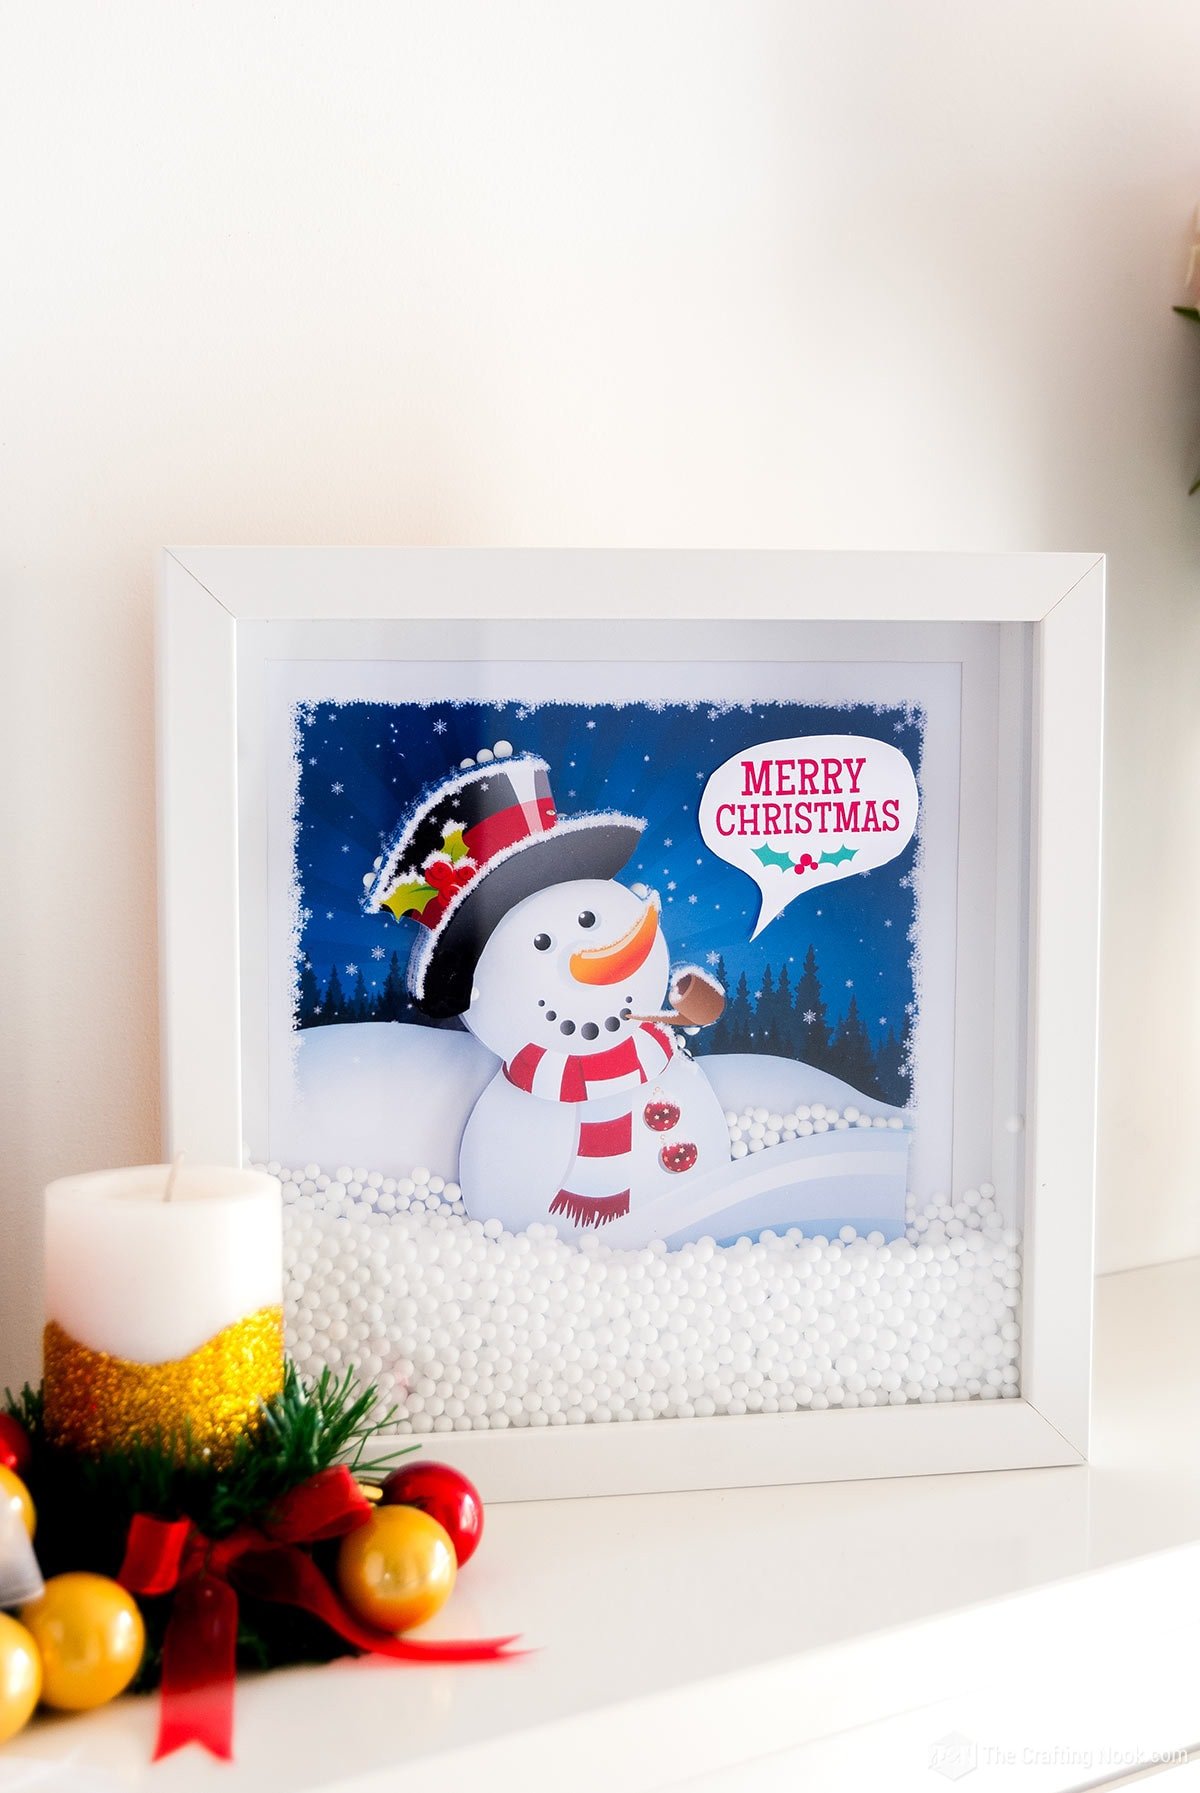
15. The final touch was adding a Merry Christmas Tag on the outside of the glass. This step is completely optional I just happened to have this one.
That’s it! Your cool and fun 3D DIY Paper Cut Snowman Shadow Box is ready to rock!!!
Crafting Tips
- Try using different types of frames instead of sticking to the usual ones. Check out secondhand stores or reuse old picture frames to make your snowman shadow box look unique and different.
- If you have steady hands, to get neat and accurate cuts on the cardstock, use a craft knife that is sharp and has a new blade. If your blade gets dull, change it so your project stays good quality.
- Make the snow look better: Put some shiny glitter or small white beads on the fake snow to make it sparkle and have more depth. It will make your snowman come alive.
- Add more things to your snowman like small snowflakes, little pom-poms, or even a tiny scarf. These small things will make your shadow box even more attractive.
- Choose good quality cardstock: Buy thicker cardstock to make a stronger shadow box. It will last longer and make your project look better.
- Customize with names or messages: Make it more special by including specific names, quotes, or messages as part of the design. It’s a special and original present.
- You could even use LED lights. Put small LED lights inside the shadow box for a beautiful effect. These lights will make the scene brighter and more interesting, particularly in a room that is not well-lit.

What do you think???? Have you made a layered Snowman Shadow Box before? Do you like this one? Let me know your thoughts in the comments!
Customization and Personalization
You can add personal touches to the shadow box by cutting out names, quotes, or messages from thick paper and including them in the design. It makes the gift even more special and one-of-a-kind.
Why not add some brightness by adding LED lights inside the shadow box to make it look very magical? You can put little LED lights on the back of the frame or place them in certain spots in the design to make it look nice and glowy.
Frequently Asked Questions
A strong and thick type of cardstock if you want it to last. Find cardstock that is somewhat thick and high-quality, around 65-80 pounds (176-216 grams per square meter). This will make sure it stays sturdy and fits well in the frame.
Fake snow or man-made snowflakes can be used to make things look like they’re covered in snow. Gently scatter them over the background or cutouts before putting the shadow box together.
You can choose any frame that matches your personal taste and is the right depth for your shadow box. You could use a deep-set frame or a shadow box frame to fit the layered design. Thrift stores or online shops have different types of frames to choose from. Mine was Ikea Ribba’s frame.
Absolutely! You can be creative and add things like sparkles, little beads, small snowflakes, or even small items like a mini scarf or hat to make the snowman look better.
It is important to use sharp scissors or a sharp craft knife with a new blade for neat cuts. Ensure that you use a cutting mat and proceed slowly while cutting on the lines of the snowman design.
More Christmas Projects to Try
If you enjoyed this Paper Cut Snowman Shadow Box tutorial, you might also love these other Christmas project ideas too:


✂️ Tutorial

DIY Paper Cut Snowman Shadow Box
Tools
- Scissors and/or craft knife
- Ruler
- Optionally, a cutting machine like a Silhouette machine or Cricut but it’s not a must.
Supplies
- A squared 3D or Shadow box frame – I used one from Ikea named Ribba
- This fun Shadow box designs Printable Templates
- Styrofoam balls or faux snow
- Thick heavy-duty foam double-sided adhesive tape
- Lots of love!
Instructions
- First start by printing the backing art and the layering pieces sheet.
- It is critical that you print both sheets with the exact same proportions otherwise they won’t match, For example, if the backing fits the page at 98%, then the second needs to fit at 98%.
- I’m sharing 2 sets of printables, one at 12×12 and another one adapted to letter size. You can choose the one you like best.
- *Please keep in mind that these free printable digital files are for personal use only and no commercial use is allowed.
- Use heavyweight cardstock to print the arts, if it’s matte coated even better because the colors turn out amazing.
- Once you got them printed, cut the backing to fit into the frame.
- Then cut all your snowman pieces.
- If you have a cutting machine, you can always use the print and cut feature for this. I didn’t do it to show that anyone can make this kind of craft and still have lots of fun!
- Then cut pieces of foam double-sided tape. Since I wanted more separation between layers I doubled each piece of the tape.
- Stick the layer as precisely as possible on top of the first layer.
- Then add the second and third layers (or more if it’s the case) again as precisely as possible so it looks like only one layer when looking at it from the front.
- It doesn’t have to be perfect just so you can’t see parts of the previous layer.
- Set the design aside.
- Get your shadow box frame and remove the backing and the passepartout.
- Then add a small amount of styrofoam balls or faux snow inside the frame. Not too much, it would take a bit of trial and error to see how much you need depending on the size of your frame.
- Make a thinner passe-partout with white cardstock and place it right before the art. This is optional.
- Now, place your layered snowman art facing down the glass on top of the faux snow and the custom passe-partout.
- Close the frame back.
- Shake your shadow box a little bit so all the faux snow goes down to the base. Some will get stuck around the layers which makes it so much prettier.
- The final touch was adding a Merry Christmas Tag on the outside of the glass. This step is completely optional I just happened to have this one.
- That’s it! Your cool and fun 3D DIY Paper Cut Snowman Shadow Box is ready to rock!!!
Share and PIN ME!!!

Til’ next time…


FREE WORKBOOK
Keeping your Sweet Home Organized
Learn how to create intentional habits and simple routines to Keep Your Home Organized. Plus freebies, printables, exclusive content, and tips.
Disclaimer: By clicking on the “Yes” button above you are giving me your consent to collect and use your information according to the law and My Policy Privacy. Zero Spam I promise!