DIY Snow Globe Christmas Ornament for Memory Keepsake
This post may contain affiliate links. Please read our Disclosure Policy.
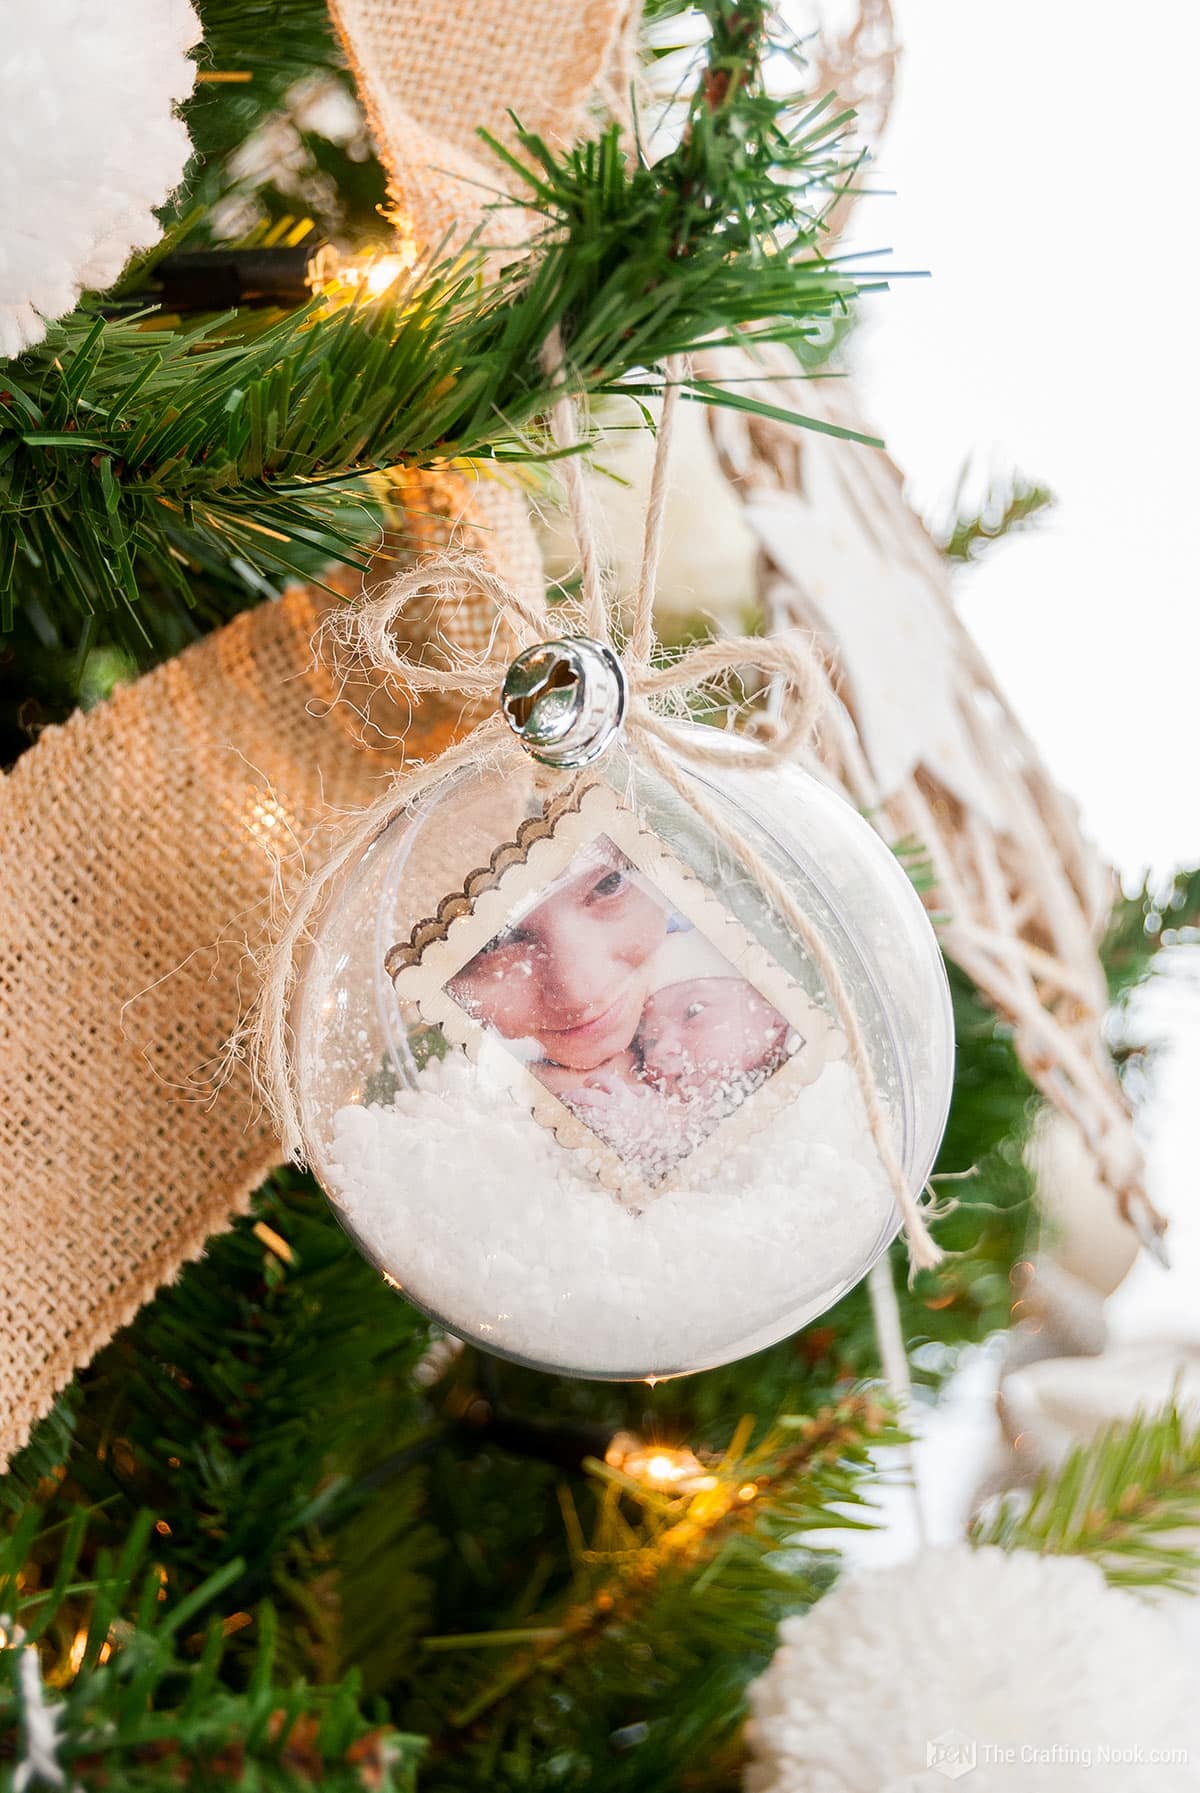
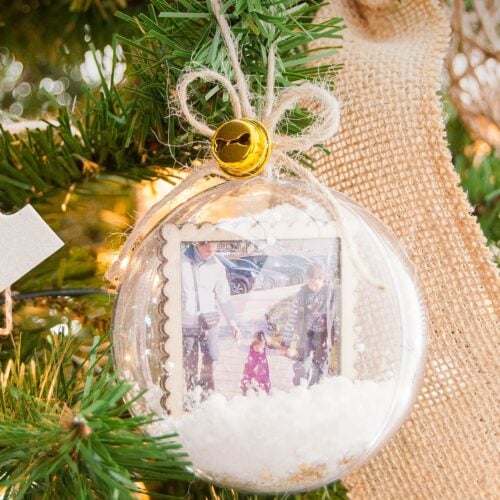
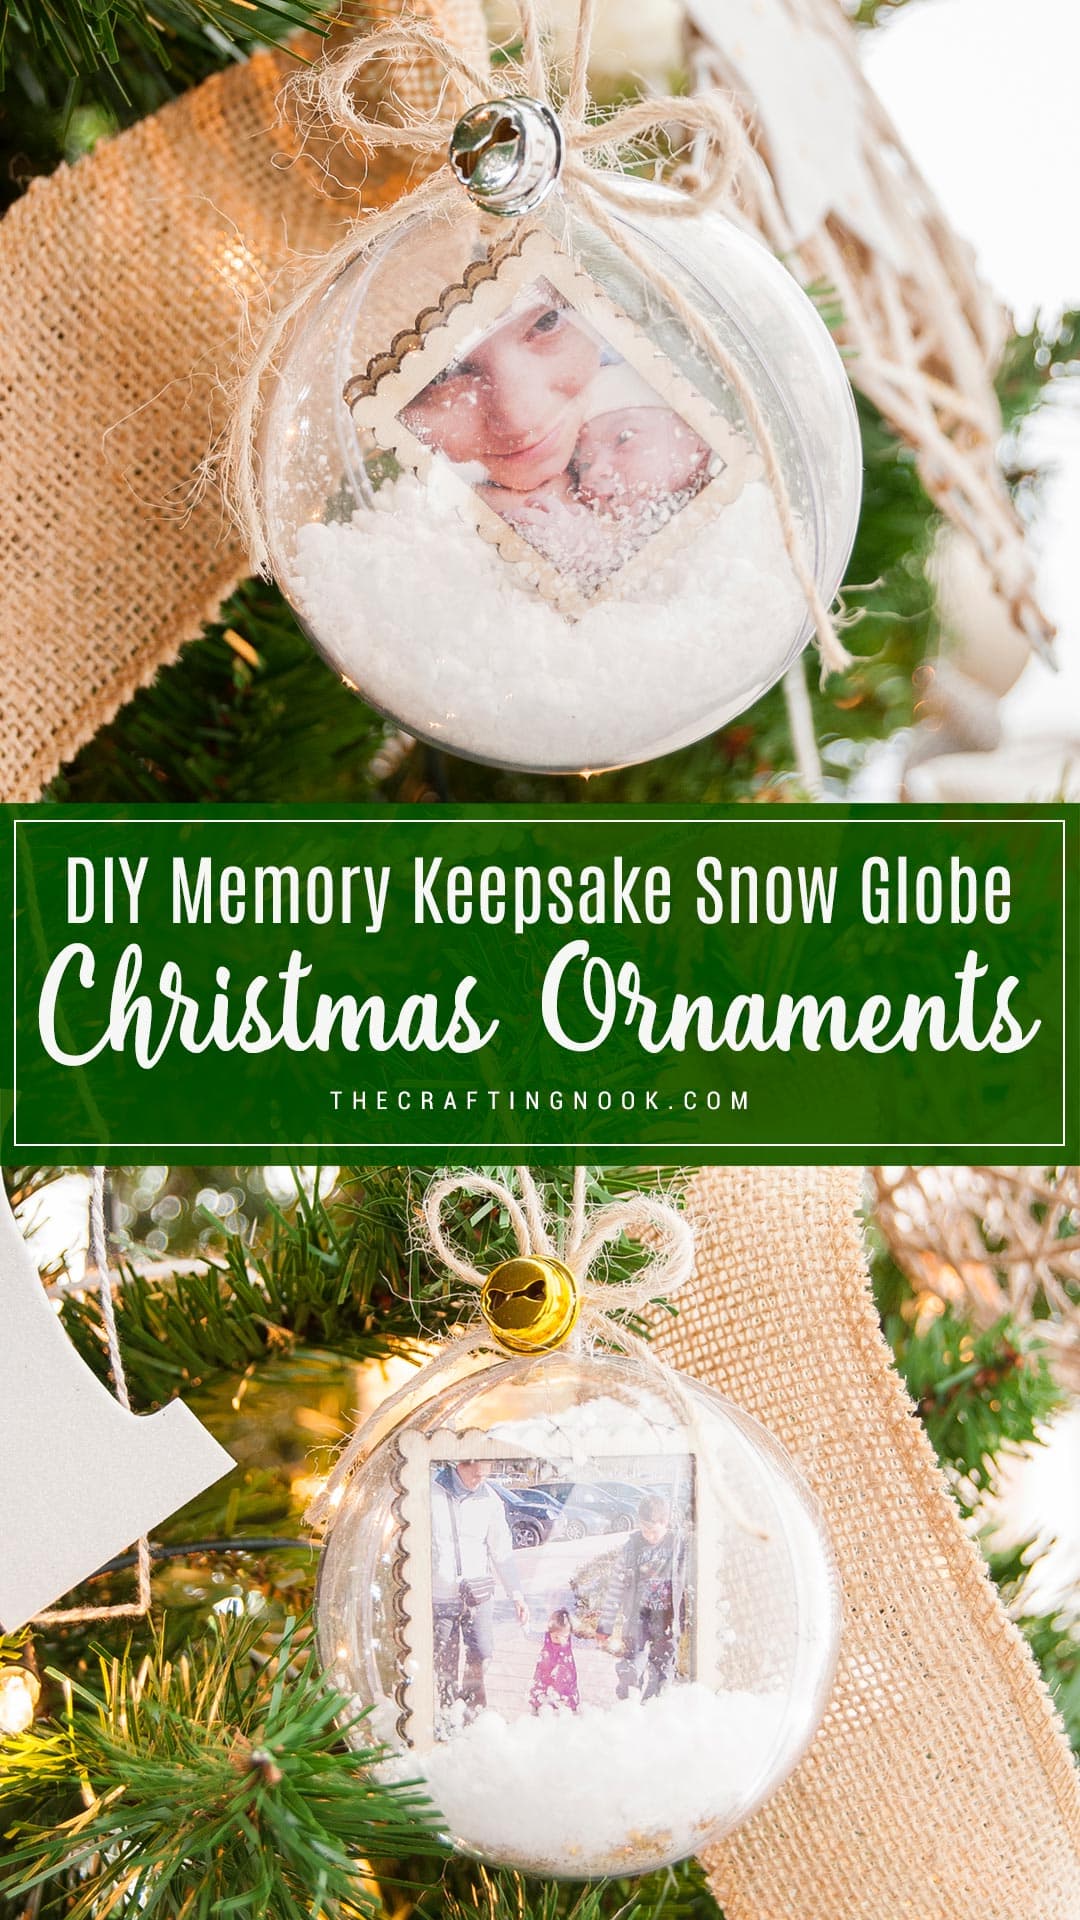
This DIY snow globe Christmas ornament is a simple way to turn a photo into a meaningful keepsake. I made it with a clear fillable ornament and faux snow, and it’s a personal decoration you can hang on the tree year after year or give as a thoughtful gift.
This project is especially popular for preserving memories, celebrating milestones, or creating a Christmas ornament that feels personal instead of disposable.

Table of Contents
How to make a Snow Globe Christmas Ornament
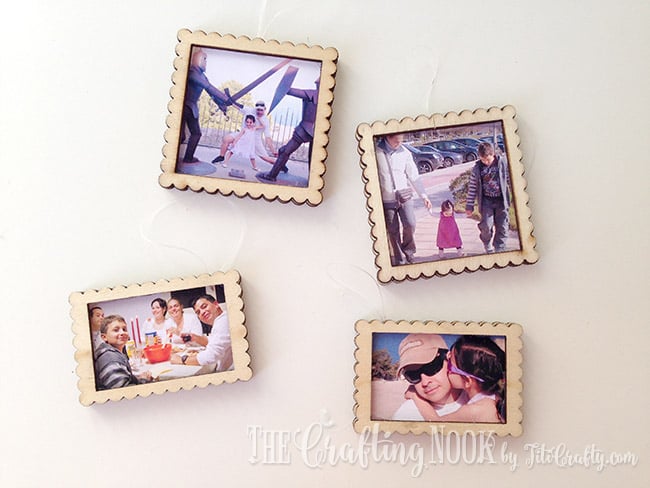
I wanted our Christmas tree to include real family memories instead of just decorative ornaments. That’s what led me to create these DIY snow globe ornaments using small photos from meaningful moments in our lives.
Each ornament holds a photo inside a clear globe, turning it into a simple keepsake you can hang on the tree year after year.

Hope you enjoy these keepsake ornaments and get inspired to make some with your own special moments and memories.
Supplies:
- Faux snow – to make it look like a winter wonderland scene.
- Christmas Jingle bells
- Clear plastic ornament {those that open in half size of your choice, I used 3 inches ornaments}
- Printed photos
- White Glitter {snow-like and gold}
- Twine
- Wooden mini frames {usually scrapbook supplies and make sure fit into the crystal balls}
- Clear elastic Nylon.
Tools:
- Hot Glue Gun and glue sticks
- Scissors and craft knife

Instructions:
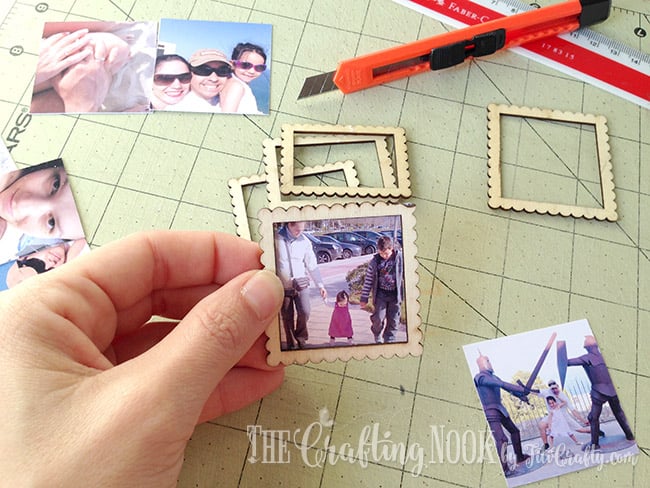
Step 1: Making the Inner Frames
Cut your photos to fit inside the mini frames, testing the size as you go.
Once the photos are ready, apply hot glue to the frame and glue the photo face down.
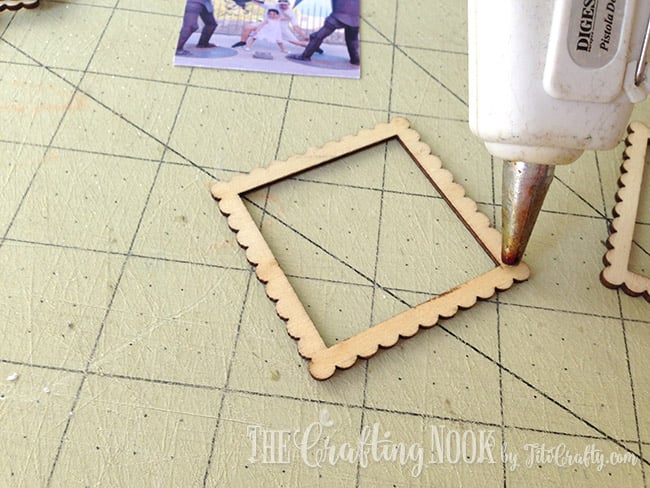

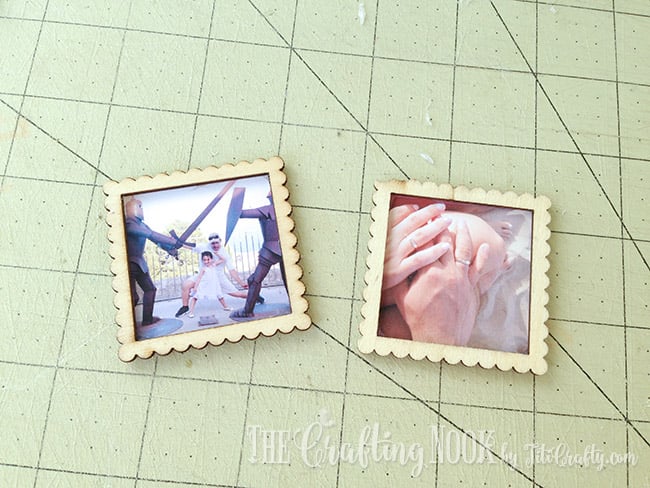
Repeat this on both frames so each photo is sealed between the front and back.
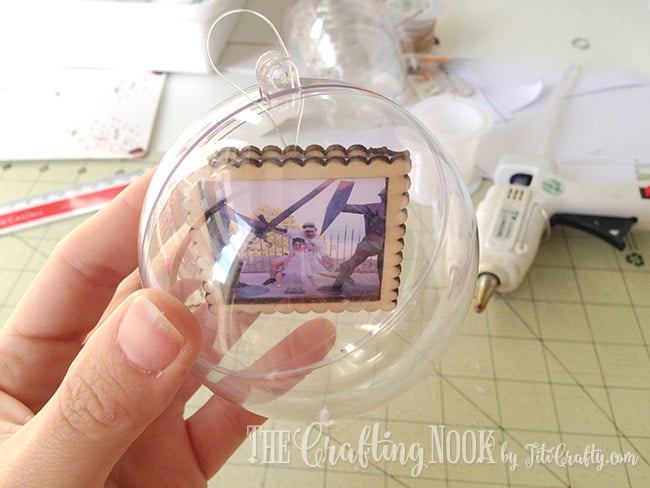
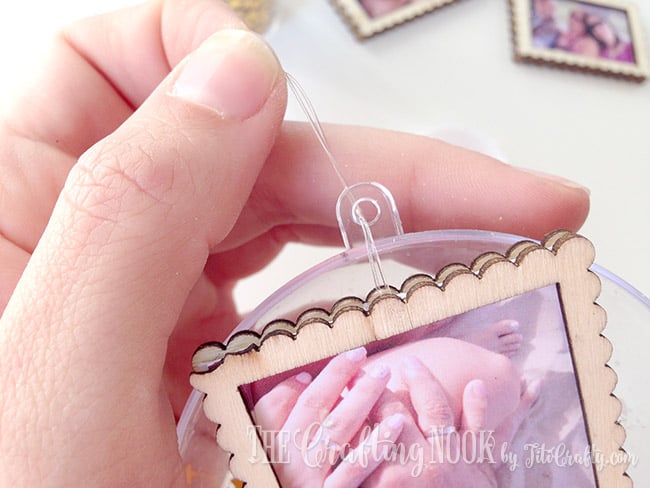
Cut a small strip of clear nylon thread, about 2 inches long.
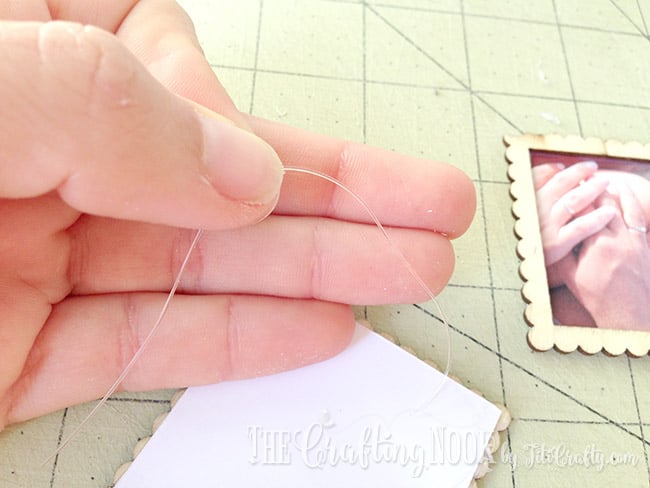
Glue the nylon thread to the back of one of the frames.

Apply hot glue to the back of the frame and photo, then glue it to the second frame to seal everything together.
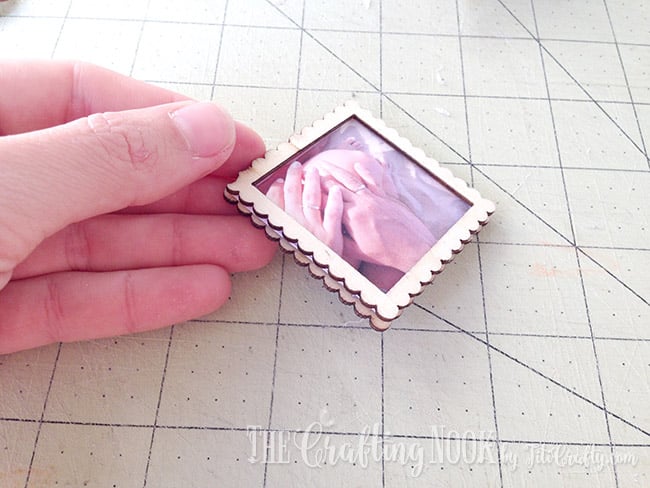
Double-check that the finished frame fits inside the clear ornament before moving on.
Repeat this process with the remaining photos and frames.

Step 2: Assembling the Snow Globe Ornament
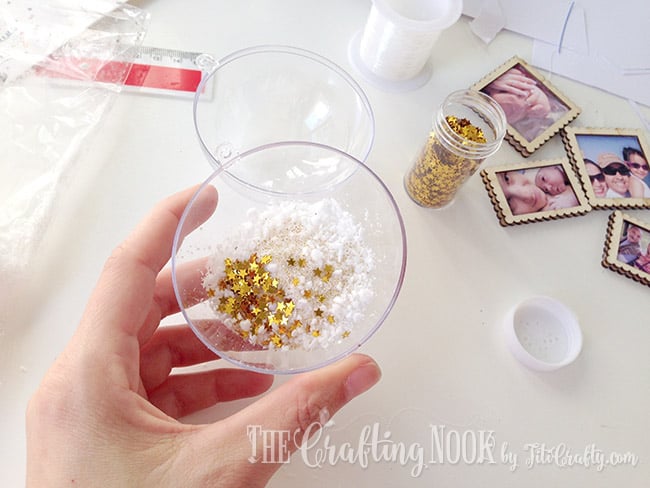
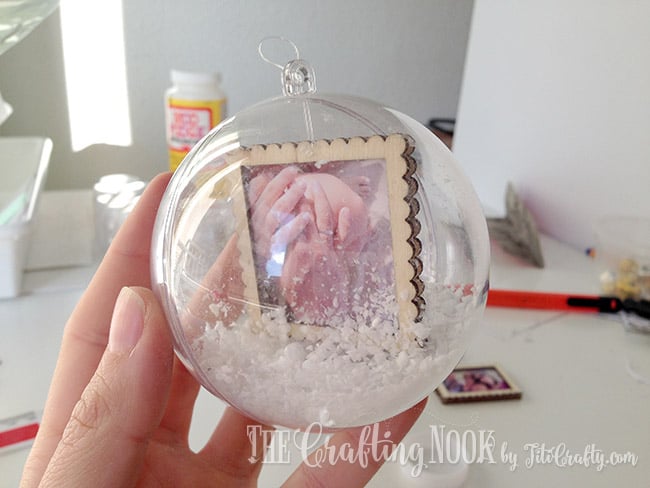
Pour a small amount of faux snow into one half of the clear ornament.
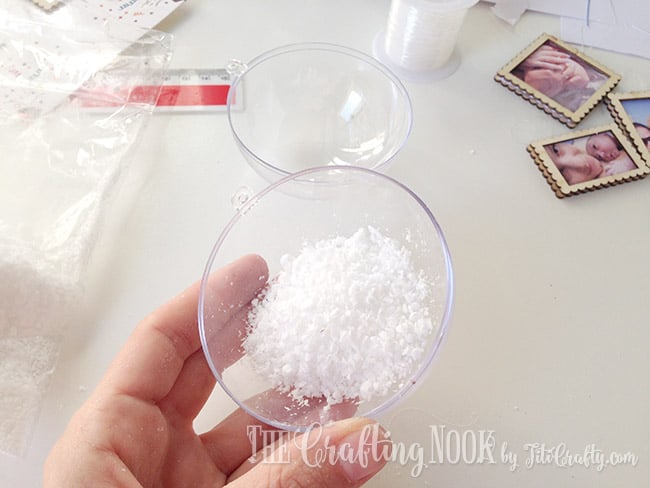
Add glitter if desired. I used white snow-like glitter, gold glitter, and a few star accents.
Insert the nylon thread through the ornament opening, adjusting it so the photo frame hangs freely without touching the sides.
Place the second half of the ornament back on.
Tip: Add a tiny dab of hot glue or a small piece of clear tape at the bottom to prevent the ornament from opening.
Repeat these steps for the remaining ornaments.

Step 3: Adding the Rustic Hanger and Bow
Cut two pieces of twine for each ornament: one for the hanger and one for the bow.
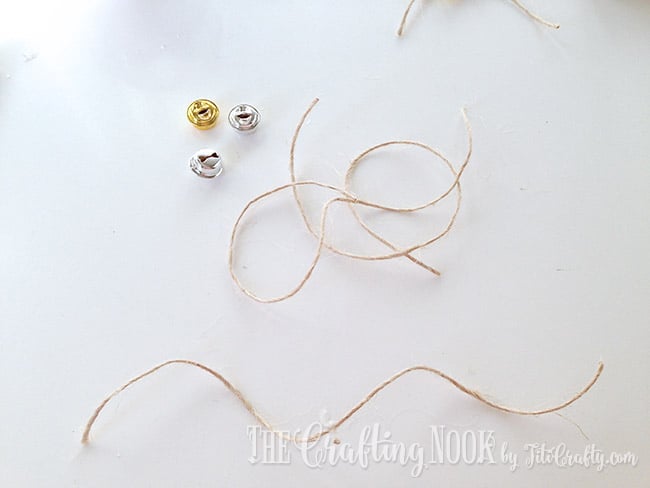
Slide a small jingle bell onto the bow piece of twine, positioning it in the center.
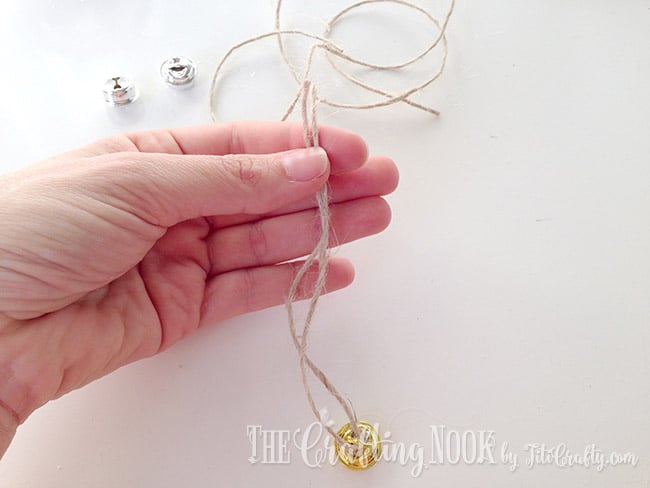
Tie the bow, keeping the bell centered.
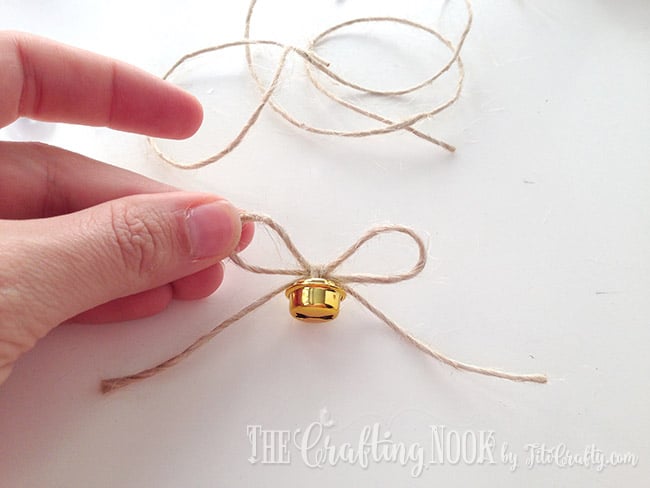
For the hanger, slide the twine through the ornament’s top opening and tie a knot.
Position the knot inside the opening, then use small dabs of hot glue to secure the bow in place

Your snow globe photo ornament is finished and ready to hang on the tree or gift as a keepsake.

Crafting Tips
Clear ornaments that open in half work best when using framed photos, since they give you more space to assemble everything neatly. If you’re using regular clear ornaments, laminating the photos and hanging them from nylon thread makes insertion easier.
Avoid permanently gluing the ornament shut if you’d like the option to reuse it in the future. Leaving it removable allows you to swap photos or decorations later. To keep it secure without sealing it permanently, place a small piece of clear adhesive tape on the bottom opening.
That’s it! There you go, one adorable Christmas ornament snow globe!
Make as many as you like and keep adding more and more memories.
Some really meaningful and pretty Memory Keepsake Christmas ornament snow globes.
A few variations and alternatives
If you find faux snow too messy, you can swap it for heavier glitter, which tends to stay in place better inside the ornament. There are also different types of faux snow available, some less lightweight than others.
Instead of twine, you can use white baker’s twine or ribbon for a softer or more elegant look. A white organza ribbon works especially well if you prefer something less rustic.
If you can’t find mini wooden frames, you have a few options. You can make simple frames using narrow craft sticks, laminate the photos and use them without frames, or insert laminated photos directly into the ornament.
To add more detail inside the snow globe ornament, you can include small elements like mini bottle brush trees, snowflakes, or tiny figurines. You can also personalize the ornament further by adding names to the photos or applying vinyl lettering to the outside of the ornament.
Aren’t these cute and joyful? Also super duper easy to make. you can have half a dozen of these ornaments made in less than an hour.

What do you think??? I would love to hear your thoughts in the comments!
Frequently Asked Questions
For a DIY snow globe ornament, you can use faux snow or glitter along with small decorative elements like bottle brush trees or mini figurines. In this project, photos are the main focal point, suspended inside the ornament to create a meaningful keepsake rather than a decorative filler ornament.
No. While traditional snow globes use liquid, DIY snow globe ornaments can be made without it. This tutorial uses a dry method with faux snow and photos, which is easier to assemble and better suited for hanging on a Christmas tree.
Clear fillable ornaments are widely available at craft stores, dollar stores, online marketplaces like Amazon, and seasonal Christmas shops. Look for ornaments that open in half, as they make it easier to assemble photo-based snow globe ornaments.
Mini frames are commonly found in the scrapbook section of craft stores. If you can’t find them, laminated photos or simple DIY frames made from narrow craft sticks are good alternatives for snow globe ornaments.
More Christmas Ornaments to Try
If you like this cute Christmas ornament Snow Globe tutorial, I’m sure you will love these other Christmas project ideas too:
✂️ Tutorial
DIY Christmas Ornament Snow Globe for Memory Keepsake
Tools
- Hot glue gun + glue sticks
- Scissors and craft knife
Supplies
- Faux snow – to make it look like a winter wonderland scene.
- Jingle bells
- Clear plastic ornament {those that open in half size of your choice I used 3inchesornaments}
- Printed photos
- Glitter {snow-like and gold}
- Twine
- Wooden mini frames {usually scrapbook supplies and make sure fit into the crystal balls}
- Clear elastic Nylon.
Instructions
Step 1: Making the Inner Frames
- Cut your photos to fit inside the mini frames, testing the size as you go.
- Once the photos are ready, apply hot glue to the frame and glue the photo face down.
- Repeat this on both frames so each photo is sealed between the front and back.
- Cut a small strip of clear nylon thread, about 2 inches long.
- Glue the nylon thread to the back of one of the frames.
- Apply hot glue to the back of the frame and photo, then glue it to the second frame to seal everything together.
- Double-check that the finished frame fits inside the clear ornament before moving on.
- Repeat this process with the remaining photos and frames.
Step 2: Assembling the Snow Globe Ornament
- Pour a small amount of faux snow into one half of the clear ornament.
- Add glitter if desired. I used white snow-like glitter, gold glitter, and a few star accents.
- Insert the nylon thread through the ornament opening, adjusting it so the photo frame hangs freely without touching the sides.
- Place the second half of the ornament back on.
- Repeat these steps for the remaining ornaments.
Step 3: Adding the Rustic Hanger and Bow
- Cut two pieces of twine for each ornament: one for the hanger and one for the bow.
- Slide a small jingle bell onto the bow piece of twine, positioning it in the center.
- Tie the bow, keeping the bell centered.
- For the hanger, slide the twine through the ornament’s top opening and tie a knot.
- Position the knot inside the opening, then use small dabs of hot glue to secure the bow in place
- Your snow globe photo ornament is finished and ready to hang on the tree or gift as a keepsake.
Notes
Share and PIN ME!
Til’ next time…


FREE WORKBOOK
Keeping your Sweet Home Organized
Learn how to create intentional habits and simple routines to Keep Your Home Organized. Plus freebies, printables, exclusive content, and tips.
Disclaimer: By clicking on the “Yes” button above you are giving me your consent to collect and use your information according to the law and My Policy Privacy. Zero Spam I promise!
I love your snow globe ornaments and would like to make some. I am in the process of getting the supplies, but I have a few questions:
What size are the clear ornaments? 2 inches, 3 inches, 4 inches, 5 inches?
What size are the wooden mini frames? 2×3, 3×3?
Thanks so much!
Hi Jennifer,
Thank you so much for visiting and I’m glad you like these cuties. I usually don’t give exact measures because we can’t always find the exact sizes so I leave it open for each person to decide. In this case, I used 8 cm {3.14 Inches} clear ornaments and I used 2 mini frame sizes: 3×5 cm {1.18 x 2 Inches} and 5×5 cm {2 x 2 Inches}. Hope this helps. You can always make them smaller or larger if you have a large Christmas tree {if this is for a Christmas tree of course}.
If you make some I would so love to see them! I get so excited to see other’s creations inspired by mines!
Hugs
Hi Cami,
Thanks for all the info. I am having a really hard time finding some small frames for the ornaments. Any ideas?
I’ve got an idea. I think I’m going to try a natural wood slice round ornament, mod podge and a photo printed on regular paper. I just need to find a small size that will fit inside my clear ornament. It will take me a bit to gather the supplies and put it together, but I’ll send you a photo when I’m done. It will be something like this but I will put mine inside a clear ornament to create a snow globe.
https://simpleasthatblog.com/2016/12/10-minute-photo-keepsake-ornaments.html
Sorry I didn’t reply last comment, it’s been crazy. The frames I found them with scrapbooking elements. Maybe if you have a craft store near by you might find them where all the scrapbooking stuff is. However your idea of using natural wood slice is absolutely adorable and I might even get inspired by you for next year! Love it!!! Can’t wait to see!
Hugs and thank you so much for keeping me posted!
Hugs
Love the looks of homemade ornaments on Christmas trees. Our tree last year was nothing but homemade family ornaments; hence, our Family Tree. ( I worked on them ornaments for 11 months)
I looked at Michaels over the weekend for some of them crystal ball ornaments but they had none so wondering where you got yours? My 100 yr. old aunt had passed away this last March and wanted to make a memory ornament for her son and daughter.
Hi Colleen!
Oh my goodness! 11 months making ornaments? You are my hero! Although it would be less stressful than spending a whole month working like nuts to make it in time! LOL.
My Christmas balls, Uhmmm I got them in one of those cheap stores. I don’t live in USA, so it’s hard for me to say. Here we have lots of Chinese shops that sells Christmas stuff really cheap and I found these and loved them to customize the ornament. Maybe on amazon? These are not actually crystal material but they do look like it. it’s really clear and delicate. These balls are also on non-chrirstmas craft supplies just in case that helps!
Let me know if you find some of how it goes!
Thank you so much for leaving me your thoughts!
huga