DIY Rustic Monogram Christmas Ornaments
This post may contain affiliate links. Please read our Disclosure Policy.
Need an idea to involve your family in your Christmas tree decoration? Get creative this season with these DIY rustic monogram Christmas ornaments. These ornaments are as festive as they are easy to make. With a few supplies, you can create beautiful custom Christmas ornaments in no time.
So… It’s finally my turn to share my Handmade ornament for our 31 Days of Handmade Christmas Ornament Blog Hop.

I know it’s crazy as it’s just October but I’m super excited to share with you my project and to be part of such an amazing team of crafters to start preparing for the holiday season!!!
I wanted to dive into the Rustic-farmhouse style so I made these Family Names Rustic Monogram Christmas Custom Ornaments. One for each one of us {E, C, and J} and one {M} for our family name. Here I’ll be showing you only 2 of them but the other two are almost ready.
Table of Contents
Family Rustic Monogram Christmas Ornaments Tutorial
I must admit it was my first time distressing and at first, I was a little unsure and even a bit scared. So, I tried first with one letter to see if I would make it right and then started the tutorial. It’s fun and so super easy since it doesn’t require perfection of any kind.
I love how these ornaments turned out and can’t wait to decorate my own rustic Christmas tree for this year. Just in case you wonder the tree you see in the photos is not actually a tree is a branch I borrowed from a friend LOL {wink!}
You can do pretty much anything here. I preferred distressing and then glittering the bottom of each letter to add some spark LOL. Using burlap ribbon, I made a bow and decorated it with mistletoe.
You can have quite some of these rustic monogram Christmas ornaments in one afternoon and if you involve your kids will be fun and even faster. Each one can add their own personal touch to it. It would be so much fun.
These cuties can make a great personal one-of-a-kind thoughtful gift too as they are such a personalized ornament that will last for years!
How to make these Rustic Monogram Christmas Ornaments
Supplies:
- Wooden letter
- Sanding paper. I used a fine one 400 grit.
- Burlap ribbon
- Christmas mistletoe
- Masking tape
- Glue
- Gold glitter
- Screw eye Pins {really tiny}
Tools:
- Needle and thread.
- Scissors
- Foam brush

Instructions:
Before we begin, be sure to follow us on Pinterest, Facebook, Instagram, and YouTube, and also sign up for our email list (at the end of this post), so you’ll never miss a post!
Step 1: Prepping and sanding the Monograms
The first thing we are going to do here is sanding the wooden letter. In this case, the letter came already painted but if yours is not then first paint your letter, let it dry and then start the sanding.

I tore a piece of sanding paper (medium grit) and started sanding the letter especially on the edges and then I would sand in both directions {vertical and horizontally} on specific spots to make the wood show up.
As I was sanding the letter it started to look old and damaged which I guess is the whole point of distressing, right?


If you have more than one letter to make then sand them all, so you have to clean only once LOL.
Clean well your surface and your letter{s} and let’s move on to the next step.
Step 2: Glitter your monogram
Secondly, with a ruler measure about an inch {I did 2 cm} from the bottom of the letter and up. If the letter has different bottom parts, then measure the first and the last so you get a straight line.

Draw a line from one edge to the other on both sides.

Apply masking tape above the line from and back.

Then apply your glue all over the bottom of your letters with a brush.

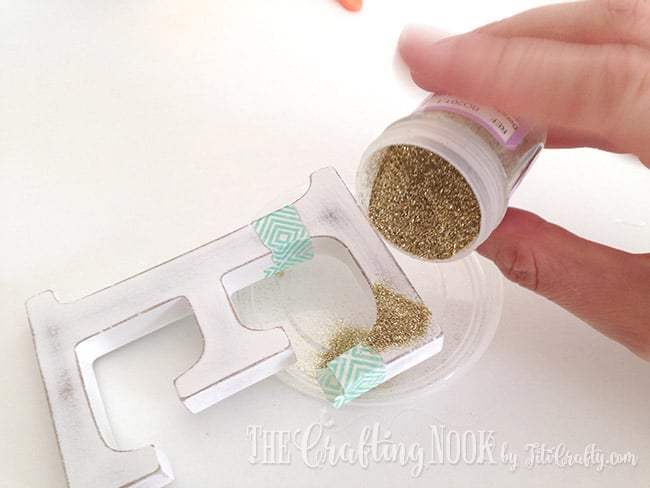
Now, the fun part, spread some glitter all over the glue and remove all the excess.
Set it aside and let it dry.

Because we have to wait while the glue dries, in the meantime let’s work on the decoration.
Step 3: Make the Rustic rustic Bow
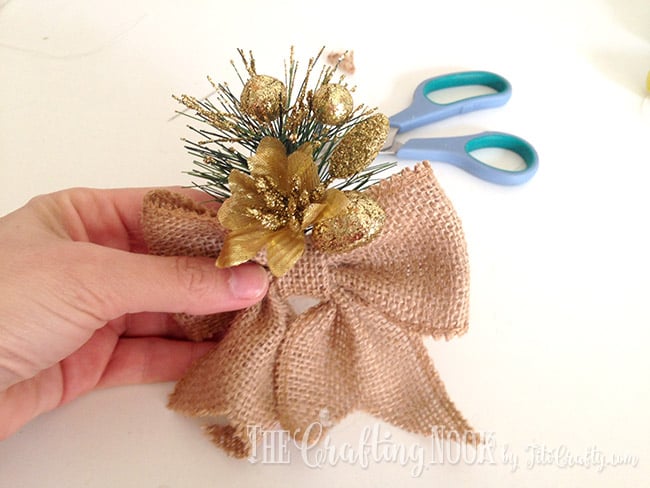
I bought some mistletoes in a craft store but it was too big so I got rid of some parts and put them together again in smaller pieces. These would make the perfect touch!

Then for the bow, I cut 3 pieces of burlap ribbon. Since I was aiming for rustic decor, I thought burlap would do the work wonderfully. But you can use your favorite ribbon style.
The sizes are relative since it will depend on your letter size and how big you want your bows to be. I made them relatively small so it was 18 cm, 15 cm and 3 cm.

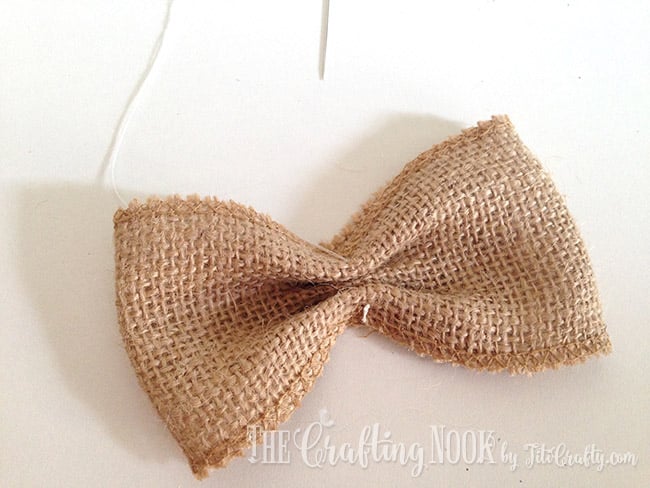
Fold the larger piece so both ends overlap in the center as shown.

Ruffle it in the center

Using a needle with thread pinch through the center of the bow. Go back and forth a couple of times so it’s secured. Do not cut the thread yet.

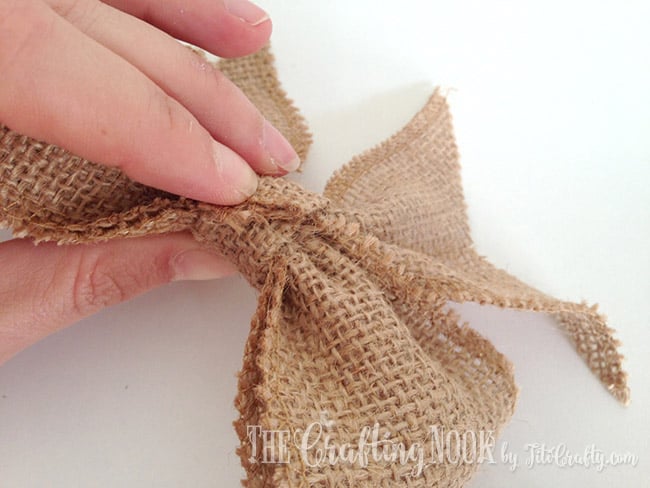
Take the next piece and without folding to ruffle in the center and with the same thread pinch in the middle through the ruffle again and push until it reaches the bow and make a couple the stitches again through the whole bow and then make a couple of loops around the bows.

Do not cut the thread yet either.

The last piece of burlap will need to be folded again in three as shown.

Place the center of the piece on top of the bow with an opening facing the bow, bow around the bow to the back until both ends meet, and stitch. You could use glue too, now that I think about it.

Finally, place the mistletoe there while stitching in the back making sure the decor goes above the bow. make some more stitches to secure it.

Now you can cut the thread LOL.
Ok, back to the letter.
Step 4: Assemble the rustic monogram Christmas ornament
Your letter should be dry by now so you can remove the masking tape and have a pretty glittery bottom of the letter!

Get your screw eye pin and screw it close to an edge on the top of the letter. Do it really carefully so you don’t crack the wood.


Using twine thread or a piece of burlap ribbon make a knot to make your hanger.

I preferred securing the bow to the hoot itself so it would be stronger. So, using my needle and thread I stitched it well in place. I didn’t want to use glue because later on I could change the bow and didn’t want the glue to damage the wooden letter.

There you Go!!! All done! We got some really pretty and Rustic Monogram Christmas Ornaments.


Now it’s time to hang them on the tree or wrap them up as Christmas gifts!
I so love how it turned out and can’t wait to finish the other two.
Here you have the “M”
Hang your Christmas ornament on your tree!
What do you think? Doesn’t it scream holiday spirit?
Like these DIY Family Rustic Monogram Christmas Tree Ornaments? Hope you do…


Frequently Asked Questions
No, it doesn’t. You can use any type of letter to make these ornaments: cardboard, plastic, 3D paper letters. Just keep in mind that the finish is never going to be the same.
You can use your favorite ribbon, fabric, twine, creativity is the limit.
Who doesn’t like glitter??? LOL. You can leave the letter as is or you can just use paint. There are amazing metalic paints that will give a gorgeous gold finish.
More Christmas Ornaments to Try
If you enjoyed this cute monogram Christmas ornament tutorial, you might also love some other Christmas project ideas too:


Need some more ideas? keep scrolling and you will have a blast!!!
Here are all 31 Bloggers in order of their appearance:
1 – The Silly Pearl :: 2 –Yesterday on Tuesday
Day 3 – The How-To Home :: 4 – An Extraordinary Day::
5 – Knick of Time :: 6 – Pet Scribbles :: 7 – Simply Kelly Designs
8 – Town and Country Living :: 9 – Petticoat JUNKtion
10 – The Everyday Home :: 11 – Up on Tippy Toes
12 – Remodelando la Casa :: 13 – DIY 180 :: 14 – 504 Main
15 – Sum of their Stories :: 16 – At Home with Jemma
17 – The Kim Six Fix :: 18 – Shabby Art Boutique
19 – Morena’s Corner :: 20 – My Uncommon Slice of Suburbia
21 – Our Southern Home :: 22 – Domestically Speaking
23 – The Crafting Nook :: 24 – Sweet Pea
25 – Dukes and Duchesses :: 26 – Heathered Nest
27 – Lovely Etc. :: 28 – Stone Gable Blog :: 29 – Mod Podge Rocks
30 – Running with a Glue Gun :: 31 – All Things Heart and Home
✂️ Tutorial

DIY rustic monogram Christmas ornaments
Tools
- Needle and thread.
- scissors
- Foam brush
Supplies
- Wooden letter
- Sanding paper. I used a fine one 400 grit.
- Burlap ribbon
- Christmas mistletoe
- Masking tape
- Glue
- Gold glitter
- Screw eye Pins {really tiny}
Instructions
STEP 1: PREPPING AND SANDING THE MONOGRAMS
- The first thing we are going to do here is sanding the wooden letter. In this case, the letter came already painted but if yours is not then first paint your letter, let it dry and then start the sanding.
- I tore a piece of sanding paper (medium grit) and started sanding the letter especially on the edges and then I would sand in both directions {vertical and horizontally} on specific spots to make the wood show up.
- As I was sanding the letter it started to look old and damaged which I guess is the whole point of distressing, right?
- If you have more than one letter to make then sand them all, so you have to clean only once LOL.
- Clean well your surface and your letter{s} and let’s move on to the next step.
STEP 2: GLITTER YOUR MONOGRAM
- Secondly, with a ruler measure about an inch {I did 2 cm} from the bottom of the letter and up. If the letter has different bottom parts then measure the first and the last so you get a straight line.
- Draw a line from one edge to the other on both sides.
- Apply masking tape above the line from and back.
- Then apply your glue all over the bottom of your letters with a brush.
- Now, the fun part, spread some glitter all over the glue and remove all the excess.
- Set it aside and let it dry.
- Because we have to wait while the glue dries, in the meantime let’s work on the decoration.
STEP 3: MAKE THE RUSTIC RUSTIC BOW
- I bought some mistletoes in a craft store but it was too big so I got rid of some parts and put them together again in smaller pieces. These would make the perfect touch!
- Then for the bow, I cut 3 pieces of burlap ribbon. Since I was aiming for rustic decor I thought burlap would do the work wonderfully. But you can use your favorite ribbon style.
- The sizes are relative since it will depend on your letter size and how big you want your bows to be. I made them relatively small so it was 18 cm, 15 cm and 3 cm.
- Fold the larger piece so both ends overlap in the center as shown.
- Ruffle it in the center
- Using a needle with thread pinch through the center of the bow. Go back and forth a couple of times so it’s secured. Do not cut the thread yet.
- Take the next piece and without folding to ruffle in the center and with the same thread pinch in the middle through the ruffle again and push until it reaches the bow and make a couple the stitches again through the whole bow and then make a couple of loops around the bows.
- Do not cut the thread yet either.
- The last piece of burlap will need to be folded again in three as shown.
- Place the center of the piece on top of the bow with an opening facing the bow, bow around the bow to the back until both ends meet, and stitch. You could use glue too, now that I think about it.
- Finally, place the mistletoe there while stitching in the back making sure the decor goes above the bow. make some more stitches to secure it.
- Now you can cut the thread LOL.
- Ok, back to the letter.
STEP 4: ASSEMBLE THE RUSTIC MONOGRAM CHRISTMAS ORNAMENT
- Your letter should be dry by now so you can remove the masking tape and have a pretty glittery bottom of the letter!
- Get your screw eye pin and screw it close to an edge on the top of the letter. Do it really carefully so you don’t crack the wood.
- Using twine thread or a piece of burlap ribbon make a knot to make your hanger.
- I preferred securing the bow to the hoot itself so it would be stronger. So using my needle and thread I stitched it well in place. I didn’t want to use glue because later on I could change the bow and didn’t want the glue to damage the wooden letter.
- There you Go!!! All done! We got some really pretty and Rustic Monogram Christmas Ornaments.
- Now it’s time to hang them on the tree or wrap them up as Christmas gifts!
- I so love how it turned out and can’t wait to finish the other two.
- Here you have the “M”
- Hang your Christmas ornament on your tree!
¡Share and PIN ME!

Til’ next time…


FREE WORKBOOK
Keeping your Sweet Home Organized
Learn how to create intentional habits and simple routines to Keep Your Home Organized. Plus freebies, printables, exclusive content, and tips.
Disclaimer: By clicking on the “Yes” button above you are giving me your consent to collect and use your information according to the law and My Policy Privacy. Zero Spam I promise!