Matching DIY Owl Costumes for Mom & Daughter
This post may contain affiliate links. Please read our Disclosure Policy.
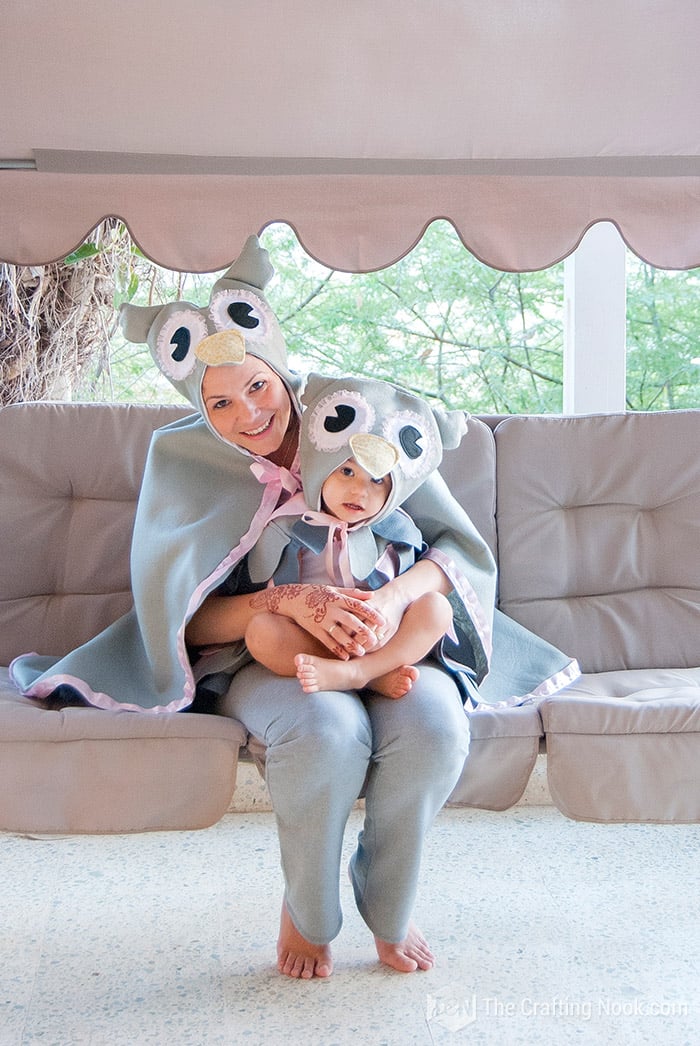
These DIY owl costumes for mom and daughter were pretty easy to make and completely cost-effective. The entire Owl Costume is made with felt, so no hemming is necessary! Just a few decorative details and lots of love!
It’s not a secret to anyone that I LOVE owls so when I saw these super cute Family Owl Costumes on the Pottery Barn Kids, I just knew I had to figure out how to make them since I didn’t have the budget to buy them.

I just wanted one for mommy and one for Emma to wear on Halloween and go around with matching costumes. I think matching outfits are so cute.
Table of Contents
Matching Mom and Daughter DIY owl costume
I really need to be honest here. I’m not a professional sewer and I have no clue how to create patterns {and my English is not perfect either}. So, what I’m sharing here is how I managed to create these super cute and fun DIY Owl Costumes.
With a little extra imagination and creativity {perhaps a little more sewing knowledge from you} I think this can be easy enough to make it.
These Owl costumes are basically two wings and a hood. So it’s not that difficult once you know how to do it.
Ooook then. Let’s start.
How to Make The owl costumes
I created the patterns as I was requiring pieces. I’m sharing a bit of how I did and the sizes will vary depending on the age and size of the kids/people.
At some points, I got so focused on what I was doing that I forgot to take pics so I tried to make graphics to explain.
Let’s see this cute costume as a cape so it’s easier to imagine.
Supplies needed:
- 3.5 Yards {3 mt} of light gray felt
- 0.5 Yards {1/2 mt} of Pink felt
- 0.5 Yards {1/2 mt} of dark gray felt
- A piece of black and white felt {for the eyes}
- A Piece of yellow/orange felt or any fabric {for the nose}.
- 1 yard of white lining fabric.
- 7 yards of pink satin ribbon {1 inch wide}
- 2 yards of pink Organza ribbon {1/2 inch wide}
- Stuffing {for the tufts if desired}
Tools:
- Sewing machine.
- Scissors
- Measuring tape
Instructions:
Step 1: The Owl Costume Pattern
The first thing I did was of course create the patterns on paper and cut them out.
These are the graphics of the patterns I created for the wings and face and you can download HERE. The hood pattern belongs to the Sewing Novice and you can download it HERE.

I created first Emma’s Owl Halloween Costume and then I applied the same process to mine but of course, bigger and with some differences.
Then I placed them on the felt and fabrics and I cut the fabric approximately 0.4 Inches away from the line marks.
I used some special fabric markers that disappear with time and/or wash to draw the lines.
Step 2: Cutting the Owl Pieces
I cut every piece first, including a bunch of “feathers” in pink, light gray, and dark gray.

Then I cut the hood and the lining.


Next, I put together both pieces of the hood and put a paper underneath it and to draw the ear tuft. Of course, I cut it out too {this pattern is in the downloadable file}.

Step 3: The Hood
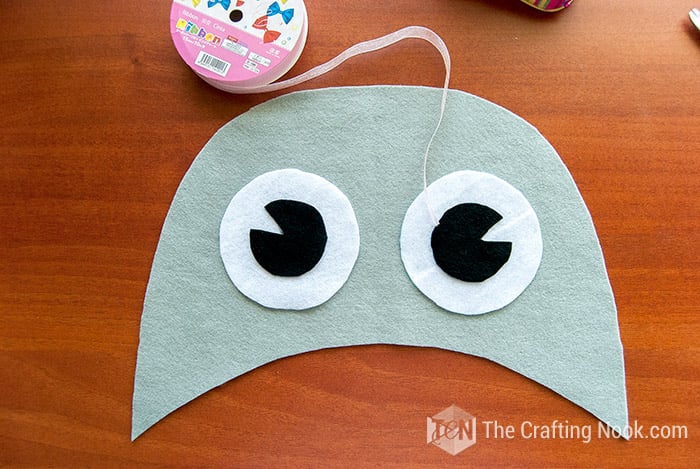
I started with the hood which would be playing the role of the owl mask.
I sew the black circle of the eyes to the white one and then to the hood.
Then I cut the beak in both felt and the fabric {I didn’t have yellow felt I used this fabric}.

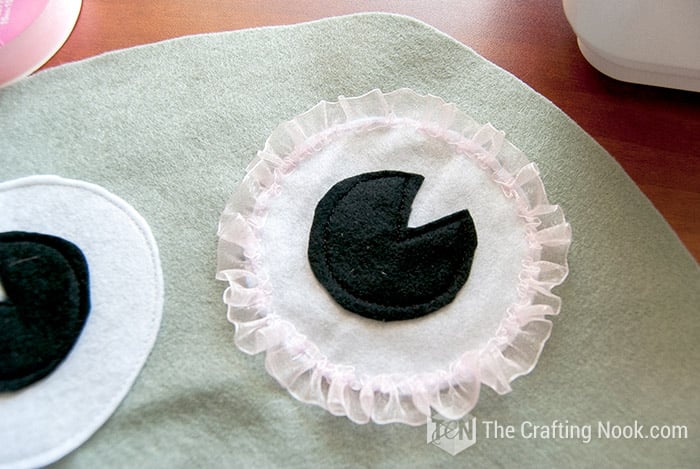
I used about 3x the perimeter of the eyes in organza ribbon to make the ruffle of the eyes.
If you make a circle with the ribbon that would surround the circle, that would be your reference and that is multiplied by 3. I did like that because it depends on the size of each eye. You might want it bigger or smaller.
Then I sewed close to the edge of the ribbon with a big stitch and relaxed pressure on the machine.
Next, I carefully pulled one of the threads and start ruffling the ribbon. Once ready I started sewing it manually to the edge of the eyes of the owl.

Then I made the beak. I sewed it first with the right side of the fabric facing the felt leaving a small space no sewed. I turned it to the right side out and then sewed all over the edge.

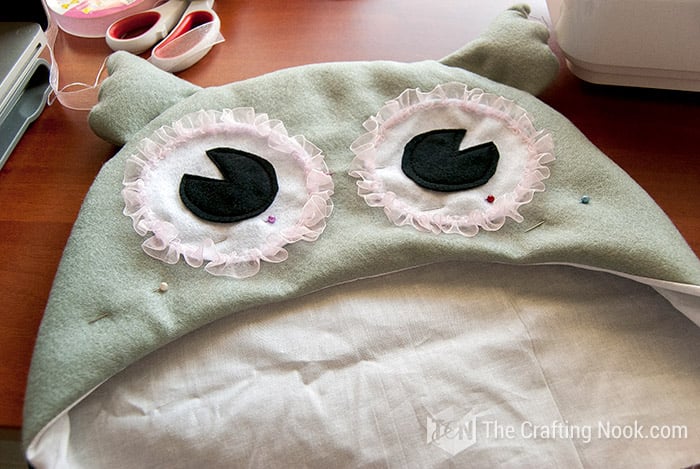
For the ears tuft, I sewed them, turned them right side out, and put the stuffing in them.
You don’t need to fill it too much; it’s just to add some volume.
I placed the tufts {as I show in the graphic below} and placed the back peace of the hood on top. The eyes and tufts should be inside. Sew around the edge as it’s shown.

The next step was the lining. I sewed it and then attached it to the hood.

I put all the lining inside the hood and with the help of some pins I made some stitches in some strategic places so the lining doesn’t move or come out.
Step 4: The owl Wings
Ok, now work on the wings of the DIY owl costumes.
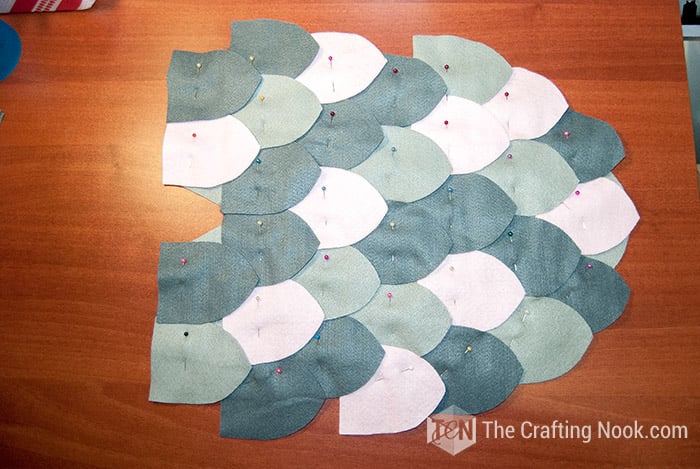
First, I created a row of feathers. I placed the felt feathers playing with different colors randomly as you can see below until I covered it all.

I secured them with pins and then I sewed each line of feathers.
Then, I sewed the pleat making sure to not sew the feathers.

Step 5: Assembling the owl pieces together
I overlapped both wings where they should be on the back. How much you overlap will depend on the back of your kid.
The sewed pleats should be on the shoulders level.

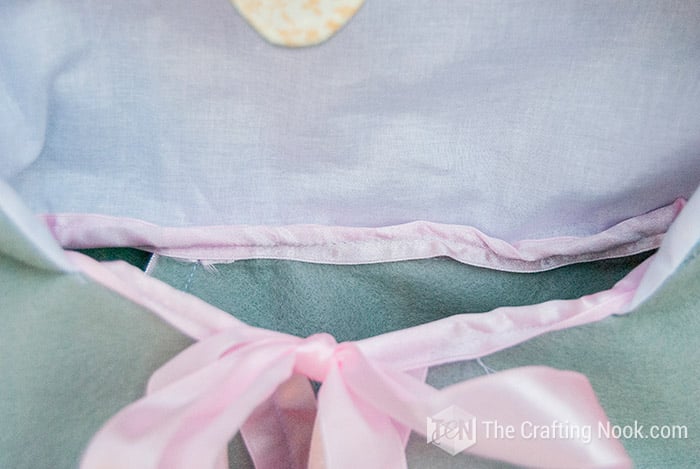
Then I sewed the hood to the wings as centered as I could and I hid the seam with the pink ribbon and;
The ribbon is also the way I tied it up to Emma’s neck with a bow.

The last touch was cutting the edges of the feathers to round them and make them well shaped.
Step 6: Mom’s Owl Costume
After finishing my daughter costume, I made mine. It was easier to make since I already knew how to make it and I didn’t add so many details.
Follow the same steps 1 to 5 except for the feathers, unless you want to make your own with feathers.
Make the wings larger. The oval should be as long as you want the wing to be.
That’s it.
DIY Owl Costume details
I used many small details on the costumes such as ruffled organza ribbon around the eyes, and some patterned fabric for the beak.
At first, I didn’t know if it would work but I love how it turned out. Also, I added a lining fabric because I thought it would be more comfortable with the touch on the face that way.


Since I wanted to hide the neck seam, I used pink satin ribbon and that same strip of ribbon is what ties the costume around the neck. I also used the ribbon to decorate the edge of the wings of my costume.


I realized when Emma was wearing the owl costume, that in some spots the feather seams are visible Ugh!. But then with the movement and stuff, you can barely see it LOL.

It is not perfect because I’m not a professional but I really LOOOOVE how they turned out. Actually, I’m making a costume for my brother too next weekend LOL. He wants to be Dracula!
¡¡¡Done… Voila!!!

The hardest part of making these costumes was trying them on Emma during each stage LOL.
She got so annoyed. But the fun part was the final pictures because Emma took the remote control of the camera and shoot like crazy.
I have to admit I couldn’t choose one pic, so I’m sharing a lot of them here. It was so much fun.

There she is… Doesn’t it look so cute?


How about me? Don’t we look cute with the DIY owl costumes too??? LOL


Frequently Asked Questions
Of course!!!! Imagination is the limit. Of course, I chose felt because is cheaper and stiffer but you can also use: Fleece, your favorite fabric (keeping in mind that will not be as stiff as felt), Also remember felt has 5 different types that could match your needs.
Absolutely yes. It’s not difficult at all the make this costume by hand. Some parts can even be glued with a hot glue gun or fabric glue instead. If you know basic hand stitches you can definitely create these cute owl costumes.
Not really. Felt is known for not being expensive. But that will depend on where you live. However, it also depends on how many or how big you will be making them.
Other sewing projects for Halloween to try
If you liked this DIY owl Costumes idea, you might also love these other sewing projects too:


✂️ Tutorial

DIY owl costumes for mom and daughter Tutorial
Tools
- Sewing Machine
- scissors
- Measuring tape.
Supplies
- 3.5 Yards {3 mt} of light gray felt
- 0.5 Yards {1/2 mt} of Pink felt
- 0.5 Yards {1/2 mt} of dark gray felt
- A piece of black and white felt {for the eyes}
- A Piece of yellow/orange felt or any fabric {for the nose}.
- 1 yard of white lining fabric.
- 7 yards of pink satin ribbon {1 inch wide}
- 2 yards of pink Organza ribbon {1/2 inch wide}
- Stuffing {for the tufts if desired}
Instructions
STEP 1: THE OWL COSTUME PATTERN
- The first thing I did was of course create the patterns on paper and cut them out. You can download them on the blog.
- I created first Emma’s Owl Halloween Costume and then I applied the same process to mine but of course, bigger and with some differences.
- Then I placed them on the felt and fabrics and I cut the fabric approximately 0.4 Inches away from the line marks.
- I used some special fabric markers that disappear with time and/or wash to draw the lines.
STEP 2: CUTTING THE OWL PIECES
- I cut every piece first, including a bunch of “feathers” in pink, light gray and dark gray.
- I cut the hood and the lining.
- I put together both pieces of the hood and put a paper underneath it and to draw the ear tuft. Of course, I cut it out too {this pattern is in the downloadable file}.
STEP 3: THE HOOD
- I started with the hood.
- I sew the black circle of the eyes to the white one and then to the hood.
- Then I cut the beak in both felt and the fabric {I didn’t have yellow felt I used this fabric}.
- I used about 3x the perimeter of the eyes in organza ribbon to make the ruffle of the eyes.
- I mean if you make a circle with the ribbon that would surround the circle, that would be your reference and that is multiplied by 3. I did like that because it depends on the size of each eye. You might want it bigger or smaller.
- Then I sewed close to the edge of the ribbon with a big stitch and relaxed pressure on the machine.
- Next I carefully pulled one of the threads and start ruffling the ribbon. Once ready I started sewing it manually to he edge of the eyes of the owl.
- Then I made the beak. I sewed it first with the right side of the fabric facing the felt leaving a small space no sewed. I turned it to the right side out and then sewed all over the edge.
- For the ears tuft, I sewed them, turned them right side out, and put the stuffing in them.
- You don’t need to fill it too much; it’s just to add some volume.
- I placed the tufts {as I show in the graphic below} and placed the back peace of the hood on top. The eyes and tufts should be inside. Sew around the edge as it’s shown.
- The next step was the lining. I sewed it and then attached it to the hood.
- I put all the lining inside the hood and with the help of some pins I made some stitches in some strategic places so the lining doesn’t move or come out.
STEP 4: THE WINGS
- Ok, now the wings.
- First, I placed the feathers playing with colors randomly as you can see below until I covered it all. I secured them with pins and then I sewed each line of feathers.
- Then, I sewed the pleat making sure to not sew the feathers.
STEP 5: ASSEMBLING THE OWL PIECES TOGETHER
- I overlapped both wings where they should be on the back. How much you overlap will depend on the back of your kid.
- The sewed pleats should be on the shoulders level.
- Then I sewed the hood to the wings as centered as I could and I hid the seam with the pink ribbon and;
- The ribbon is also the way I tied it up to Emma’s neck with a bow.
- The last touch was cutting the edges of the feathers to round them and make them well shaped.
STEP 6: MOM’S OWL COSTUME
- After finishing Emma’s I made mine. It was easier to make since I already knew how to make it and I didn’t add so many details.
- Follow the same steps 1 to 5 except for the feathers, unless you want to make your own with feathers.
- Make the wings larger. The oval should be as long as you want the wing to be.
- That’s it.
Notes
Hope you enjoyed this tutorial as much as I enjoyed making it and sharing it with you!!!
So, what do you think, don’t we look too cute???… I’m not sure about myself but it was fun making them and let’s see what happens at the Halloween party we are going to.
Are making costumes for your kids for yourself???? Or have you used family costumes????
IF you like this costume Tutorial, can you be so kind to share???

Til’ next time…


FREE WORKBOOK
Keeping your Sweet Home Organized
Learn how to create intentional habits and simple routines to Keep Your Home Organized. Plus freebies, printables, exclusive content, and tips.
Disclaimer: By clicking on the “Yes” button above you are giving me your consent to collect and use your information according to the law and My Policy Privacy. Zero Spam I promise!
Such a cute costume! Could you please update the link to the pattern?
Hi Katie,
Thank you for letting me know there was a problem with the link! I appreciate that. I just fixed the link, it should automatically download the pdf. Let me know if it works!
Hugs.
Hello!
I’m trying to make this costume for my little one, but the link to the pattern is not working! Can you please help!?
Thank you so much!
Dana
Hi Dana, so sorry the link didn’t work, but so excited you want to make this costume!!! I fixed the link, at least I think I did. Please try again and let me know!!!
Hugs and XOXO
These costumes are absolutely adorable!
Thanks so much =D!!!
Awww…unfortunately only one of the pics shows up for me, but from that pic the owls looks fantastic!! Thanks for linking to my hooded towel tutorial. I’m pretty impressed that you thought to use a hooded towel tutorial to make a costume! Great work!
These costumes are gorgeous! I would wear mine everyday!
Thanks so much everyone for your great comments, for stopping by and take the time to see what I have to share! Love having you, you visit and comments totally made my day!
XOXO
Cami
adorable! I have a friend with a daughter and they love owls! They totally need to do this. I love it!
Thanks for linking up to Gingerly Made’s Show & Tell. YOU’ve been featured! http://www.gingerlymade.com/2013/11/show-tell-features.html
SO cute!! Hope you guys had fun last night! Thanks for sharing at Share Your Stuff Tuesdays!
Oh my goodness, I’m dying! This is so stinkin’ cute! What a talented momma you are! So fabulous.
-Kristina (Mother’s Niche)
Adorable!! Beautiful work and it looks like you’re having a great time! Pinned it and sharing it on social media.
Your little one is precious, too!
Thanks for linking up at the party,
<3 Christina @ I Gotta Create!
Thanks so much Christina! It was a great time LOL she was fascinated pressing the cam button LOL
XOXO
How adorable! Im glad I’m not the only one doing coordinating costumes for me and my kid. I might as well do it while I can now! We’re going to be matching tigers, so I made my own striped t-shirt, ears and tail!
Wow! These costumes are beyond cute!! :) I love them! Thank you so much for sharing at Marvelous Mondays this week! Pinned & sharing.
You two are SOOO CUTE!!! I love the pretty details. The photos are lovely too!
This is adorable! Great pics too. I love the feathers. Thanks for sharing!
Hellp! Stopping by from the Serenity You hop. These costumes are so precious and downright gorgeous! I especially love the feathered wings. What a special memory!
Happy Halloween!
Thanks so much B Gira. Thanks so much for stoping by and leaving me some love! I’m glad you like it!
XOXO
These are soo cute! Totally fabulous costumes!Thanks for linking to a Round Tuit!Hope you have a fabulous week!Jill @ Creating my way to Success http://www.jembellish.blogspot.com/
Thanks so much Jil! Have a fabulous week yourself!
XOXO
Oh how incredibly cute :) Love the matching costumes for a mummy and a little person :)
Thanks so much Jenya! I’m happy you like it!
XOXO
Super cute!
Thanks!!!! xoxo
perfectly adorable! thank you for linking up to Snickerdoodle Sunday!!
Yayyyy Thanks SO much!
Adorable!!
Yayyy Thankd Dina!
XOXO
Oh what a fantastic job you did and how kind of you to share a step by step how to
Thanks so much PinkOddy! Love sharing and inspiring!
XOXO
Oh, what cute costumes. You look adorable in them. Hope your weekend is wonderful.
Thanks sooo much Heidi!!!
XOXO
Your costumes caught my attention on Google+! When I came to your blog, I can’t tell you how impressed I am with your attention to detail and photos! What great pictures you took together. Wonderful stuff!
Thanks so much Rae! I’m glad you like it!
XOXO
Cami
Your costume really caught my eye on google+. When I came to your blog, I am really impressed with the pattern you created and your attention to detail. anyone could follow this and make this adorable set! Kuddos to you and your daughter…great photos as well. Thanks
Thanks so much Rae! That is ver encouraging. This was a total challenge. I’ve never made anything without patterns before. Thanks so much for your sweet comment and for stopping by.
Your costumes caught my eye at the Serenity Saturday party. Absolutely adorable!!! Nicely done ;) Happy Halloween! :)
Awww Thanks you Brenda for this lovely comment and for stopping by. I’m so happy that you like it!
XOXO
Cami
You two are seriously too cute for words. I LOVED the photo sesh – – all your fun poses together. Your love for each other is palpable in this post! (And the costumes are SO creative. I love owls…and a Mama and daughter duo is just out of this world amazing.) Well done, Camila!
LOL Thanks Lauren. That was a huge challenge and I’m very happy with the results. =D. Those photos were so much fun. As soon as I noticed that Emma’s got distracted with remote control and was happy I just let her and started rolling with it with funny faces and stuff. That was a great and fun time LOL! Thanks so much my friend I so happy that you stopped by as usual!
Love it! How adorable. This an awesome way to create great memories with her.
Yes it is indeed Beca, I love having this moments with her. Thanks so much for stopping by
Hugs
Cami
soooo cute! Emma looks great and so sweet! I really appreciate your attention to detail, such as the ribbon around the eyes: gorgeous and clever: eyes gets more expressive.Great tutorial, as always! Thanks!xoxoKiki
Thanks so much Kiki. I really enjoyed making this costume! I’m very glad you like it!
XOXO
Cami