DIY Pom pom Spider Craft for Halloween
This post may contain affiliate links. Please read our Disclosure Policy.
It’s Halloween, and we’re going to show you how to make a quick and easy Pom pom spider craft for your decoration. All it takes is some yarn, cardboard, and a pair of scissors for you to get started right now.
I was planning my Halloween decor when I came up with the idea to make some spiders hanging from the garland as well but then I thought that it would be cute to make the spiders with wool pom poms instead of cutouts!

So I decided to make them a new project!
This project is the perfect fun Halloween craft to make with kids and toddlers. You just have to take care of the scissors art or get some rounded-tip type of scissors so it’s safe for them to cut. This type of craft is a great activity to improve fine motor skills in young and older kids.
Table of Contents
Halloween Pom pom Spider Craft
Don’t these little cuties make you smile? Our easy pom pom spiders are so soft and fluffy, and the good news is they are very easy to make too! It just needs a little bit of patience (at least for me LOL). I place them on top of our fruit plate. And it looks so spooky and cute.
You may have seen our DIY pom pom garland before in which we used a pom pom maker which makes it quick and easy to create big, fluffy pom poms.
But if you don’t have pom pom makers around, this tutorial will show you how to make easy pom poms that you can add some cardstock legs to the center of the pom pom and then turn the pom pom into a spider with legs.

How to make a Pom Pom Spider
Supplies:
- Black yarn or wool
- Wiggle eyes (Googly eyes)
- Cardboard
- Black cardstock.
Tools:
- Scissors
- A Compass
- Pen
- Hot Glue Tool
Instructions:
1. Draw two concentric circles on the cardboard with the compass.
2. The sizes will depend on how big you want the pom poms.

3. Cut them and make another one exactly the same using the first as your reference.

4. Then make a cut on a side of both circles like this:

5. Next, put them together with the open cut in opposite directions like this:

6. Then I made a small ball of wool that would go through the center hole of the circle.

7. Started wrapping the circular cardboards with the yarn. It doesn’t matter if it’s not enough you can always make another ball and keep going. Make sure to wrap yarn enough to stuff the circle up.


8. When it’s done, find the cardboard separation, and with a pair of sharp scissors right between the 2 cardboard, carefully cut the wool following the shape. You can also use a cutter for this.


9. Then cut a strip of wool slide it between both cardboards and make a tight knot securing the bunch of wool together.
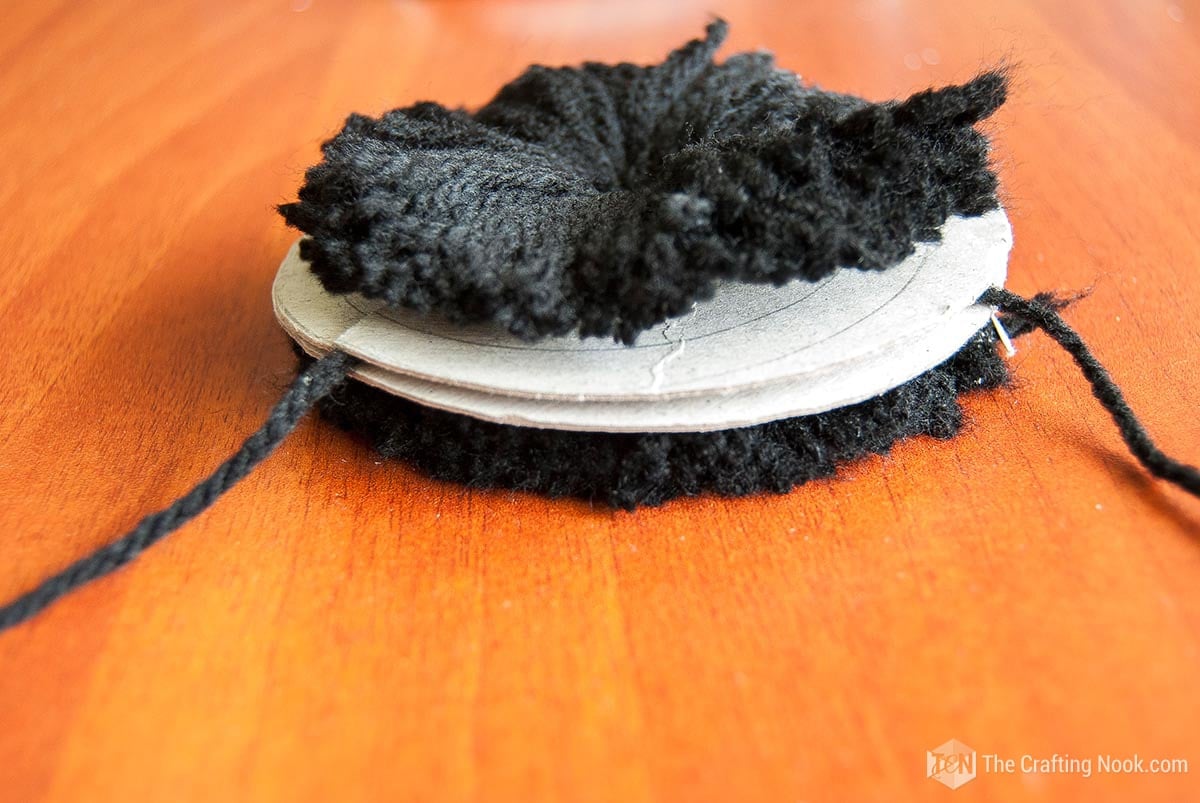

10. Next, remove the cardboard pieces carefully.

11. Trim as needed to make the pom pom even.
12. And here you have the first large black pom-pom!

13. Then cut some strips of black cardstock at a wide angle like these:

14. With a hot glue gun, glue 4 of them to both sides at the center of the pom pom.

15. And the final touch is putting on some googly eyes!

16. Done!!! You got yourself a cute spider!
You can put them on your Halloween decor, and hang them from the ceiling, mantel, or windows.

I placed mine around the house including on the fruit plate we have in the kitchen! And tadaaaaa! Spooooooooky!!!!! LOL

Craft Tips
There are many types of pom pom makers out there, so if you don’t want to use cardboard, you can always get some makers and get started!
There are several things that can be used as spider legs on these spiders instead of cardstock. you can use basic black pipe cleaners because they match the fuzzy look of the pom poms and are easy to find. You could also use painted toothpicks. Perhaps even craft foam paper, glitter paper, or cardboard. I’d even use painted craft sticks if they were handy for this project.
You can always use wiggly eyes in different sizes to make them spookier and more fun.
Make spiders in various sizes of pom poms by creating the circles templates in different sizes.


What do you think??? Do you like working with yarn?
Frequently Asked Questions
The easiest way to make a pom pom is with your hand. Wind the yarn around your hand multiple times, carefully remove it and tie it around the center. Cut the ends and you are all done. However, the best and most accurate method to make pom poms is using cardboard circles.
Acrylic yarn is the best type of yarn for pom poms. It’s cheap. You can find it on most craft stores and even in dollar trees. It’s one of the most affordable types of yarn out there.
If your pom pom is not round, make sure that you are wrapping the yarn evenly around the circle templates. If you wrap too much in one area, but not enough in the others, your pom-pom will come out shaped as a football ball. You can also try trimming your pom-pom to give it a more uniform shape.
More Halloween Craft Ideas to Try
If you like this pompom spider craft tutorial, you might love these other Halloween craft ideas too

✂️ Tutorial

DIY Pom pom Spider Craft for Halloween
Tools
- scissors
- A Compass
- Pen
- Hot Glue tool.
Supplies
- Black yarn or wool
- Wiggle eyes Googly eyes
- Cardboard
- Black cardstock.
Instructions
- Draw two concentric circles on the cardboard with the compass.
- The sizes will depend on how big you want the pom poms.
- Cut them and make another one exactly the same using the first as your reference.
- Then make a cut on a side of both circles like this:
- Next, put them together with the open cut in opposite directions like this:
- Then I made a small ball of wool that would go through the center hole of the circle.
- Started wrapping the circular cardboards with the yarn. It doesn’t matter if it’s not enough you can always make another ball and keep going. Make sure to wrap yarn enough to stuff the circle up.
- When it’s done, find the cardboard separation, and with a pair of sharp scissors right between the 2 cardboard, carefully cut the wool following the shape. You can also use a cutter for this.
- Then cut a strip of wool slide it between both cardboards and make a tight knot securing the bunch of wool together.
- Next, remove the cardboard pieces carefully.
- Trim as needed to make the pom pom even.
- And here you have the first large black pom-pom!
- Then cut some strips of black cardstock at a wide angle like these:
- With a hot glue gun, glue 4 of them to both sides at the center of the pom pom.
- And the final touch is putting on some googly eyes!
- Done!!! You got yourself a cute spider!
- You can put them on your Halloween decor, and hang them from the ceiling, mantel, or windows.
More pom pom crafts from my favorite blogs
- Hedgehog Pom Poms by Red Ted Art.
- Pom Pom Wall Hanging by DIY Candy.
- DIY Faux Cactus made with Yarn Pom Poms by Laura Radniecki.
Share and PIN ME!

Til’ next time…


FREE WORKBOOK
Keeping your Sweet Home Organized
Learn how to create intentional habits and simple routines to Keep Your Home Organized. Plus freebies, printables, exclusive content, and tips.
Disclaimer: By clicking on the “Yes” button above you are giving me your consent to collect and use your information according to the law and My Policy Privacy. Zero Spam I promise!