DIY Patriotic Tote Bag with Toothbrush Painting
This post may contain affiliate links. Please read our Disclosure Policy.
Get ready to show off your patriotic spirit with this fun DIY Patriotic Tote Bag project! Today, we’ll dive into the wonderful world of sewing and toothbrush painting to create a one-of-a-kind patriotic tote bag. Unleash your creativity as we guide you through step-by-step instructions and share handy tips and tricks.
Whether you’re a seasoned crafter or a sewing newbie, this project is perfect for everyone. So grab your sewing kit, and a toothbrush, and let’s embark on a fun-filled journey to design a charming tote bag that proudly displays your love for your country. Let’s get started!

Table of Contents
DIY Paint Splattered Patriotic Tote Bag
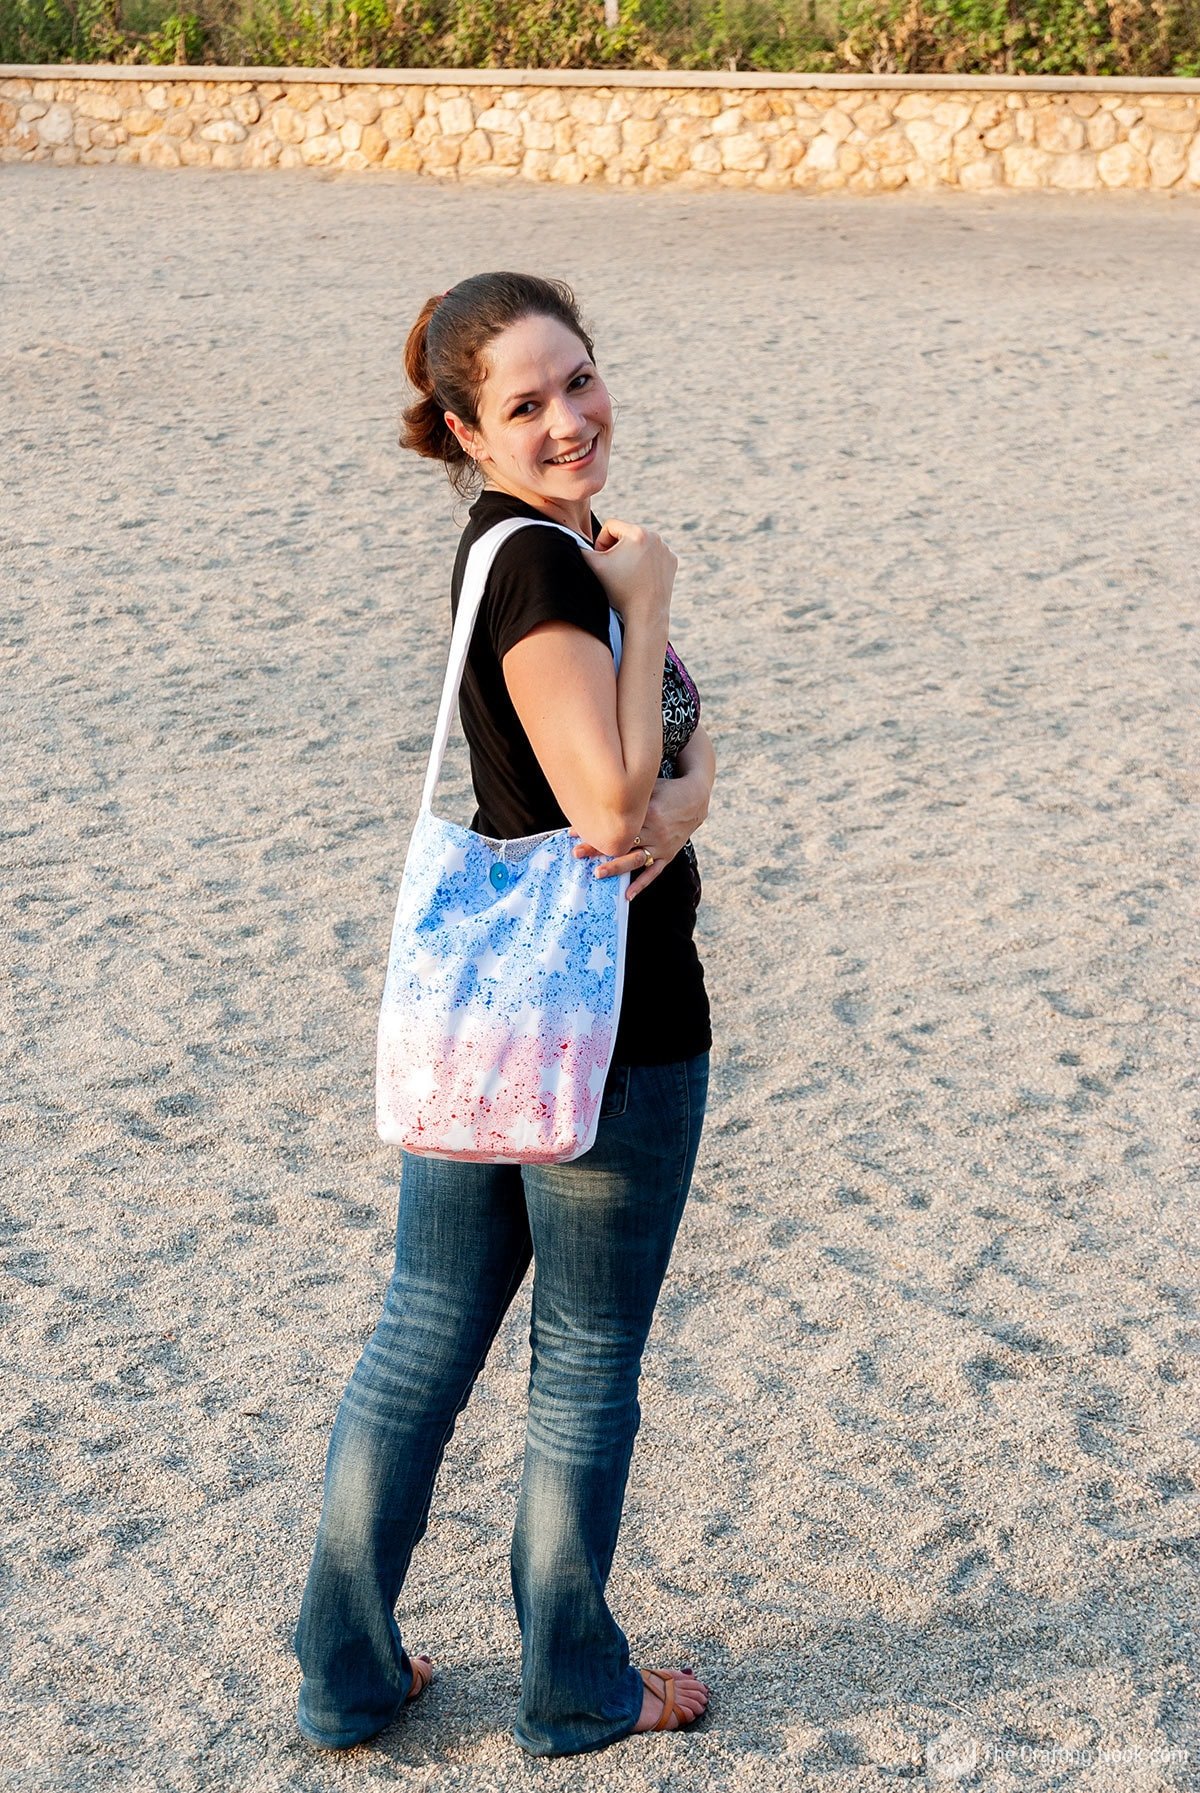
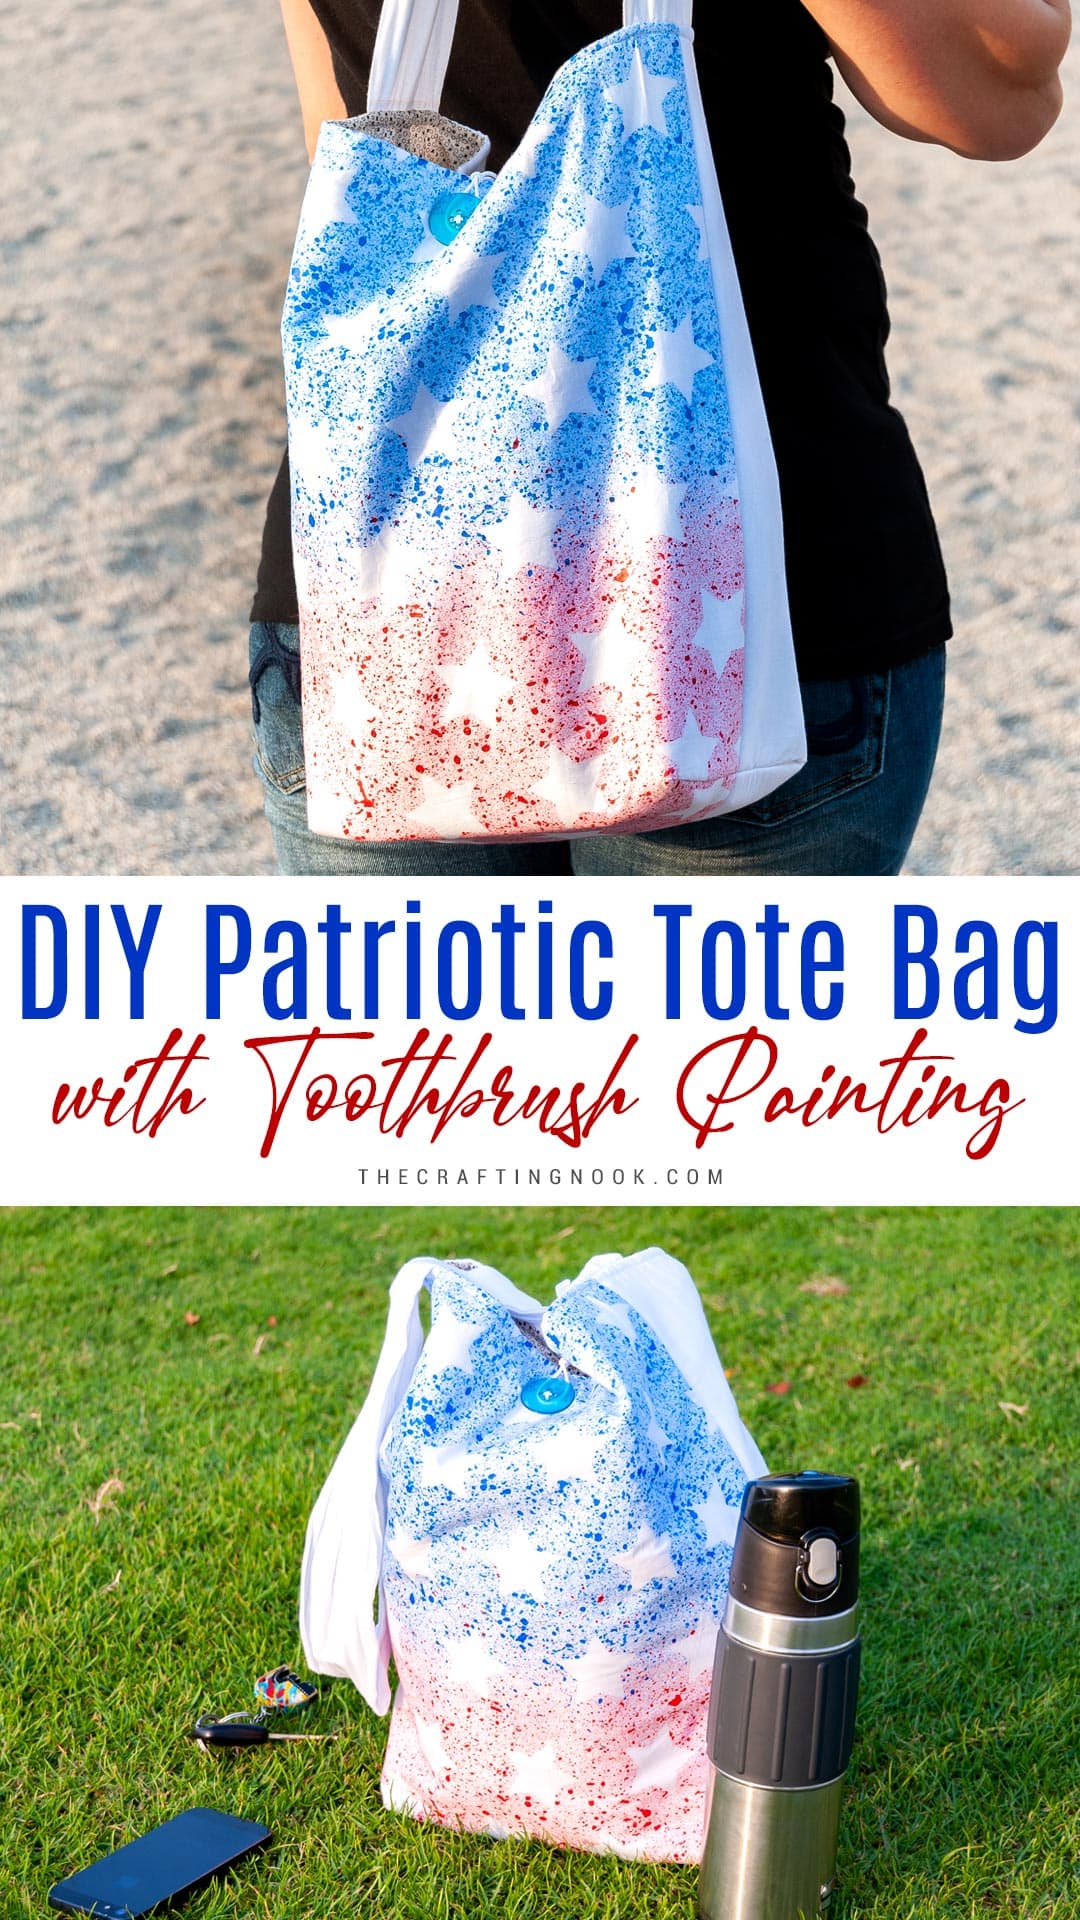
I’m happy to be sharing with you this super fun Patriotic Tote Bag with Toothbrush Painting technique that I made for my June Silhouette Challenge woot! It was fun indeed to make.
I love painting fabric, remember my Em’s and Mommy Coordinated Aprons? It was so fun painting Chef and Sous Chef. and how about my DIY Monogrammed Zippered Pillow Cover? I definitely enjoy painting!
This patriotic tote bag is easy to make but it takes some time to have it ready. The result is really good though!
The funny thing is that I end up making an American patriotic project because I didn’t read the whole instructions for this group project LOL.
I could have done something from Venezuela where I lived most of my life of Brazil where I actually was born Haha.
Aaaanyway I enjoy lots making this patriotic tote bag and I actually use it often hope you like it too.
How to make a DIY Patriotic Tote Bag using a ToothBrush Painting technique
Supplies:
- Fabric paint – I used red and blue
- White fabric – 2 pieces 40 x 60 cm (16″ x 24″)
- White fabric – for handle 1 piece 80 x 16 cm (32″ x 6″)
- Patterned fabric – for lining 2 Pieces 40 x 60 cm (16″ x 24″)
- Patterned fabric – for lining 1 piece 30 x 16 cm (12″ x 6″)
- White felt or batter – 2 Pieces 40 x 60 cm (16″ x 24″)
- Old toothbrush
- Vinyl or freezer paper stars.
- 1 white small button
- 1 Big button {I used blue}
- About 10 cm (4 Inches) of elastic cord.
- Matching thread and needles
Tools:
- Sewing machine – although if you know your way around hand sewing, you can definitely do it without a sewing machine.
- Cutting machine – Silhouette Cameo or Cricut. However, if you don’t have one you can just print out a bunch of stars and cut them out by hand on freezer paper
- Measuring tape and ruler
- Pins
Instructions:
Step 1: Prep Work
Cut all the necessary fabric pieces and also cut my felt.

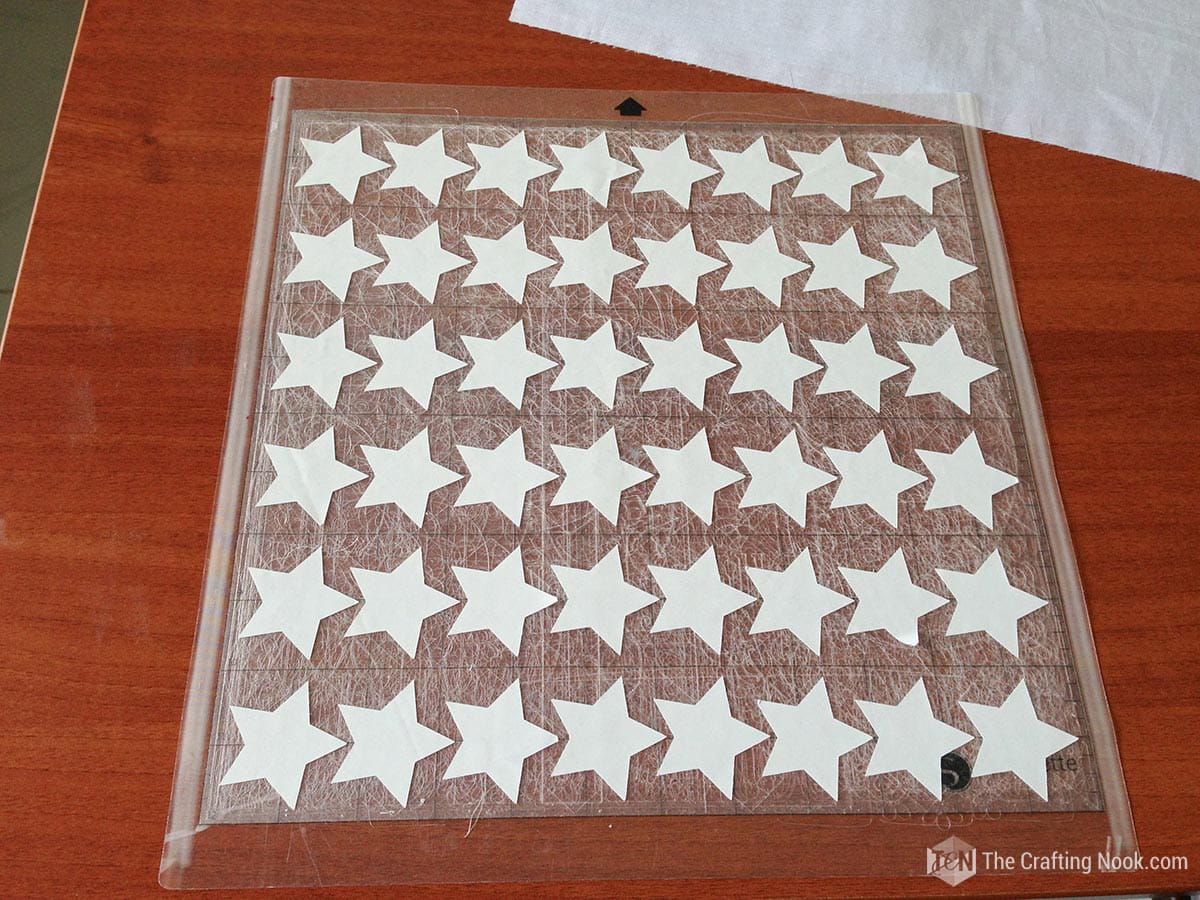
I made some starts on my Silhouette studio app and filled the whole cutting area.

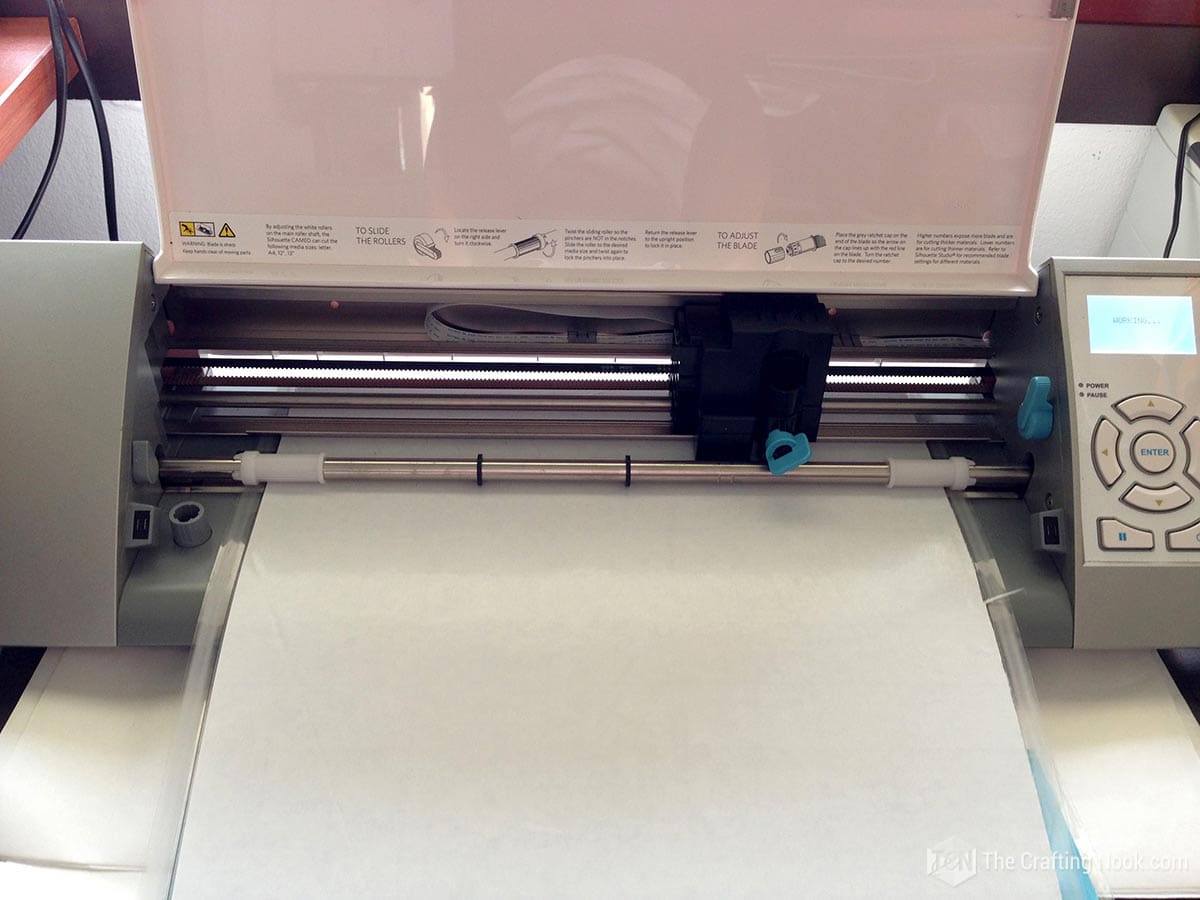
I cut a piece of freezer paper to cover the cutting area of my mat. 12×12. Placed it wax side facing up.
Step 2: Cutting the stencils
Then I sent it and cut it on my Cameo using a freezer paper. I used print paper as a setting and set the blade to 1.
Once the cut was made, I remove all the paper leaving only the stars on the mat.
Step 3: Stenciling and painting
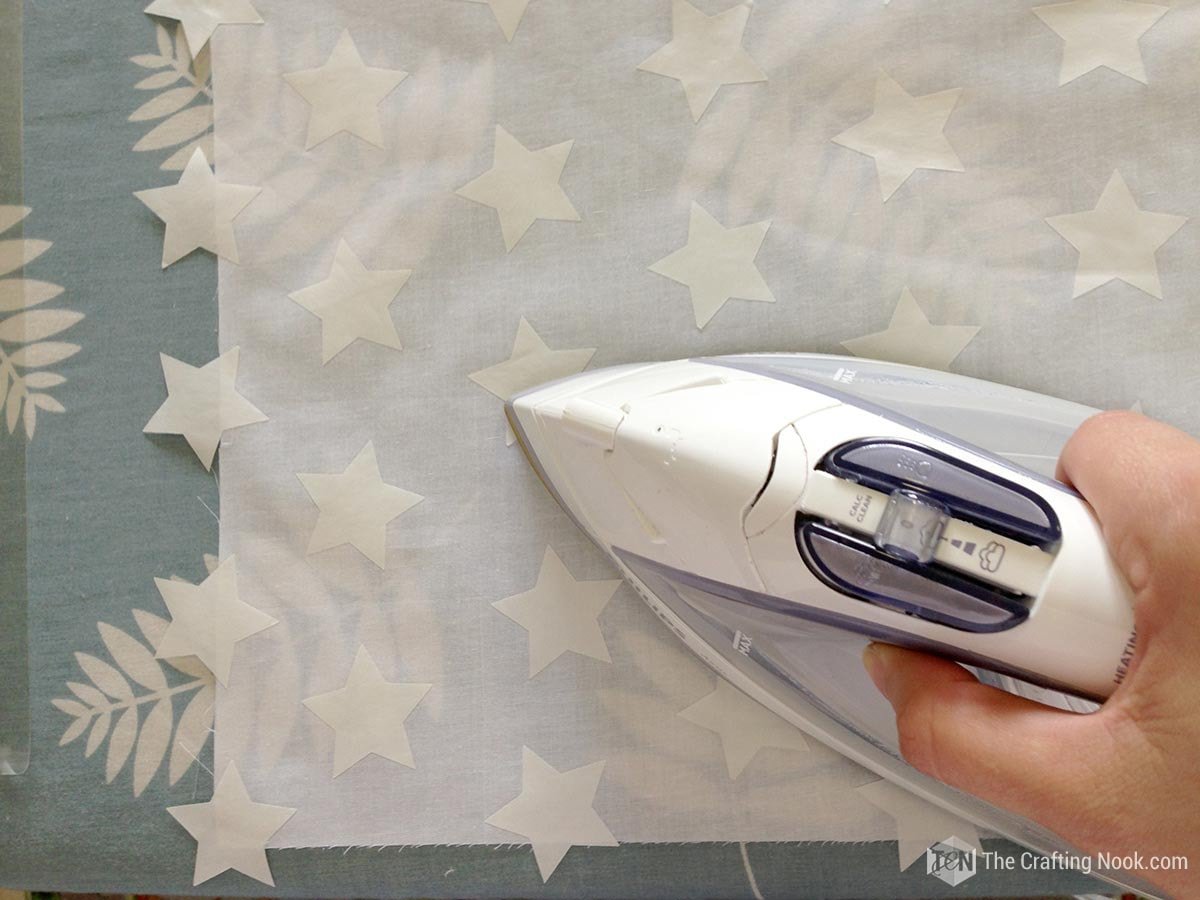
Using one of the 40 x 60 white fabric I placed and ironed the stars on the right side.
Then I protected a table with paper and also used a plastic surface.
I placed the star-masked fabric there and secure it with small pieces of tape.
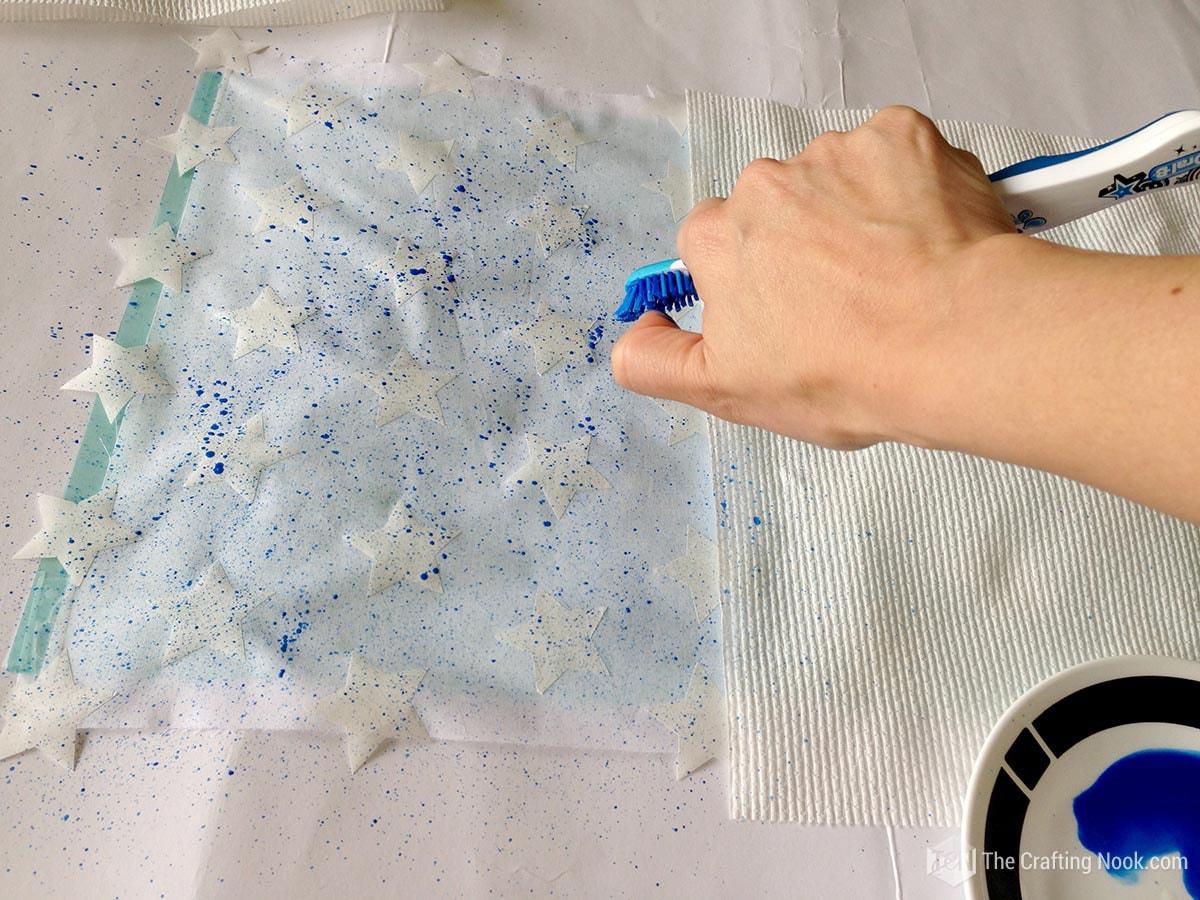
I slightly deluded the paint with some water, just a few drops to make it a bit thinner.
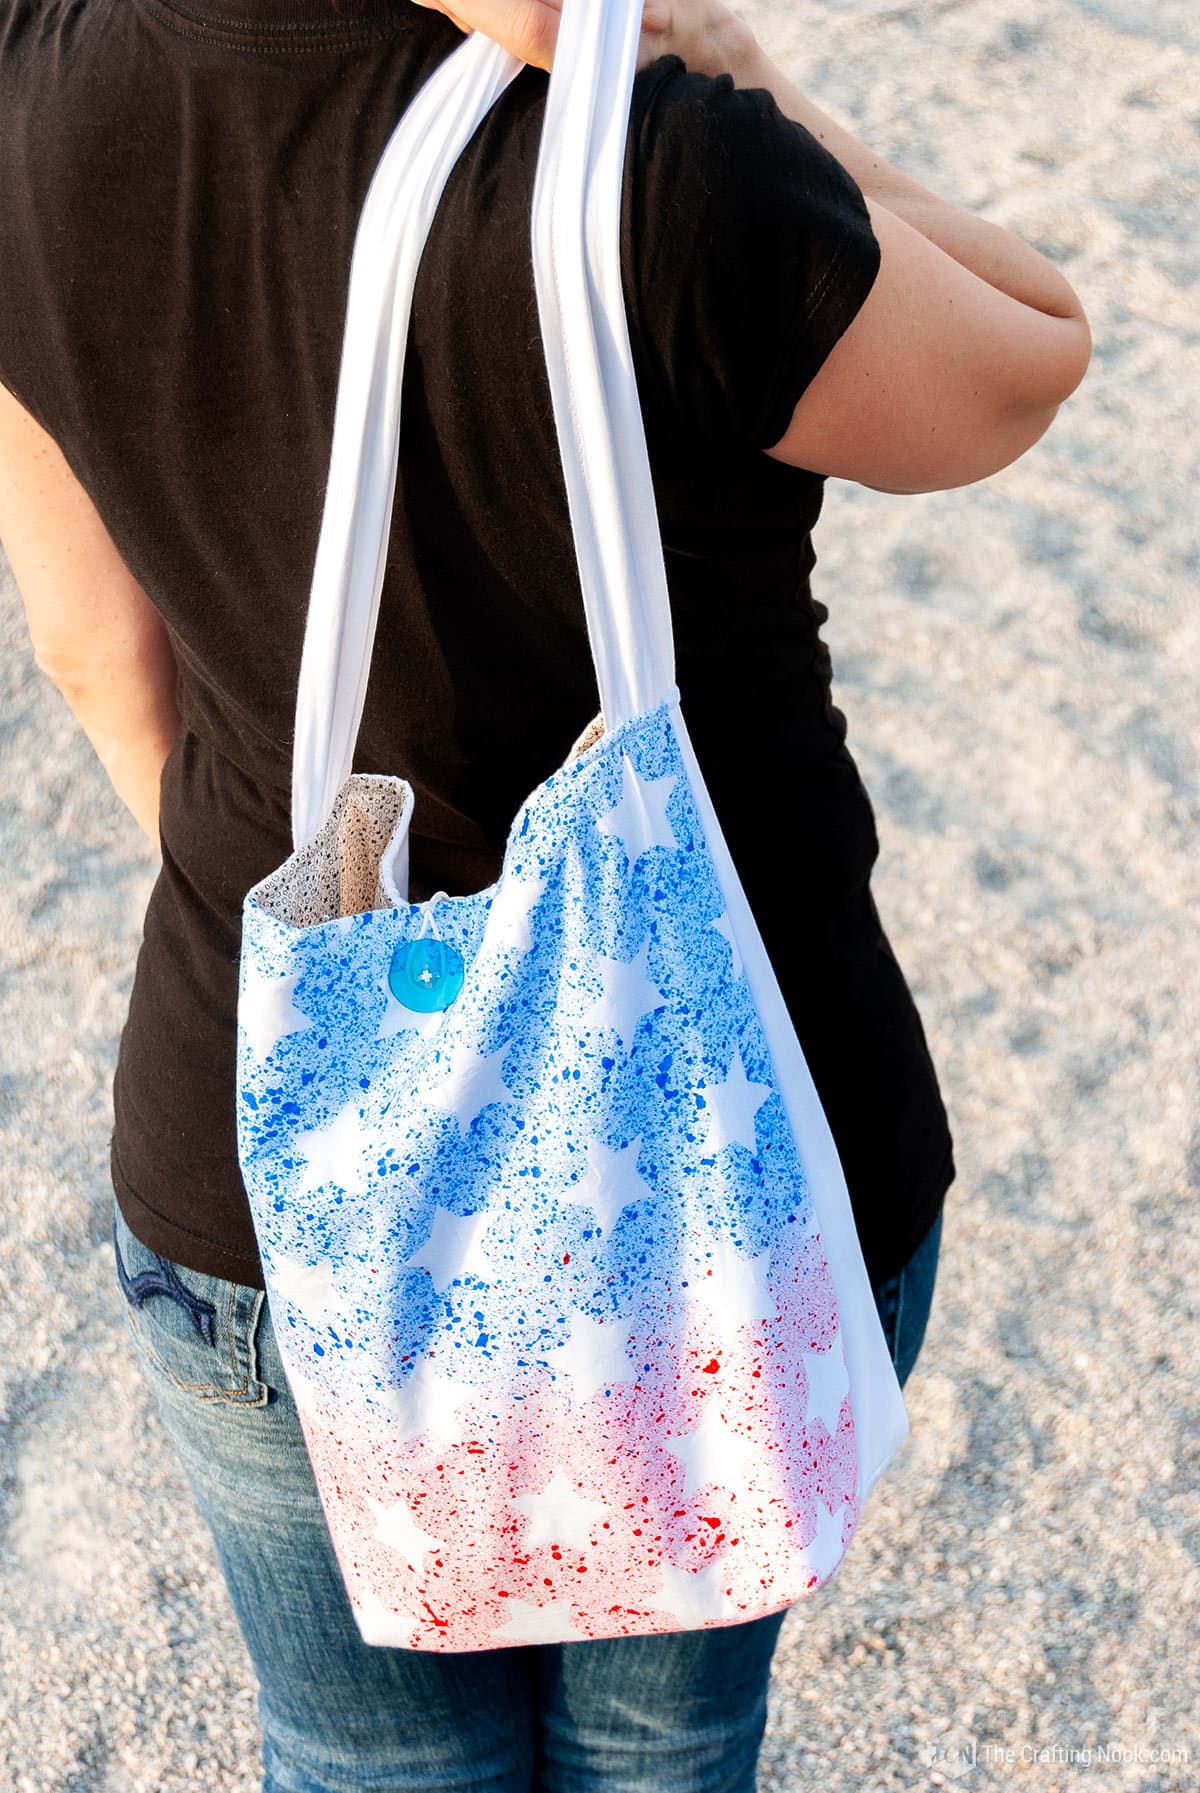
With the toothbrush, I started splatting the blue paint on half of the fabric and the other half with red paint.
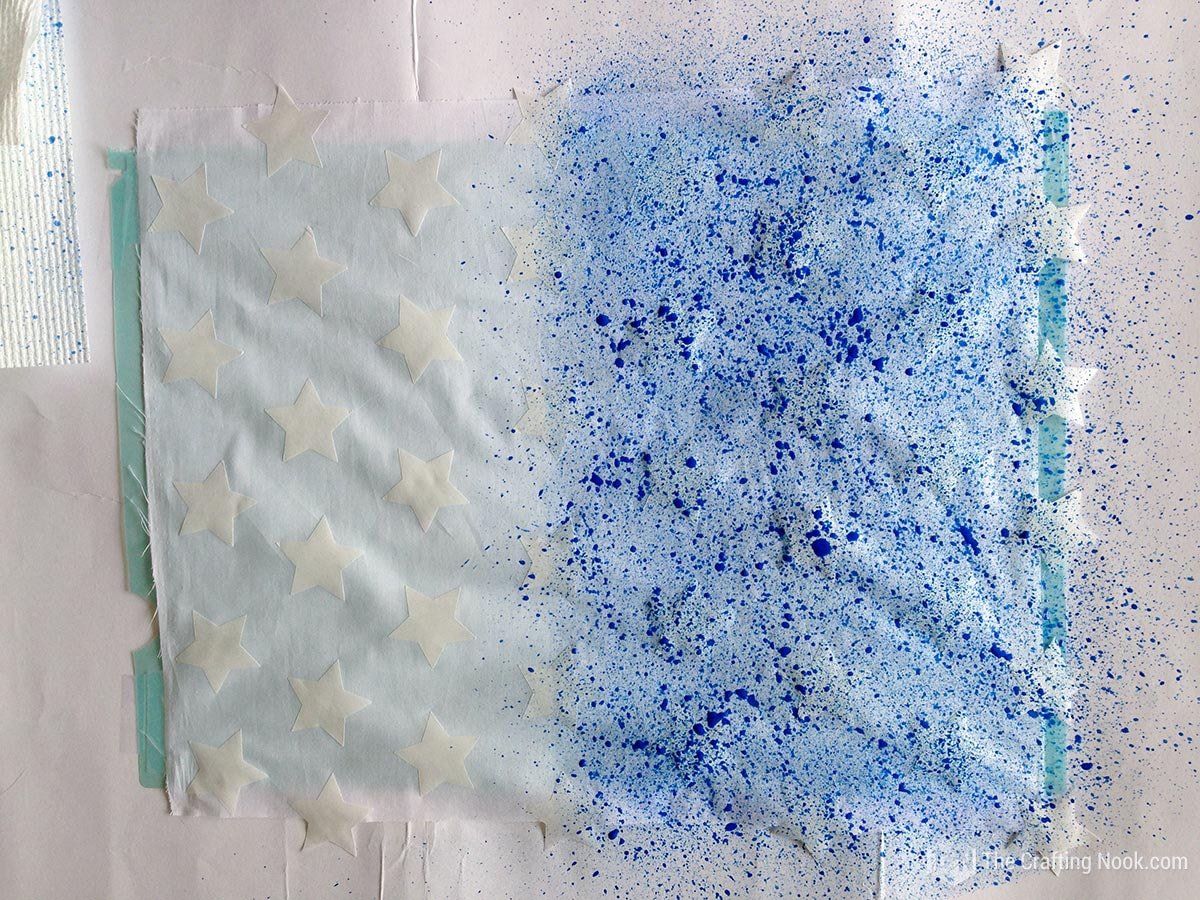

I left it dry for a couple of hours and then removed the stars carefully.
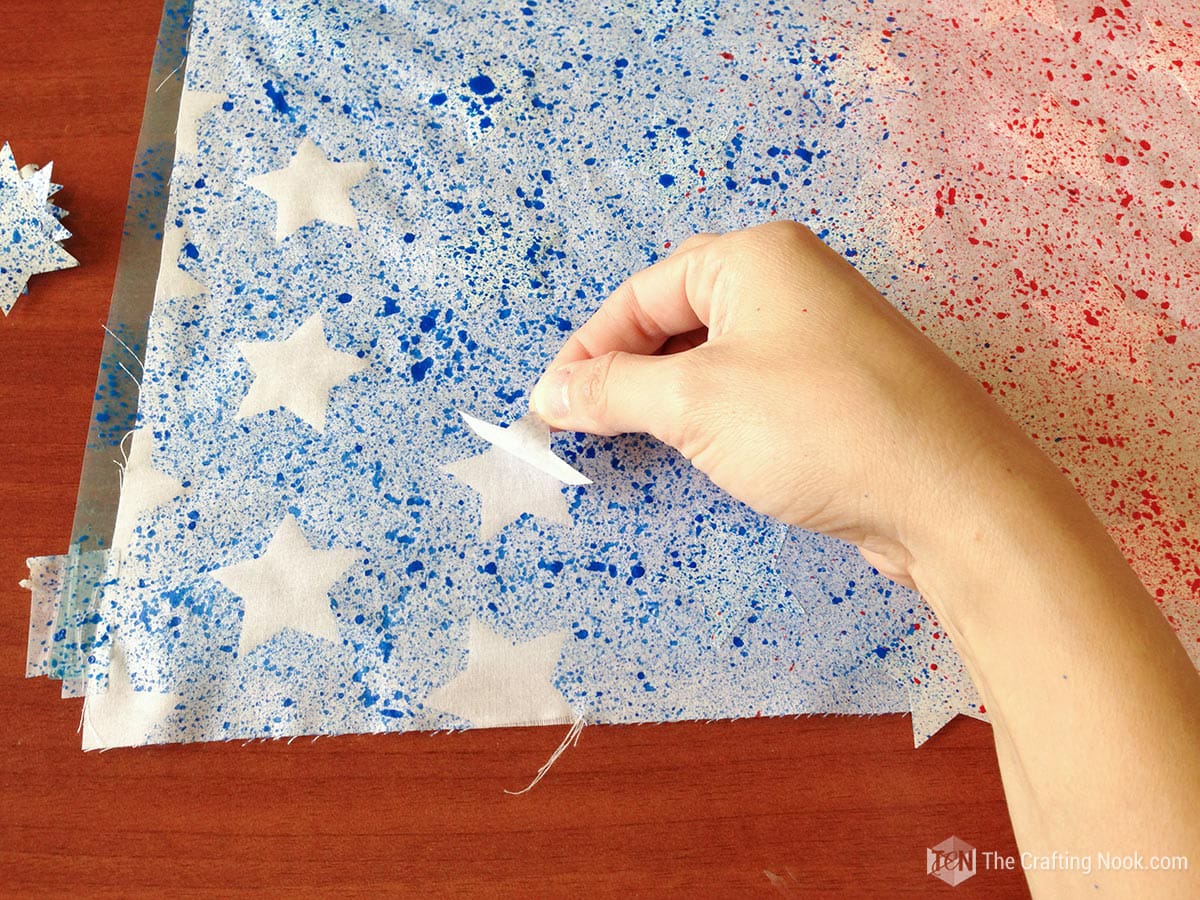
Tadaaa! The painting is done!

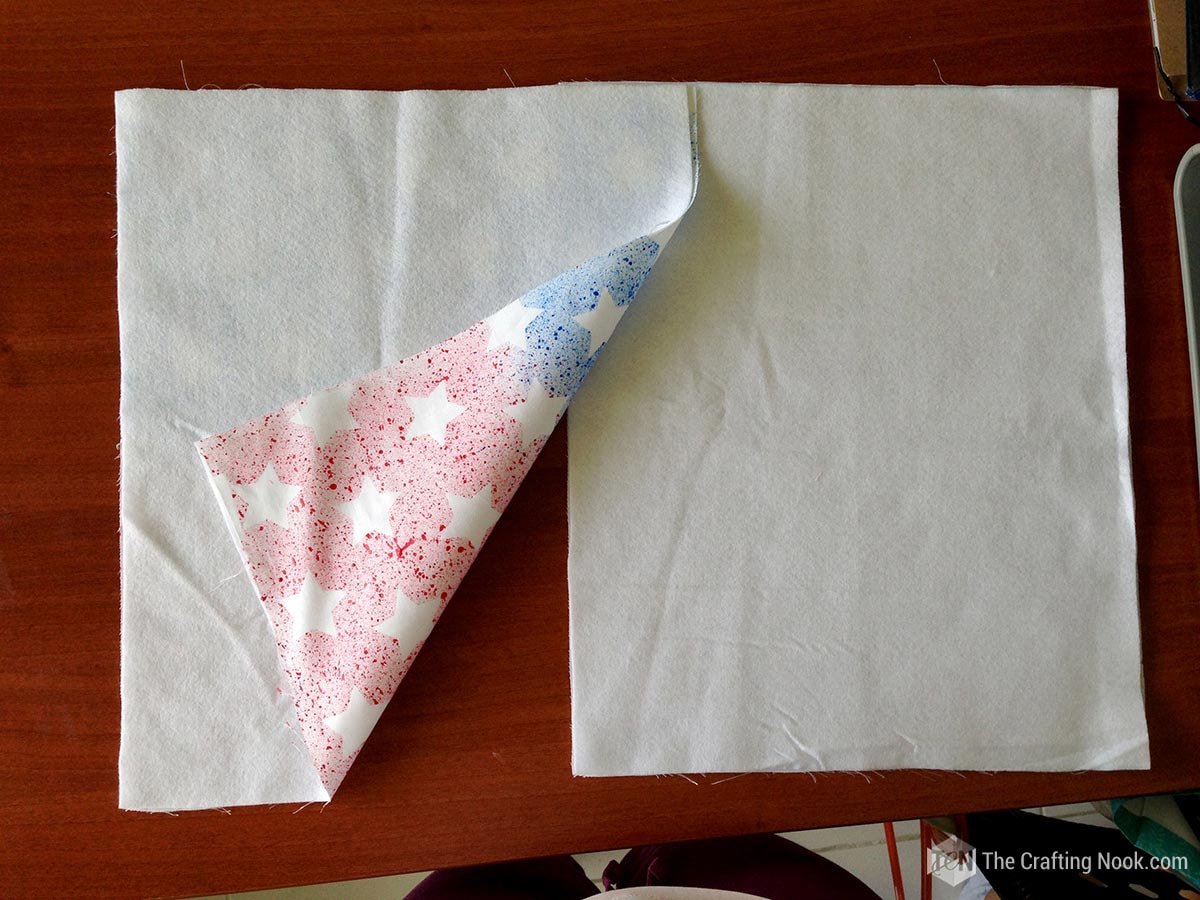
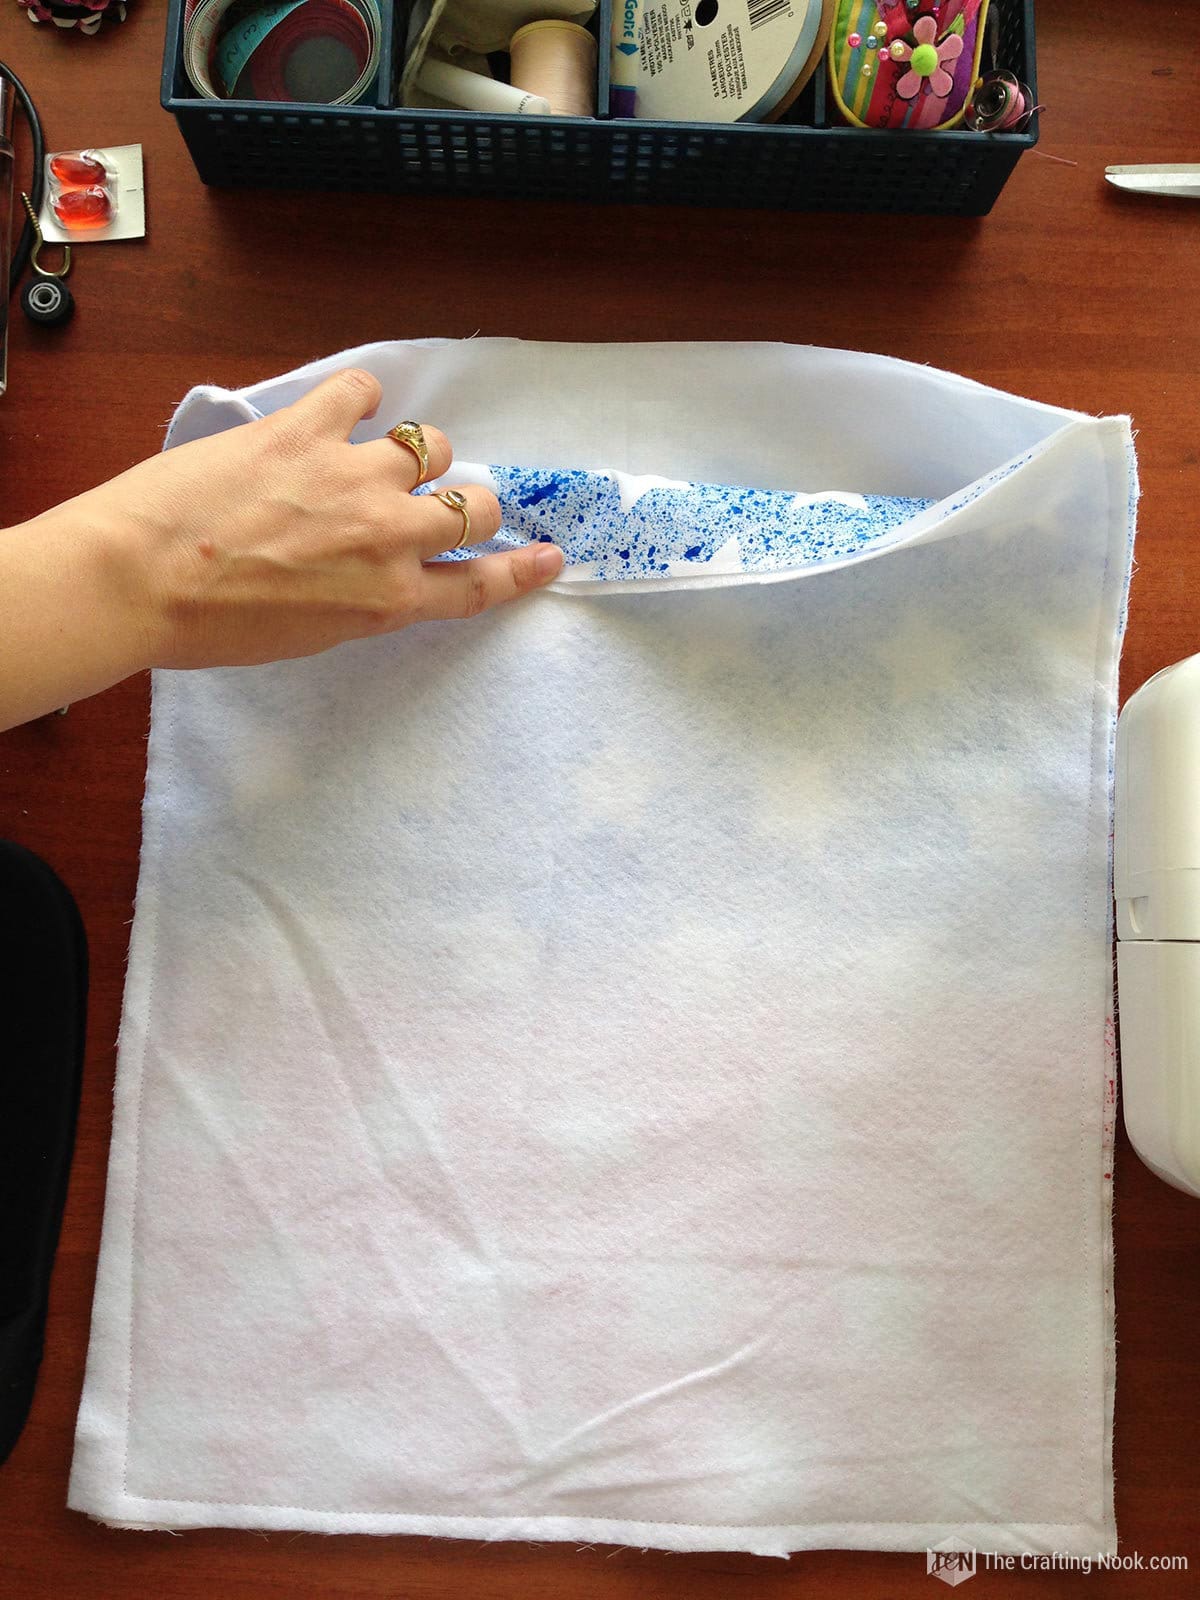
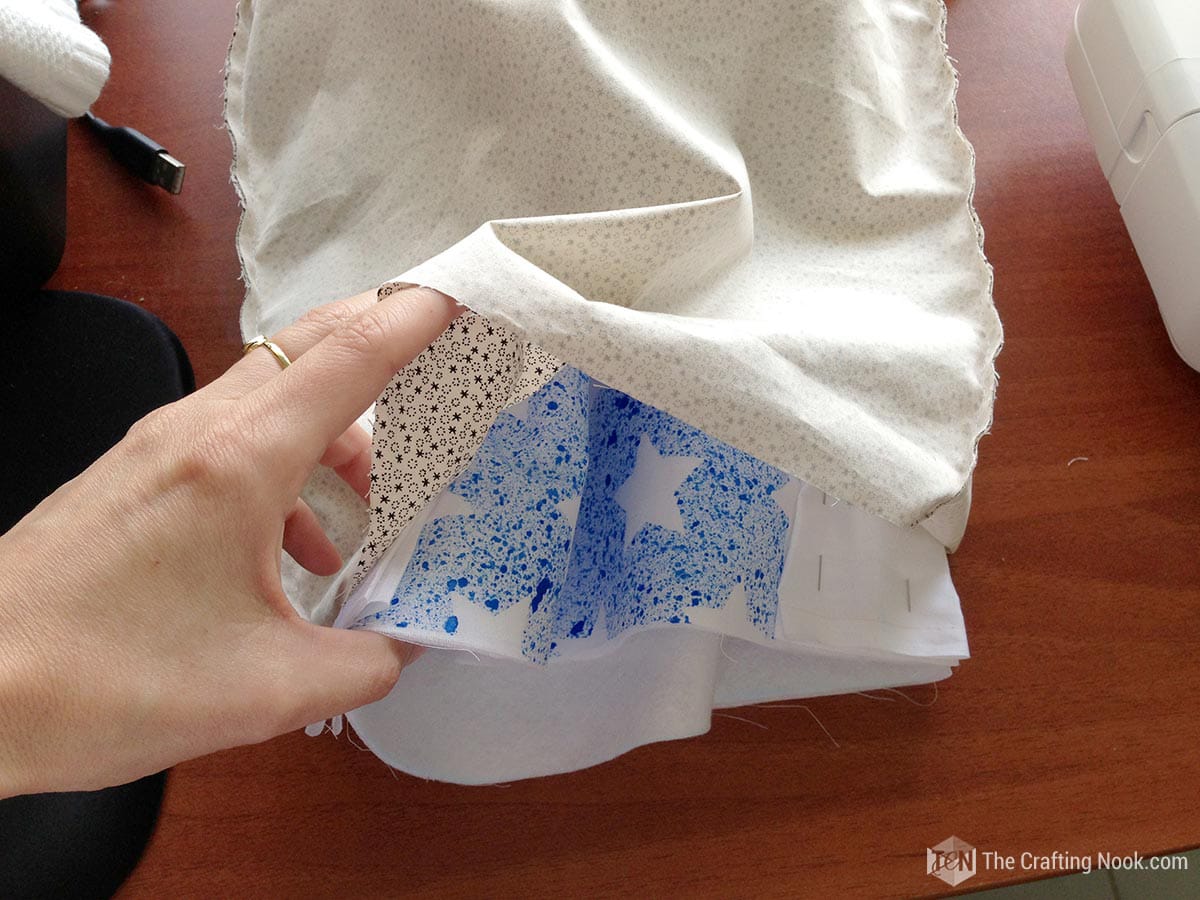
Step 4: Sew the outer side of the tote bag.
I put together one piece of 40 x 60 white fabric with one piece of felt.
And I put together the painted fabric with the piece of felt (painted fabric facing out).
Then placed both groups together, white fabric and painted fabric facing each other and stitched around 2 long felt sides and one short side leaving one short side open.
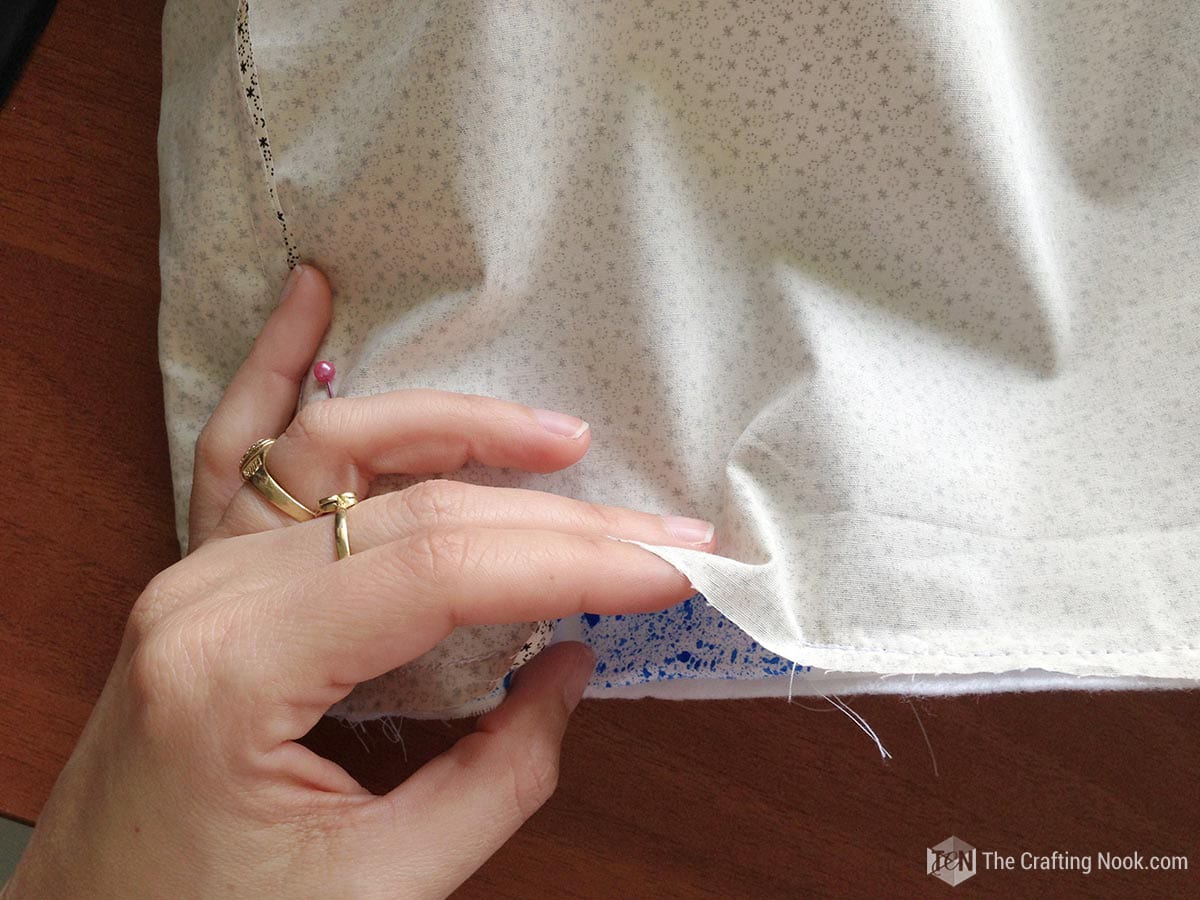
In order for the bag to have a flat bottom we will need to create a pleat. To do this, fold the bottom corners of your bag so it creates a triangle in the corner. Matching up the side seam and bottom seam will make this line up perfectly.
Pinned the corner; and with a water erasable pen, made a mark 2.5” away from the corner.
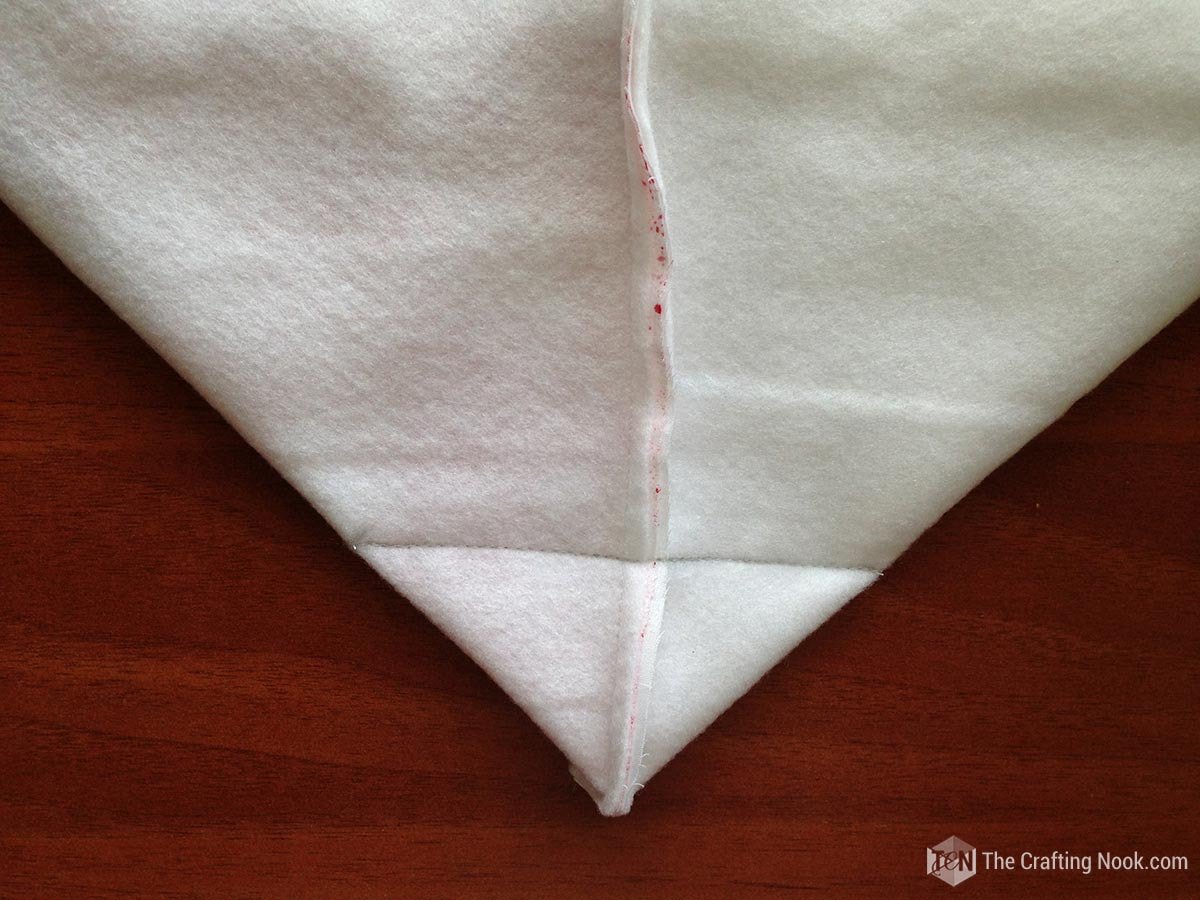
Drew a stitching line and then stitch across to create a pleat.
I cut the triangle leaving a seam allowance of 1 cm.

Turned it over.
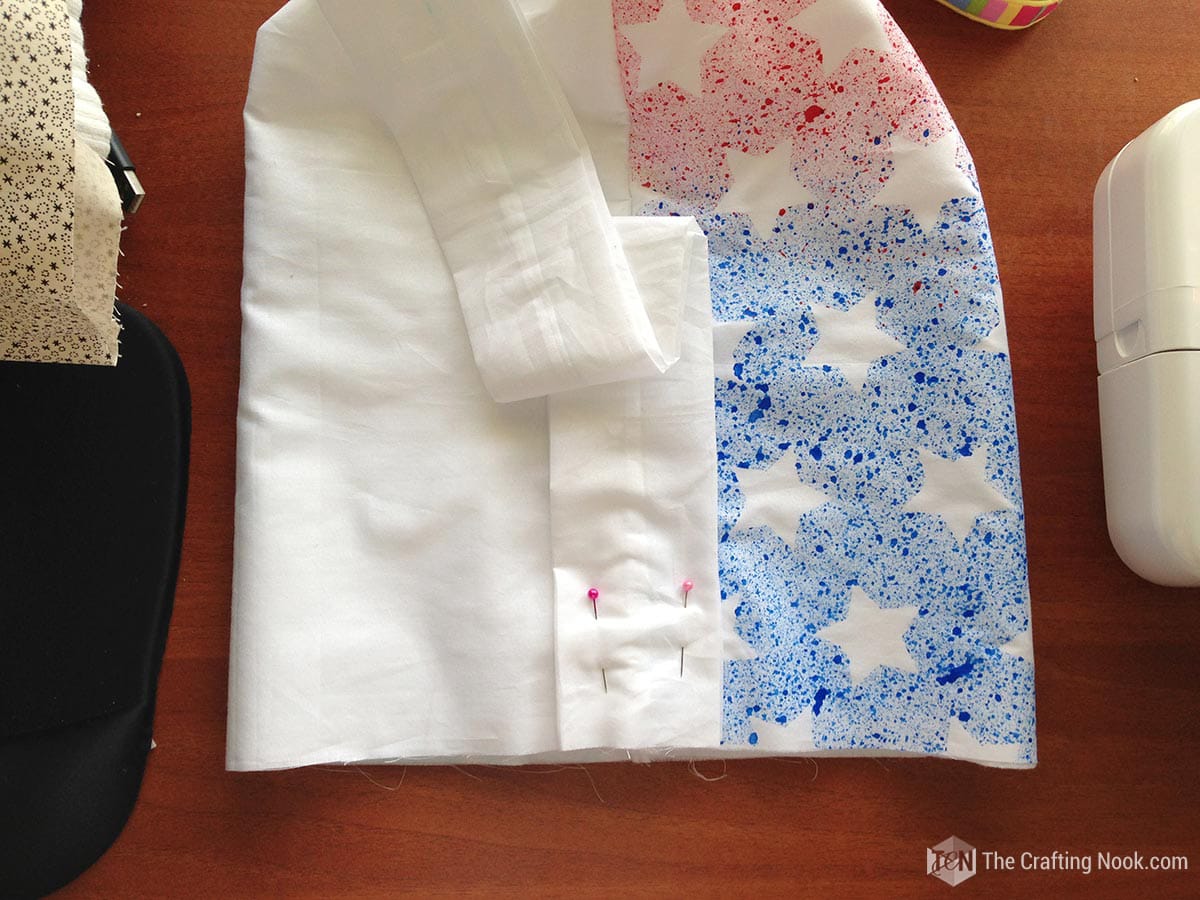
Step 5: Sew the handle of the Tote Bag
Folded the 80 x 16 cm handle fabric in half lengthwise, stitched the long side, and turned it inside out.

I placed and pinned in place each end of the handle strip to the sides of the tote bag on the right side.
Step 6: Sew the inner pockets
To make inside pockets I hemmed one long side of the 30 x 16 patterned fabric and placed it on top of the right side of one of the 40 x 60 cm patterned fabric.
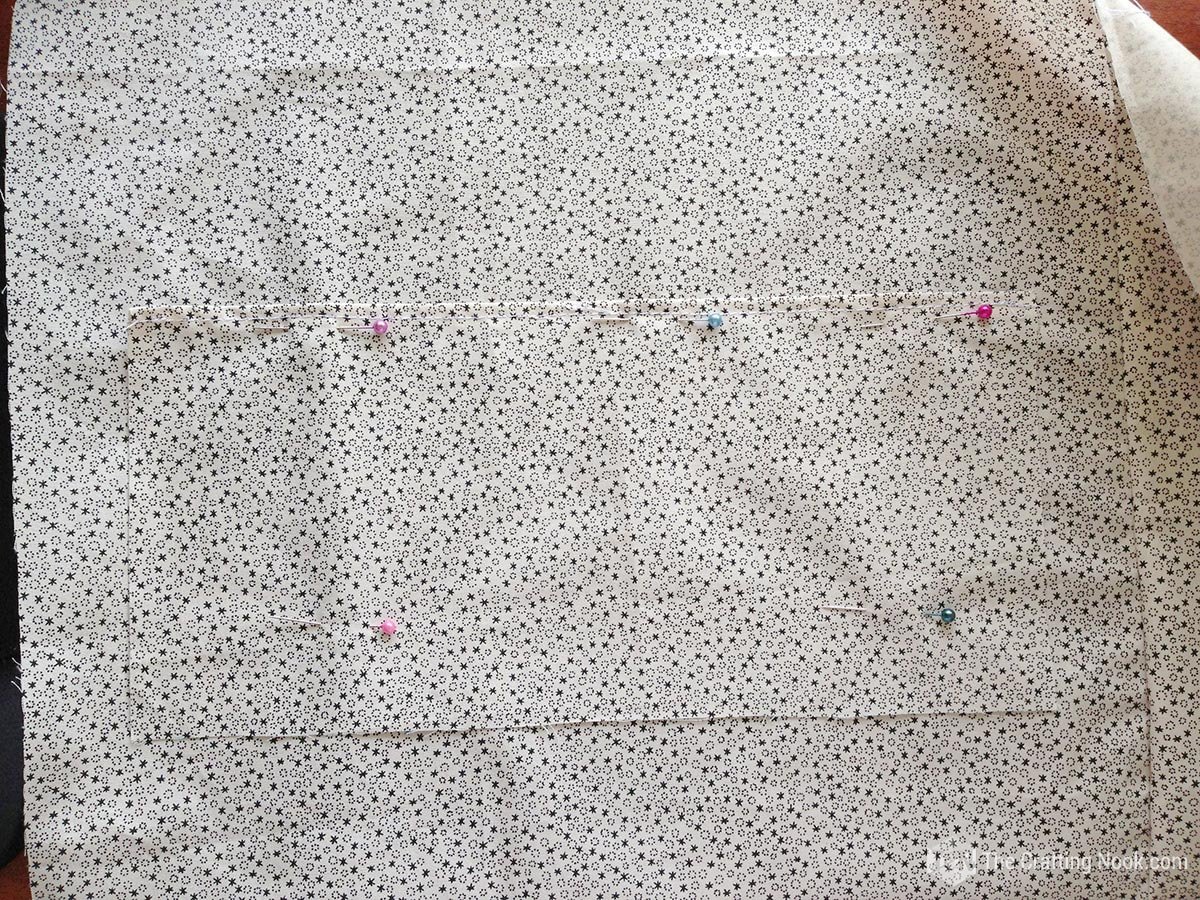
Stitched it around the sides and bottom.

I also stitched about 10 cm from one edge to make a phone pocket.
Step 7: Sew the lining of the bag
Repeated step 5 with only the patterned fabric or the fabric you are using as the lining.
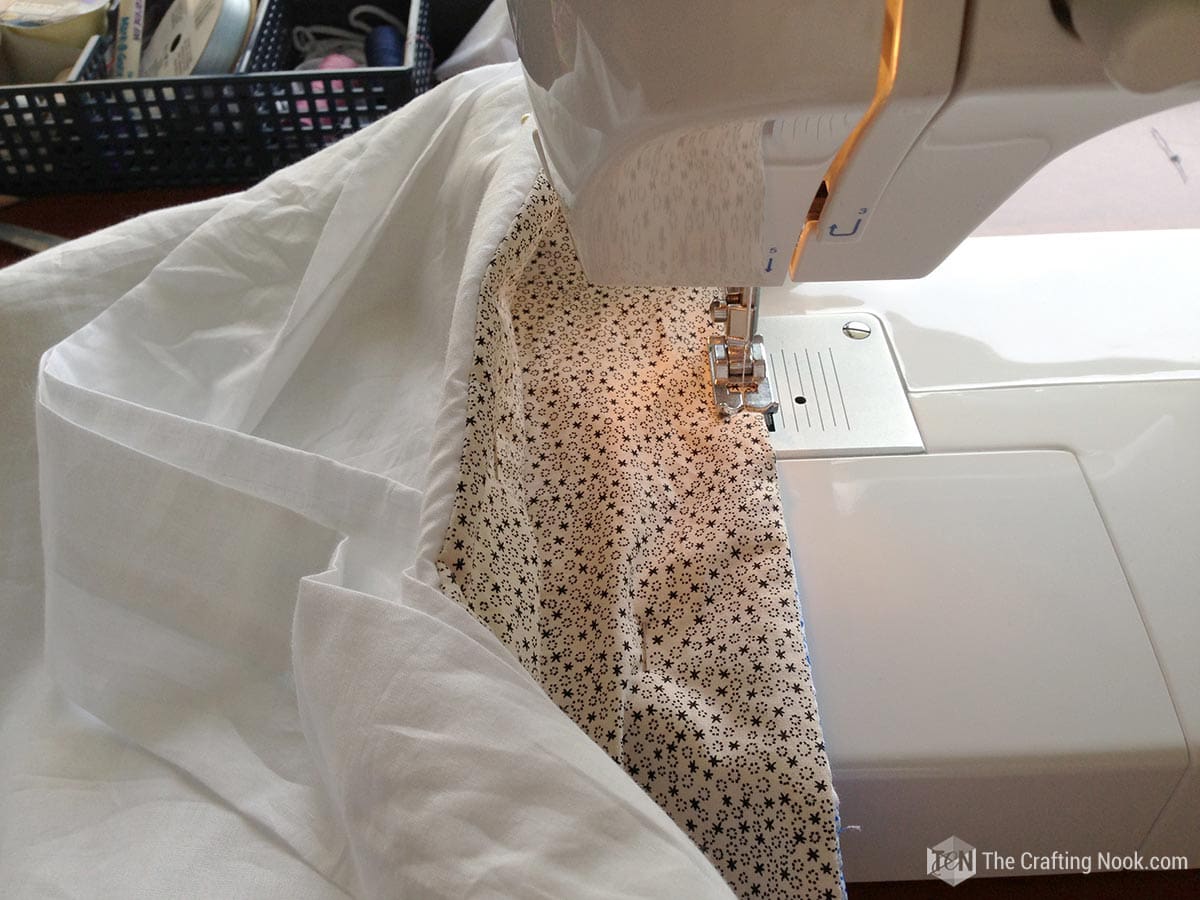
Step 8: Assemble the Tote Bag
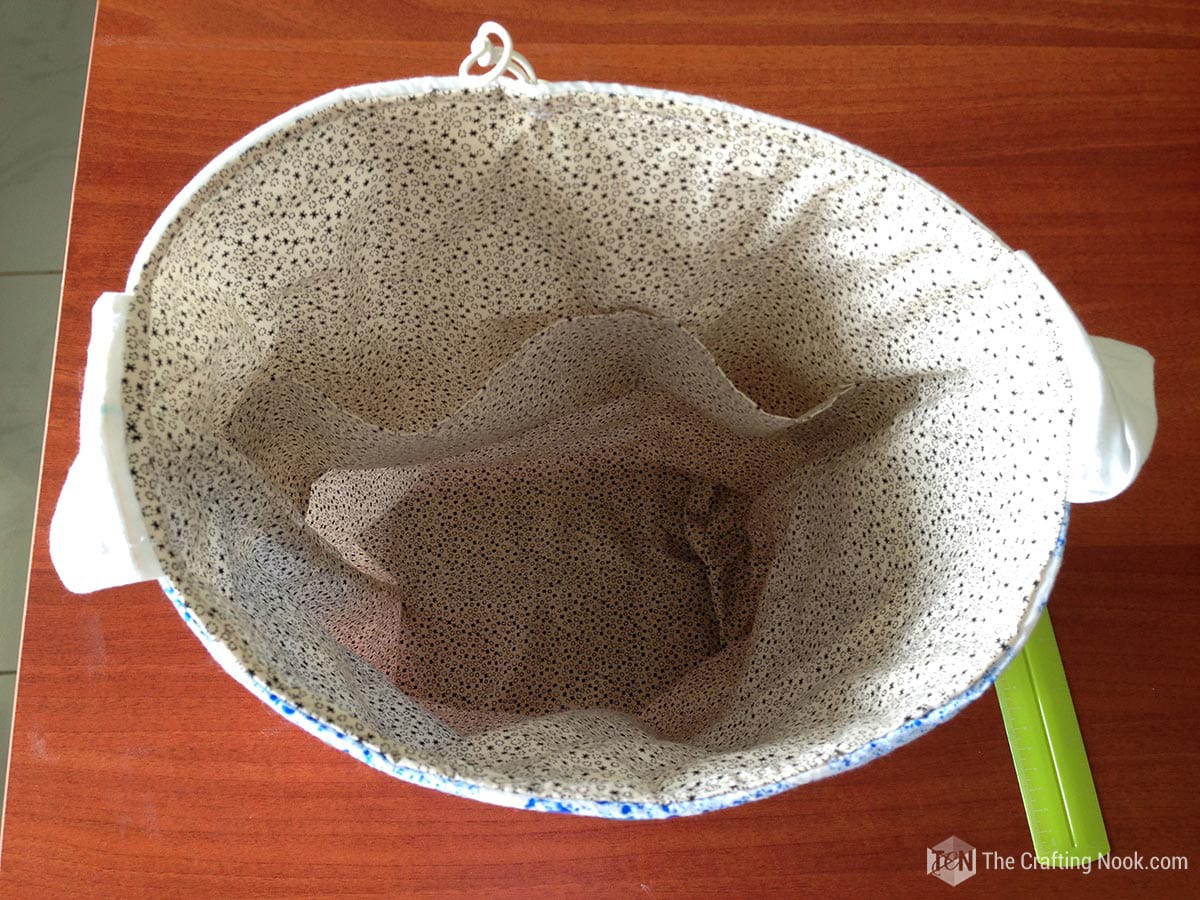
It’s time to sew the white and patterned fabric/lining together. I placed white fabric (with felt) inside the patterned fabric, right sides together.
I stitched around the top bag leaving a 1 cm seam allowance and also leaving a 6-8 cm opening for turning the bag.
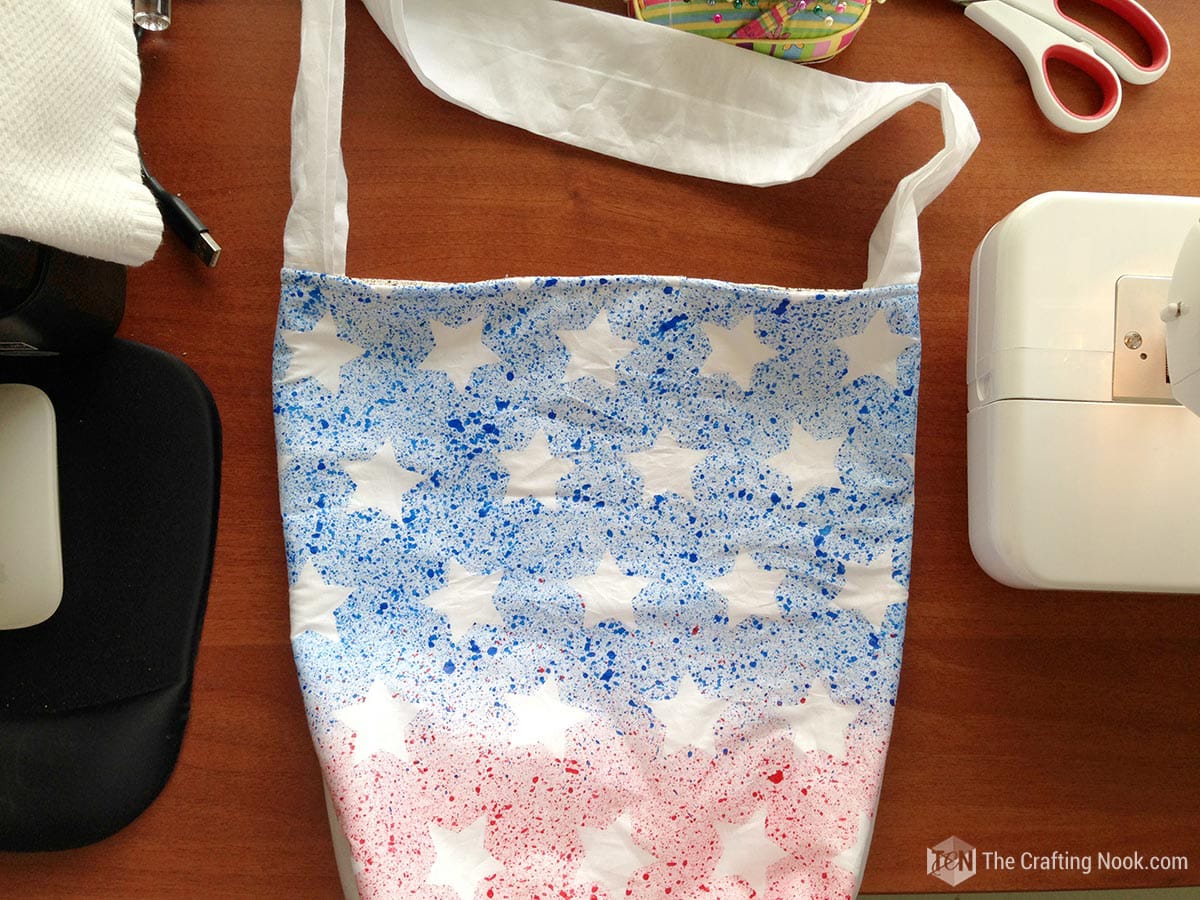
Turned the bag inside out and pushed the patterned side inside the bag.

Stitched all the way around the top edge of the bag. This closed up the opening I used to turn.
At this point, the bag is almost done.
Step 9: Final touches
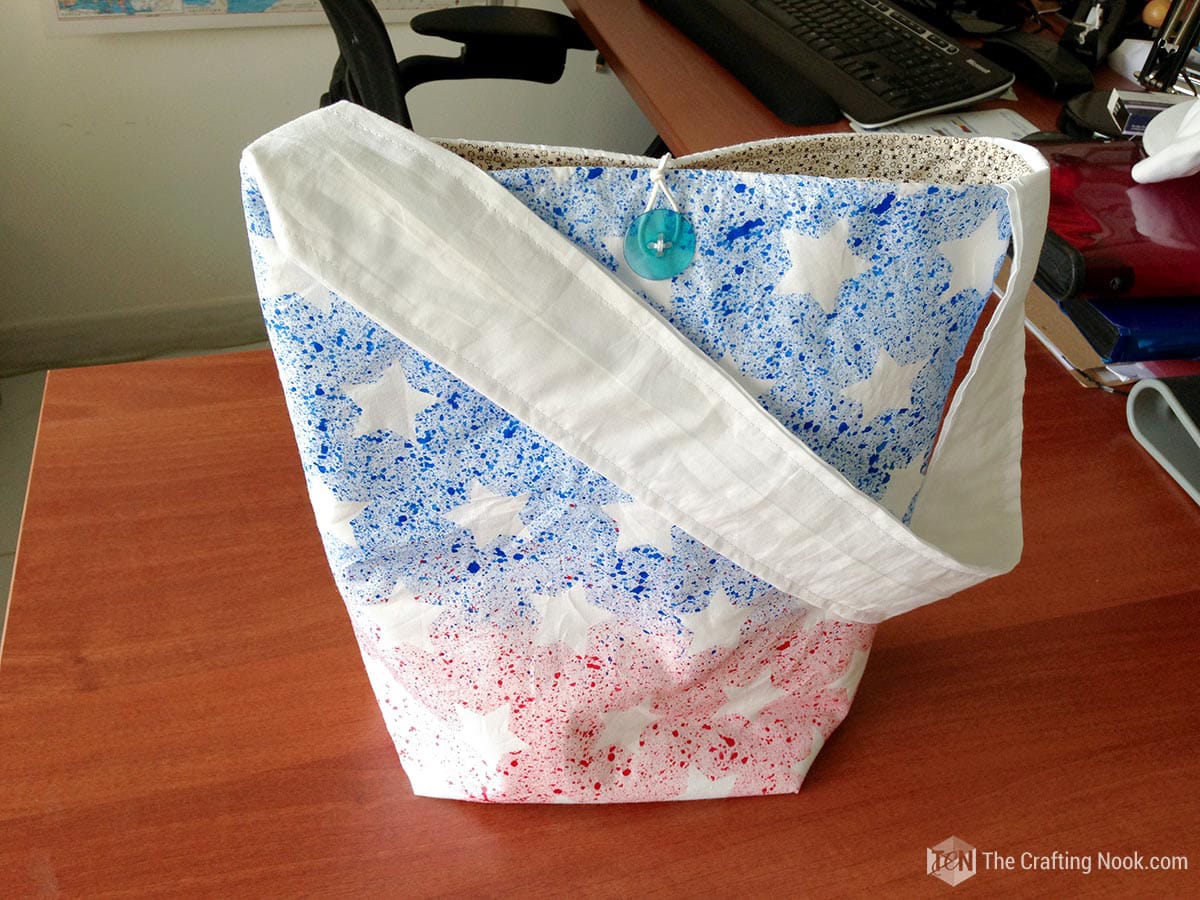
On the back of the bag, I stitched a button with the elastic cord.

I just folded the elastic in half and made a knot on the end and in the middle.
On the front side of the bag (the painted one), I stitched the big blue button and placed the elastic around it.

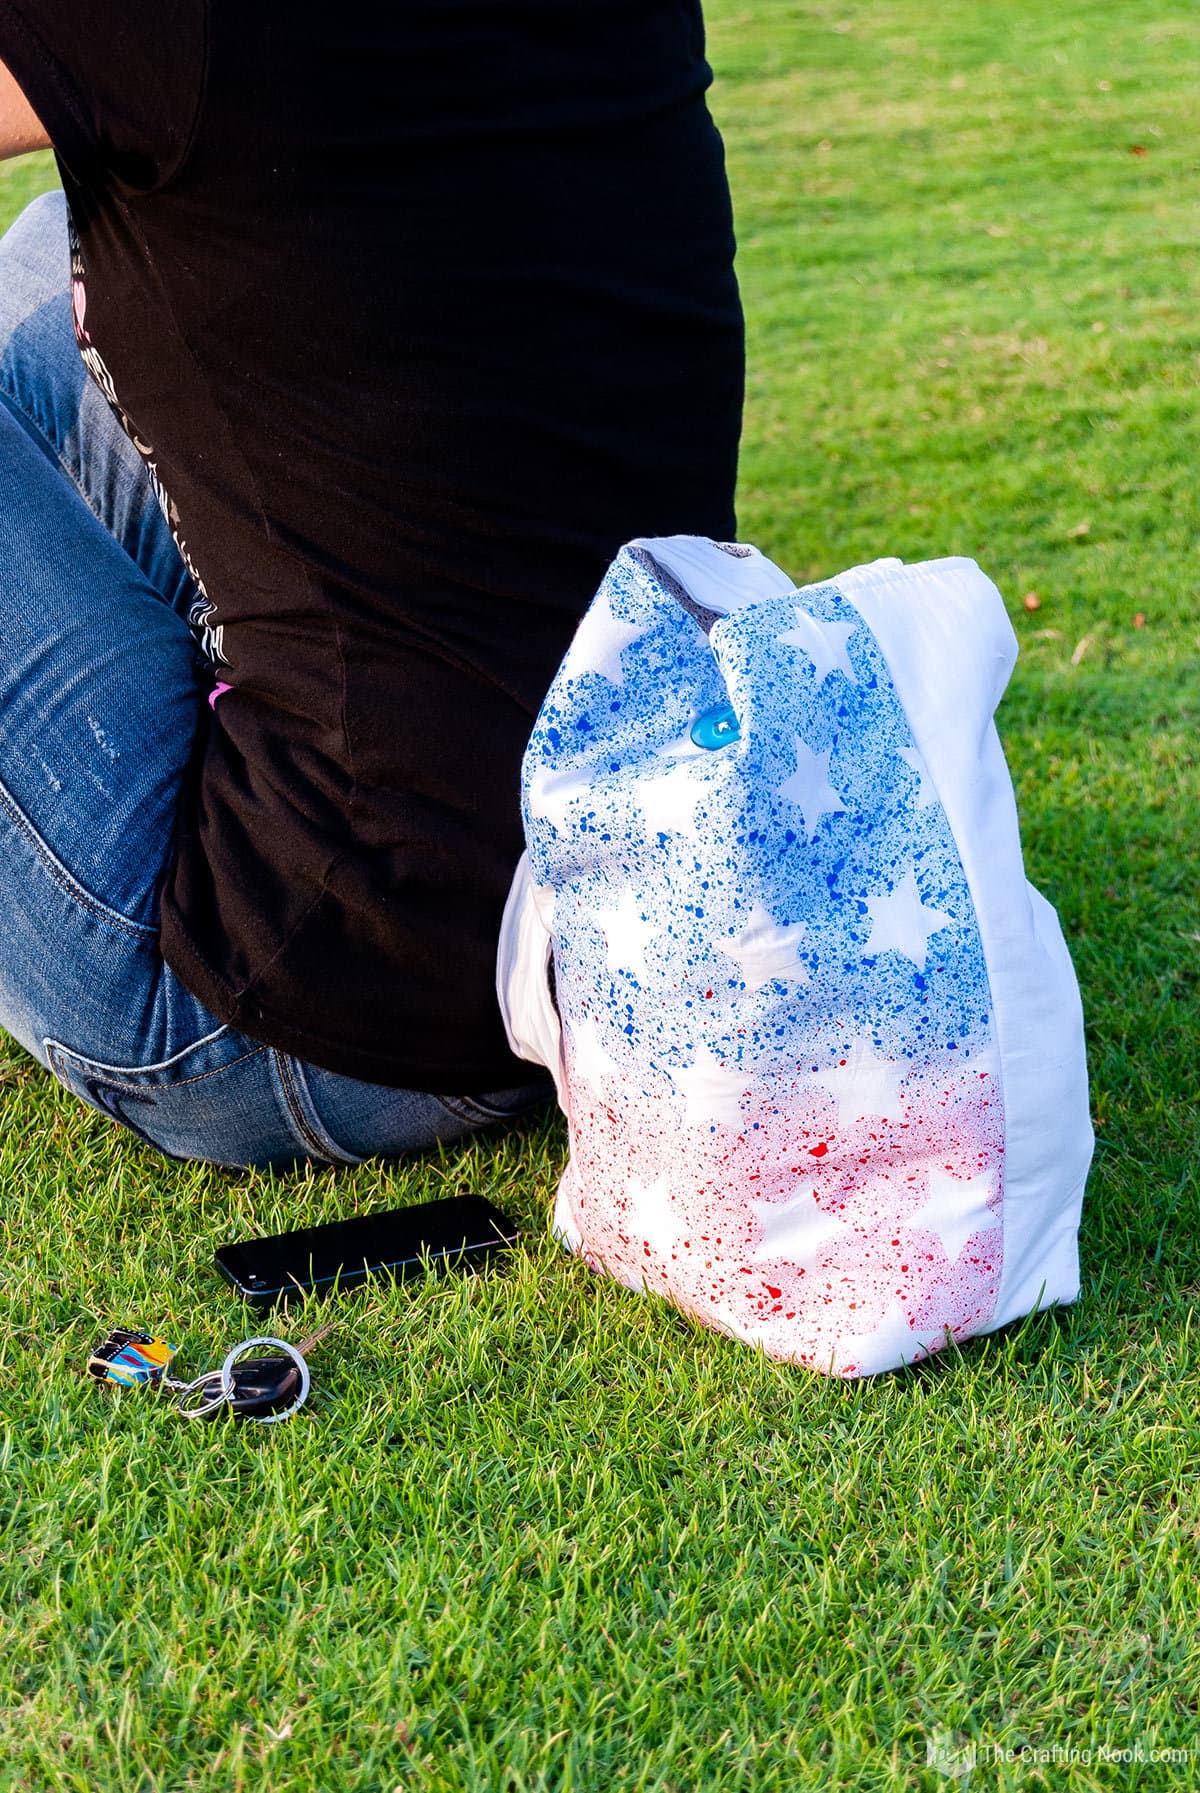
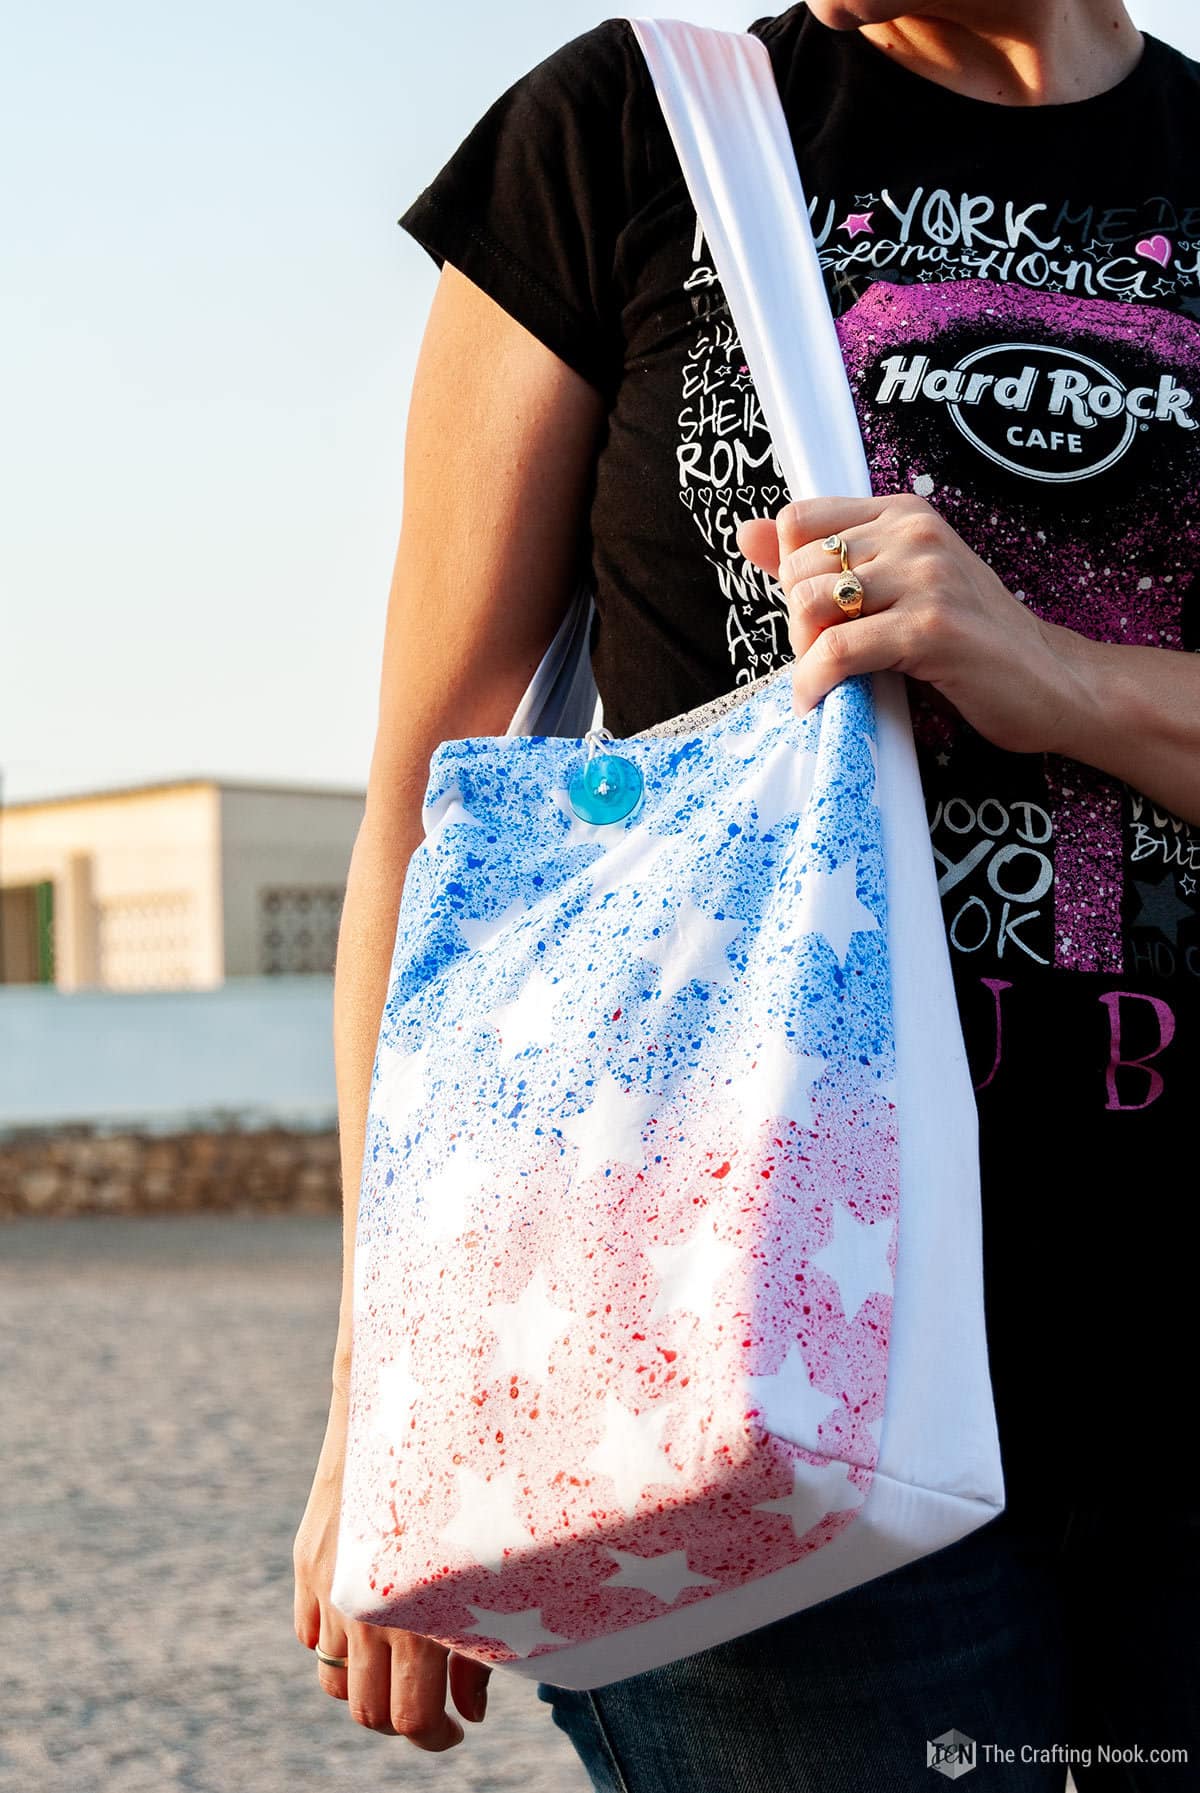
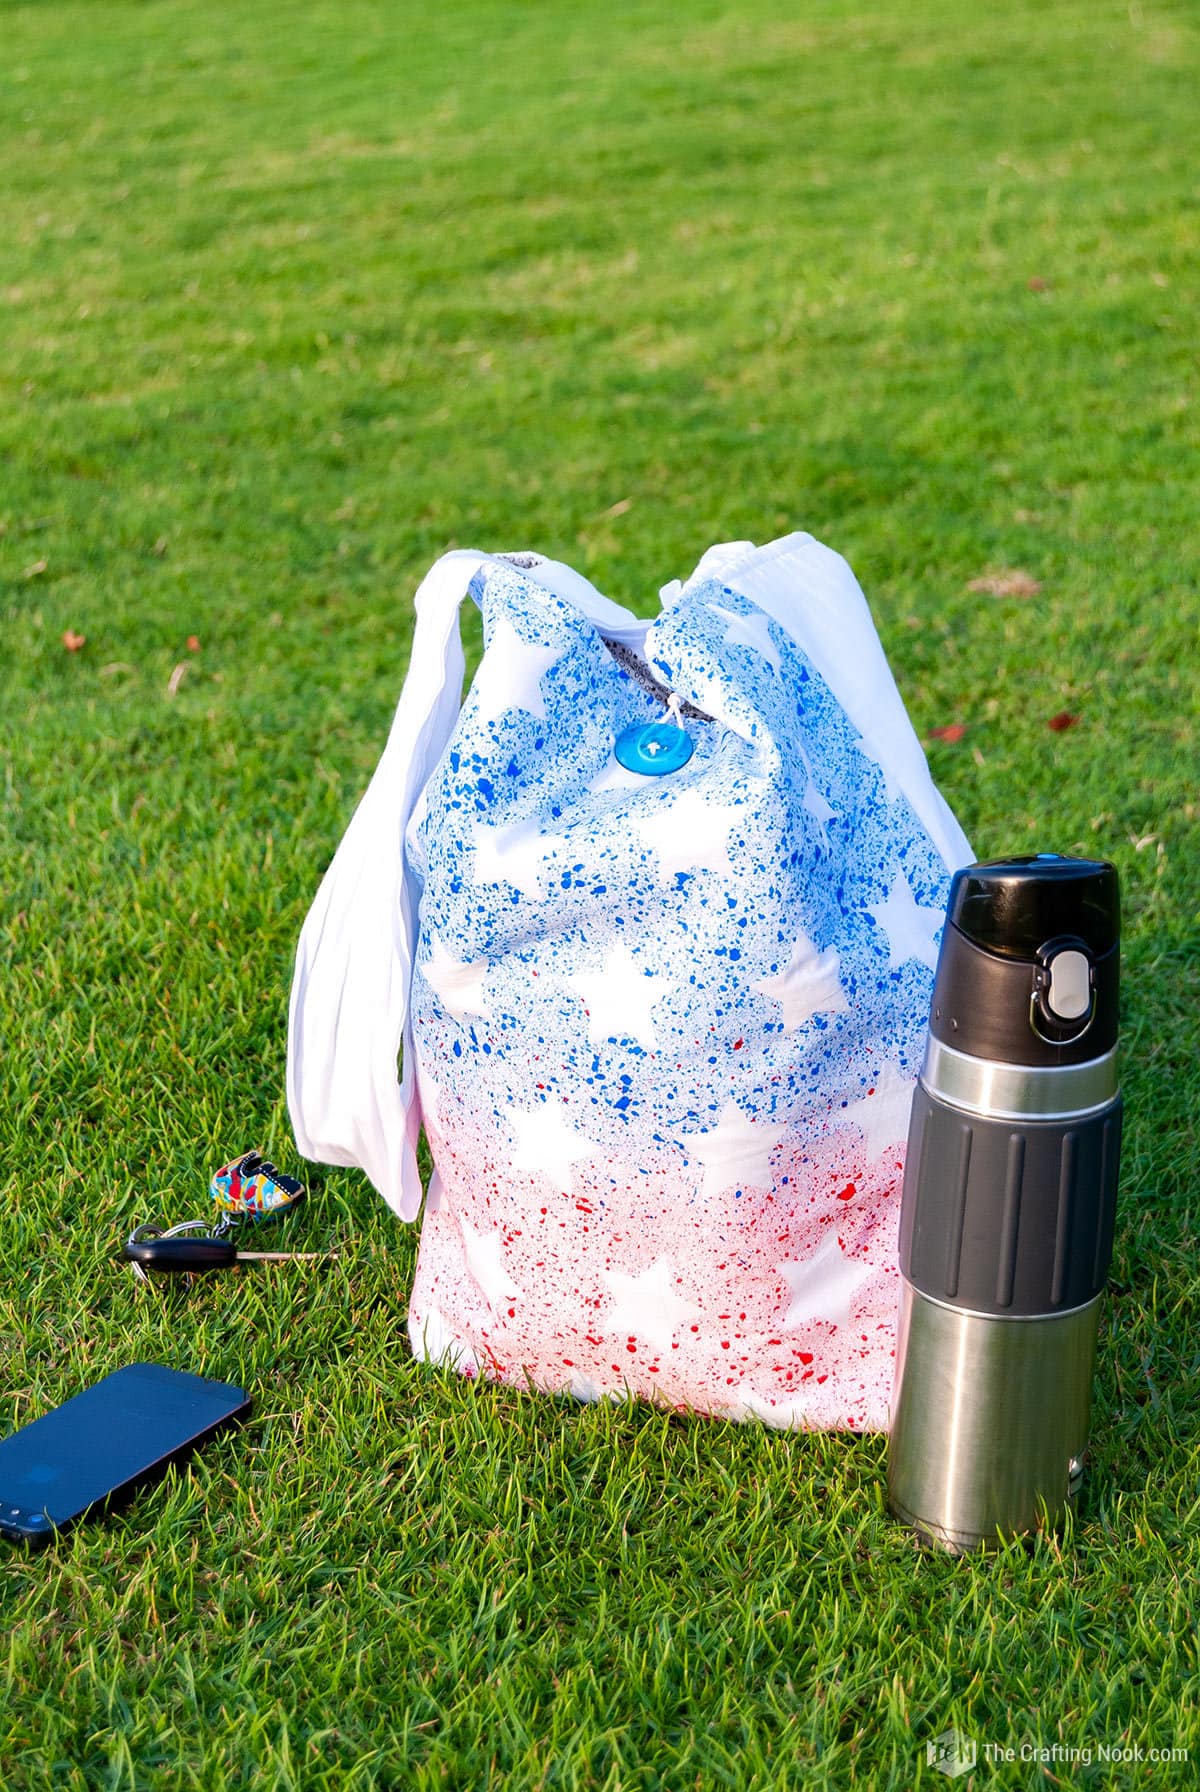
Tadaaaaaaaaa!!! The patriotic tote bag is ready to rock…
I just love it!!!! My dad even helped me with some awesome pictures while using it!
Fun, fun, fun, and hot, hot, hot… the temperature was almost 40 degrees Celsius (about 101 degrees Fahrenheit).
Crafting Tips:
- Before starting your toothbrush painting, make sure to wet the bristles slightly. This will help create a smoother and more controlled application of paint on your tote bag.
- After painting, let your design dry completely. To protect it from fading or smudging, use a fabric sealant spray. This will ensure your patriotic artwork stays vibrant for a long time.
- To prevent fraying edges on your fabric, you can do the traditional zig-zag or apply a thin layer of clear nail polish or fabric glue along the cut edges. This will seal the threads and give your tote bag a polished finish.
- Experiment with different toothbrushes for unique paint effects. A soft-bristled toothbrush creates a fine splatter, while a stiffer toothbrush can give a more textured look. Try out various toothbrushes to achieve the desired effect for your patriotic design.
- Mix the fabric paint with a fabric medium to ensure that the paint adheres well and stays vibrant even after washing your tote bag.
- To protect your finished tote bag design, iron it on the reverse side using a pressing cloth. This will set the paint and make it more resistant to fading or smudging.
- When sewing your tote bag, reinforce the handles by stitching a small square or an “X” pattern at the attachment points. This will provide extra strength and durability, ensuring your bag can carry all your patriotic essentials.
- Lastly, don’t be afraid to let your creativity shine! Experiment with patterns, colors, and designs that represent your personal style and love for your country. Let your DIY patriotic tote bag be a reflection of your unique artistic spirit.
Frequently Asked Questions
Yes, you can use a variety of fabrics such as cotton, canvas, or even denim. Just ensure that the fabric is suitable for painting and can withstand the toothbrush painting technique.
Fabric paints or acrylic paints work best for toothbrush painting. Make sure to choose colors that are vibrant and suitable for your patriotic design. If you use acrylic paint, make sure to use a medium and fabric paint sealant.
It’s a good practice to pre-wash the fabric to remove any sizing or chemicals that may affect the paint’s adhesion. However, check the specific instructions on the fabric or paint you’re using, as some may have different recommendations.
Yes, most fabric paints are machine washable. However, it’s best to follow the specific instructions on the paint bottle regarding washing and drying to ensure the longevity of your design.
The drying time can vary depending on the type of paint and fabric. Generally, it takes a few hours to dry completely. For faster drying, you can use a hairdryer on a low heat setting.
Absolutely! It’s actually perfect to get kids involved. You can get creative and add embellishments like ribbons, sequins, or fabric patches to enhance your patriotic design. Just make sure they are securely attached.
Definitely! Toothbrush painting can be used for various projects like T-shirts, canvas shoes, or even home decor items. Feel free to explore and experiment with different surfaces and designs.
More sewing Projects to Try
If you enjoyed this cute patriotic tote bag tutorial, you might also love these sewing projects for kids too:

Want to Check Out More Silhouette Projects?
My Silhouette Challenge buddies and I are all sharing projects on our blogs today, so peruse the projects below for a wealth of Silhouette inspiration!
1. The Kim Six Fix // 2. Create & Babble // 3. Simply Kelly Designs // 4. Dragonfly & Lily Pads // 5. Mama Sonshine // 6. Lil Mrs. Tori // 7. Tried & True // 8. It Happens in a Blink // 9. The Thinking Closet // 10. unOriginal Mom // 11. Weekend Craft // 12. The Outlandish Momma // 13. Adventures in All Things Food // 14. Practically Functional // 15. Silhouette School //16. Ginger Snap Craft // 17. The Crafting Nook (This post) // 18. Architecture of a Mom //
✂️ Tutorial

DIY Patriotic Tote Bag with Toothbrush Painting
Tools
- Sewing machine – although if you know your way around hand sewing, you can definitely do it without a sewing machine.
- Cutting machine – Silhouette Cameo or Cricut. However, if you don’t have one you can just print out a bunch of stars and cut them out by hand on freezer paper
- Measuring tape and ruler
- Pins
Supplies
- Fabric paint – I used red and blue
- White fabric – 2 pieces 40 x 60 cm 16″ x 24″
- White fabric – for handle 1 piece 80 x 16 cm 32″ x 6″
- Patterned fabric – for lining 2 Pieces 40 x 60 cm 16″ x 24″
- Patterned fabric – for lining 1 piece 30 x 16 cm 12″ x 6″
- White felt or batter – 2 Pieces 40 x 60 cm 16″ x 24″
- Old toothbrush
- Vinyl or freezer paper stars.
- 1 white small button
- 1 Big button {I used blue}
- About 10 cm 4 Inches of elastic cord.
- Matching thread and needles
Instructions
STEP 1: PREP WORK
- Cut all the necessary fabric pieces and also cut my felt.
- I made some starts on my Silhouette studio app and filled the whole cutting area.
- I cut a piece of freezer paper to cover the cutting area of my mat. 12×12. Placed it wax side facing up.
STEP 2: CUTTING THE STENCILS
- Then I sent it and cut it on my Cameo using a freezer paper. I used print paper as a setting and set the blade to 1.
- Once the cut was made, I remove all the paper leaving only the stars on the mat.
STEP 3: STENCILING AND PAINTING
- Using one of the 40 x 60 white fabric I placed and ironed the stars on the right side.
- Then I protected a table with paper and also used a plastic surface.
- I placed the star-masked fabric there and secure it with small pieces of tape.
- I slightly deluded the paint with some water, just a few drops to make it a bit thinner.
- With the toothbrush, I started splatting the blue paint on half of the fabric and the other half with red paint.
- I left it dry for a couple of hours and then removed the stars carefully.
- Tadaaa! The painting is done!
STEP 4: SEW THE OUTER SIDE OF THE TOTE BAG.
- I put together one piece of 40 x 60 white fabric with one piece of felt.
- And I put together the painted fabric with the piece of felt (painted fabric facing out).
- Then placed both groups together, white fabric and painted fabric facing each other and stitched around 2 long felt sides and one short side leaving one short side open.
- In order for the bag to have a flat bottom we will need to create a pleat. To do this, fold the bottom corners of your bag so it creates a triangle in the corner. Matching up the side seam and bottom seam will make this line up perfectly.
- Pinned the corner; and with a water erasable pen, made a mark 2.5” away from the corner.
- Drew a stitching line and then stitch across to create a pleat.
- I cut the triangle leaving a seam allowance of 1 cm.
- Turned it over.
STEP 5: SEW THE HANDLE OF THE TOTE BAG
- Folded the 80 x 16 cm handle fabric in half lengthwise, stitched the long side, and turned it inside out.
- I placed and pinned in place each end of the handle strip to the sides of the tote bag on the right side.
STEP 6: SEW THE INNER POCKETS
- To make inside pockets I hemmed one long side of the 30 x 16 patterned fabric and placed it on top of the right side of one of the 40 x 60 cm patterned fabric.
- Stitched it around the sides and bottom.
- I also stitched about 10 cm from one edge to make a phone pocket.
STEP 7: SEW THE LINING OF THE BAG
- Repeated step 5 with only the patterned fabric or the fabric you are using as the lining.
STEP 8: ASSEMBLE THE TOTE BAG
- It’s time to sew the white and patterned fabric/lining together. I placed white fabric (with felt) inside the patterned fabric, right sides together.
- I stitched around the top bag leaving a 1 cm seam allowance and also leaving a 6-8 cm opening for turning the bag.
- Turned the bag inside out and pushed the patterned side inside the bag.
- Stitched all the way around the top edge of the bag. This closed up the opening I used to turn.
- At this point, the bag is almost done.
STEP 9: FINAL TOUCHES
- On the back of the bag, I stitched a button with the elastic cord.
- I just folded the elastic in half and made a knot on the end and in the middle.
- On the front side of the bag (the painted one), I stitched the big blue button and placed the elastic around it.
- Tadaaaaaaaaa!!! The patriotic tote bag is ready to rock…
What do you think guys??? Do you like this cute and fun patriotic tote bag??? Have you painted something with a toothbrush????
Share and PIN ME!!!
Til’ next time…


FREE WORKBOOK
Keeping your Sweet Home Organized
Learn how to create intentional habits and simple routines to Keep Your Home Organized. Plus freebies, printables, exclusive content, and tips.
Disclaimer: By clicking on the “Yes” button above you are giving me your consent to collect and use your information according to the law and My Policy Privacy. Zero Spam I promise!