DIY Upcycled Tape Rolls Halloween Gift Baskets
This post may contain affiliate links. Please read our Disclosure Policy.
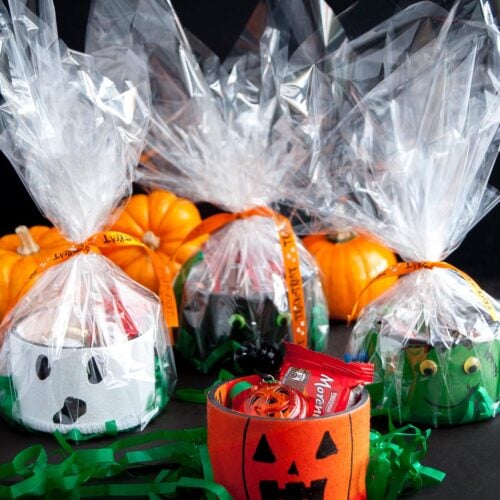
These Upcycled Tape Rolls Halloween Gift Baskets are a perfect craft to make on a family afternoon. It’s super easy to make, fun and most of all will teach our kids the importance of reusing and upcycling! These baskets will rock your Halloween night!
Am I the only one that feels like only yesterday we were hugging and wishing Happy New Year???… Oh my how fast this year flew by.

It’s unbelievable! I was working with my mom making these cute upcycled tape rolls Halloween gift baskets for our neighbors’ kids and I was thinking the whole time “I can’t believe I’m making Halloween crafts already”.
Table of Contents
Upcycled Tape Rolls Halloween Gift Baskets
I feel Halloween is like a magical season – yeah I know it’s spooky and all that but hear me out.
Kids enjoy so much using costumes and living their characters for a little while. Even though they can do it any time, Halloween makes it special because everyone else is doing it too so there is an exchange of dreams and creativity!
My girl enjoys Halloween so much and she has a hard time choosing because she wants to be all her favorite characters.
She loves Frozen and she uses Elsa’s dress almost every day (at least when the weather allows it) but she also wanted me to paint her face as a butterfly again after her school theater show. So still no idea what she’ll be this year.

Today in order to add a little more fun to the Halloween collection of ideas, mom and I made some really cute, easy, and upcycled crafts.
We used those big tape rolls we use to pack stuff to move, to create some cute baskets representing the most known Halloween characters to fill them with treats and goodies for kids.
We had so much fun. You can check out her post on her blog in Spanish showing how to make these but using Frankenstein.
So cute! This has been one my favorite spooky basket ideas ever!
Well, Let’s see how we made them.
How to Make Halloween gift baskets with UPCYCLED TAPE ROLLS
This craft is an super fun and spooky cute all treats, no tricks! It’s all about having a Halloween fun night or day!
Supplies:
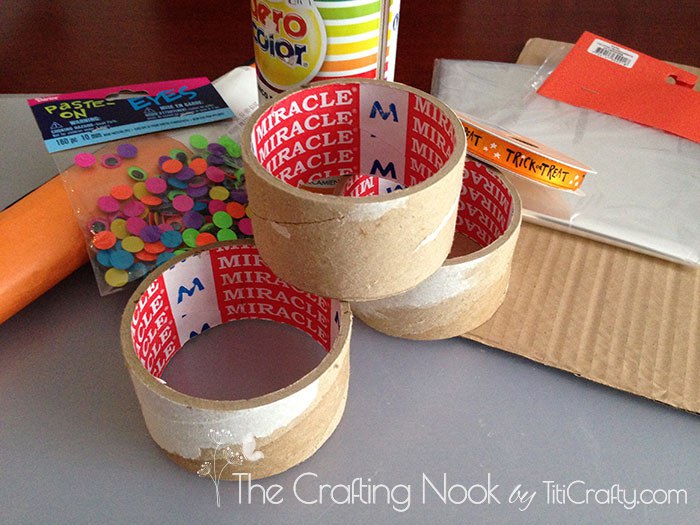
- Tape rolls – those from large masking tapes rolls or packing tape.
- Cardboard
- Spray paint (Halloween colors: orange, black, white and green) – you can replace this with acrylic paint.
- Googly eyes
- Ribbon
- Color papers {again Halloween colors}
- Transparent plastic.
- Fuzzy wires or pipe cleaners.
- Black permanent marker.
- Corkboard Pins
- Black cardstock
- White crayon or marker
- Favorite candies – all pre-packed. Since these baskets are painted you don’t want to put candies without their packaging.
Tools:
- Hot Glue tool and glue sticks
- Scissors
Instructions
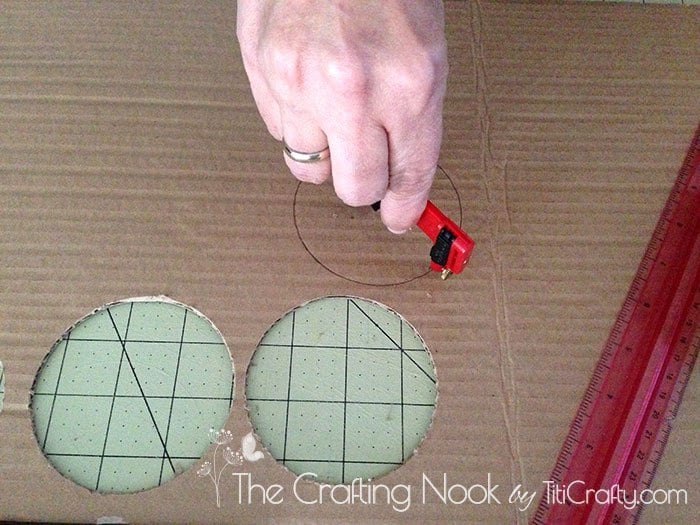
First of all, I removed dust from the tape rolls and cut some cardboard circles the same diameter as the rolls and leave them aside. Make as many circles as the number of rolls you are going to use.
1. Paint the rolls with your favorite colors. I applied 2 coats of paint each.
2. Let the paint dry for several hours to get rid of the smell. Although I used waterbase spray paint almost no scent, it’s better be safe. If you used acrylic paint, make sure it’s completely dry before moving on.
3. Apply hot glue to the edges of one end of the roll.
4. stick the cardboard circles you had previously made.
5. Proceed to draw the details of each character you are going to create. We made Ghosts, Jack-o-Lantern, Spider, Bats, and Frankenstein.
6. for Jack-o-Lantern I draw triangles for the eyes and nose and just some zig-zag{ish} for the mouth.
7-8. Started some stripes all around the role to give the idea of a pumpkin.
9-10. Using hot glue I hide the cardboard with the plush iron wires.
11. I folded in half over and over the color papers until I got a strip about 2 inches.
12-13. Cut thin strips to create spaghetti with the papers LOL.
14. Mixing the colors I filled each cup with strips of paper. In green cups I used orange paper, in ghosts I used green paper and so on.
15. With my black marker, I painted the visible edge of the cup to make it look better.
16. For the other cups we did the same process, but with different details. Like for Ghosts we just draw some handy black circles.
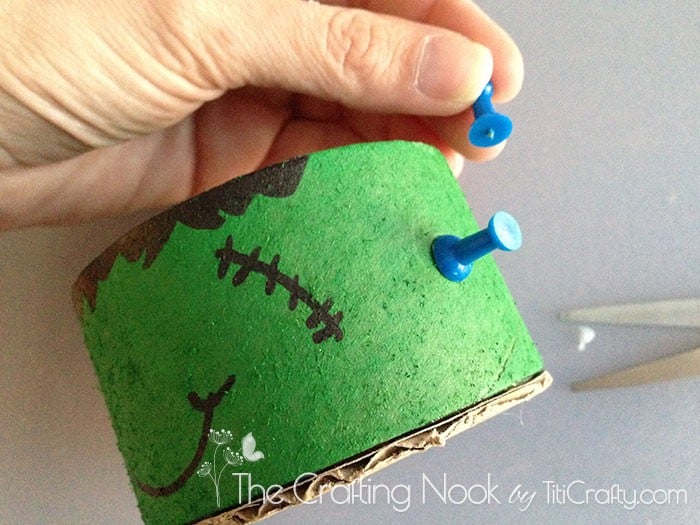
17. For Frankenstein, we draw the hair, scars and mouth then glued the funny eyes; we cut the metal part of the pins and used it as the neck bolts.
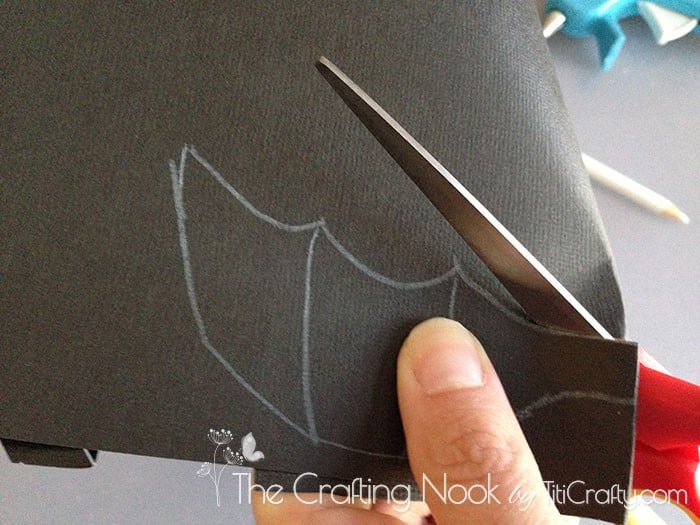
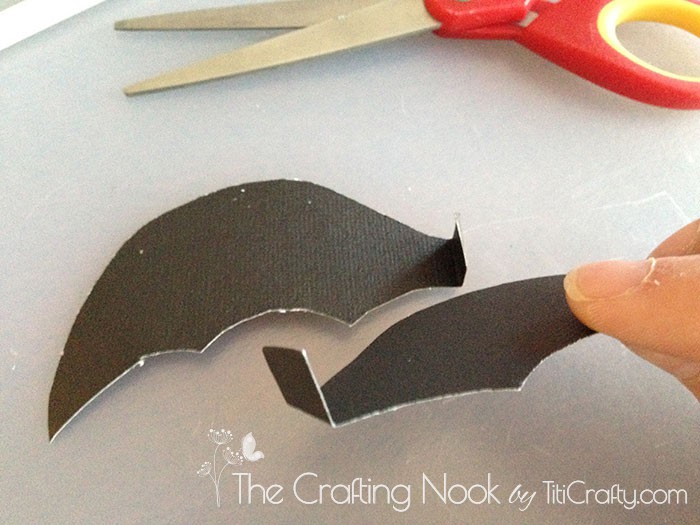
18. For the bat, we cut a couple of wings with details using white crayons. We fold the inner side and glued it to each side of the cup. Again with white crayon we drew the mouth with fangs and glued funny eyes.
19. For Spider, we used a bunch of plastic eyes and for the legs, we used black plush iron wires.
20. Then we filled the cups with treats and wrapped them with transparent plastic tied with Halloween ribbons!
That’s it! You get some really cute gifts that you can fill with your friends and family’s favorite treats and give them full of love not spending too much!
Crafting Tips
If you have young kids and don’t want to use spray paint, you can just paint the tape rolls with acrylic paint. I used water base spray paint because id didn’t smell like regular sprays and had a very big yard to work on. But for indoors and small kids I definitely recoomend acrylic paint.
You can paint the bottom cardboard too or replace it with wood slices or any other material that would hold the content.
You can replace the pipe cleaner wires with your favorite ribbon.


Frequently Asked Questions
Fill Halloween basket for kids with Halloween candy, Chocolate, Halloween toys, stickers, glow sticks, play dough, puzzles, and balloons, plus fun things like socks, bubbles and goodie-bag items and watch how excited they’ll get. If you making a large amount of these, consider dollar store fun items.
Consider putting together a movie night basket Halloween treats as a fun twist to your spooky Basket! You can also send your favorite Halloween movie on DVD, as well as drinks and snacks, popcorn, and some cozy socks for your neighbor’s spooky movie night! But if you want to make a small one, consider, including nail polish or bath bombs, for ladies, a bow tie for gentlemans among other sweet treats
No, absolutely not. I used it because its so much easier and I found a waterbase spray paint that barely smells. Aternatively, you can use your favorite acrylic paint, or school paints for this craft. It will turned out great!
More Halloween Ideas to try
If you liked this upcycled Halloween gift baskets tutorial, you might also love these other Halloween project ideas too:
✂️ Tutorial
DIY Upcycled Tape Rolls Halloween Gift Baskets
Tools
- Hot Glue tool and glue sticks
- scissors
Supplies
- 5 Tape rolls – those from large masking tapes rolls or packing tape.
- Cardboard
- Spray paint Halloween colors: orange, black, white and green – you can replace this with acrylic paint.
- Googly eyes
- Ribbon
- Color papers {again Halloween colors}
- Transparent plastic.
- Fuzzy wires or pipe cleaners.
- Black permanent marker.
- Corkboard Pins
- Black cardstock
- White crayon or marker
- Favorite candies – all pre-packed. Since these baskets are painted you don’t want to put candies without their packaging.
Instructions
- First of all, I removed dust from the tape rolls and cut some cardboard circles the same diameter as the rolls and leave them aside. Make as many circles as the number of rolls you are going to use.
- Paint the rolls with your favorite colors. I applied 2 coats of paint each.
- Let the paint dry for several hours to get rid of the smell. Although I used waterbase spray paint almost no scent, it’s better be safe. If you used acrylic paint, make sure it’s completely dry before moving on.
- Apply hot glue to the edges of one end of the roll.
- stick the cardboard circles you had previously made.
- Proceed to draw the details of each character you are going to create. We made Ghosts, Jack-o-Lantern, Spider, Bats, and Frankenstein.
- for Jack-o-Lantern I draw triangles for the eyes and nose and just some zig-zag{ish} for the mouth.
- 7-8. Started some stripes all around the role to give the idea of a pumpkin.
- 9-10. Using hot glue I hide the cardboard with the plush iron wires.
- I folded in half over and over the color papers until I got a strip about 2 inches.
- 12-13. Cut thin strips to create spaghetti with the papers LOL.
- Mixing the colors I filled each cup with strips of paper. In green cups I used orange paper, in ghosts I used green paper and so on.
- With my black marker, I painted the visible edge of the cup to make it look better.
- For the other cups we did the same process, but with different details. Like for Ghosts we just draw some handy black circles.
- For Frankenstein, we draw the hair, scars and mouth then glued the funny eyes; we cut the metal part of the pins and used it as the neck bolts.
- For the bat, we cut a couple of wings with details using white crayons. We fold the inner side and glued it to each side of the cup. Again with white crayon we drew the mouth with fangs and glued funny eyes.
- For Spider, we used a bunch of plastic eyes and for the legs, we used black plush iron wires.
- Then we filled the cups with treats and wrapped them with transparent plastic tied with Halloween ribbons!
- That’s it! Start giving these cuties away!
What do you think of this craft??? Have you reused those finished tape rolls? If so, What have you made with them?
Share and PIN ME!

Til’ next time…


FREE WORKBOOK
Keeping your Sweet Home Organized
Learn how to create intentional habits and simple routines to Keep Your Home Organized. Plus freebies, printables, exclusive content, and tips.
Disclaimer: By clicking on the “Yes” button above you are giving me your consent to collect and use your information according to the law and My Policy Privacy. Zero Spam I promise!


