How to Add Watermark to Multiple Photos at Once with Photoshop Automate Batch
This post may contain affiliate links. Please read our Disclosure Policy.
Step-by-step tutorial with video and screenshots with detailed instructions. In this article, you’ll learn how to batch add watermark to photos all at once using Photoshop.
How awesome would it be if you could add a watermark to a bunch of Photos at Once? Well, you can!!! With Photoshop you have an awesome feature called automate batch that allows you to apply specific actions to multiple images at once.
This is the second blog post of a short series of Photoshop Actions to optimize your time as well as your images. I invite you to check out the first one if you haven’t seen it yet.

Table of Contents
Watermark Photos with Photoshop Automate Batch
Blogging is hard enough so whenever I can make things easier for me I’ll go for it without blinking.
Photoshop is no longer an impossible app. Nowadays, you can have your license to use Photoshop for $9,99 so you can make the most out of your images and editing skills. This is not sponsored, I’m just sharing my point of view and why I love it so much.
I’ve been doing this for at least 7 out of the 9 years I’ve been blogging. Even though I’m constantly learning new things, this process is something I never change since it saves me tons of time.
Photoshop Actions is my go-to whenever I have to repeat certain steps or editions like resizing, watermarking, cropping, etc.
You can also learn a lot about this on Adobe’s site. They have lots of tutorials on how to use their App.
To add a watermark to photos you just need to create your watermark placing PS Action and then automate batch them all which is what I’ll explain here. But first, you might ask:
What is Automate Batch in Photoshop?
This is a feature in Photoshop that helps you turn simple repetitive tasks into easy and automatic processes. For this, you need Actions that later can be automated so the system makes all tasks by itself. Batch processing can automate tedious chores for you.
Why should I add a watermark to my photos?
With the arrival of digital photography, so did the ability to easily “steal” photos from blogs and websites, as well as by other means. “Oh! Wow—Love that beautiful photo!” Right-click. Save to desktop. Or, save it as wallpaper. The problem is not the downloading part is the use people might give and the worst one is crediting themselves as the authors. Image theft has rapidly increased over the past few years.
The Watermark is not the perfect solution but at least you are not handing your images away that easily.
Watermarking your images also serves another purpose: letting people know who the image belongs to.
It’s like a marketing facet. Making your work easily identifiable might help viewers find you and more of your work, especially if it gets shared around the Web.
Of course, for some people, a watermark is a simple way to “sign” their art pieces.
One thing I usually recommend when watermarking photos is to use fade white with a slight shadow. That way the image stays the main focus.
I don’t like to make my watermarks scream at people. Sometimes my watermarks are barely visible but people notice when they want to know where the photo came from.
This strategy is especially important for professional photographers, content creators, bloggers, and artists.
What if I don’t use Photoshop, are there alternatives?
If you are a content creator, blogger, or just work with photography, I definitely recommend using Photoshop or Lightroom for photo edition. But I understand if you don’t use it and this post is probably not for you unless you want to take a peek and see how good it would be to use it.
With Photoshop you can automate quite some functions you have to do on a regular basis and the edition features of Photoshop are so professional and honestly, it feels limitless.
However, there are a few alternatives. I have never used them though. I have heard good things about Watermarkly and Watermark.ws which you can batch watermark photos from the web. Both offer free and paid plans and a few customizations. But like I said I have never used them so I don’t know all the details.
There are also watermark app options for both mobile (ios and Android) and desktop that might be of help.
What can be used as a watermark on photos?
You can watermark pretty much anything from your logo or signature to illustrations or simple texts. For logos, it’s recommended the simplified version so it’s easier to recognize but less intrusive when applied transparency. Watermark text is even easier and you can use your own branding font to write your domain or business name. You just have to choose what type of watermark will best suit your brand.
In a more simplified way, you can watermark:
- Logos
- Signatures
- Plain text
- Copyright symbol
- Domain URL
- Business name with branded fonts
- Simple graphics and illustrations
How to create my Watermark Photoshop Action?
I’ve created this video to show you my process to create my own Watermark Actions and how I apply it to multiple images at once. This is the process I follow for my own blog and image needs in hopes that it might help you optimize your time and your processes. If you are more of a step-by-step text and images kind of person, scroll down and keep reading!
Before we begin, be sure to follow us on Pinterest, Facebook, Instagram, and YouTube, and also sign up for our email list (at the end of this post), so you’ll never miss a post!
You need to have your watermark template image already created in .png or .psd file without background. Don’t use jpg as it brings a white background.
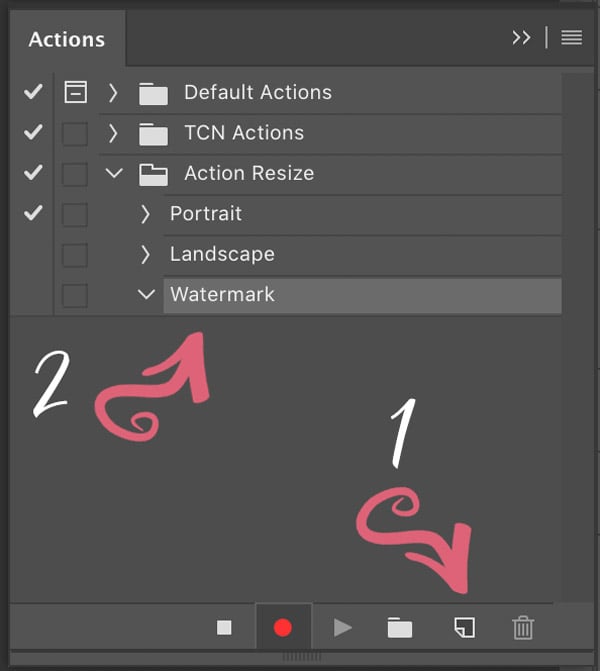
Firstly, create a New Action, use the button (sheet icon), or choose New Action from the Actions panel menu and give it a name. Let’s call it Watermark.
Open one of your resized images.
With the action that has been created hit the Record button and you will see that action you created will show up in your folder and with the red circle in red which means is now recording.
Then Go to File > Place Embedded
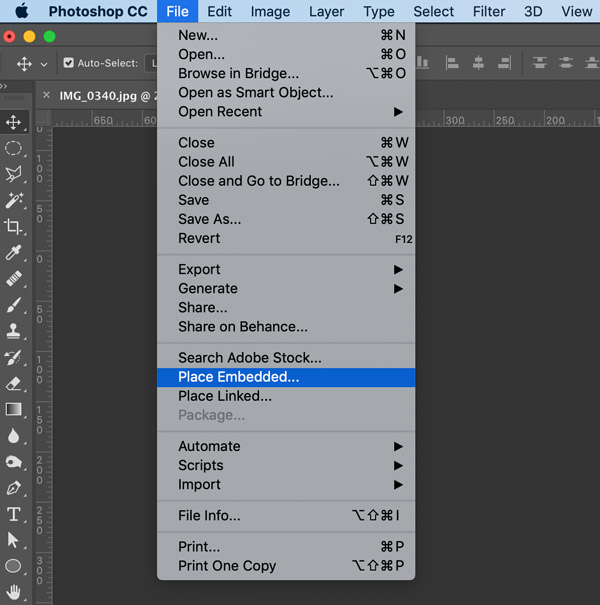
Find your watermark file, select it and hit choose.
The image will show up with a bounding box, just hit the enter key to embed it.
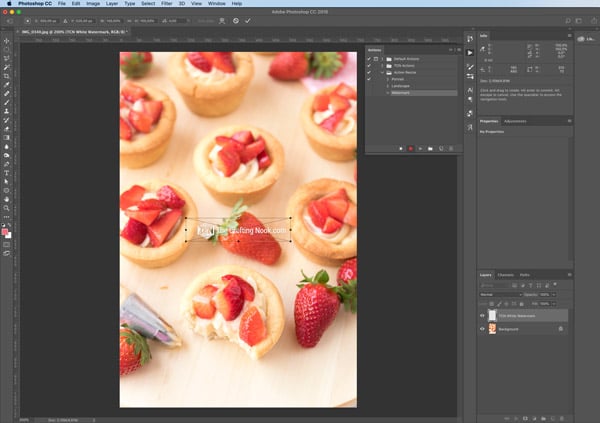
I like to have my watermark on the bottom-right corner of my images so select both layers, watermark, and background image and using your alignment buttons at the top, click align right and then align bottom.
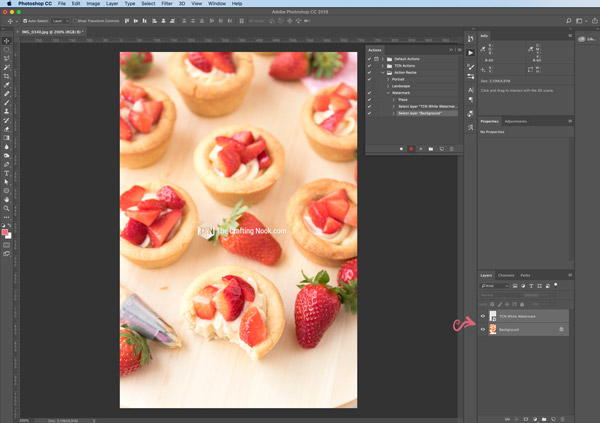
The next step, holding your shift key hit once your up arrow key and then your left arrow key.
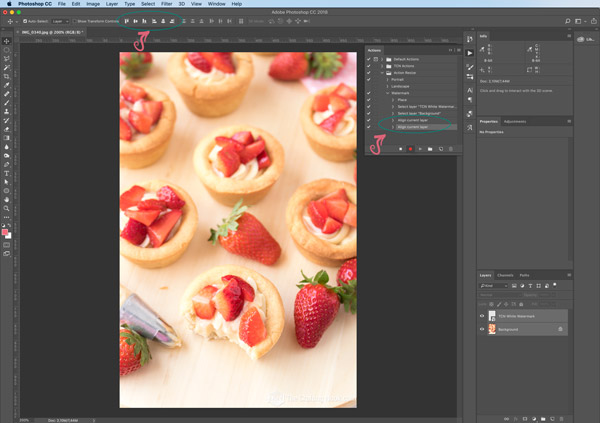
This is to separate your watermark from the edges of the photo and give some air around it.

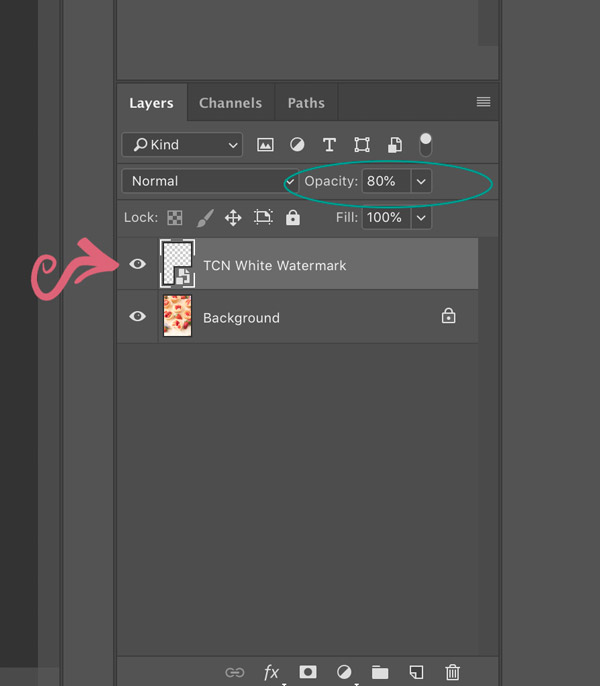
This is totally optional and the values are up to you. Lower your watermark opacity. I usually set transparency to 80% so it fades a little bit into the photo.
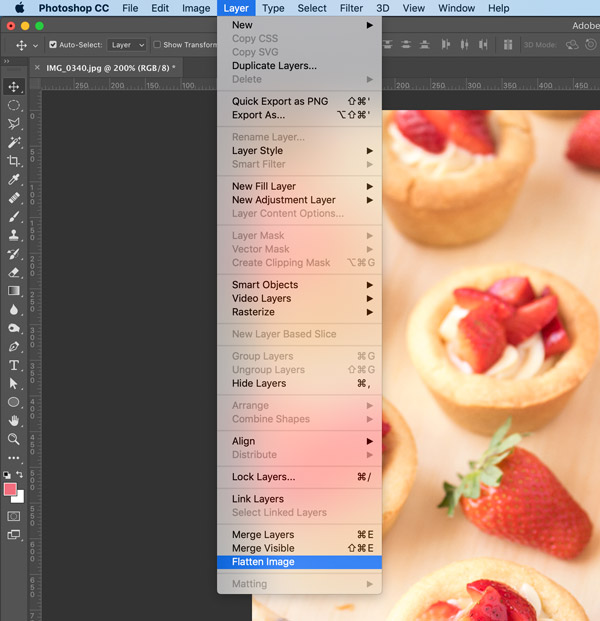
Now, select both layers again and let’s flatten the image. Go to Layer > Flatten Image.
It’s time to save. So just hit Command S (Control S on PC) or go to File > Save. Confirm max quality in the dialog box.
Close your image.
Ok, a quick note here. Since you closed the image, you can’t see the actions anymore but it’s still recording. So, open any image and click on the square icon to stop recording and then delete the “Open” task in the action list. Your LAST TASK should be “Close”.
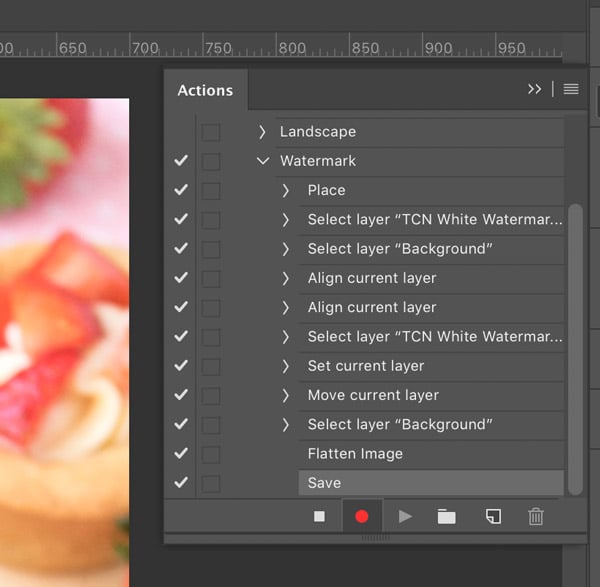
Your Watermark Action is ready.
Lastly, close your image so we can test watermark your automation.
Watermarking Photos with Photoshop Automate Batch
Firstly, make sure all your optimized and resized images are in the right folder (single folder of their own).
Then go to File > Automate > Batch.
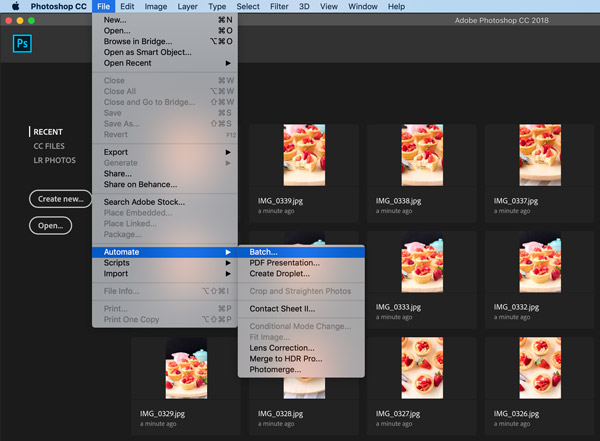
It will open a Dialog Box. Follow the order set on the image below
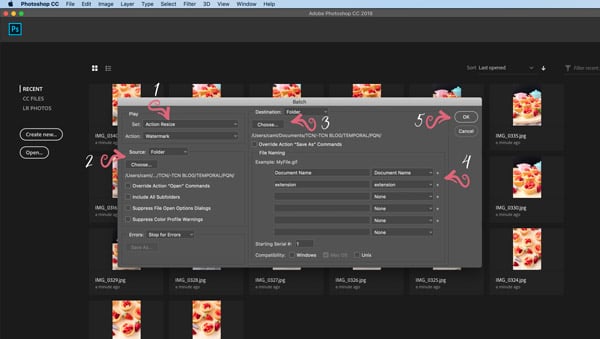
- Make sure your Action Set and watermark Action is set correctly. In the Set pop-up menu, select the set that contains the action you want to apply.
- In the Source pop-up menu, select Folder. Click the Choose button, navigate to the folder that you want to use, and click OK (in Windows) or Choose (in Mac OS). Select other options in the Source area, as desired.
- In the Destination pop-up menu, select Folder where you want the processed images to go to. Click the Choose button, navigate to the folder that you want to use, and click OK (in Windows) or Choose (in Mac OS). I usually choose the same folder to override the images without watermark. But you can have a different folder if you prefer.
- Specify how you want Photoshop to create the filenames for the new, processed files by selecting options from the drop-down menus.
When you process large numbers of files, these naming tools can help you keep track of when and how the files were created.
Also…
- Tick and box you might think it’s useful to you.
- In the Errors pop-up menu, select whether you want Photoshop to stop processing a batch when it encounters an error or whether you want it to simply continue and list the errors in a file. If you select the latter option, click the Save As button and, in the Save dialog box, specify a name and location for the log.
When you finish selecting options in the Batch dialog box, click OK to start the batch processing.
You will see flashes of lights in the screen that’s because it’s opening and closing images like crazy. It’s ok.
Once Photoshop stops. Go to your folder and check your photos. All of them should be watermarked by now. If not check your Action steps.
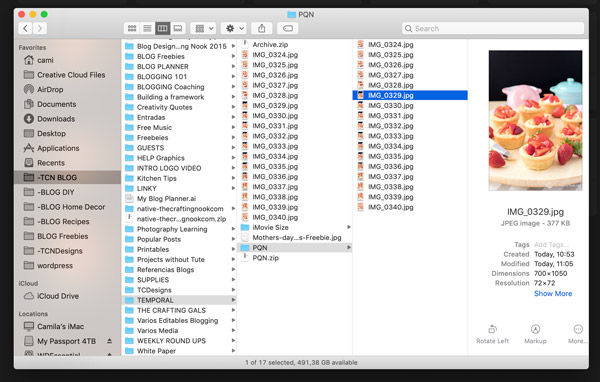
That’s it. For now on and until you need to change something specific you don’t have to do anything else here. Just automate your watermark whenever your photos are ready to go and placed in your pre-set folder.
Wasn’t that hard, was it? Bulk watermark photos makes it all super easy.
I truly hope this post and video were helpful to you. Hope that this helps you optimize your time and make some tedious processes easier.

How to Add Watermark to Multiple Photos at Once with Photoshop Automate Batch
Tools
- Personal Computer
Supplies
- Adobe Photoshop
Instructions
- You need to have your watermark image already created in .png or .psd file without background.
- Firstly, create New Action button (sheet icon), or choose New Action from the Actions panel menu and give it a name. Let’s call it Watermark.
- Once the action has been created hit Record button and you will se that action you created will how up in your folder and with the red circle in red which means is now recording.
- Open one of your resized images.
- Then Go to File > Place Embedded
- Find your watermark file, select it and hit choose.
- The image will show up with a bounding box, just hit enter key to embed it.
- I like to have my watermark on the bottom-right corner of my images so select both layers, watermark and background image and using your alignment buttons at the top, click align right and then align bottom.
- Next step, holding your shift key hit once your up arrow key and then your left arrow key.
- This is to separate your watermark from the edges of the photo and give some air around it.
- This is totally optional and the values up to you. Lower your watermark opacity. I usually set it to 80% so it fades a little bit into the photo.
- Now, select both layers again and let’s flatten the image. Go to Layer > Flatten Image.
- It’s time to save. So juts hit Command S (Control S on PC) or go to File > Save. Confirm max quality in the dialog box.
- Close your image. Ok a quick note here. Since you closed the image you can’t see the actions anymore but it’s still recording. So open any image and click on the square icon to stop recording and then delete the “Open” task in the action list. Your LAST TASK should be “Close”.
- Your Watermark Action is ready.
- Lastly close your image so we can test watermark your automation.
Watermarking Photos with Photoshop Automate Batch
- Firstly, make sure all your optimized and resized images are in the right folder (single folder of their own).
- Then go to File > Automate > Batch.
- It will open a Dialog Box.
- (1) Make sure your Action Set and watermark Action is set correctly. In the Set pop-up menu, select the set that contains the action you want to apply.
- (2) In the Source pop-up menu, select Folder. Click the Choose button, navigate to the folder that you want to use, and click OK (in Windows) or Choose (in Mac OS).
- Select other options in the Source area, as desired.
- (3) In the Destination pop-up menu, select Folder where you want the processed images to go to. Click the Choose button, navigate to the folder that you want to use, and click OK (in Windows) or Choose (in Mac OS).
- I usually choose the same folder to override the images without watermark. But you can have a different folder if you prefer.
- (4) Specify how you want Photoshop to create the filenames for the new, processed files by selecting options from the drop-down menus. When you process large numbers of files, these naming tools can help you keep track of when and how the files were created.
- Tick and box you might think it’s useful to you.
- In the Errors pop-up menu, select whether you want Photoshop to stop processing a batch when it encounters an error or whether you want it to simply continue and list the errors in a file. If you select the latter option, click the Save As button and, in the Save dialog box, specify a name and location for the log.
- When you finish selecting options in the Batch dialog box, click OK to start the batch processing.
- You will see flashes of lights in the screen that’s because it’s opening and closing images like crazy. It’s ok.
- Once Photoshop stops. Go to your folder and check your photos. All of them should be watermarked by now. If not check your Action steps.
- That’s it. Form now on and until you need to change something specific you don’t have to do anything else here. Just automate your watermark whenever your photos are ready to go and placed in your set folder.
Frequently Asked Questions
Photographers and Content Creators add watermarks to their work to protect their work from being used without their permission. It’s not the perfect solution but at least you are not handing your images away that easily.
Watermarking your image
You can watermark pretty much with anything but the most commons are Logos, Signatures, Plain text, Copyright symbol, Domain URL, Business name with branded fonts, Simple graphics and illustrations.
If you are a content creator, blogger, or just work with photography, I definitely recommend using Photoshop or Lightroom for photo editions. However, there are a few alternatives. I have never used them though. I have heard good things about Watermarkly and Watermark.ws. Both offer free and paid plans and a few customizations. There are also watermark app options for both mobile (ios and Android) and desktop that might be of help.
I know there might be other ways to do this, or with small differences but this is how it has worked for me for years.
If you have any suggestions or a different way to do this process, feel free to share in the comments. I’m always happy to learn new ways to do things!
Enjoyed learning How to add Watermark to photos (many at once)? You might also love these posts too:
Til’ next time…


FREE WORKBOOK
Keeping your Sweet Home Organized
Learn how to create intentional habits and simple routines to Keep Your Home Organized. Plus freebies, printables, exclusive content, and tips.
Disclaimer: By clicking on the “Yes” button above you are giving me your consent to collect and use your information according to the law and My Policy Privacy. Zero Spam I promise!



Thank you for this. I’m developing an eCommerce website for a client and had 150 images to batch resize and watermark. Your post has saved me many hours of work. Worked perfect for my needs.
I am thrilled to hear that! I’m glad this post was helpful!
Hugs,
Cami
Great tutorial, thanks! The only thing I found was that by opening the image after starting to record the action, when completing the batch process it kept opening that same image first and didn’t put the watermark on any other images. Also in PS2022 you don’t have to open an image at the end to see the Actions window, you can open it from the ‘Window’ drop down menu at the top without an image being open. Thanks again!
Hi Tom, You are totally right. I meant to say that you should have an opened image when you hit the record button. Thank you for pointing that out. I’ll fix that in the tutorial ASAP.
I haven’t used PS PS2022 just yet. I’m resistant to changes LOL but I will and then I will update this post as needed with any changes in the process.
Again thank you so much, I appreciate you taking the time to share your feedback.
Kind regards,
Cami
Thanks for sharing this useful information.
Glad it was helpful!
Regards!
Great. Your Blog is a great tutorial. I think It’s really suitable with me. I will try this. Thank you!
Thank you so much for your kind words! I’m really glad to help and hope it works for you as it helps me!
Best of luck
Hugs
Thanks for your sharing for making it easy for me to produce great photos
Thanks a lot! I’m really glad you found it helpful!
Kind regards,
Hugs!
helpful much. I am just newbie. Thanks you much!
Thank you Lori. Glad I could be helpful.
Best of luck!
This method retains the file name I initially saved to, which means when I run the batch it just saves over the same file every time it opens a new one to process. I’ve solved this before, twice, but it’s years between each attempt so I forget how.
Not sure I follow. But this is what I do, I think I mentioned within the post, I create a temporary folder with 2 folders inside one is the original size and resolution and the other small for post images. The first thing I do is resizing my images using the action I created in the previous blog post (I think it’s linked here). This automatically sends images to original and small folder. So when I’m batching watermark I specify to use the images in SMALL folder. So yes it keeps the name but in a specific folder so I don’t affect my original images or any other. Hope I make sense and that somehow I answered your question. Let me know
Hugs
Great tutorial. The conditional action was new to me. Thank you man. Great stuff!