DIY Binder Dividers + Free Cut Files
How cute would your home binders look if you made DIY binder dividers? Check out this easy way to make them and get the free cut files here.
I shared previously how I revamped my old and damaged Blog Planner Folder and a few months ago I shared My Blog Planner, which has been my best friend during my blogging time LOL.

Table of Contents
Blog Planner DIY binder dividers + Free Cut Files
Now I decided to go a bit further and create my own tabbed binder dividers so I could get rid of my uuuuuugly ones LOL and get some binder organization done.
This post may contain affiliate links. Please read our Disclosure Policy.
I’m really so happy with the results. Now it looks new, bright, and colorful. I got so inspired by this that now I’m creating my own blog planner pintable’s =D.
What I like the most about this project is that I only used paper/cardstock and of course my Silhouette Cameo with its supplies such as sketch Pens. The first thing I worked on was the design of the dividers.
How to make these cute dividers
Basic Supplies:
- The provided files.
- Cardstock Cover 65-90 lb (180-220 gr)
- Scrapbook paper or your favorite cardstock colors.
- Glue – I used mod podge; I recommend a glue that won’t bend the cardstock.
Tools:
- Cutting Machine – Silhouette Cameo or Cricut
- Sketch Pens
Instructions:
Before we begin, be sure to follow us on Pinterest, Facebook, Instagram, and YouTube, and also sign up for our email list (at the end of this post), so you’ll never miss a post!
Step 1: Designing the dividers
Firstly, I made the whole divider shape for the base and then added some details such as a cute flower, divider tabs borders, and the name of the divider.
It took me quite some time to put this together but it was so worth it.

Also, I prepared the cutting files for the divider tab templates so you can snag them depending on your needs:
Step 2: Cutting all the divider tabs
Once all the cutting files were ready, I started cutting. It was kind of a process because I had to cut first and then in the same sheet using sketch pens.
For this I specified a color: RED is cut and GREEN is Sketch pen because the flower shape would be printed around the cut petals.
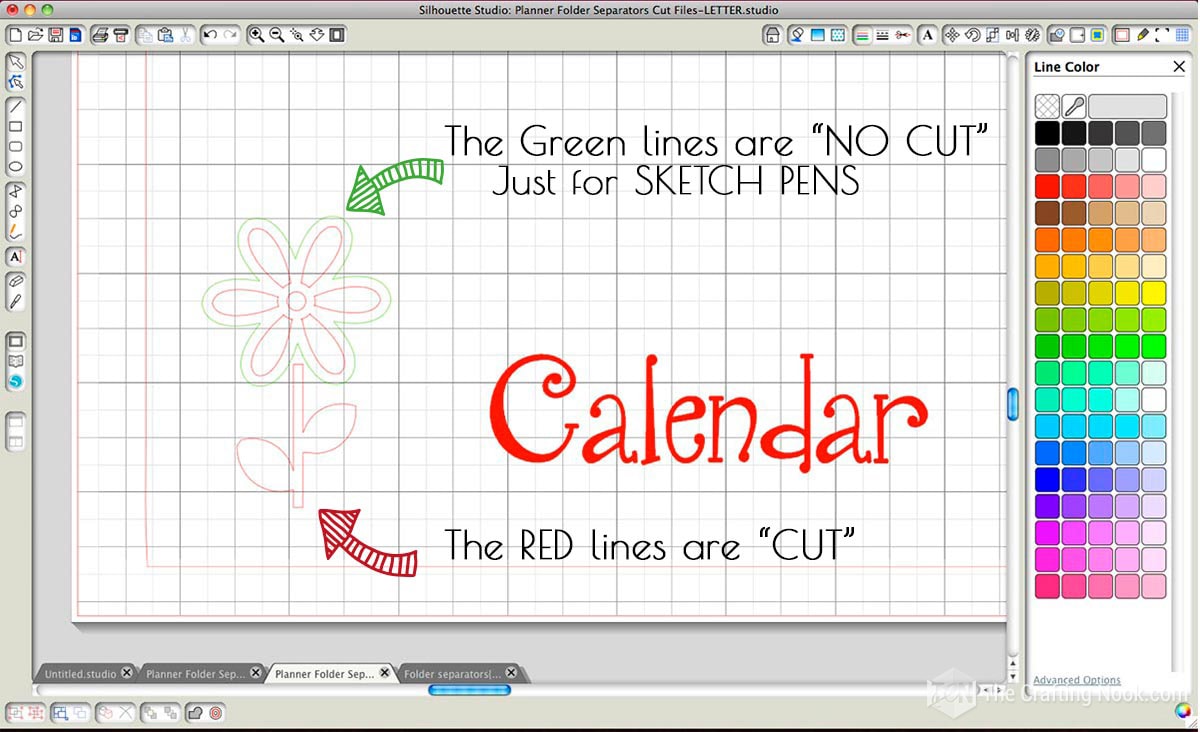
Then it was time to cutting and sketching the sheets dividers with my Silhouette machine!

Next, I cut all the divider color tabs in different colors It was 12 in total. Even though I repeated the color, the texture of the paper was very different.


Ok, Once I had everything cut, I started the second part.
Step 3: Assembling the binder dividers.

I also cut some strips of paper in different colors that would be used as the background of the cutout flower and texts.

Then I used mod podge for this because I like that it doesn’t make paper create creases. It’s clean and it also protects the paper.
So I glued the colored card stock on the back of the divider.

And then I glued the DIY divider tab in the border on the right side of the divider.
Here you have the first sample =D

And now, the whole stack of sheet dividers is finished!

Then I punched the divider pages with the regular paper punch holes so I could put them in the Binder.

And here you go!…
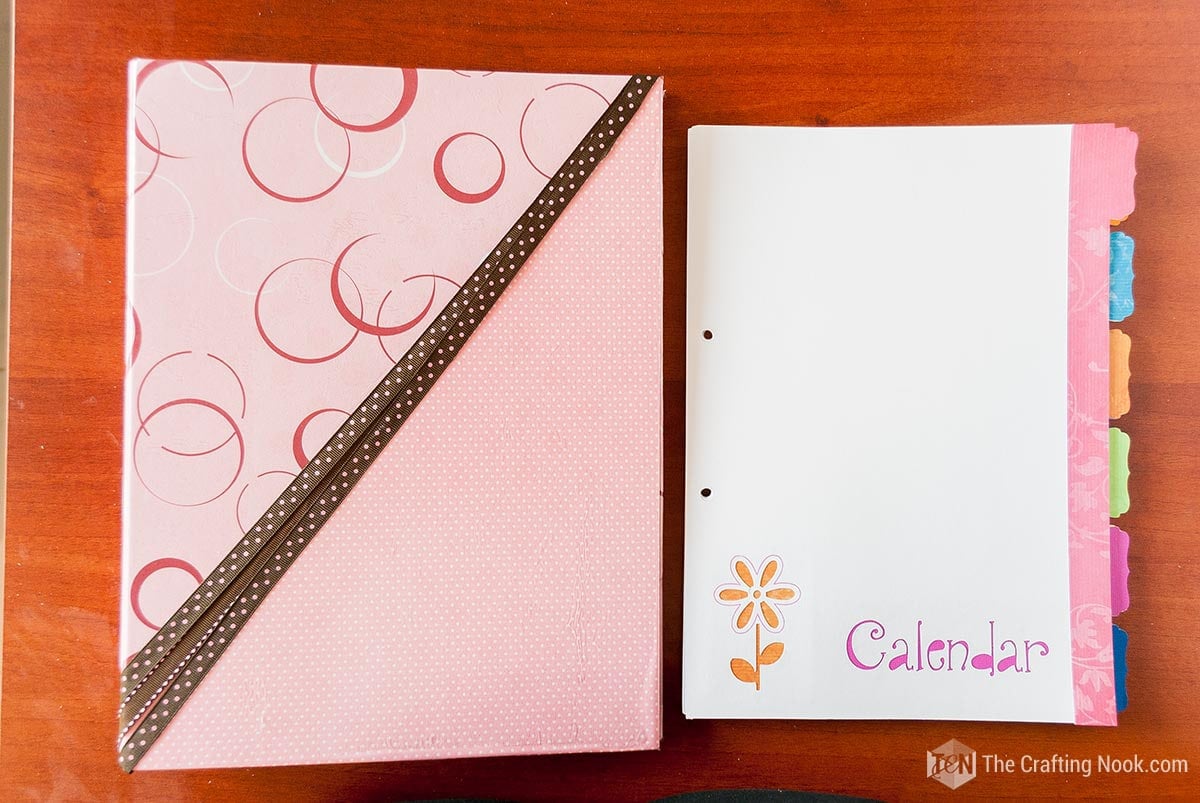
These are some samples of the sheet dividers. I left some blank dividers at the end just in case I need them later.


Step 4: Inserting the dividers into the binder
Finally, it was time to get my blog planner organized =D.
I took all my planner sheets and organized them under each divider accordingly.
put them inside my ring binder and closed the rings.

Step 5: Naming the DIY binder tabs
You can write down directly onto the divider tabs, the name of the tab.
Since I didn’t want to write on the tabs, this is what I did:
I cut some small pieces of each paper color I used and placed them on white paper in the same order as the dividers.
Then I stuck them with a couple of double-sided tapes and then I applied transparent contact paper on top of everything.

With a black sharpie, I wrote the name of each tab. If I ever change it I just use some acetone to erase it and write it again!

That’s it!
My blog planner is done!
What do you think??? Like it???


Frequently Asked Questions:
Short answer, YES. To make these ones just like you see them yes, you need a cutting machine. But if you ignore the cutout names on the dividers and the little flower you could cut them with a craft knife or scissors.
I recommend cover cardstock around 65-90 lb for the base of the divider to make sure it holds well. For the decorations, your favorite cardstock or scrapbook paper will do.
Yes, if you only want to use the tabs, you just need to cut that file.
More Silhouette Came Projects to Try
If you like this fun DIY binder dividers tutorial you might also like these other Silhouette Cameo Projects too:


✂️ Tutorial

DIY binder dividers Tutorial + Free Cut Files
Tools
- Cutting Machine – Silhouette Cameo or Cricut
- Sketch Pens
Supplies
- The provided files.
- Cardstock Cover 65-90 lb 180-220 gr
- Scrapbook paper or your favorite cardstock colors.
- Glue – I used mod podge I recommend a glue that won’t bend the cardstock.
Instructions
STEP 1: DESIGNING THE DIVIDERS
- Firstly, I made the whole divider shape for the base and then added some details such as a cute flower, divider tabs borders, and the name of the divider.
- It took me quite some time to put this together but it was so worth it.
- Also, I prepared the cutting files so you can snag them depending on your needs:
STEP 2: CUTTING ALL THE DIVIDERS
- Once all the cutting files were ready I started cutting. It was kind of a process because I had to cut first and then in the same sheet using the sketch pens.
- RED is cut and GREEN is Sketch pen because the flower shape would be printed around the cut petals.
- Then it was time to cutting and sketching the sheets dividers!
- Next, I cut all the divider borders in different colors It was 12 in total. Even though I repeated the color, the texture of the paper was very different.
- Once I had everything cut, I started the next part.
STEP 3: ASSEMBLING THE BINDER DIVIDERS.
- I also cut some strips of paper in different colors that would be used as the background of the cutout flower and texts.
- Then I used mod podge for this because I like that it doesn’t make paper create creases. It’s clean and it also protects the paper.
- So I glued the colored card stock on the back of the divider.
- And then I glued the DIY divider tab in the border on the right side of the divider.
- And now, the whole stack of sheet dividers is finished!
- Then I punched the dividers with the regular paper punch so I could put them in the Binder.
- And here you go!…
- These are some samples of the sheet dividers. I left some blank dividers at the end just in case I need them later.
STEP 4: INSERTING THE DIVIDERS TO THE BINDER
- Finally, it was time to get my blog planner organized =D.
- I took all my planner sheets and organized them under each divider accordingly.
- put them inside my binder and closed the rings.
STEP 5: NAMING THE DIVIDER TABS
- You can write down directly onto the divider tabs, the name of the tab.
- Since I didn’t want to write on the tabs, I cut some small pieces of each paper color I used and placed them on white paper in the same order as the dividers.
- Then I stuck them with a couple of double-sided tapes and then I applied transparent contact paper on top of everything.
- With a black sharpie, I wrote the name of each tab. If I ever change it I just use some acetone to erase it and write it again!
- That’s it!
Want to Check Out More Silhouette Projects?
My Silhouette Challenge buddies and I are all sharing projects on our blogs today, so peruse the projects below for a wealth of Silhouette inspiration!
- DIY Window Shutter Mail Organizer by Weekend Craft
- Organizing Silhouette and Craft Supplies by The Happier Homemaker
- Simple Recipe Organization by It’s Always Craft Time
- Put a Label on it! Herb Names for Plant Stakes by Get Silvered
- Super Simple Linen Closet Labels by Two Purple Couches
- Child desk accessories by Architecture of a mom
- DIY Pantry Labels by The Turquoise Home
- Create Craft Room Labels by Dragonfly & Lily pads
- How to Make a Cut File into a Print & Cut by Create & Babble
- Simple Chest Freezer Organizational Board by Nearly Handmade
- Nursery Closet Dividers & Silhouette Cut File by Creative Ramblings
- Make Custom Box Templates with a Silhouette for Drawer Organization by One Dog Woof
- Organizing the Craft Room by What’s Next Ma
- Vinyl Wall Calendar by Crafts Cakes and Cats
- Blog Planner Sheet Dividers + Free Cut Files by The Crafting Nook by Camila
- Simple Project Calendar by Little Blue’s Room
- Receipt Organization with Free Cut File by The Thinking Closet
- Cute and Easy Labels by Life After Laundry
- “What’s For Dinner?” Menu Planning Board by un–Original Mom
- Mixing Organization and Function: An Easy Conversion Chart by My Paper Craze
- Why do my cookies taste so bad? A lesson in baking. by The Life and Times of a TAP
- The evolution of my labeling system by feto soap
Til’ next time…


FREE WORKBOOK
Keeping your Sweet Home Organized
Learn how to create intentional habits and simple routines to Keep Your Home Organized. Plus freebies, printables, exclusive content, and tips.
Disclaimer: By clicking on the “Yes” button above you are giving me your consent to collect and use your information according to the law and My Policy Privacy. Zero Spam I promise!
