DIY Upcycled Tin Can Trash Can
This post may contain affiliate links. Please read our Disclosure Policy.
Trash cans shouldn’t be always ordinary, ugly, or expensive. Transform your trash into treasure! Learn how to create a charming DIY upcycled tin can trash can with fabric decoupage. Upcycle with style and sustainability.
I have o question, How many old tin cans do we throw away into the trash every year?… No comments LOL.

Table of Contents
How to make Upcycled Tin Can Trash Cans
Imagine turning ordinary tin cans into nice garbage cans that work well and look good for your home decor. I personally love tin can crafts.
This tutorial will show you how to be creative and make something new by using old materials like tin cans, and old fabric with the decoupage technique.
Get excited to decorate your home with beautiful and eco-friendly items made from things that are usually thrown away.
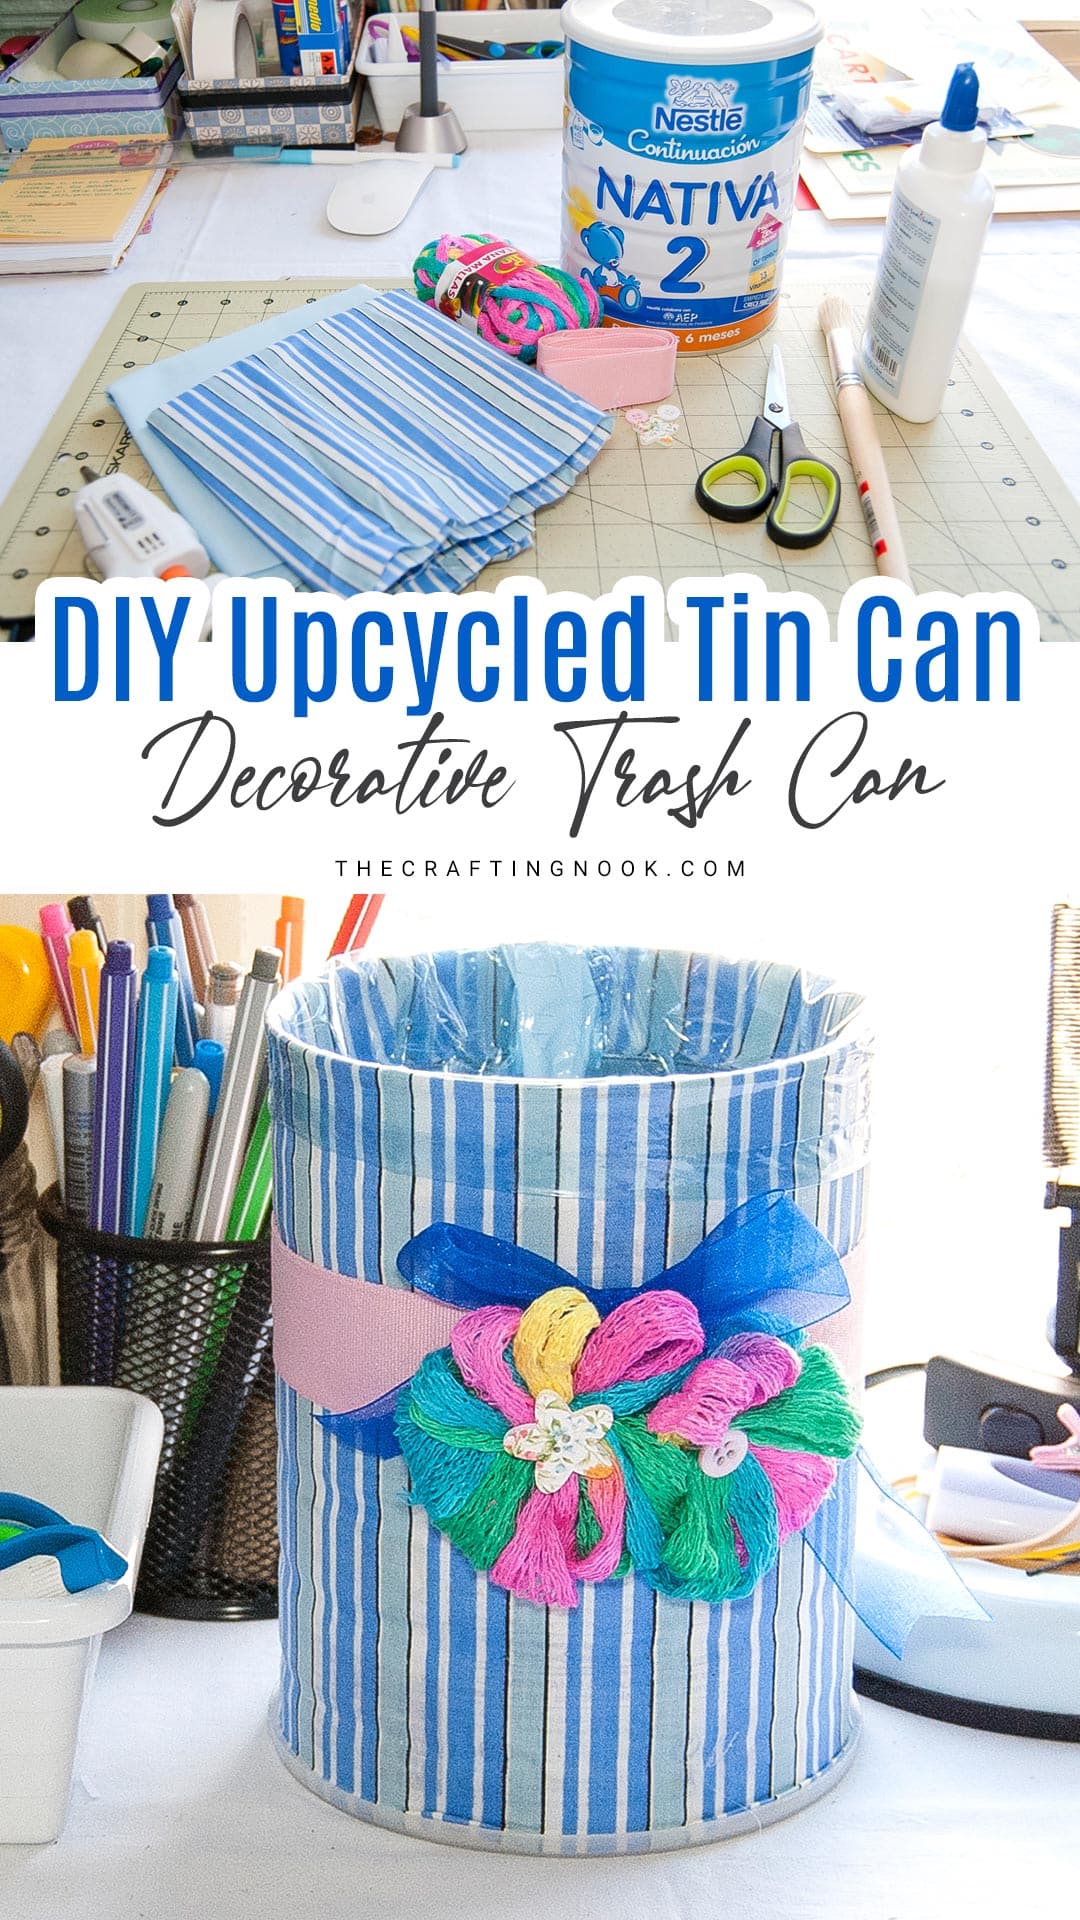
Here in Spain Baby Milk formula comes in big tin cans, about 1 Kg (about 1/2 pound), which is awesome to reuse for so many purposes.
In the end, any tin can is reusable isn’t it? In my case, I used it to make a decorative trash bin for my desk because I didn’t want anything commercial or bought.
So, I decided to decorate one of my baby’s milk tin cans and upcycle it for a better purpose as I had a few saved for an opportunity like this.
Let’s explore and experience the happiness of making your own trash can using upcycled cycled tin cans.
If you want to make this craft idea, here is how I made it.
Craft Supplies:
- A large tin can.
- Fabric.
- Ribbon
- Flowers or any decoration you like
- A brush
- Strong white glue or decoupage glue
- Clear varnish for fabric or decoupage.
- Hot glue gun
- Scissors
- Pencils

Instructions:
Firstly, if your tin can has a lid, don’t throw it away.
Straighten your fabric, it really doesn’t matter if it’s wrinkled, it will be fine after gluing it.
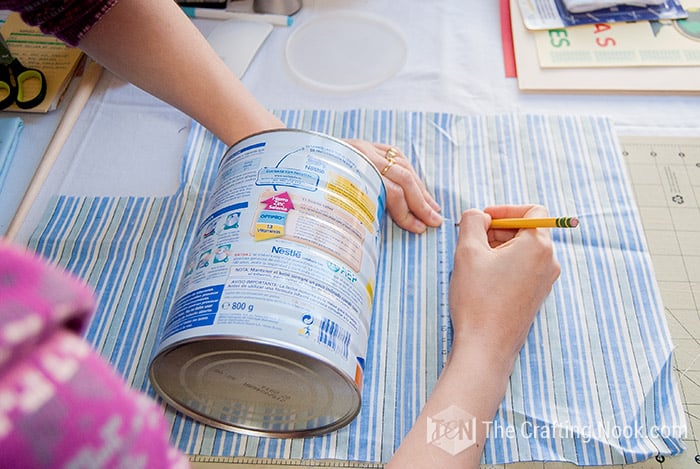
Measure your tin can height. Then mark it on your fabric leaving about 1 inch on both top and bottom.
Also, measure your tin can’s perimeter (around the can).
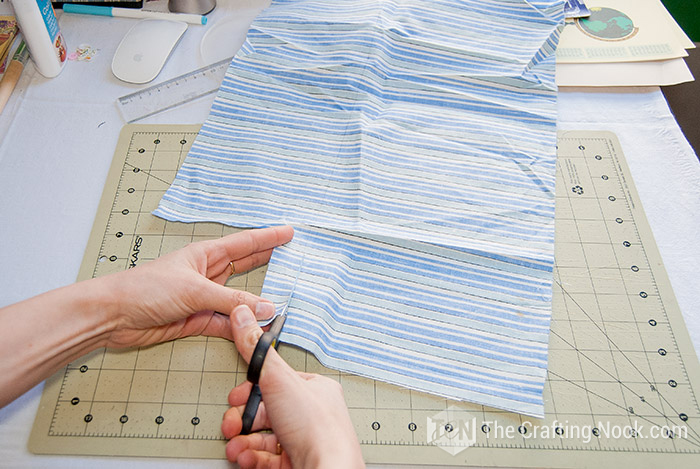
Cut your fabric
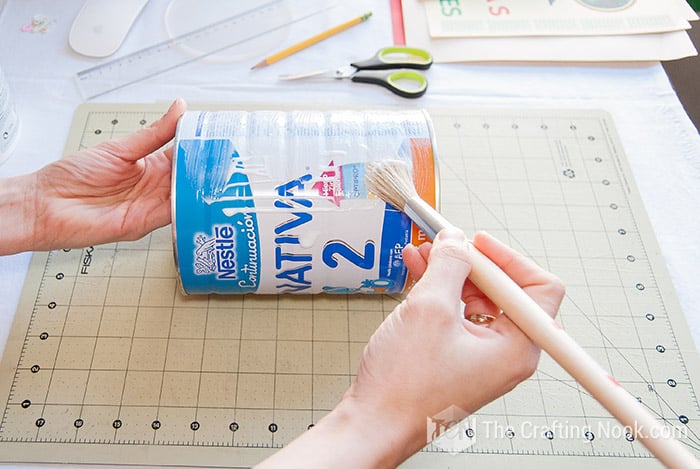
Apply your white glue with the brush to your tin can by sections.

Then start gluing your fabric and straightening it with your fingers or a scraper. Go by sections.
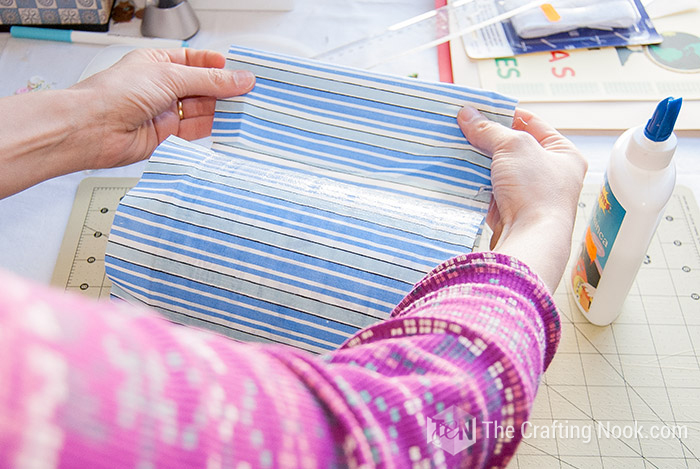
When you reach the other end, fold it and glue it.

Once the end is glued, apply some more glue on top of the fabric around all the fabric. Don’t worry it won’t be really visible but it will protect the fabric.
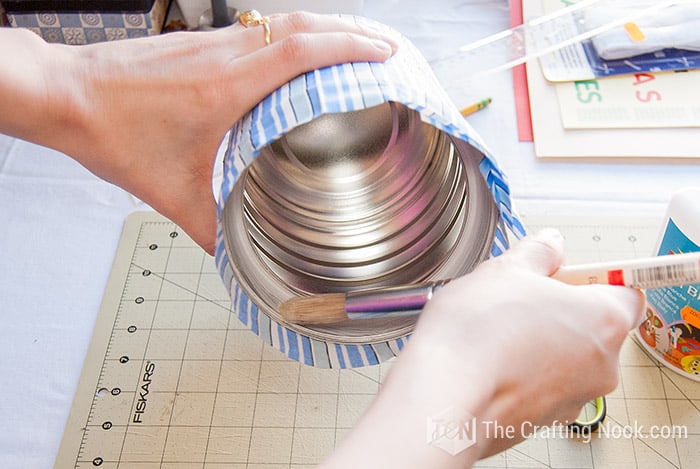
Once done, let it dry for a few hours and then apply glue to the inner edge of the tin can and fold the fabric inwards. Apply some glue on top here too.
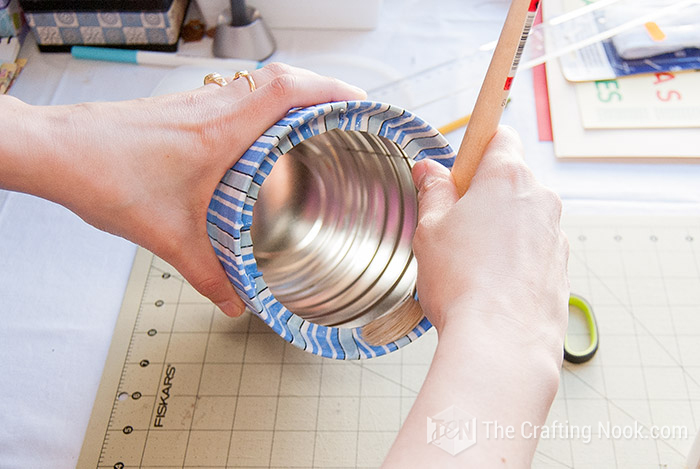
For the bottom extra fabric, cut right at the edge of the tin can and apply some glue so it won’t fray.
While it all dries, you can plan your decoration.
Once dry, apply clear varnish or sealant. This helps keep the material clean and makes it last longer.
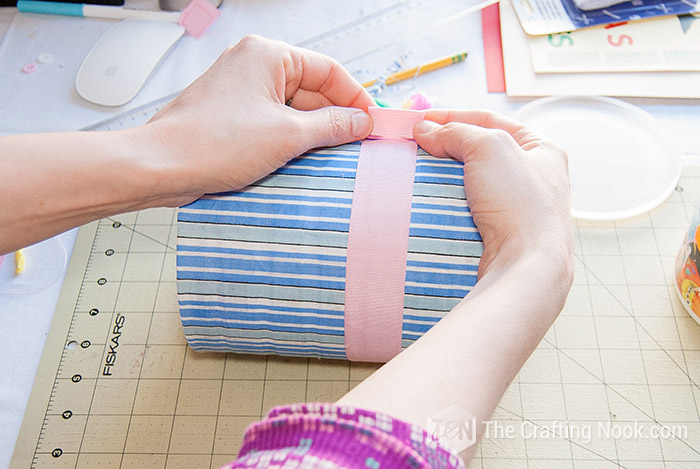
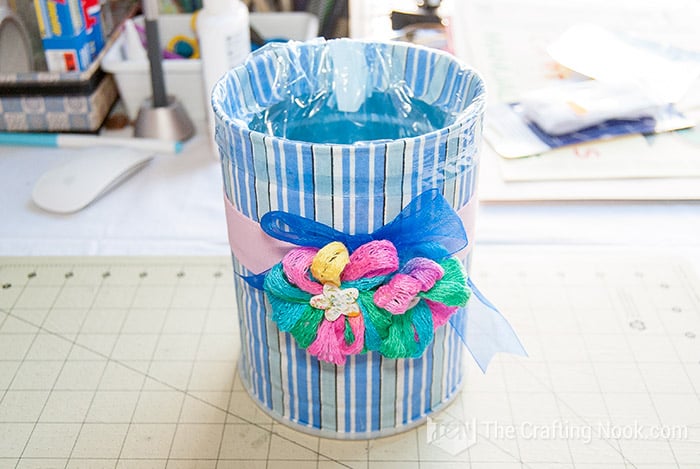
I used ribbon to decorate my trash can. I place it around the tin can, ensuring the fabric cover end stays in the back. Fonding the end, I glued it with hot glue in the front.
To hide the finish, I glued a couple of cute flowers made with yarn. You can use felt flowers, fabric flowers, or a bow. Imagination is the limit.
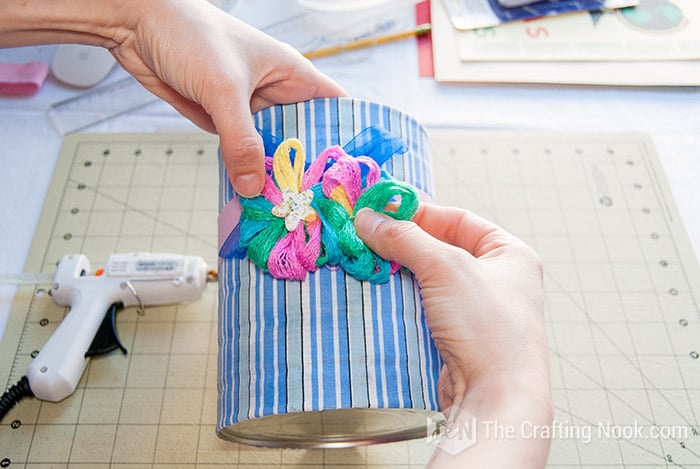
Finished the decoration with some cute buttons as the flower center.
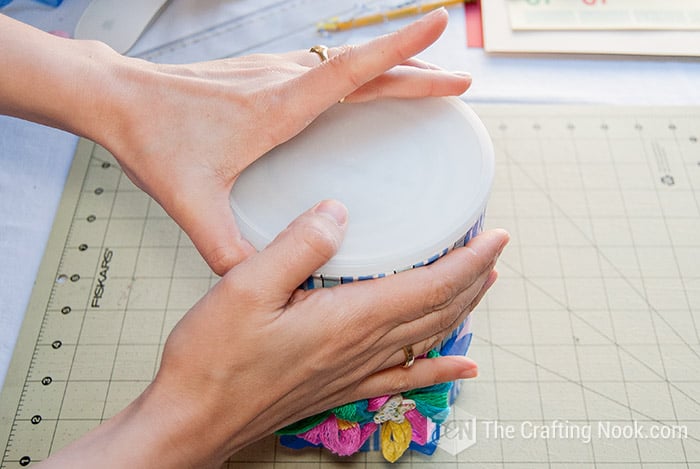
Lastly, remember the lid I told you not to throw away. Well, you can now put it back but to the bottom of your can as a finish.
It will protect your tin can from rusting and the fabric from fraying. Most importantly will prevent the can from scratching any surface. Win-win!
Putting the lid back is tricky since now you can the fabric but it’s totally possible by being careful and with a little patience.
Voilà! This is how mine looks and I love it.
Trash bins don’t have to be ugly or ordinary. They can be part of our decoration and imagination is the limit.
Crafting Tips
Wash and iron the fabric before sticking it onto the tin can. This makes sure that any wrinkles or shrinkages are gone, resulting in a smooth and perfect finish.
Put a clear layer of varnish or sealer on the fabric after adding decoupage. This helps keep the material clean and makes it last longer.
if you want to make things look old and worn, gently rub some sandpaper on the sides of the metal can and the fabric after putting on some decorative paper. This makes the can look old-fashioned and special.
Try using different types of cloth with different designs and textures to make your designs more exciting and appealing. Use different types of fabrics with different colors and patterns to make a fun and unique design for your trash can.
Have fun with painting by using stencils or sponges to make the tin can look pretty. Add cool designs or pictures that match the material you used to decorate your rubbish bin, so it stands out and is unique.
If you’re having trouble making the fabric stick smoothly to the can, you can use a blow dryer or a heat gun to warm the fabric gently. This makes it easier for the material to fit onto curved surfaces smoothly.
Use many tin cans. Make them into garbage bins of different sizes and heights. Put them together to create a nice and useful recycling area that adds some character to a room.

What do you think? Do you like this upcycled tin can idea?

Repurposed Tin Cans Ideas
Tin cans are great to create so many decorative and functional fun projects for the home, here are some ideas:
- Desk Lamp
- Fun planter
- Storage container
- Candle holder
- Pencil holder
- Kids craft supplies organizers
- … and so much more.
Frequently Asked Questions
Mostly any fabric will do. However, lightweight cotton or linen fabrics are ideal for decoupaging onto tin cans. They adhere well and are easy to manipulate around the can’s surface. Avoid using thick or heavy fabrics as they may be more challenging to work with.
Well, to be honest, that’s what I used. I like using strong, heavy-duty glue for these types of crafts. However. it’s recommended to use a specialized decoupage glue or a fabric-specific adhesive. These types of glues provide better adhesion and flexibility, ensuring a long-lasting bond between the fabric and the tin can.
Start by applying a thin layer of glue onto the tin can, then carefully place the fabric on top, smoothing it out as you go. Use your fingers or a soft brush to press out any wrinkles or air bubbles, working from the center toward the edges. Take your time and be gentle to achieve the desired result.
It’s not recommended to submerge the tin can in water or wash it. Instead, lightly wipe the surface with a damp cloth or sponge to clean any dirt or stains. Avoid using harsh chemicals or abrasive materials that could damage the fabric or the decoupage.
Applying a clear varnish or sealant over the fabric decoupage adds an extra layer of protection. It helps to safeguard the fabric from moisture, spills, and general wear and tear. Choose a varnish specifically designed for decoupage projects and follow the manufacturer’s instructions for application.
More Upcycling Projects to Try
If you enjoyed this DIY Upcycled Tin Can Trash Can, you might also love these other fun upcycling ideas too:

Decorated Tape and Ribbon Craft Tool Holder
What else can be made with tin cans?
- DIY Decorative Tin Can Vases by Elysia over at Haute and Healthy Living
- Tin Can Project: Make Your Own Flower Pot by Amy over at More Like Grace
- Enamelware Inspired Tin Can Centerpiece by Lily over at Lilyardor
Hope you like this Upcycled Tin Can tutorial and that it inspires you to put your upcycling skill to practice!
✂️ Tutorial

DIY Upcycled Tin Can Trash Can
Tools
- Hot glue gun and glue sticks
Supplies
- A large tin can.
- Fabric.
- Ribbon
- Flowers or any decoration you like
- A brush
- Strong white glue or decoupage glue
- Clear varnish for fabric or decoupage.
- Hot glue gun
- Scissors
- Pencils
Instructions
- Firstly, if your tin can has a lid, don’t throw it away.
- Straighten your fabric, it really doesn’t matter if it’s wrinkled, it will be fine after gluing it.
- Measure your tin can height. Then mark it on your fabric leaving about 1 inch on both top and bottom.
- Also, measure your tin can’s perimeter (around the can).
- Cut your fabric
- Apply your white glue with the brush to your tin can by sections.
- Then start gluing your fabric and straightening it with your fingers or a scraper. Go by sections.
- When you reach the other end, fold it and glue it.
- Once the end is glued, apply some more glue on top of the fabric around all the fabric. Don’t worry it won’t be really visible but it will protect the fabric.
- Once done, let it dry for a few hours and then apply glue to the inner edge of the tin can and fold the fabric inwards. Apply some glue on top here too.
- For the bottom extra fabric, cut right at the edge of the tin can and apply some glue so it won’t fray.
- While it all dries, you can plan your decoration.
- Once dry, apply clear varnish or sealant. This helps keep the material clean and makes it last longer.
- I used ribbon to decorate my trash can. I place it around the tin can, ensuring the fabric cover end stays in the back. Fonding the end, I glued it with hot glue in the front.
- To hide the finish, I glued a couple of cute flowers made with yarn. You can use felt flowers, fabric flowers, or a bow. Imagination is the limit.
- Finished the decoration with some cute buttons as the flower center.
- Lastly, remember the lid I told you not to throw away. Well, you can now put it back but to the bottom of your can as a finish.
- It will protect your tin can from rusting and the fabric from fraying. Most importantly will prevent the can from scratching any surface. Win-win!
- Putting the lid back is tricky since now you can the fabric but it’s totally possible by being careful and with a little patience.
Share and PIN ME!!!
Til’ next time…


FREE WORKBOOK
Keeping your Sweet Home Organized
Learn how to create intentional habits and simple routines to Keep Your Home Organized. Plus freebies, printables, exclusive content, and tips.
Disclaimer: By clicking on the “Yes” button above you are giving me your consent to collect and use your information according to the law and My Policy Privacy. Zero Spam I promise!
Thanks SOOOO much ladies for your sweet comments. I always enjoy so much reading them. I appreciate that you take the time to visit and leave some love!!!
Lots of xoxo and hugs
Cami
Great repurposing! Love the stripes! Thanks for sharing at All Things Pretty!
Cami this is so sweet. A wonderful transformation and recycle too. Thank you for sharing at the Thursday favorite things hop xo
Hi Cami
This is lovely. Great idea.
Angel
Que hermoso !!!! que buena idea, lo voy a intentar con una de las latas viejas de leche de mi hija
Hola Vero, gracias por el comentario y me alegra que te guste. Siiii haslo es super divertido y a parte reciclas :D. Cuando lo hagas me encantaría ver como se ve :D
Cuidate y espero tenerte por estos lados pronto!
Que hermoso ! que buena idea