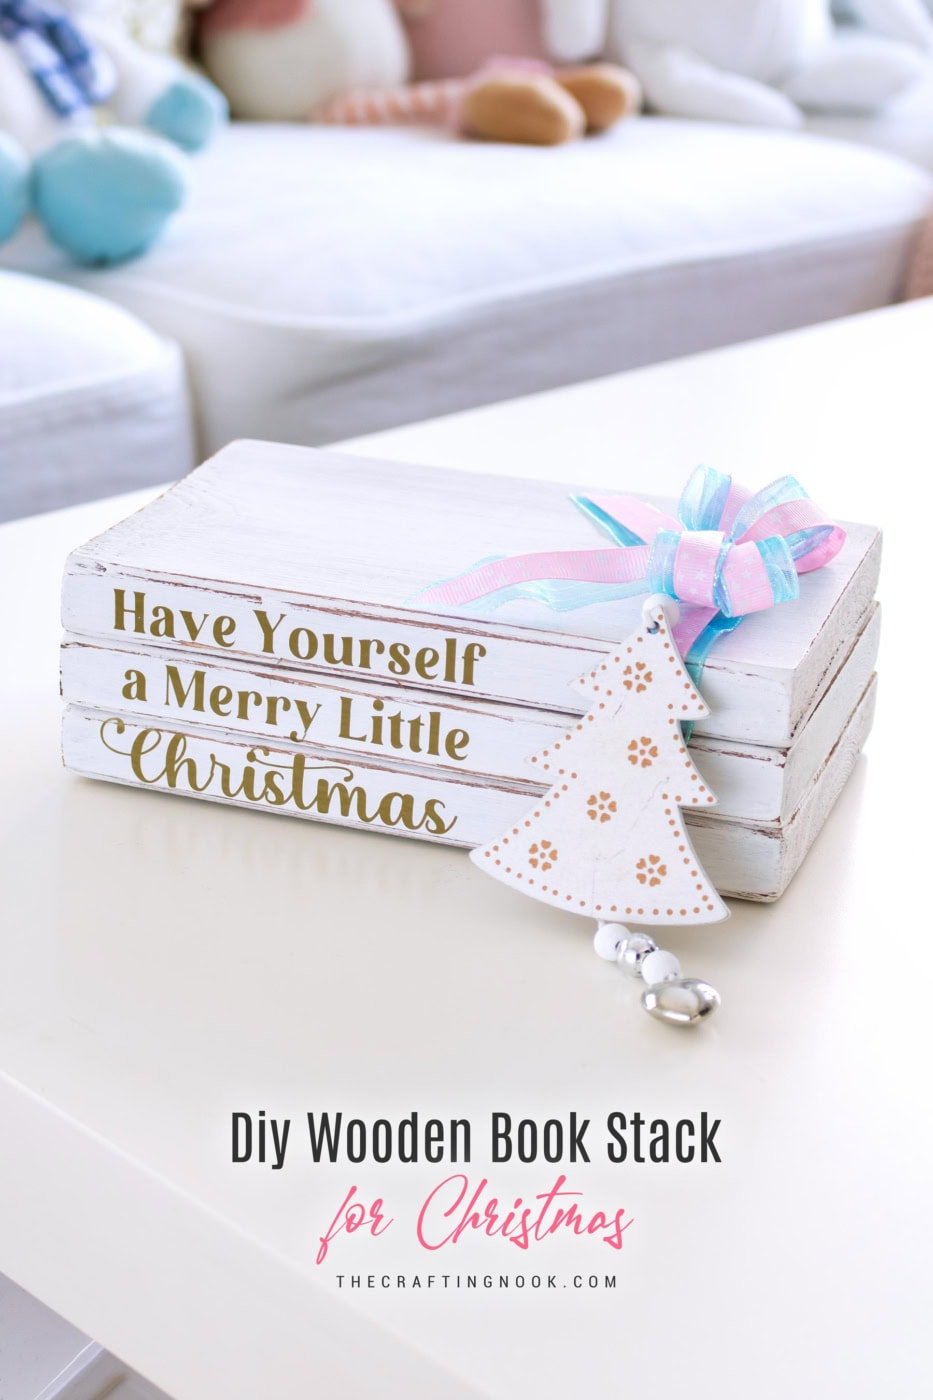
Diy Wooden book stack for Christmas
This post may contain affiliate links. Please read our Disclosure Policy.
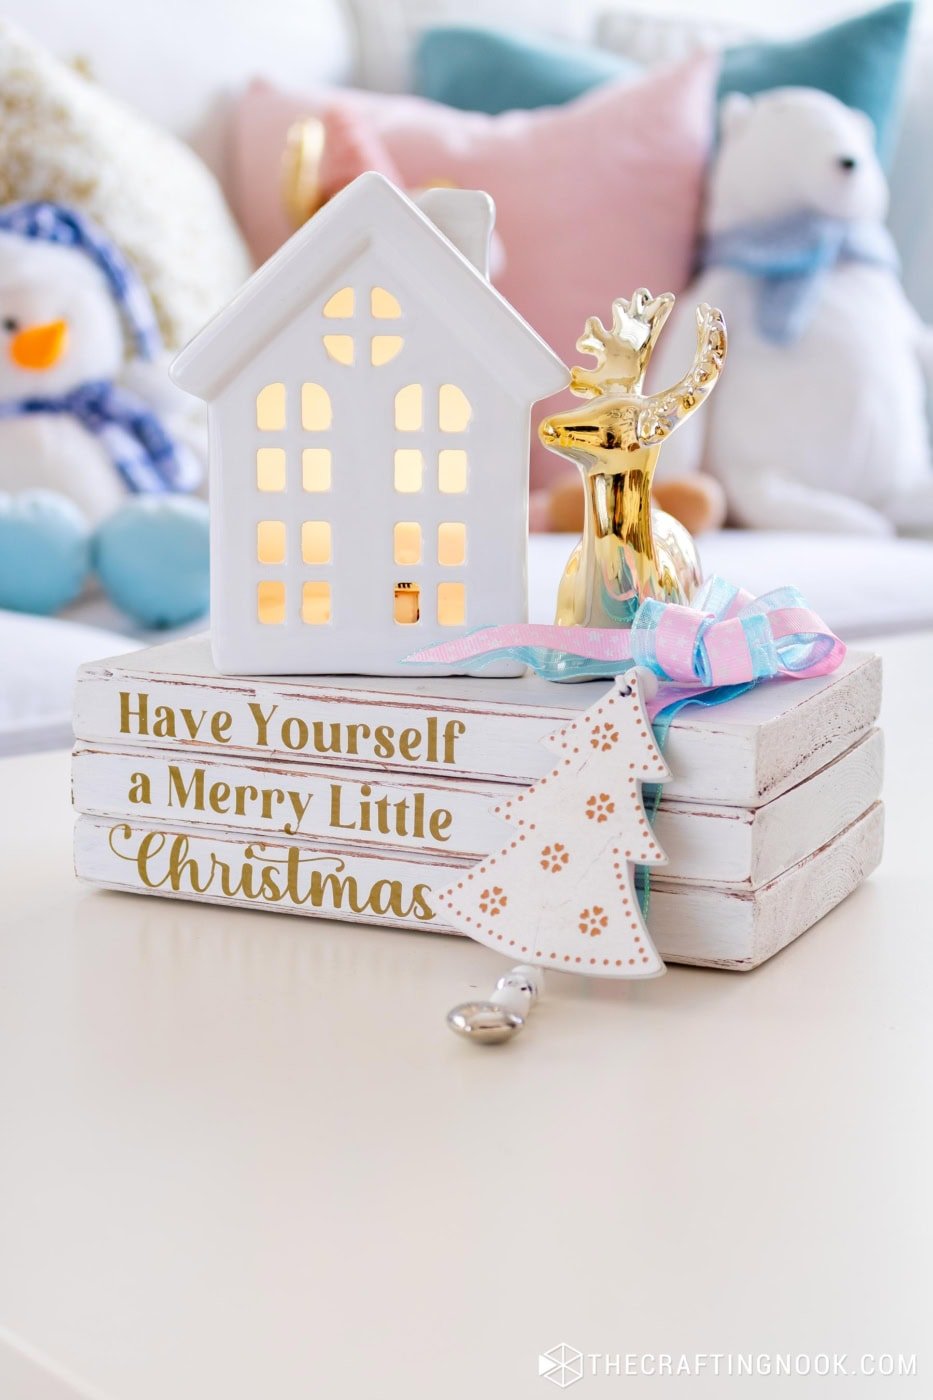
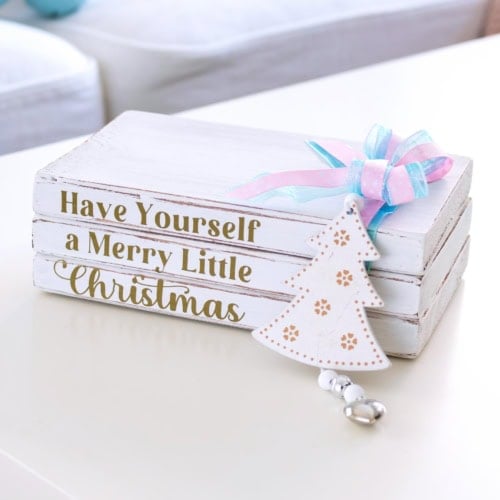
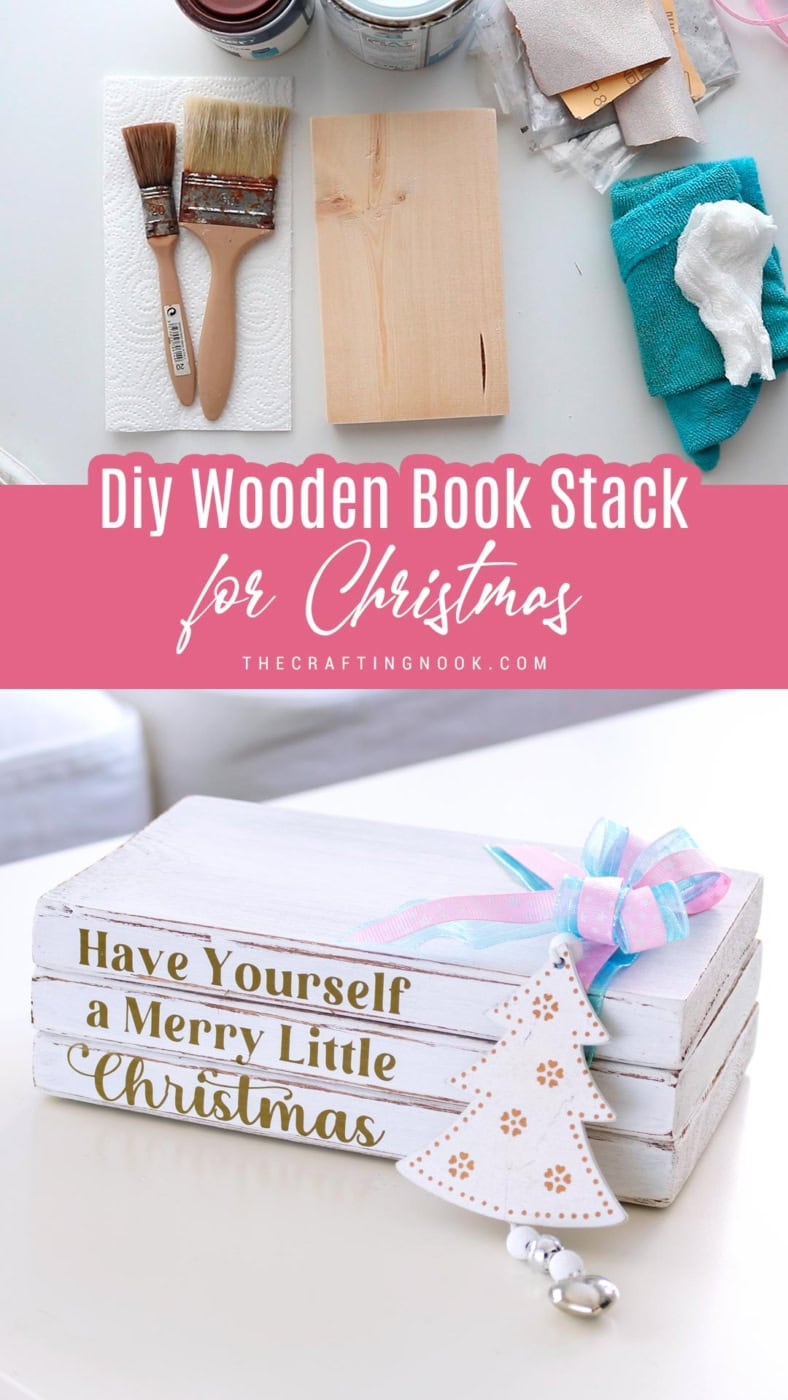
Learn how to create a cozy wooden book stack for Christmas with easy sanding, staining, painting, and vinyl steps. A sweet handmade décor piece for your home.
I love small projects that can sit on a shelf and quietly bring a bit of joy. This little stack of “wooden books” does exactly that. Maybe it’s because they look like tiny stories sitting quietly on the shelf, or maybe it’s because they feel a bit nostalgic. Either way, I’ve always loved the look of wood book stacks, and this year I finally sat down to make one.
I’ve been trying to be more intentional with my décor lately, choosing pieces I can reuse instead of packing everything away the minute January arrives.
So while today’s stack is dressed up for Christmas with a sweet message and gold vinyl, the back side will be all about Spring once the holidays pass. A quick ribbon switch, a fresh little phrase, and suddenly this same project goes right into Easter season without taking up extra storage space. My kind of craft. I’ll be sharing the Spring version soon!
This one is easy, relaxing, and honestly perfect for an afternoon of quiet creating. Let me walk you through it.
Table of Contents
How to Make a Wooden Book Stack
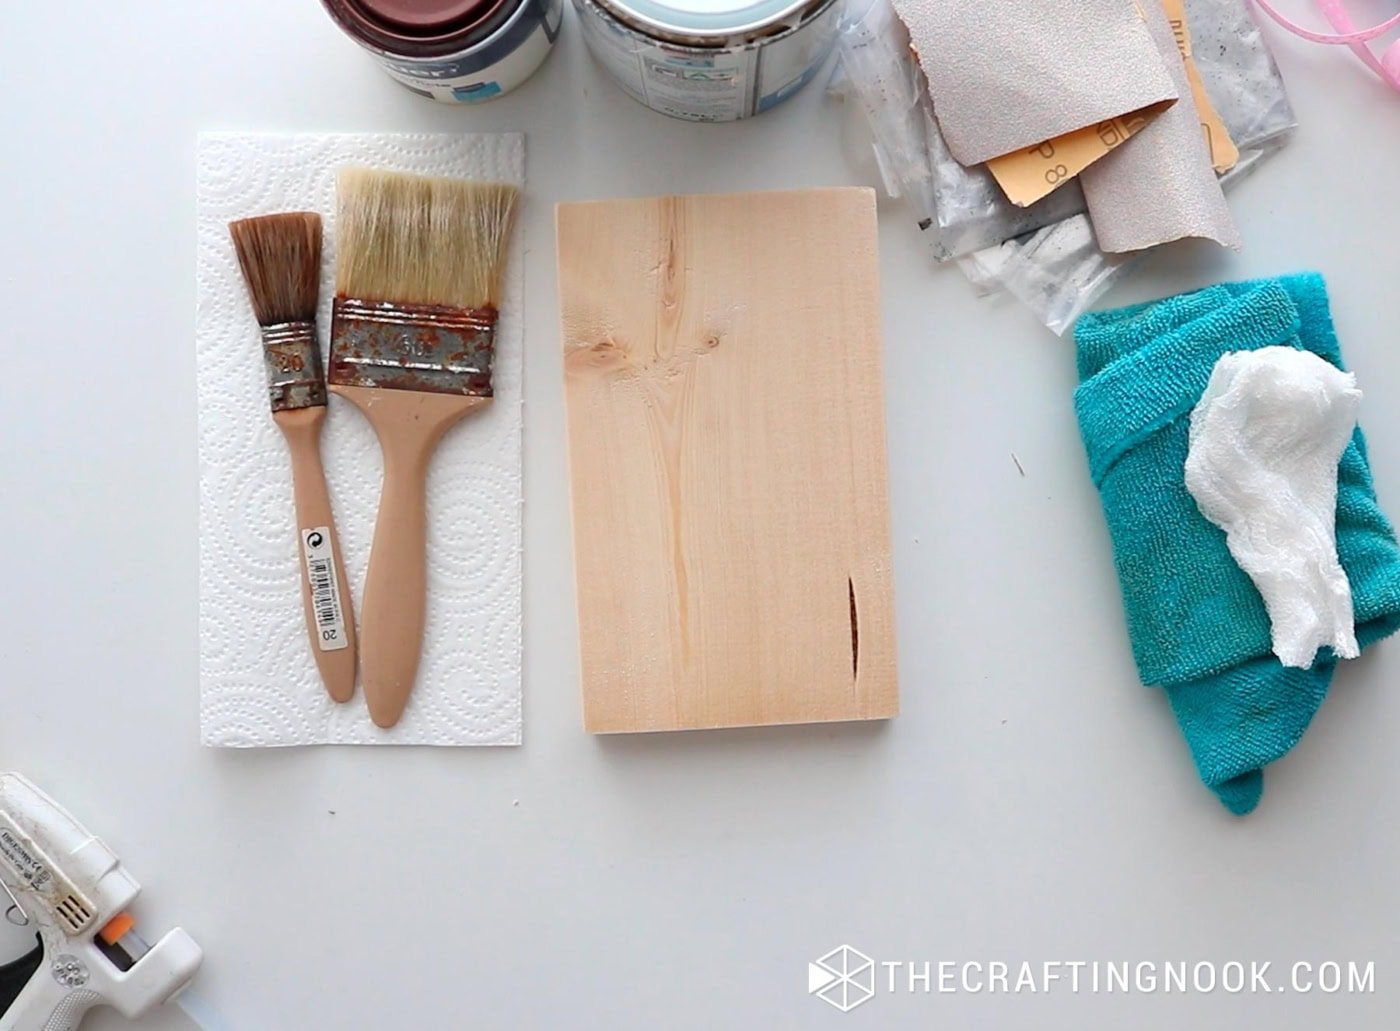
Supplies:
- Three small wood blocks (cut to the same width and thickness, book-style)
- Sandpaper, medium and fine grit
- Wood stain
- Acrylic paint
- Brushes for stain and dry brushing
- Cloths or rags
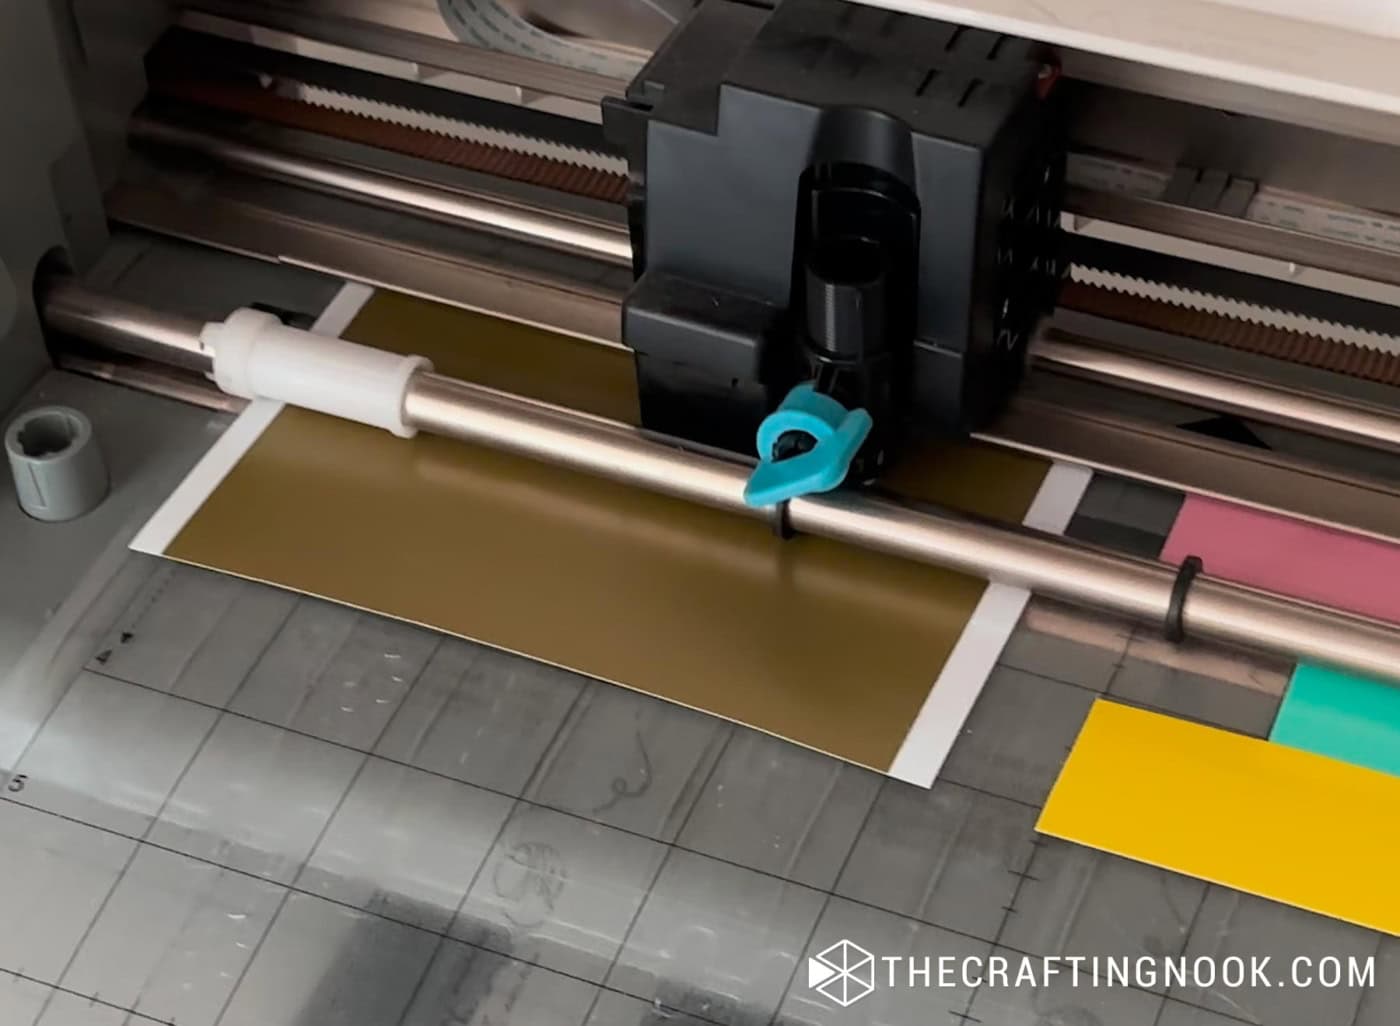
- Vinyl (any color you like; I used metallic gold)
- Transfer tape
- Ribbons and small embellishments
Tools:
- Scissors
- Hot glue gun
- Scrapper and weeding tools
- Cutting machine (Silhouette or Cricut) – Optional, you can definitely handwrite it or use stencils.
Instructions:
Step 1: Shape and sand the “books”
Start with 3 wood blocks that have the same width and thickness.
With medium grit sandpaper, smooth all the surfaces. Remove any splinters and rough edges.
To mimic the spine of a book, hold your sandpaper at a diagonal across the long front edge of each block.

Sand from the top corner down toward the bottom corner so you create a gentle groove.
Repeat two or three times in the same direction until you see a soft diagonal indent.
Do this on each “book” so all three have that subtle spine line.
Switch to fine grit sandpaper and go over the whole block again. Focus on corners, edges and the diagonal groove. You want everything to feel smooth to the touch.
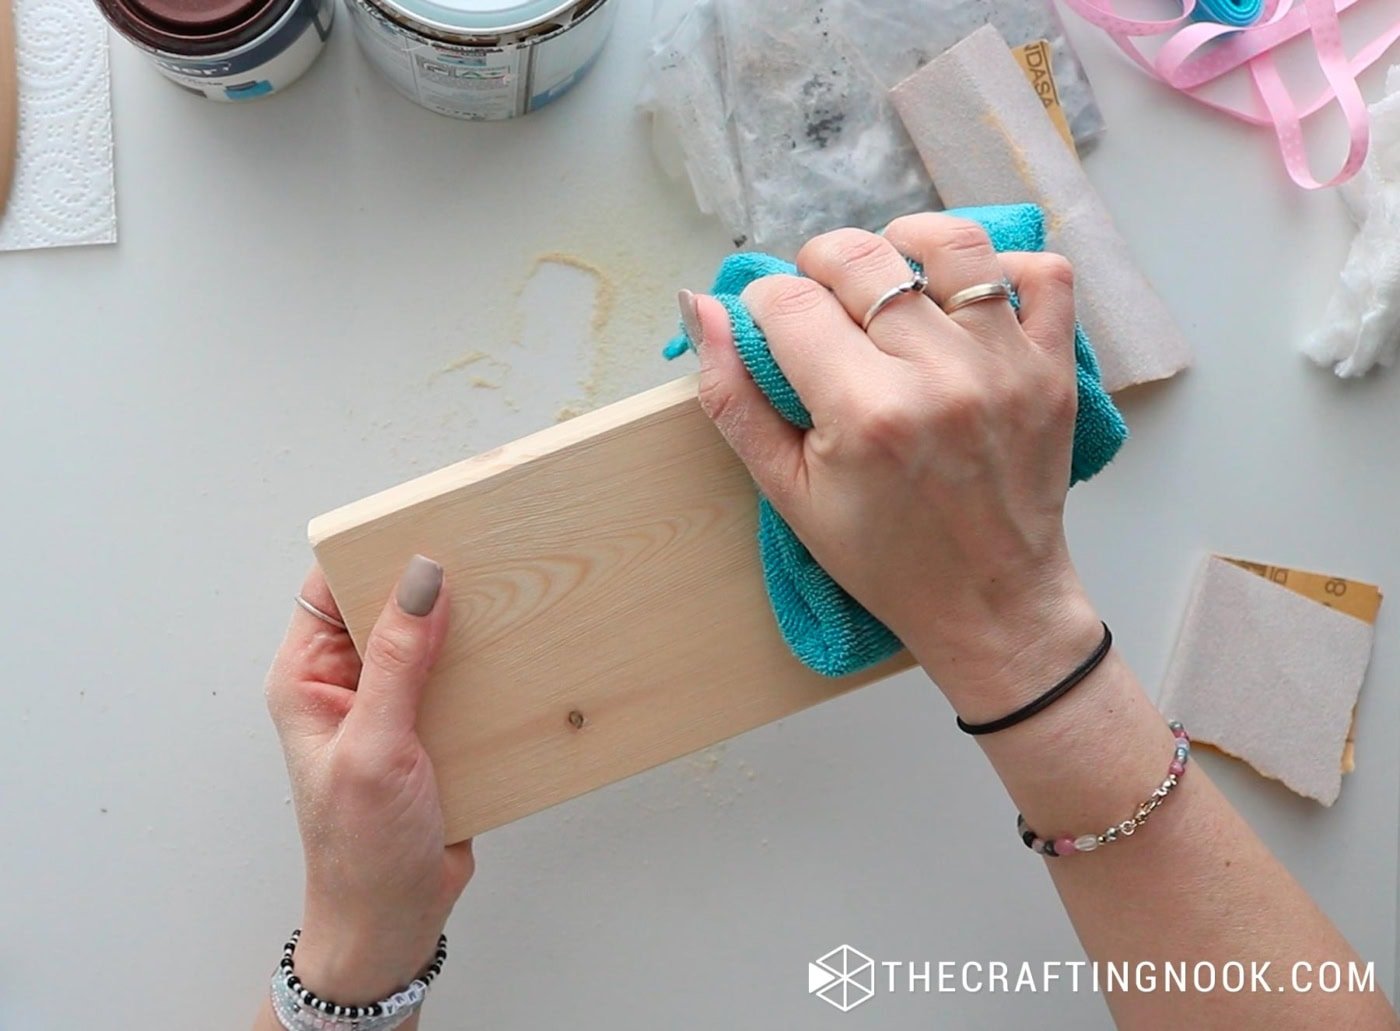
Wipe each block with a dry cloth to remove all the dust.
Step 2: Stain the wood
Protect your surface with plastic or craft paper.
Using a brush, apply a generous coat of stain on all sides of the wood.
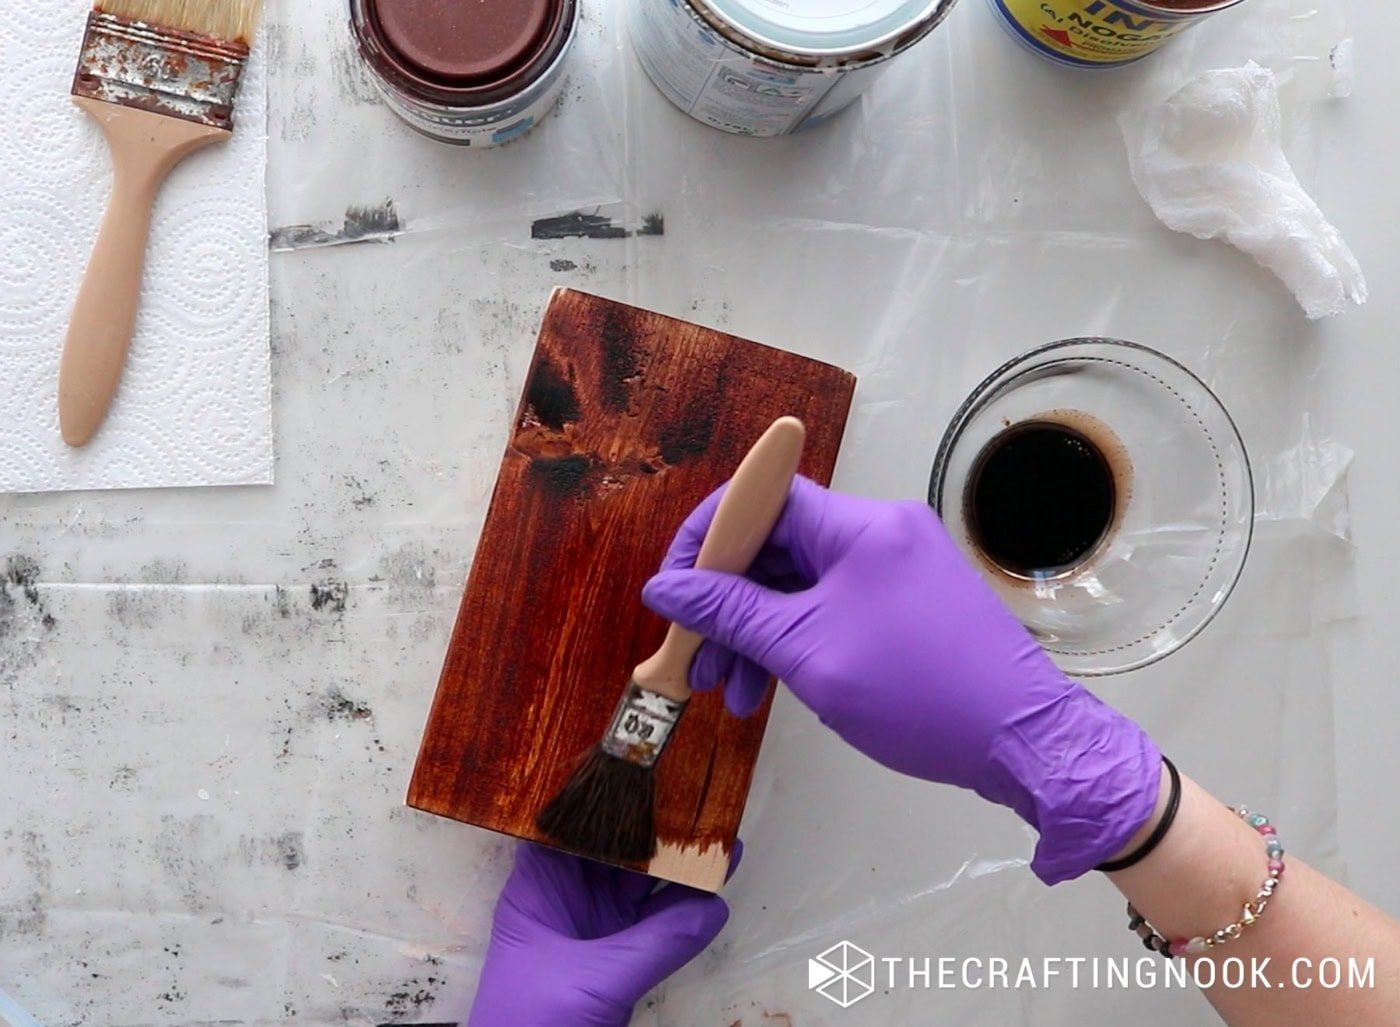
Let the stain sit for a few seconds. This helps the color sink in and gives a richer tone.
Wipe off the extra stain with a soft cloth, following the direction of the wood grain.
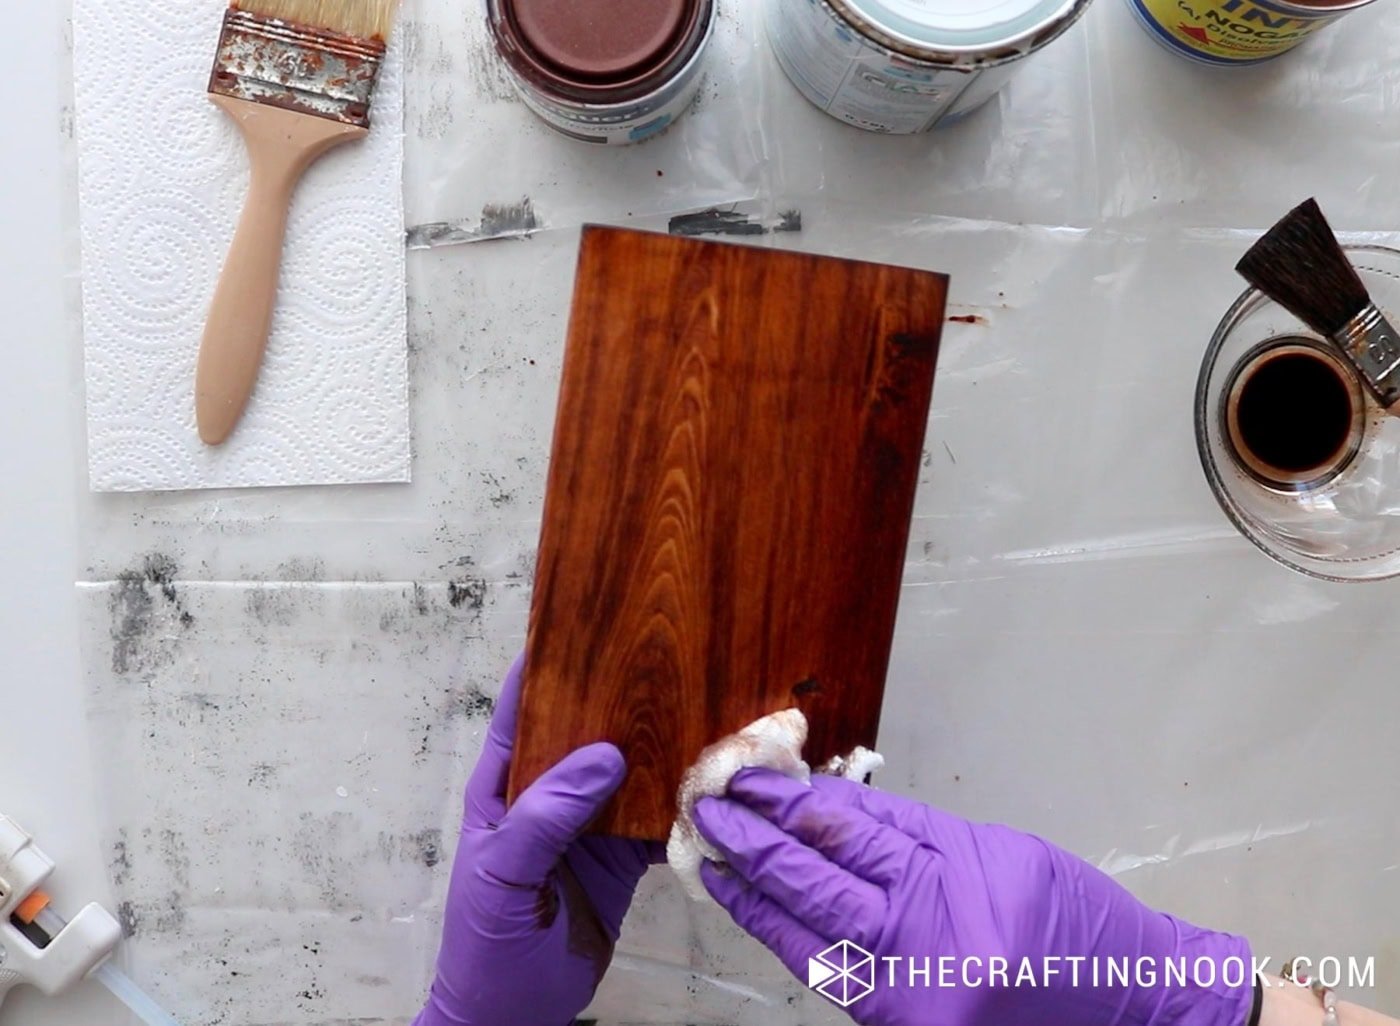
If you want a deeper color, repeat with a second coat.
When you are happy with the color, set the pieces aside and let them dry overnight.
This part is important! If the stain is still tacky, the paint will not behave well on top.
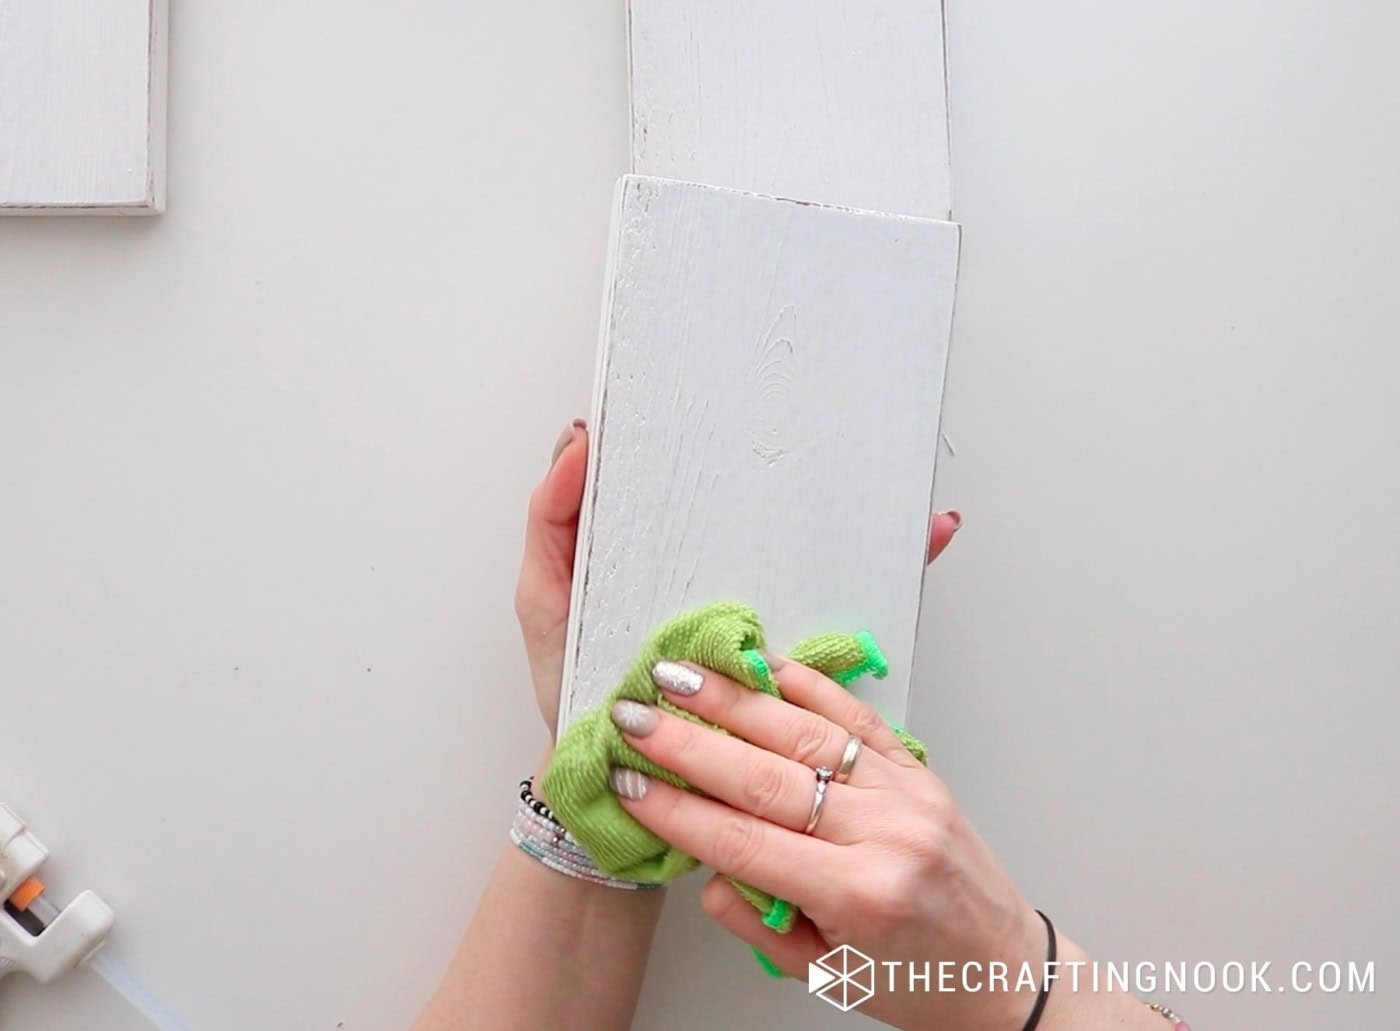
Step 3: Dry brush the paint
We are going for that painted, slightly worn book look.
The next day, once the stain is completely dry, grab your acrylic paint.
Dip a large brush into the paint and then wipe most of it off on a scrap piece of paper. The brush should look almost dry.
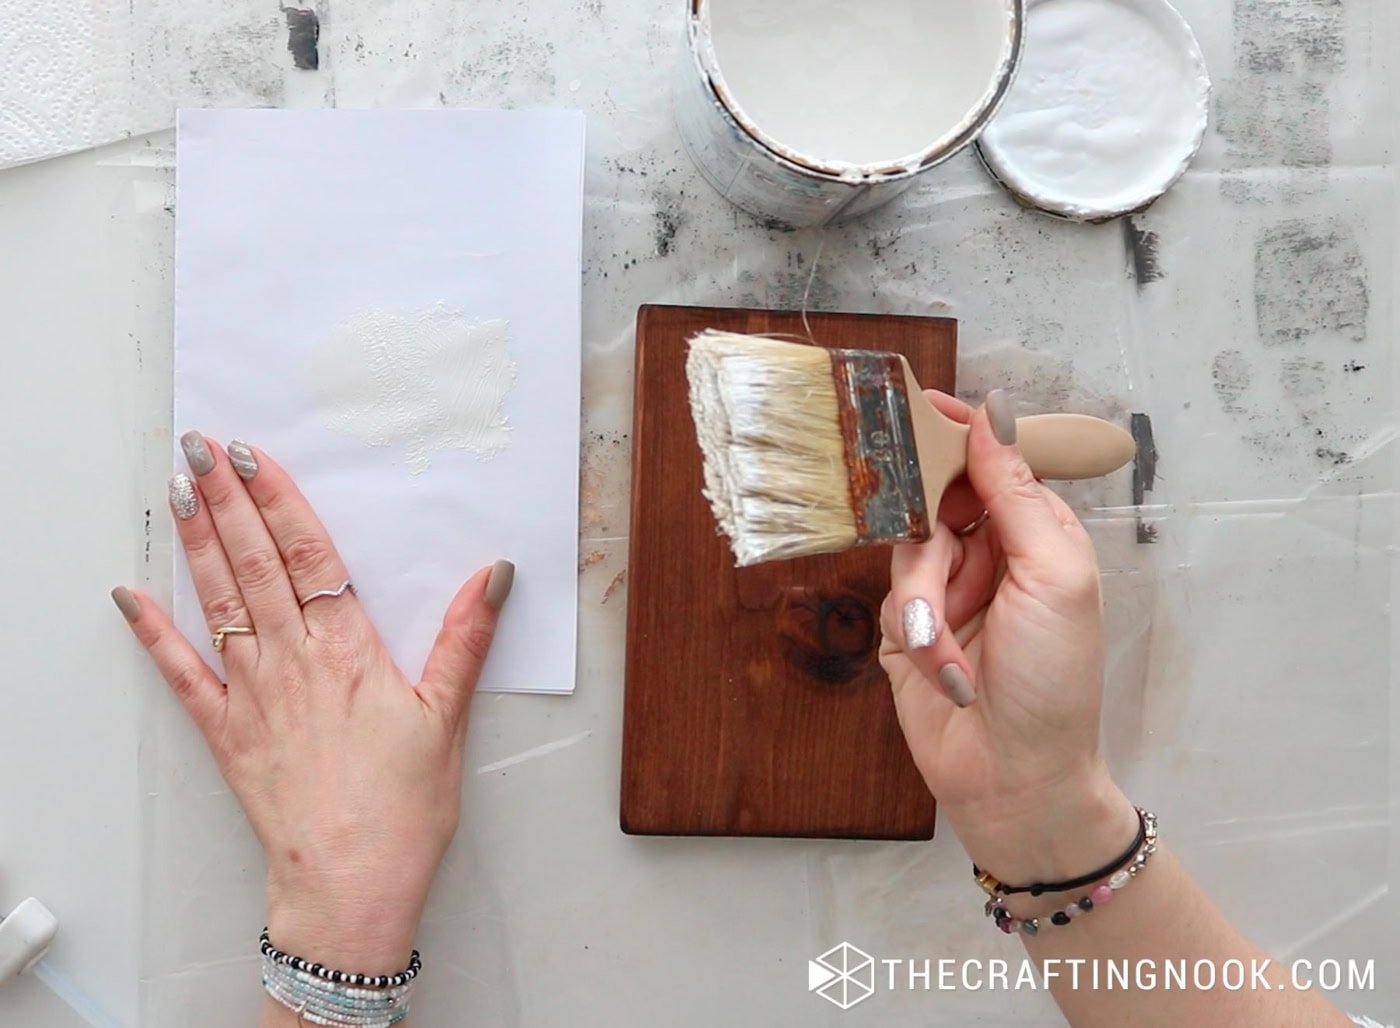
Lightly drag the brush over the stained wood, always in the same direction as the grain. Thin streaks of paint should appear, but you should still see the stain underneath.
Cover the front, back, sides and the spine edges of each block.
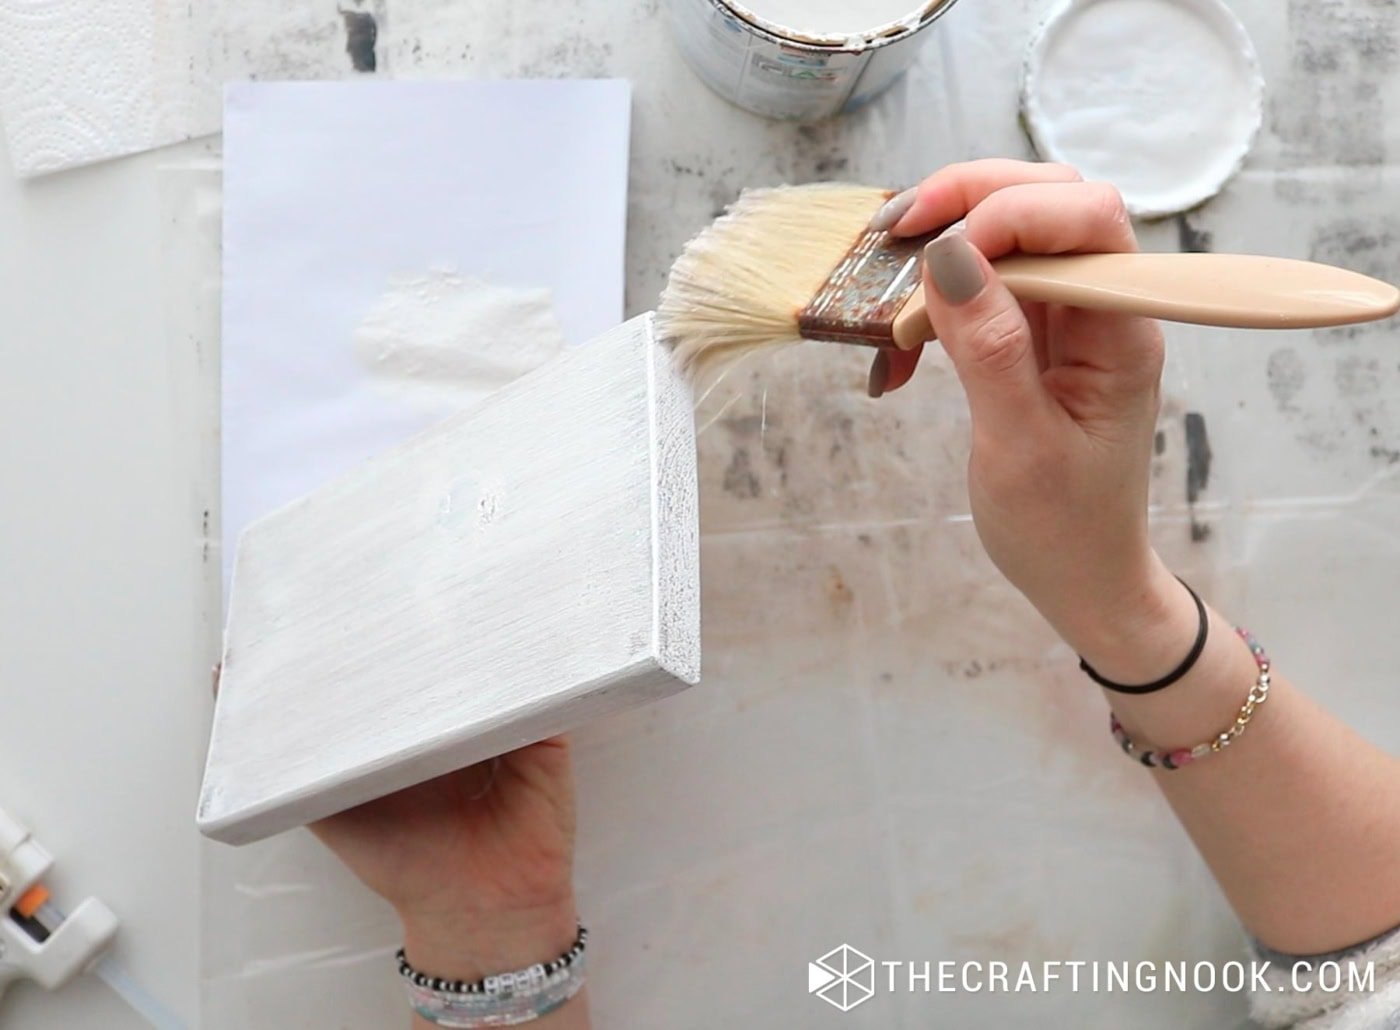
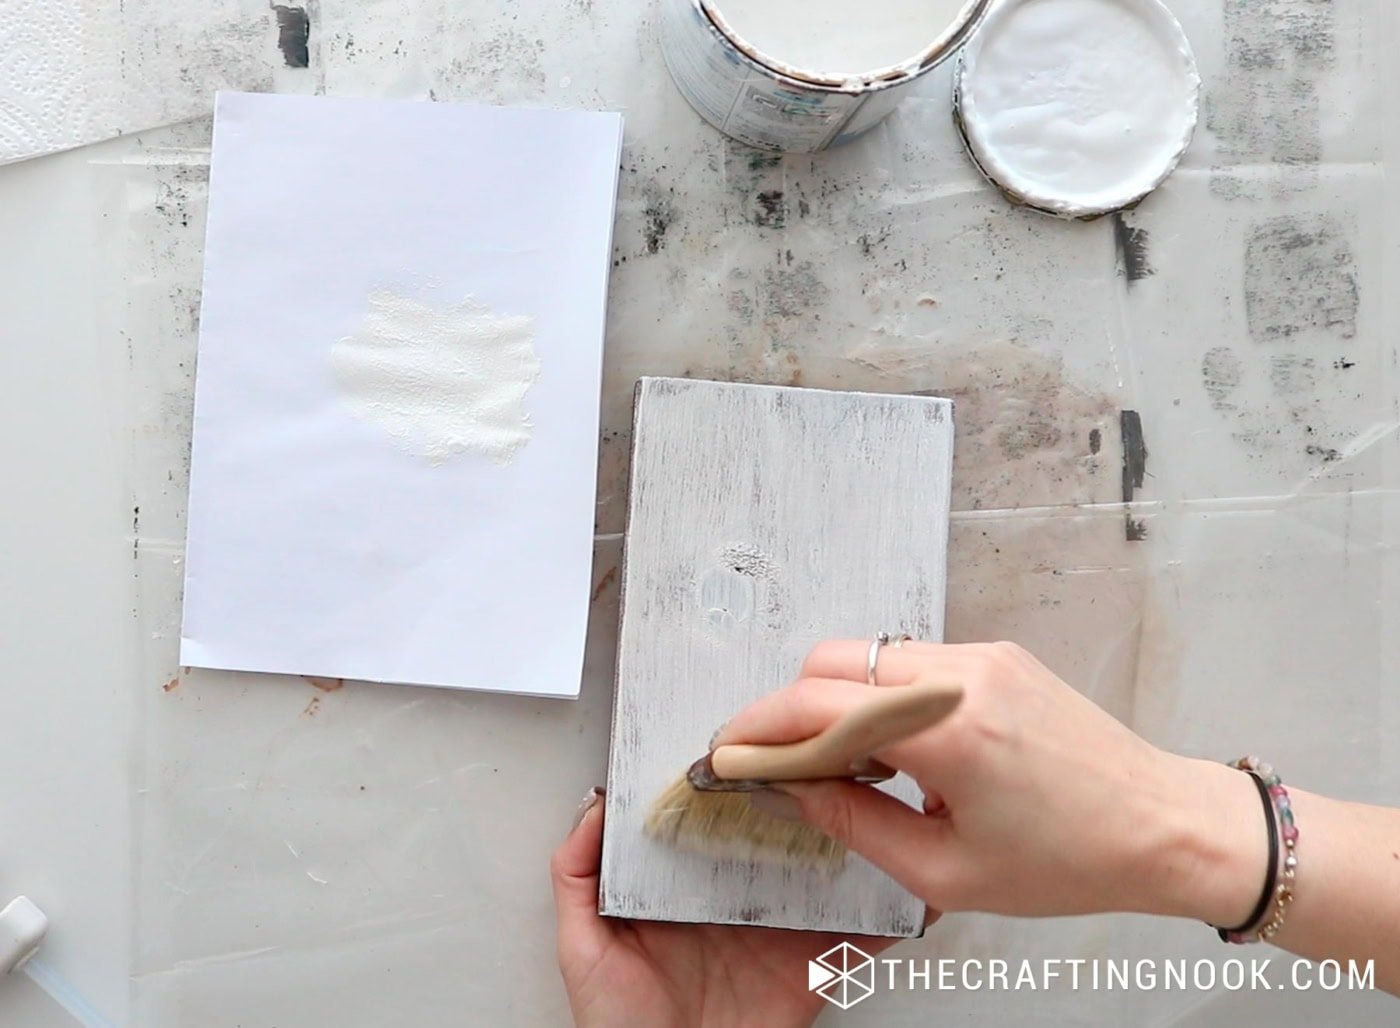
Let the first coat dry for about 30 minutes.
Repeat with a second light coat if you want more coverage. I still like some of the wood peeking through, so I keep the layers thin.
After your final coat, let the paint dry for about 2 hours before moving to sanding and aging.
Step 4: Distress and define the edges
Once the paint feels dry and firm, use fine-grit sandpaper to gently distress the edges.
Sand along the corners, the diagonal spine line and the sides until a bit of stain shows through.
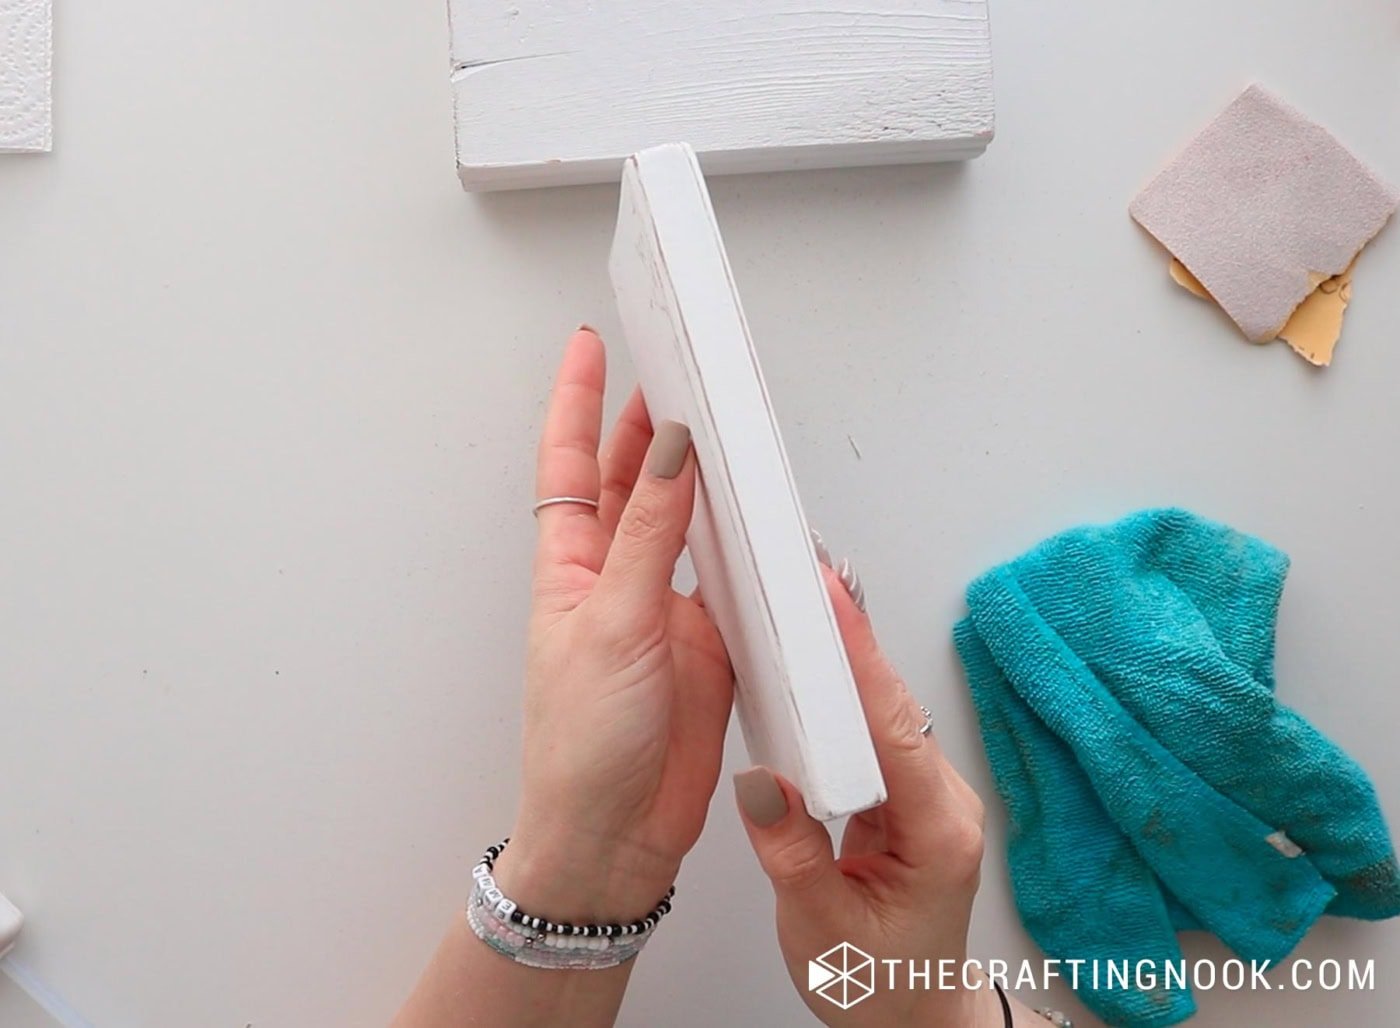
Keep checking as you go. A little distressing already makes a big difference.
Wipe the dust away with a clean, slightly damp cloth so your surface is ready for vinyl.
Now your blocks already look like tiny books.
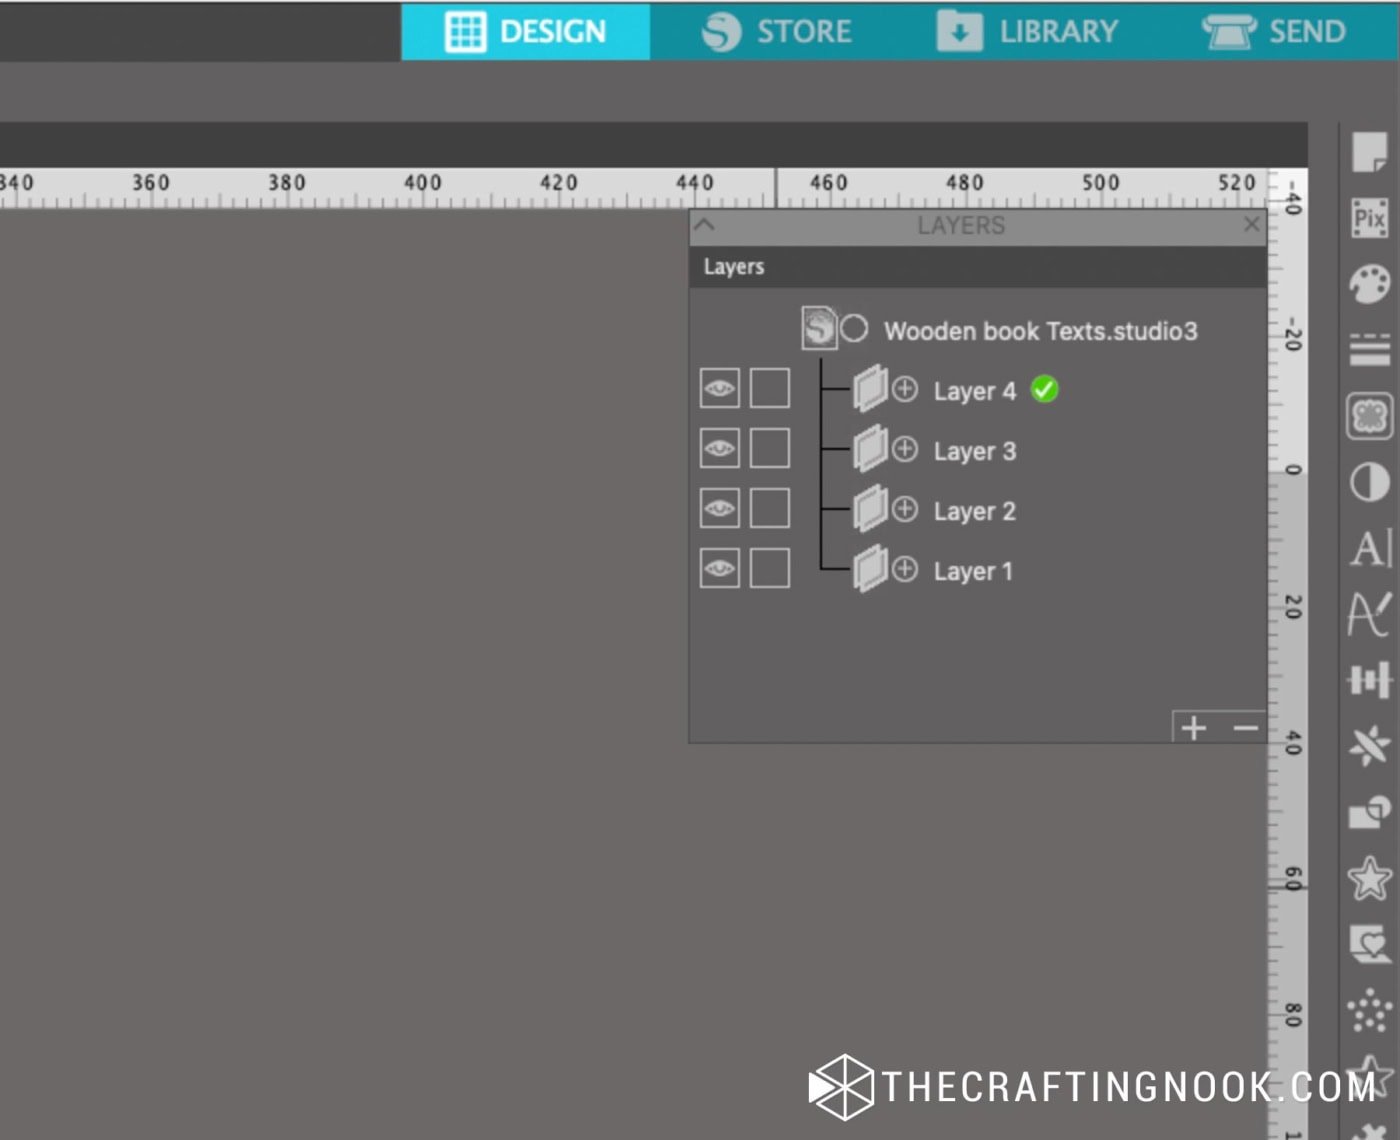
Step 5: Design and cut the vinyl text
This is where your cutting machine comes in.
Open your cutting software.
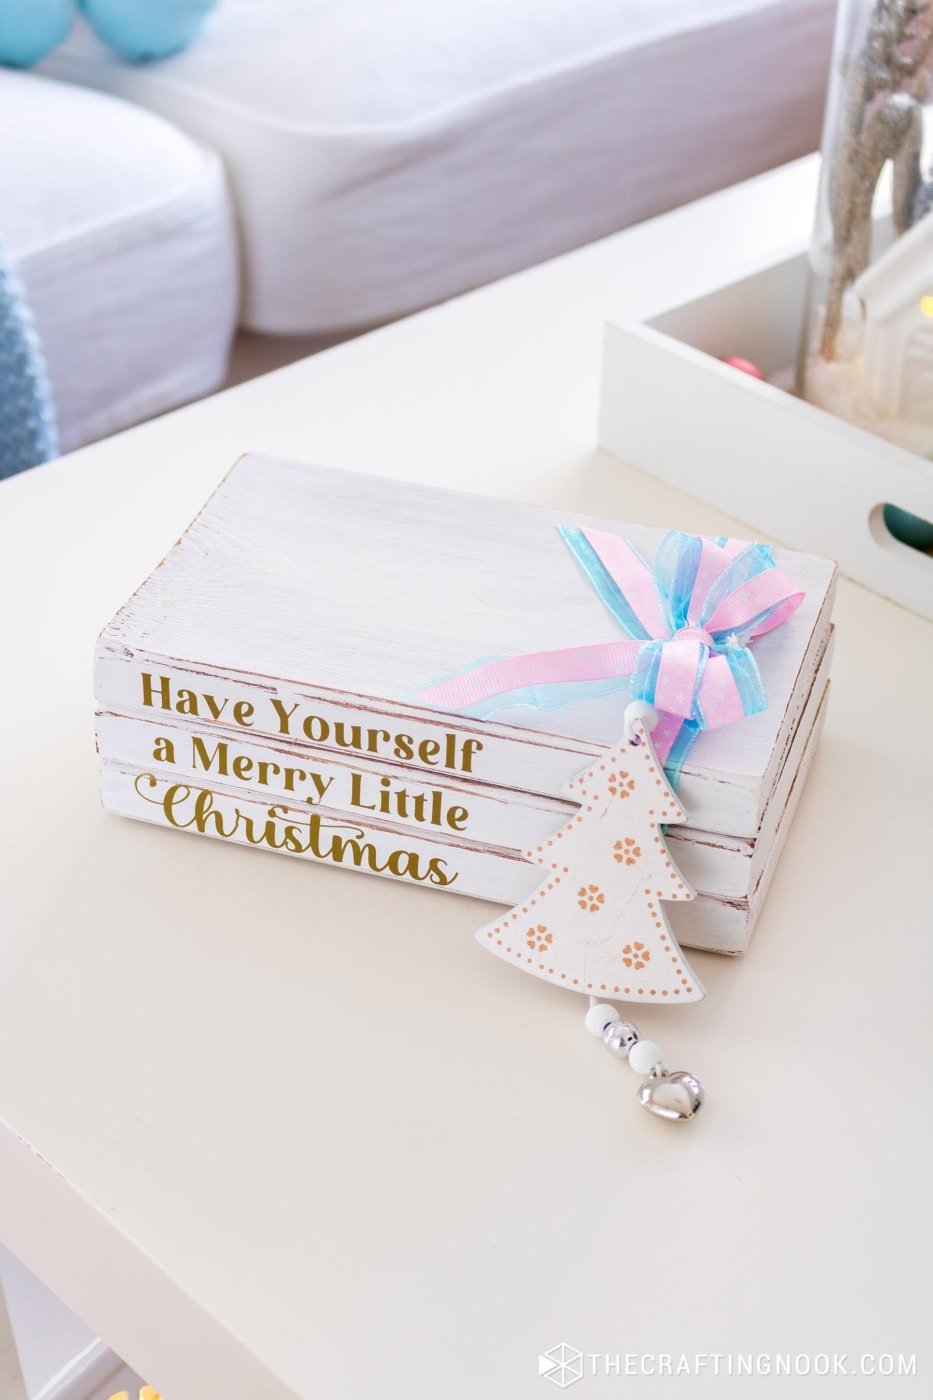
Create three separate lines of text for the Christmas side. I used:
“Have Yourself”
“a Merry Little”
“Christmas”
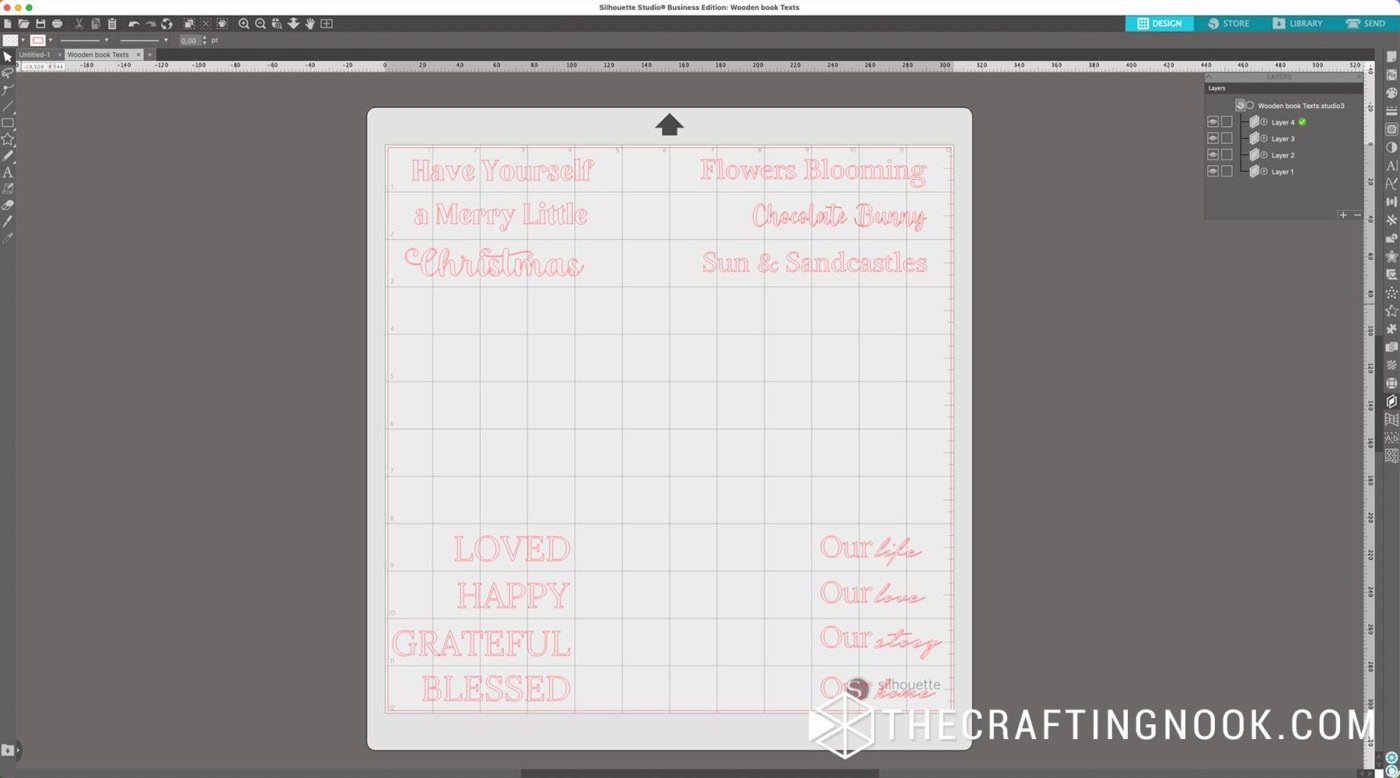
Because I’m planning on making these wood books reversible and making another one, you see I have created 4 sets, but if you are doing only one, just create the lines you will use.
Measure the side of each wood block so you know how long and tall your text can be. Leave a little margin at the top and bottom.
Resize each line of text inside the software to fit the measurement of each “spine.”
Choose your fonts. I chose a simple serif since it works nicely for the first lines, and a script for the word “Christmas” to give a nice contrast.
Group each line so it moves as one piece and place all three lines on your virtual mat.
If you are also preparing the Spring or Easter side, add those phrases in a different part of the mat and keep them grouped as another set or layer.

Select the vinyl material setting, load the vinyl into your machine (no mirroring needed because this is regular adhesive vinyl) and send it to cut.
Step 6: Weed and prepare with transfer tape
Once the cut is finished, remove the vinyl from the mat.
Use your weeding tool to peel off the vinyl around the letters and the little pieces inside letters like “e”, “a” and “o”.
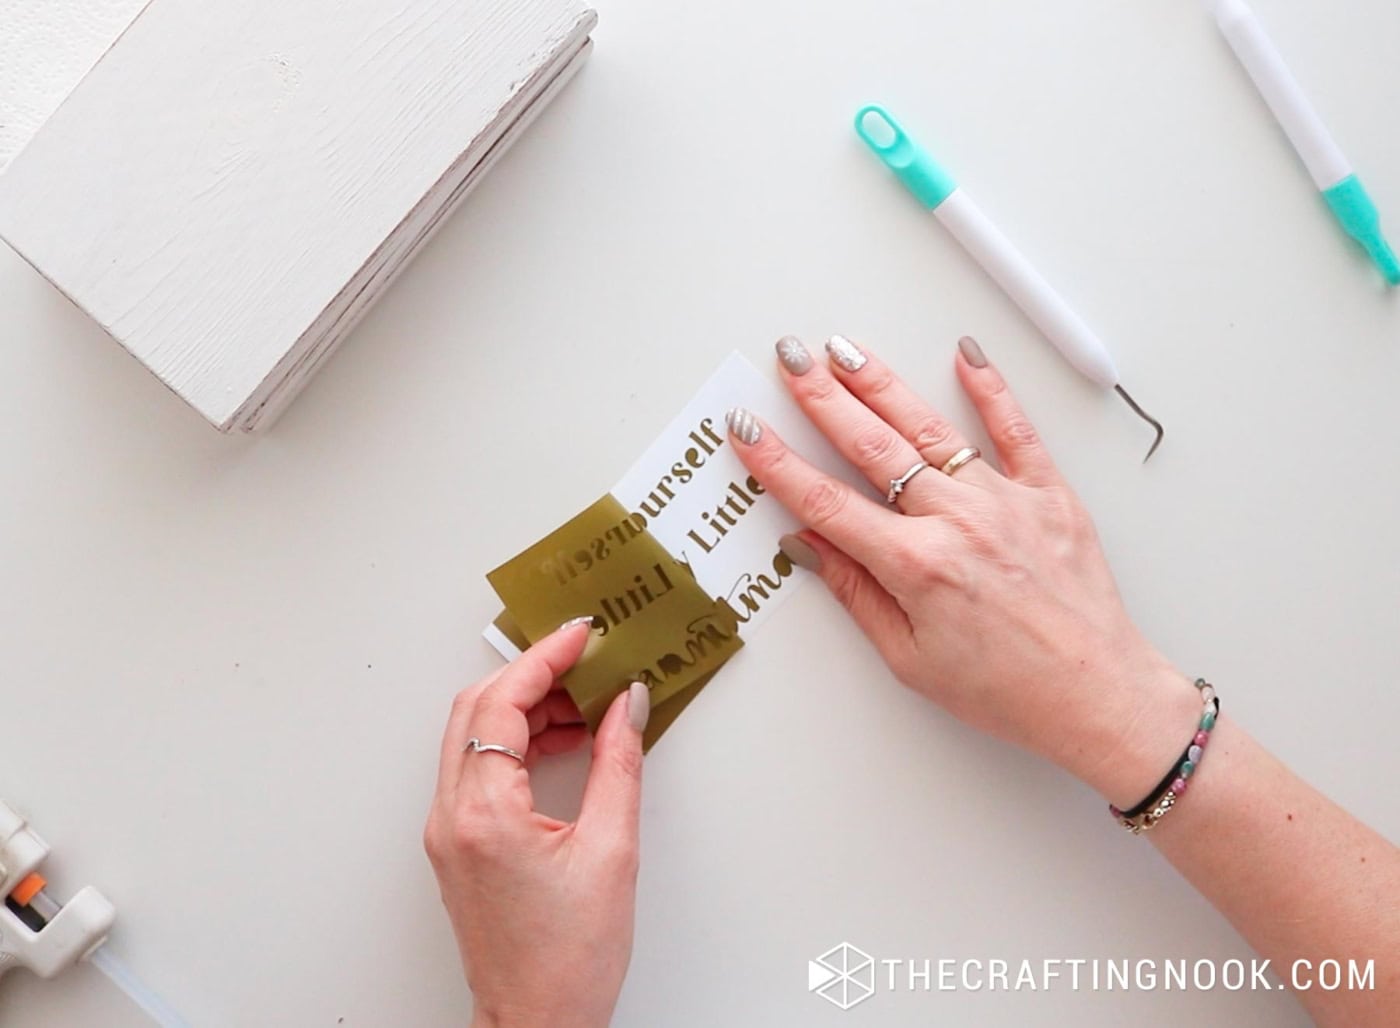
Cut a piece of transfer tape slightly larger than the phrase.
Lay the transfer tape on top of the weeded vinyl and smooth it with a scraper so the letters stick to the tape.
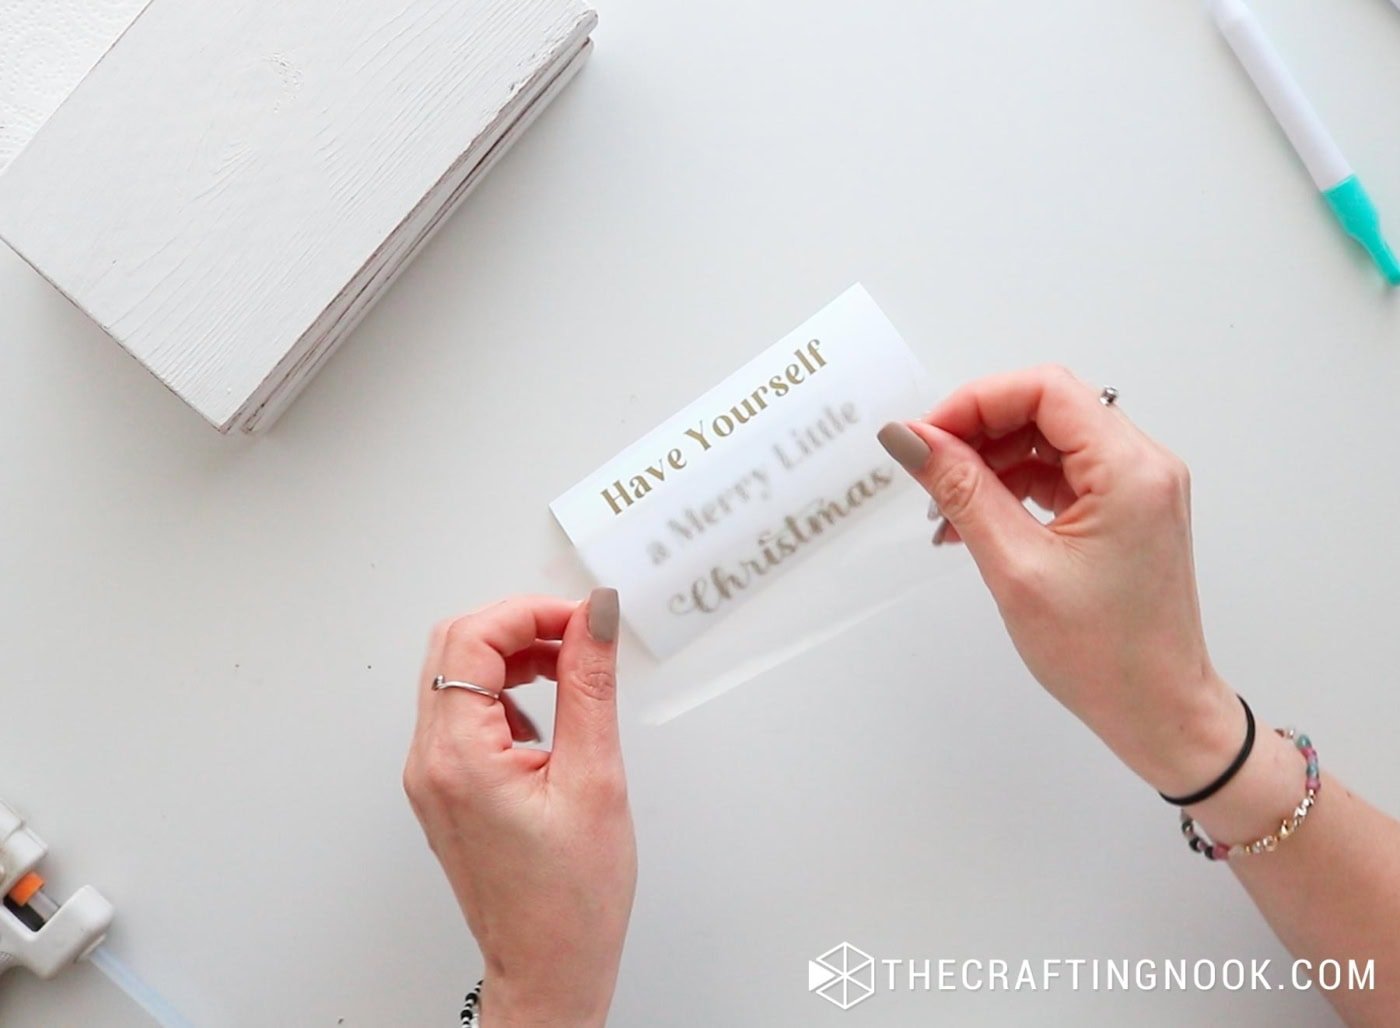
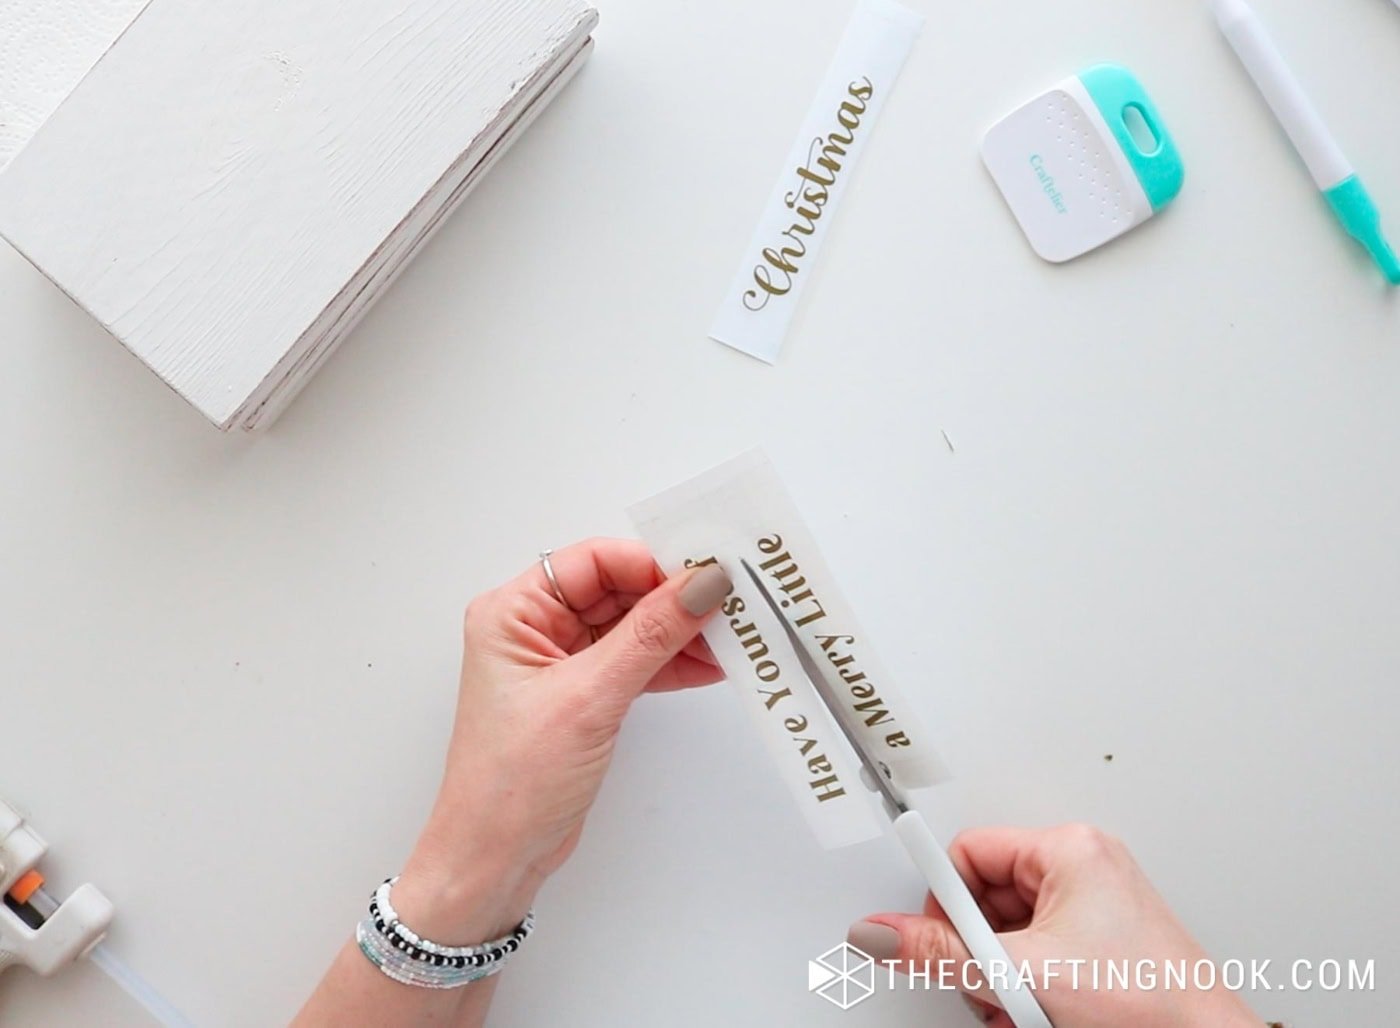
Cut around each phrase so you have smaller rectangles to work with.
Flip it over and gently peel the vinyl backing away, making sure all the letters stay on the transfer tape.
Step 7: Apply the vinyl to the spines
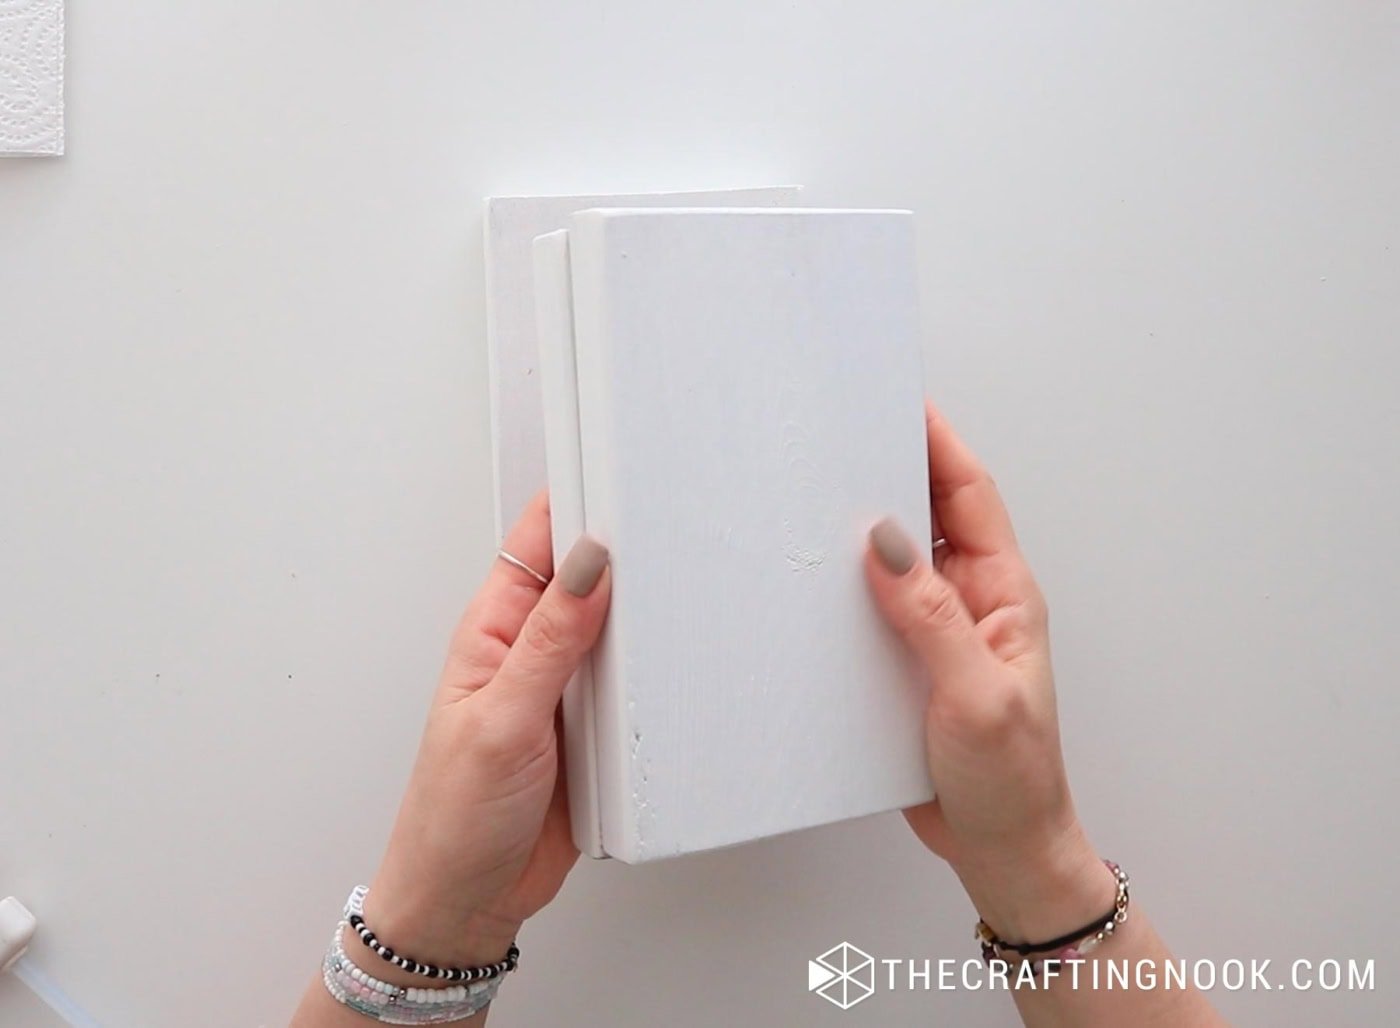
Stack your three blocks together in the order you want them to sit, and hold them tight so they line up nicely.
You can use a bit of painter’s tape on the top and bottom to keep the stack from shifting.
Start with the top phrase “Have Yourself.”
Lightly place the transfer tape on the spine and check that the phrase is centered and straight.
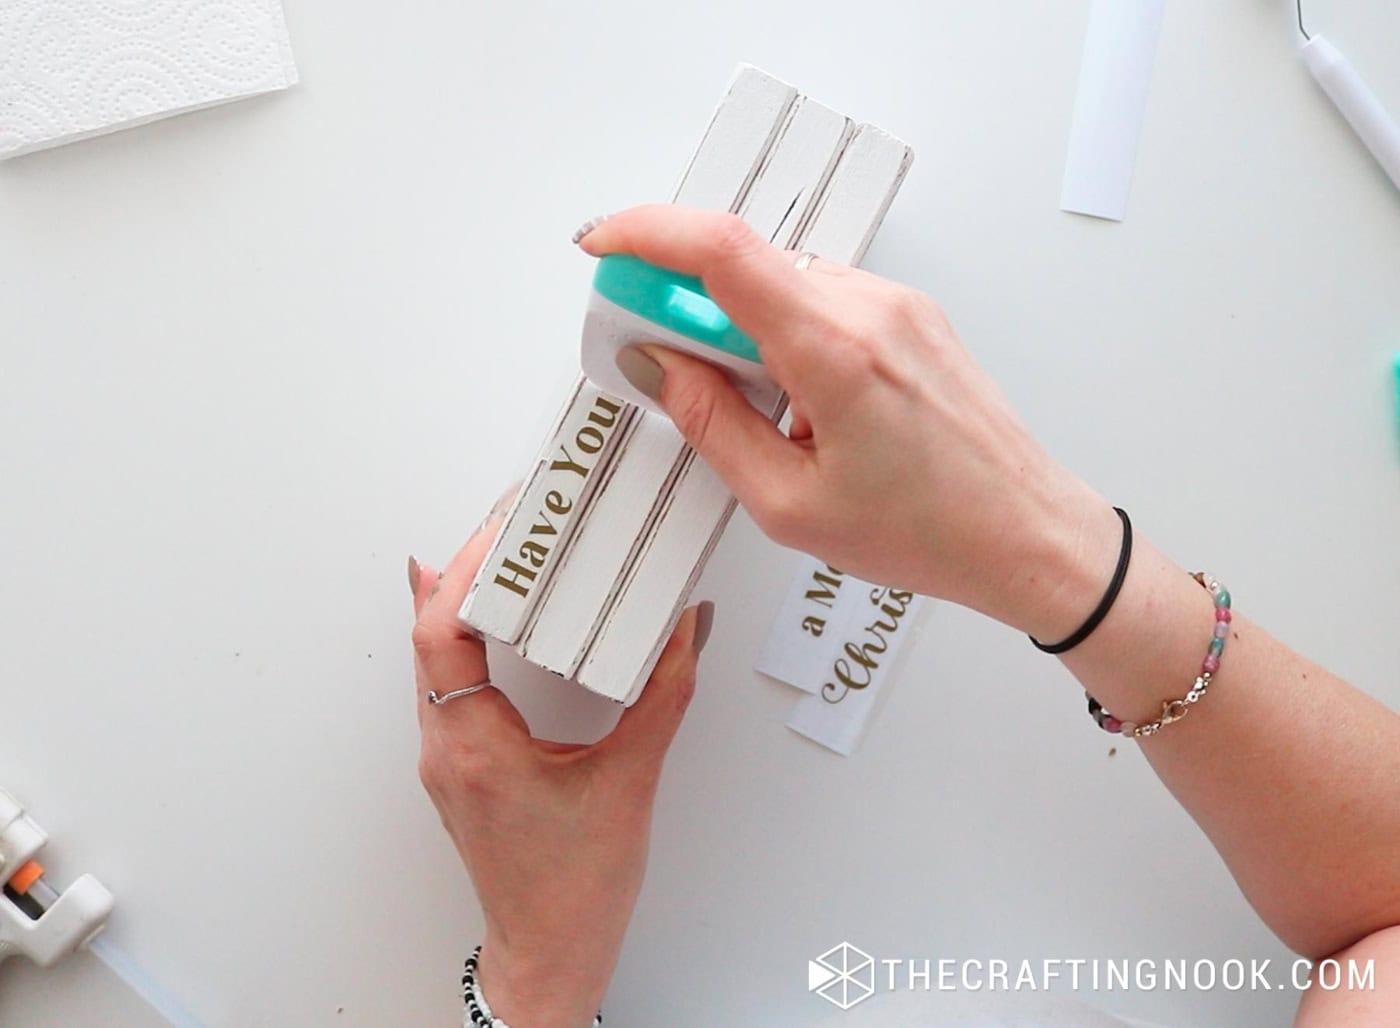
Once you are happy, press it down and rub over the letters with your scraper.
Slowly peel the transfer tape off, leaving the vinyl letters on the wood.
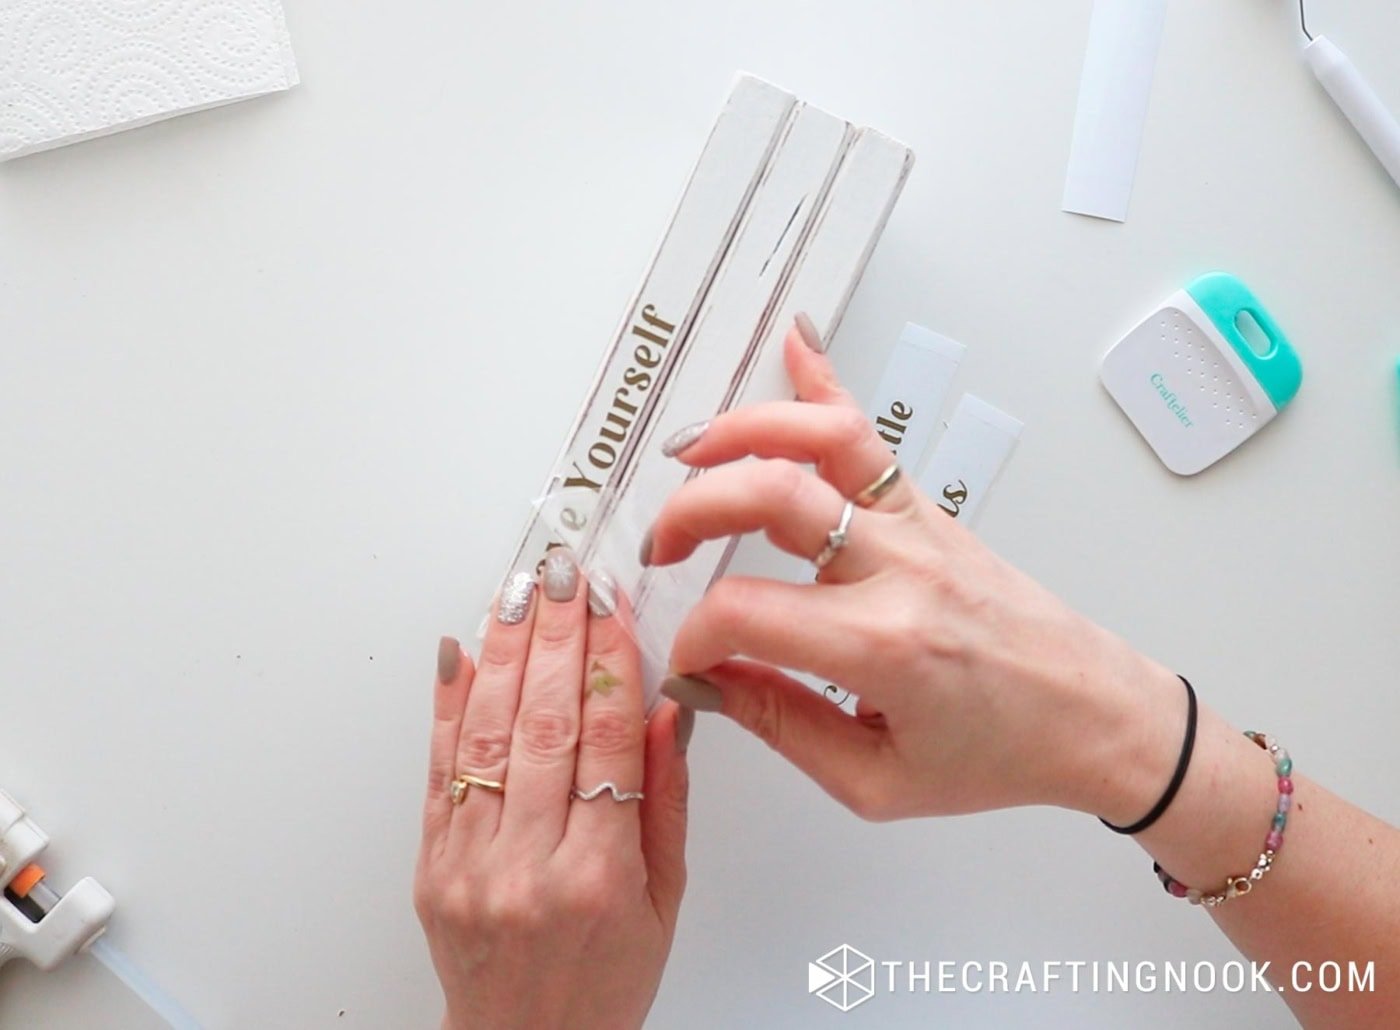
Repeat with “a Merry Little” on the middle block and “Christmas” on the bottom block.
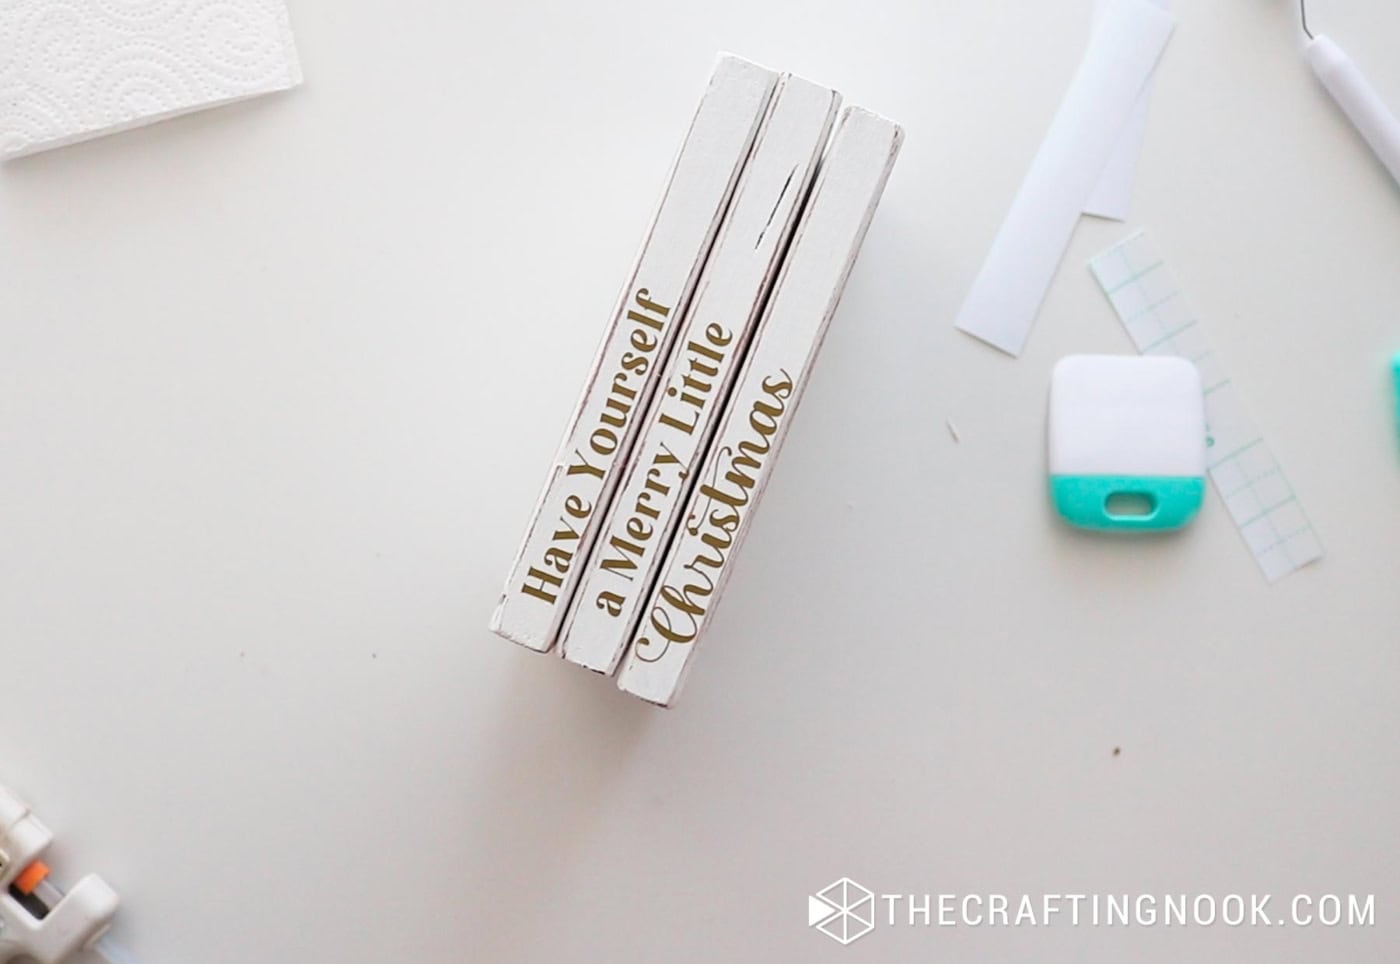
Run your fingers over each letter to make sure they are fully adhered, especially along the distressed edges.
Now you have your Christmas message on one side of the stack. You can repeat the same process for your Spring / Easter words on the opposite side of the blocks.
Step 8: Tie the stack with ribbon
Place the three blocks together again in the correct order.
Wrap ribbon around the stack, just like you would tie a present.
Cut the ribbon leaving enough length to glue it at the top with hot glue.
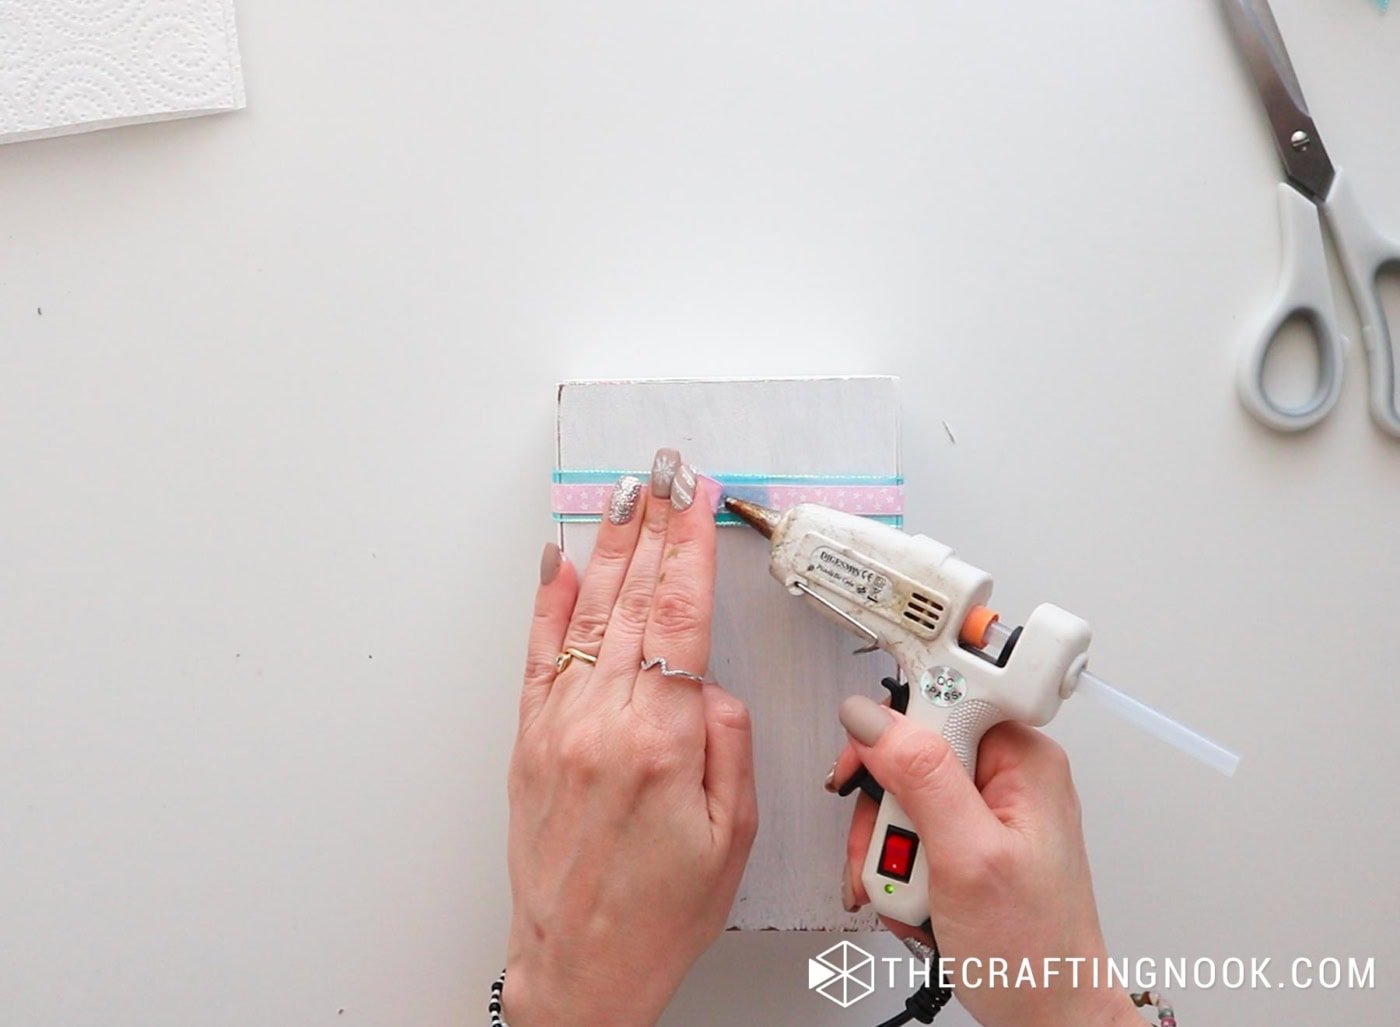
Make a separate bow with matching ribbons and glue it on top of the wrapped ribbon.

Adjust the loops and tails until you like how full it looks.
Step 9: Add a little charm or Ornament on top
Glue or hang a small ornament, wooden tree, bell or beads under the bow.
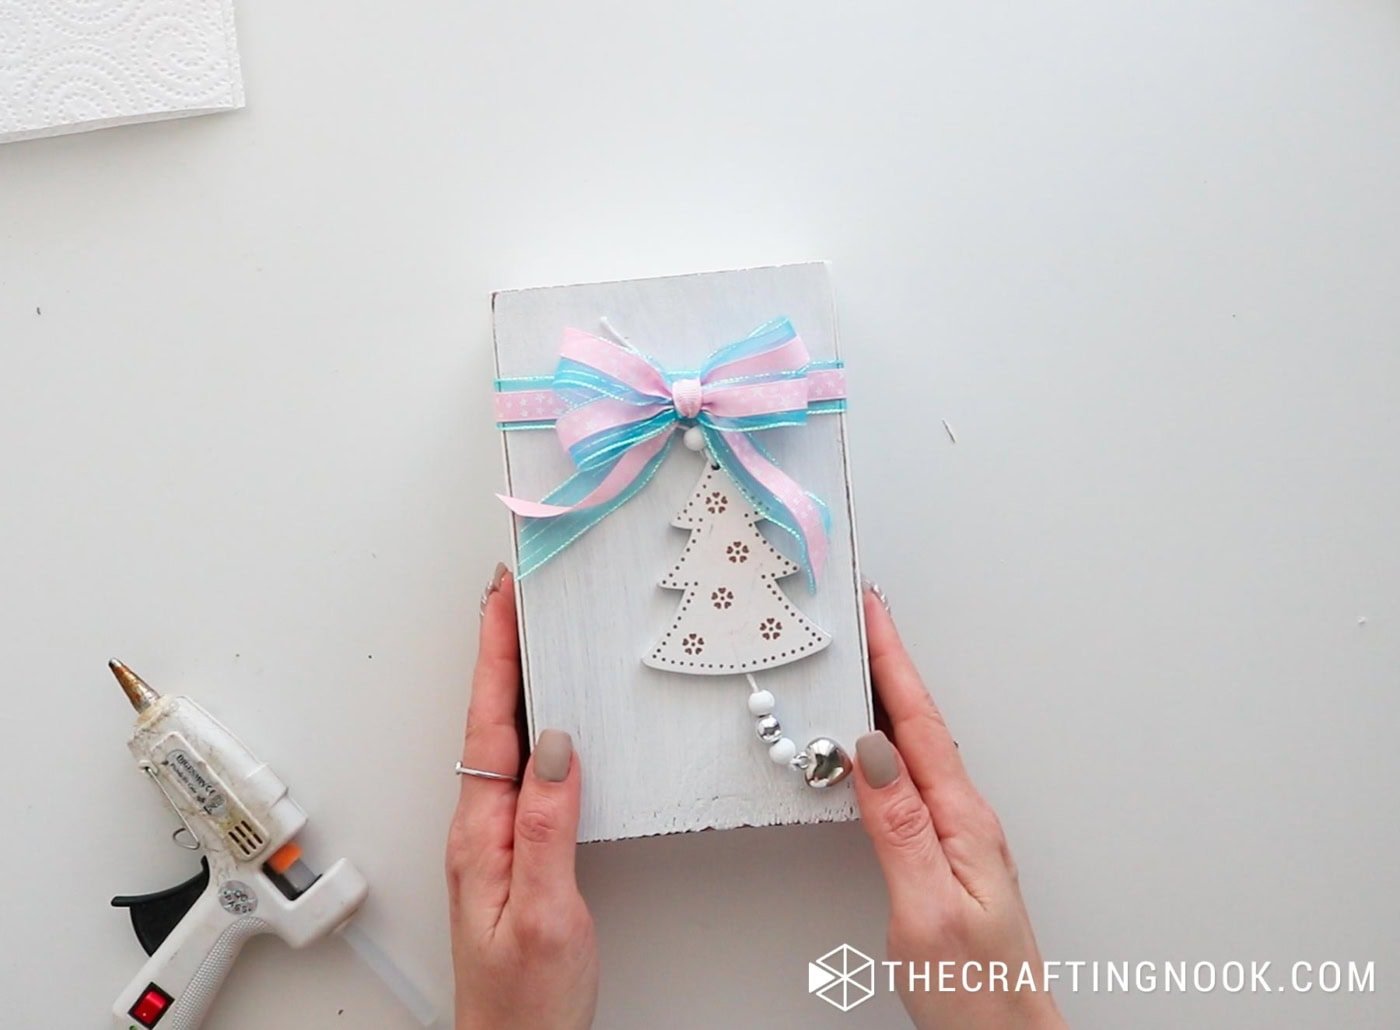
Keep it simple so it does not hide the pretty ribbon or the book shape.
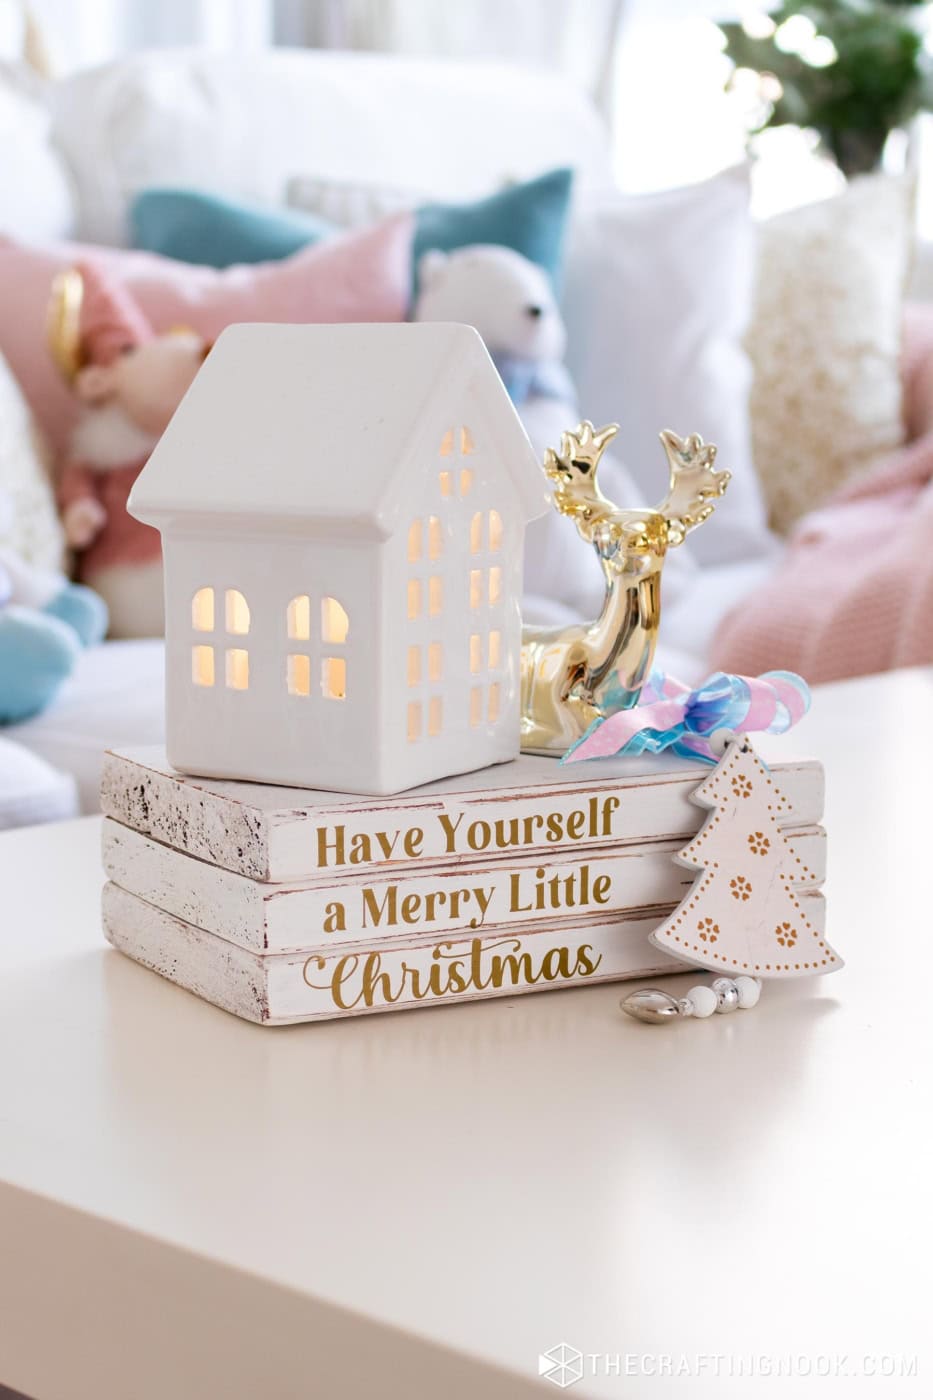
Your cute wooden book stack is ready to sit on a shelf, coffee table or next to the tree.
Bonus: Reversible for Spring and Easter
The beauty of this project is that it does not end with Christmas.
On the opposite side of the stack, I added fresh Spring wording. When the holidays are over I simply flip the stack around, swap the ribbon for a more seasonal color and it instantly becomes a Spring or Easter decoration. No repainting, no new project, just a simple turn and a ribbon change. The tutorial will come soon!
Crafting Tips
- If your stain feels too dark, lightly sand before painting to soften it.
- Keep your dry brush strokes long and light so the paint looks natural and not streaky.
- Test your vinyl size on scrap paper before cutting if you are unsure about the font size.
- Neutral white blocks work with almost any color ribbon. That makes it easier to reuse the stack for different seasons.
Frequently Asked Questions
Any smooth, lightweight wood works great. Pine, poplar, or craft-store wood blocks are perfect. Just make sure all three pieces are the same size so the “spines” line up nicely.
Nope! It definitely makes things easier, but you can still make this project with stencils, alphabet stickers, or even hand-painted lettering if that’s more your style.
Usually, the paint isn’t fully dry or there’s a bit of dust left from sanding. Wipe the surface well and make sure the paint has dried for a few hours. A quick pass with the scraper tool or even a warm blow dryer also helps the vinyl grab onto the wood.
Totally. The white-washed look is classic, but you can go darker, brighter, or even try pastel tones. Just keep the surface slightly distressed so the “book” look stays visible.
Just repeat the vinyl steps on the back side! Add wording for Spring, Easter, Summer… whatever you want. Then change the ribbon to match the season and you’re done.
You can, but you don’t have to. If this is décor that stays indoors and isn’t handled often, it will hold up really well without a topcoat. If you want extra protection, a light coat of matte Mod Podge works fine.
More Wood Projects To Try
Like this Diy Wooden book stack for Christmas tutorial? You might definitely love these other Wood project ideas too:

✂️ Tutorial
Diy Wooden book stack for Christmas
Tools
- scissors
- Hot glue gun
- Scrapper
- Cutting machine – Silhouette or Cricut Optional, you can definitely handwrite it or use stencils.
Supplies
- Three small wood blocks cut to the same width and thickness, book-style
- Sandpaper medium and fine grit
- Wood stain
- Acrylic paint
- Brushes for stain and dry brushing
- Cloths or rags
- Vinyl any color you like; I used metallic gold
- Transfer tape
- Ribbons and small embellishments
Instructions
Step 1: Shape and sand the “books”
- Start with 3 wood blocks that have the same width and thickness.
- With medium grit sandpaper, smooth all the surfaces. Remove any splinters and rough edges.
- To mimic the spine of a book, hold your sandpaper at a diagonal across the long front edge of each block.
- Sand from the top corner down toward the bottom corner so you create a gentle groove.
- Repeat two or three times in the same direction until you see a soft diagonal indent.
- Do this on each “book” so all three have that subtle spine line.
- Switch to fine grit sandpaper and go over the whole block again. Focus on corners, edges and the diagonal groove. You want everything to feel smooth to the touch.
- Wipe each block with a dry cloth to remove all the dust.
Step 2: Stain the wood
- Protect your surface with plastic or craft paper.
- Using a brush, apply a generous coat of stain on all sides of the wood.
- Let the stain sit for a few seconds. This helps the color sink in and gives a richer tone.
- Wipe off the extra stain with a soft cloth, following the direction of the wood grain.
- If you want a deeper color, repeat with a second coat.
- When you are happy with the color, set the pieces aside and let them dry overnight.
- This part is important! If the stain is still tacky, the paint will not behave well on top.
Step 3: Dry brush the paint
- We are going for that painted, slightly worn book look.
- The next day, once the stain is completely dry, grab your acrylic paint.
- Dip a large brush into the paint and then wipe most of it off on a scrap piece of paper. The brush should look almost dry.
- Lightly drag the brush over the stained wood, always in the same direction as the grain. Thin streaks of paint should appear, but you should still see the stain underneath.
- Lightly dry-brushing white paint over the stained wood block.
- Cover the front, back, sides and the spine edges of each block.
- Let the first coat dry for about 30 minutes.
- Repeat with a second light coat if you want more coverage. I still like some of the wood peeking through, so I keep the layers thin.
- After your final coat, let the paint dry for about 2 hours before moving to sanding and aging.
Step 4: Distress and define the edges
- Once the paint feels dry and firm, use fine-grit sandpaper to gently distress the edges.
- Sand along the corners, the diagonal spine line and the sides until a bit of stain shows through.
- Keep checking as you go. A little distressing already makes a big difference.
- Wipe the dust away with a clean, slightly damp cloth so your surface is ready for vinyl.
- Now your blocks already look like tiny books.
Step 5: Design and cut the vinyl text
- This is where your cutting machine comes in.
- Open your cutting software.
- Create three separate lines of text for the Christmas side. I used:
- “Have Yourself”
- “a Merry Little”
- “Christmas”
- Because I’m planning on making these wood books reversible and making another one, you see I have created 4 sets, but if you are doing only one, just create the lines you will use.
- Measure the side of each wood block so you know how long and tall your text can be. Leave a little margin at the top and bottom.
- Resize each line of text inside the software to fit the measurement of each “spine.”
- Choose your fonts. I chose a simple serif since it works nicely for the first lines, and a script for the word “Christmas” to give a nice contrast.
- Group each line so it moves as one piece and place all three lines on your virtual mat.
- If you are also preparing the Spring or Easter side, add those phrases in a different part of the mat and keep them grouped as another set or layer.
- Select the vinyl material setting, load the vinyl into your machine (no mirroring needed because this is regular adhesive vinyl) and send it to cut.
Step 6: Weed and prepare with transfer tape
- Once the cut is finished, remove the vinyl from the mat.
- Use your weeding tool to peel off the vinyl around the letters and the little pieces inside letters like “e”, “a” and “o”.
- Cut a piece of transfer tape slightly larger than the phrase.
- Lay the transfer tape on top of the weeded vinyl and smooth it with a scraper so the letters stick to the tape.
- Cut around each phrase so you have smaller rectangles to work with.
- Cutting the vinyl phrases apart with scissors.
- Flip it over and gently peel the vinyl backing away, making sure all the letters stay on the transfer tape.
Step 7: Apply the vinyl to the spines
- Stack your three blocks together in the order you want them to sit, and hold them tight so they line up nicely.
- You can use a bit of painter’s tape on the top and bottom to keep the stack from shifting.
- Start with the top phrase “Have Yourself.”
- Lightly place the transfer tape on the spine and check that the phrase is centered and straight.
- Once you are happy, press it down and rub over the letters with your scraper.
- Slowly peel the transfer tape off, leaving the vinyl letters on the wood.
- Repeat with “a Merry Little” on the middle block and “Christmas” on the bottom block.
- Run your fingers over each letter to make sure they are fully adhered, especially along the distressed edges.
- Now you have your Christmas message on one side of the stack. You can repeat the same process for your Spring / Easter words on the opposite side of the blocks.
Step 8: Tie the stack with ribbon
- Place the three blocks together again in the correct order.
- Wrap ribbon around the stack, just like you would tie a present.
- Cut the ribbon leaving enough length to glue it at the top with hot glue.
- Make a separate bow with matching ribbons and glue it on top of the wrapped ribbon.
- Adjust the loops and tails until you like how full it looks.
Step 9: Add a little charm or Ornament on top
- Glue or hang a small ornament, wooden tree, bell or beads under the bow.
- Keep it simple so it does not hide the pretty ribbon or the book shape.
- Your cute wooden book stack is ready to sit on a shelf, coffee table or next to the tree.
Share and PIN ME!!!
Til’ next time…


FREE WORKBOOK
Keeping your Sweet Home Organized
Learn how to create intentional habits and simple routines to Keep Your Home Organized. Plus freebies, printables, exclusive content, and tips.
Disclaimer: By clicking on the “Yes” button above you are giving me your consent to collect and use your information according to the law and My Policy Privacy. Zero Spam I promise!