DIY Mini Christmas Wood Sign Ornaments
This post may contain affiliate links. Please read our Disclosure Policy.
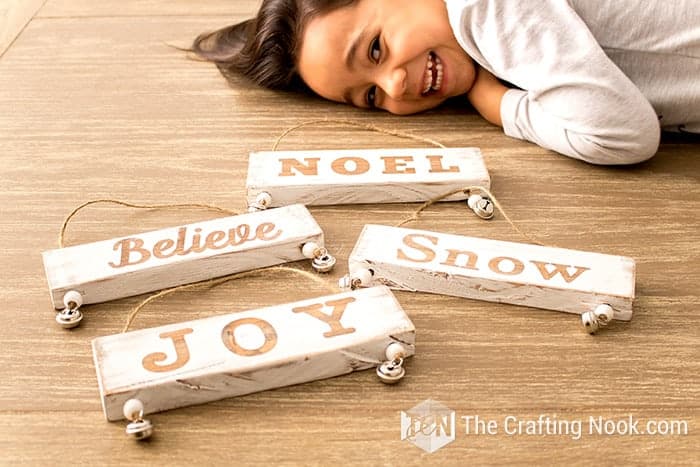
Cute and easy to make Christmas project, these DIY Mini Christmas Wood Sign Ornaments are the perfect addition and a fun way to decorate your Christmas tree with an amazing rustic look.
It’s been so crazy busy lately around the house, especially because we are in a new home that I haven’t been able to create as much as I wanted to for our Christmas decor.

Table of Contents
Simple and Easy Mini Christmas Wood Sign Ornaments
However, I’ve managed to work on some projects that I LOVE how they turned out. These Mini Christmas Wood Sign Ornaments are some of them.
Ever since I started working with wood a few weeks ago I’ve been getting more confident and started experimenting more. This project was fun and also really relaxing to make, and they look so pretty on the Christmas tree.
Holiday décor is the most wonderful time of the year, also my favorite, and I’m all about rustic farmhouse style so thought these wood signs would make the perfect ornament.
I got the inspiration from Holly’s Rustic Wood Christmas Ornament Signs and of course, I gave it my own twist.
For this DIY Christmas project, I didn’t have to buy anything since I only use stuff that I already had. Of course, if you don’t have exactly what I used you can always change things and you will probably still get a pretty awesome result.
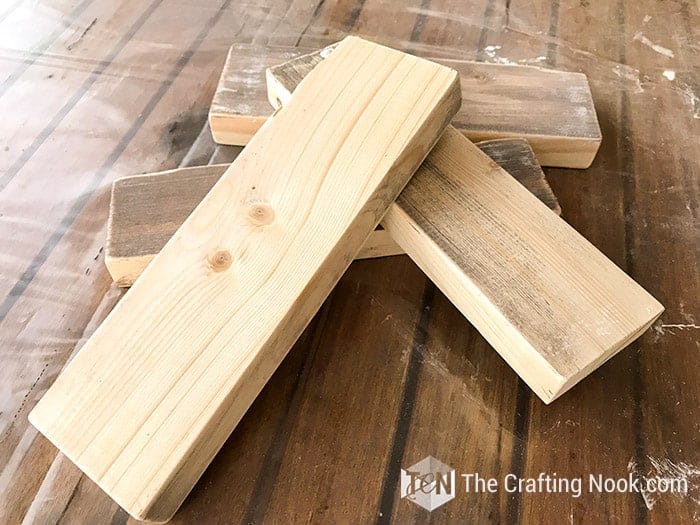
I had some leftover wood planks so I cut them in half and got 4 mini strips of wood. Some of them were already painted so I used that to my advantage to weather it.
How to make these cute Mini Christmas Wood Sign Ornaments
As I said it’s a fun and very relaxing project, no perfection or expertise is needed. Believe me! I’m in no way an expert in woodwork or painting.
These wood sign ornaments changing the words for names can make great gifts for loved ones too.
Supplies:
- Wood strips {as many as you want and the size is completely up to you, they can be all different if you may.}
- Wood stain {I used walnut}
- White Acrylic Paint {or any appropriate kind of white paint}
- Sandpaper {I used 150 because that was what I had}
- 2 Brushes {one for stain and another one for acrylic paint}
- Whipping cloth.
- Gloves
- Vinyl cut letter {cut yourself some words or buy those pre-made vinyl letters}
- Twine
- Beads and Jingle bells {optional}
Tools:
- Drill and wood drill bits the size of your twine thickness.
- Cutting machine – Silhouette Cameo or Cricut.
- Weeding tool.
- Steel brush.
Instructions:
Before we begin, be sure to follow us on Pinterest, Facebook, Instagram, and YouTube, and also sign up for our email list (at the end of this post), so you’ll never miss a post!
Step 1: Prepping the wood
So, the first thing I did was sand the woods to remove as much paint as I could, also to avoid splinters. I had one piece raw but the rest were painted in brown, white, and grey.
If you want that same effect, just get some acrylic paint and paint your strips randomly with those colors let them dry completely, and then sand them off. You can see a full tutorial on this here.
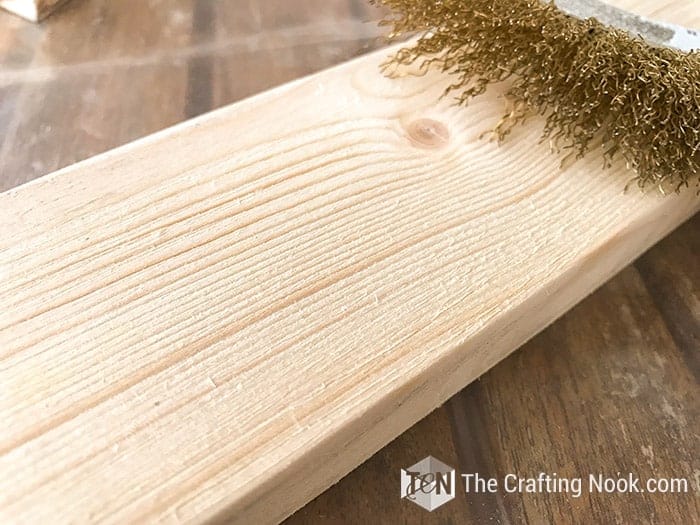
When I liked how each strip of wood looked I brush them with the steel brush roughly. This opens a bit the wood grain so it will look even more rustic and also absorb the stain better.
Then it’s important to clean each wood piece very well to remove dust and any dirt.
Step 2: Staining the wooden signs
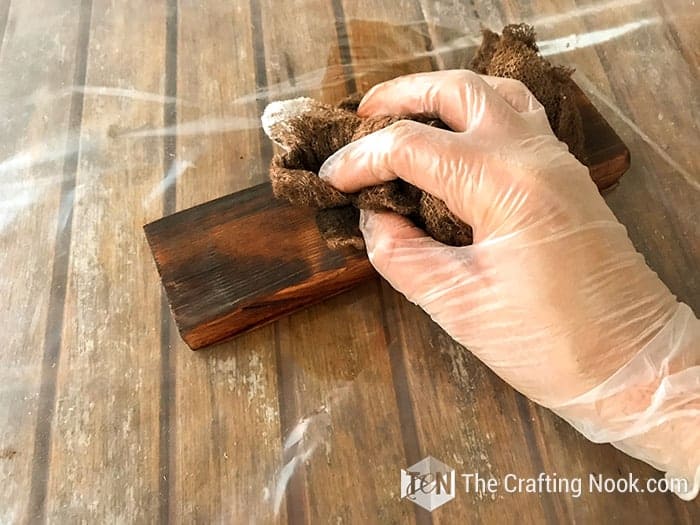
I stained all the strips with walnut wood stain.

First, stain it all and then remove the excess with your cloth. You can, of course, stain the wood with the cloth directly but I wanted the wood to absorb as much stain as it could so I used a brush and then rub it with the cloth.
Let it dry and I get something like this:

Step 3: Drilling the hanging holes
Next step, I drilled holes vertically on each strip.
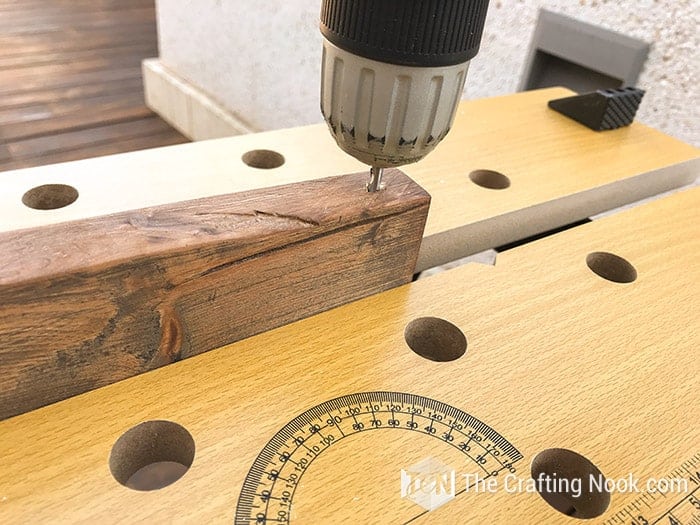
Why vertically? Well, because I wanted to hang some beads and jingle bells at the bottom, basically LOL.

Sand a bit everything again.
Step 4: Applying the Stencil
Clean your wood strips very well and start placing your stencil letters on them.
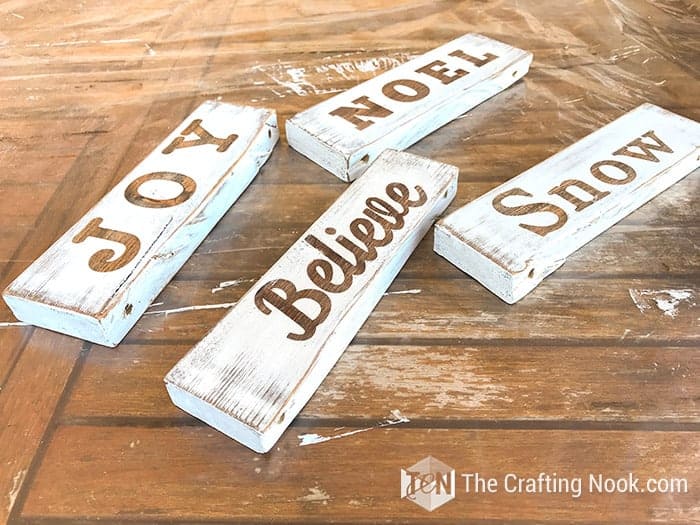
I used the words JOY, SNOW, BELIEVE and NOEL.
You can use any word you like, like Merry Christmas divided into two wood signs, Santa, Let it snow, Holiday, snowman, first Christmas (if you have a newborn), imagination is the limit.
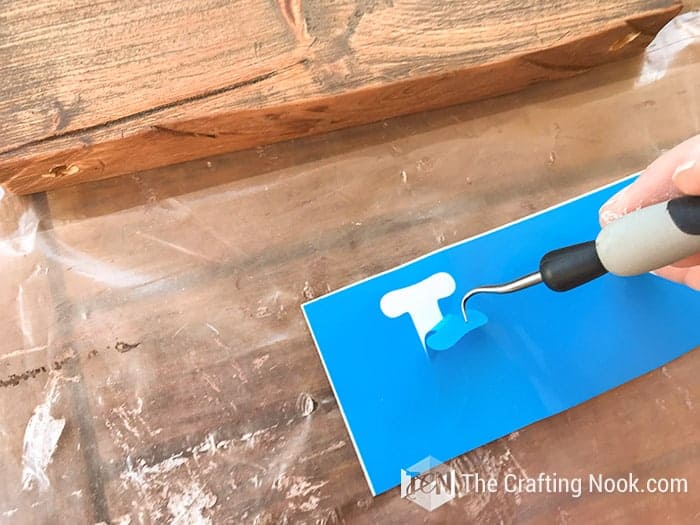
Since I cut them with my Silhouette cameo, I just peel them from the sheet and place them on one side of the strip. I didn’t use transfer tape because the letters were very easy to handle.
Repeat with the rest.

Step 5: Painting the Christmas sign ornaments
Then dry brush with the white acrylic paint on top of everything. Don’t pay attention to details, just brush it and brush it randomly until you are happy with the whiteness.
You can check out my dry brush technique tutorial here.
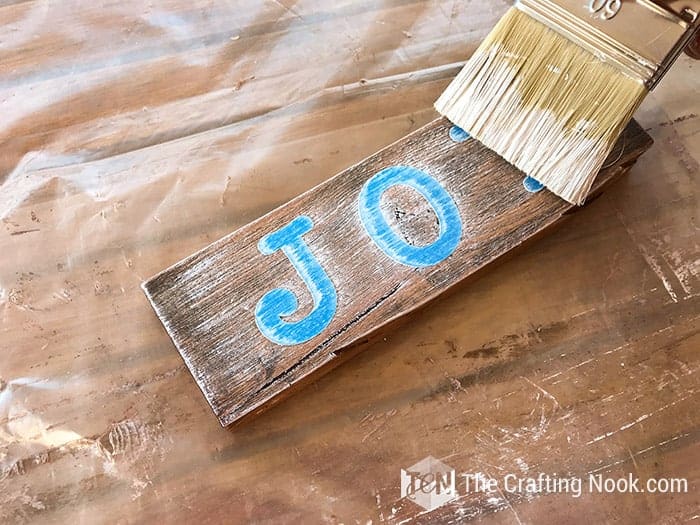

Repeat with the rest and let them dry for a couple of hours.

Step 6: Peel off the stencils
Once the wood signs are completely dry, it’s time to remove the stencils.
Carefully peel each letter off carefully from the wood.

You will get this pretty effect with the aged wood on the back.
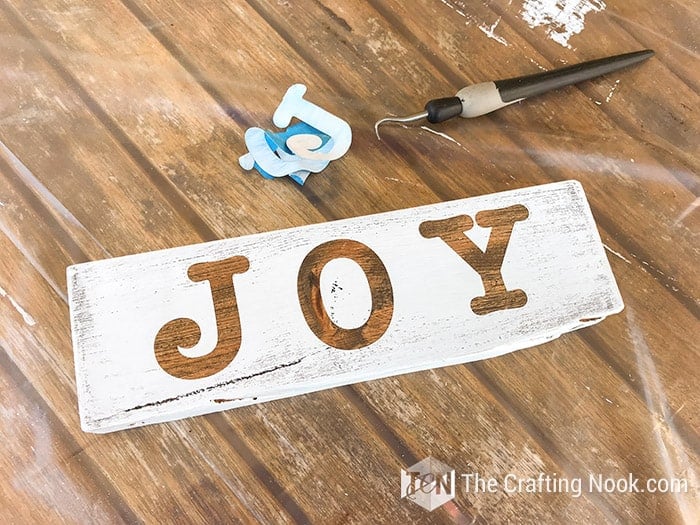
When I peeled them all off I got this! I was in love!

Step 7: Sand each wood sign
Then it’s time to sand again with your sandpaper. The lowest the grit the better, I only had 150 so that’s what I used.
Sand it so you kind of damage the white paint but don’t get too carried away because you might sand off the stain too.
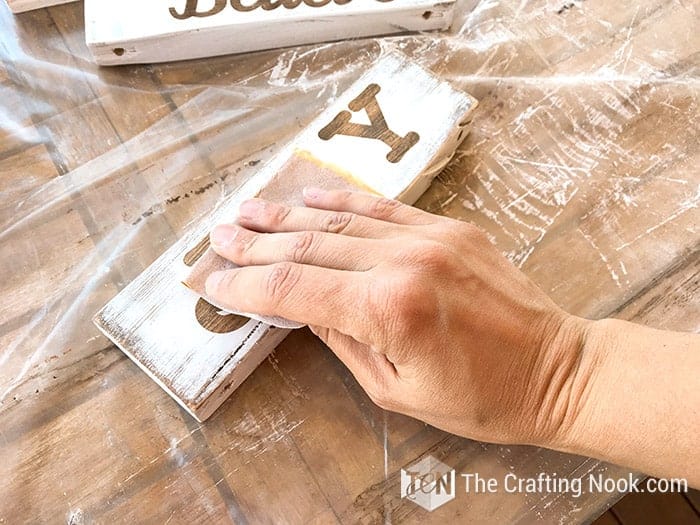
Focus on the wood edges mostly and some sanding on the letter edges too.
There you go! Signs are done!
Step 8: Installing the wood sign hanger
Cut some twine strings long enough to go from one hole to the next creating a nice triangle and leaving some more for decor.


Insert the twine through the holes making sure the ends are on the bottom of each sign.

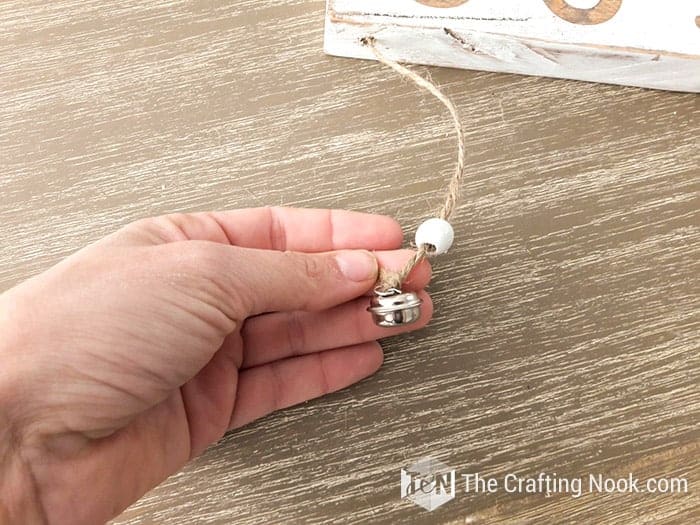
Insert your beads and jingle bells {if the case}. You can decorate the end of the twine with almost any embellishment like cranberries and springs, wooden snowflakes or trees, even tassels. Or why not, no embellishment at all.
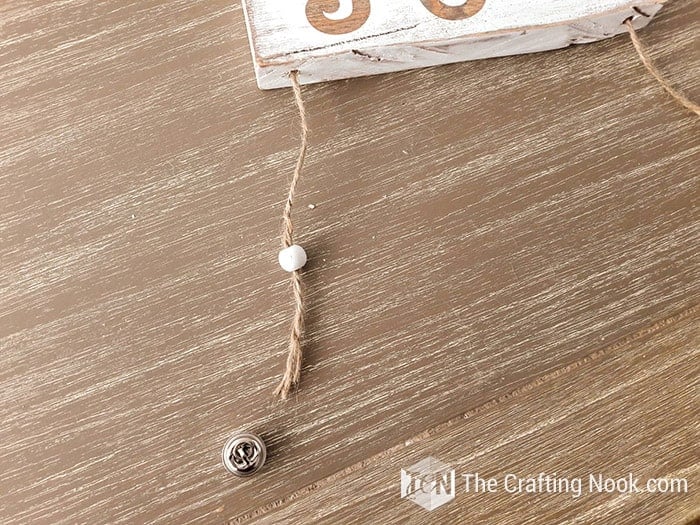
Finish each end with a tight knot.
Pull the twine from the top and you are done!
Repeat with the rest of the signs.
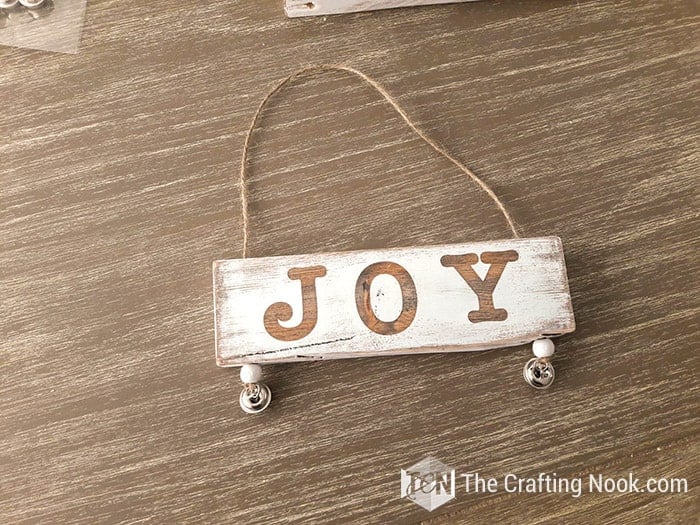
The Mini Christmas Wood Sign Ornaments are ready to be hung on your tree!!!
Crafting Tips
If you don’t have stencil material, that’s ok, any vinyl will do, even cheap contact paper.
If you happen to have heavy-duty vinyl, I recommend pressing each piece through a towel to remove the excess adhesive to avoid leaving it behind when you remove the stencil.
When using pre-made letters, I also recommend pressing them to a towel just to be sure they won’t leave adhesive behind.
The more imperfect your boards are, the better. If you find reclaimed wood or scraps from a construction site, an old palette, even better!

I LOVE how they turned out! and it seems like someone else loved them too!
Look how pretty they look on the tree! What do you think???


Frequently Asked Questions
I used furniture acrylic satin paint that is all in one and I love that. But you can use chalk paint, latex paint, spray paint, and so on. I used also wood stain as my base to create that weathered look and to give the words a bold wood color. but you can use 2 different paint colors.
It definitely can. You can find stencil letters in craft stores. You just need to find the style you love the most and make sure the size is right.
Imagination is the limit. You can use different types of yarn, cotton twine, ribbon, or no hanger at all. You can just tuck it among the branches.
More Christmas Ornaments to Try
If you liked this Mini Wooden Christmas Sign Ornaments tutorial, you might also LOVE these other Christmas project ideas too:


✂️ Tutorial

DIY Mini Christmas Wood Sign Ornaments
Tools
- Drill and wood drill bits the size of your twine thickness.
- Cutting Machine – Silhouette Cameo or Cricut
- Weeding tool
- Steel brush.
Supplies
- Wood strips {as many as you want and the size is completely up to you they can be all different if you may.}
- Wood stain {I used walnut}
- White Acrylic Paint {or any appropriate kind of white paint}
- Sandpaper {I used 150 because that was what I had}
- 2 Brushes {one for stain and another one for acrylic paint}
- Whipping cloth.
- Gloves
- Vinyl cut letter {cut yourself some words or buy those pre-made vinyl letters}
- Twine
- Beads and Jingle bells {optional}
Instructions
STEP 1: PREPPING THE WOOD
- So, The first thing I did was sand the woods to remove as much paint as I could, also to avoid splinters. I had one piece raw but the rest were painted in brown, white, and grey.
- If you want that same effect, just get some acrylic paint and paint your strips randomly with those colors let them dry completely, and then sand them off. You can see a full tutorial on this here.
- When I liked how each strip of wood looked I brush them with the steel brush roughly. This opens a bit the wood grain so it will look even more rustic and also absorb the stain better.
- Then it’s important to clean each wood piece very well to remove dust and any dirt.
STEP 2: STAINING THE WOODEN SIGNS
- I stained all the strips with walnut wood stain.
- First, stain it all and then remove the excess with your cloth. You can, of course, stain the wood with the cloth directly but I wanted the wood to absorb as much stain as it could so I used a brush and then rub it with the cloth.
- Let it dry and I get something like this:
STEP 3: DRILLING THE HANGING HOLES
- Next step, I drilled holes vertically on each strip.
- Why vertically? Well, because I wanted to hang some beads and jingle bells at the bottom, basically LOL.
- Sand a bit everything again.
STEP 4: APPLYING THE STENCIL
- Clean your wood strips very well and start placing your stencil letters on them.
- I used the words JOY, SNOW, BELIEVE and NOEL.
- You can use any word you like, like Merry Christmas divided into two wood signs, Santa, Let it snow, Holiday, snowman, first Christmas (if you have a newborn), imagination is the limit.
- Since I cut them with my Silhouette cameo, I just peel them from the sheet and place them on one side of the strip. I didn’t use transfer tape because the letters were very easy to handle.
- Repeat with the rest.
STEP 5: PAINTING THE CHRISTMAS SIGN ORNAMENTS
- Then dry brush with the white acrylic paint on top of everything. Don’t pay attention to details, just brush it and brush it randomly until you are happy with the whiteness.
- You can check out my dry brush technique tutorial here.
- Repeat with the rest and let them dry for a couple of hours.
STEP 6: PEEL OFF THE STENCILS
- Once the wood signs are completely dry, it’s time to remove the stencils.
- Carefully peel each letter off carefully from the wood.
- You will get this pretty effect with the aged wood on the back.
- When I peeled them all off I got this! I was in love!
STEP 7: SAND EACH WOOD SIGN
- Then it’s time to sand again with your sandpaper. The lowest the grit the better, I only had 150 so that’s what I used.
- Sand it so you kind of damage the white paint but don’t get too carried away because you might sand off the stain too.
- Focus on the wood edges mostly and some sanding on the letter edges too.
- There you go! Signs are done!
STEP 8: INSTALLING THE WOOD SIGN HANGER
- Cut some twine strings long enough to go from one hole to the next creating a nice triangle and leaving some more for decor.
- Insert the twine through the holes making sure the ends are on the bottom of each sign.
- Insert your beads and jingle bells {if the case}. You can decorate the end of the twine with almost any embellishment like cranberries and springs, wooden snowflakes or trees, even tassels. Or why not, no embellishment at all.
- Finish each end with a tight knot.
- Pull the twine from the top and you are done!
- Repeat with the rest of the signs.
- The Mini Christmas Wood Sign Ornaments are ready to be hung on your tree!!!
Share and PIN ME!

Til’ next time…


FREE WORKBOOK
Keeping your Sweet Home Organized
Learn how to create intentional habits and simple routines to Keep Your Home Organized. Plus freebies, printables, exclusive content, and tips.
Disclaimer: By clicking on the “Yes” button above you are giving me your consent to collect and use your information according to the law and My Policy Privacy. Zero Spam I promise!
I absolutely love these! I have been looking for a Christmas craft to get started with and this is going to be it!! Thank you for the great idea and fantastic instructions.
Hey Kelly!
Thank you so so much for your sweet words. You have no idea how happy I am! I’m glad to know the instructions were clear and that you will be making these cuties! I’m actually thinking about making a few more this year!
If you make them, I would love if you share them with me either by mail or tagging me on social media posts! I absolutely love seeing projects inspired by mines out there!!!
Hugs and best of luck!
Cami
These ornaments are WONDERFUL, Cami! Love them!