HO HO HO DIY Christmas Door Hanger + Cut File
This post may contain affiliate links. Please read our Disclosure Policy.
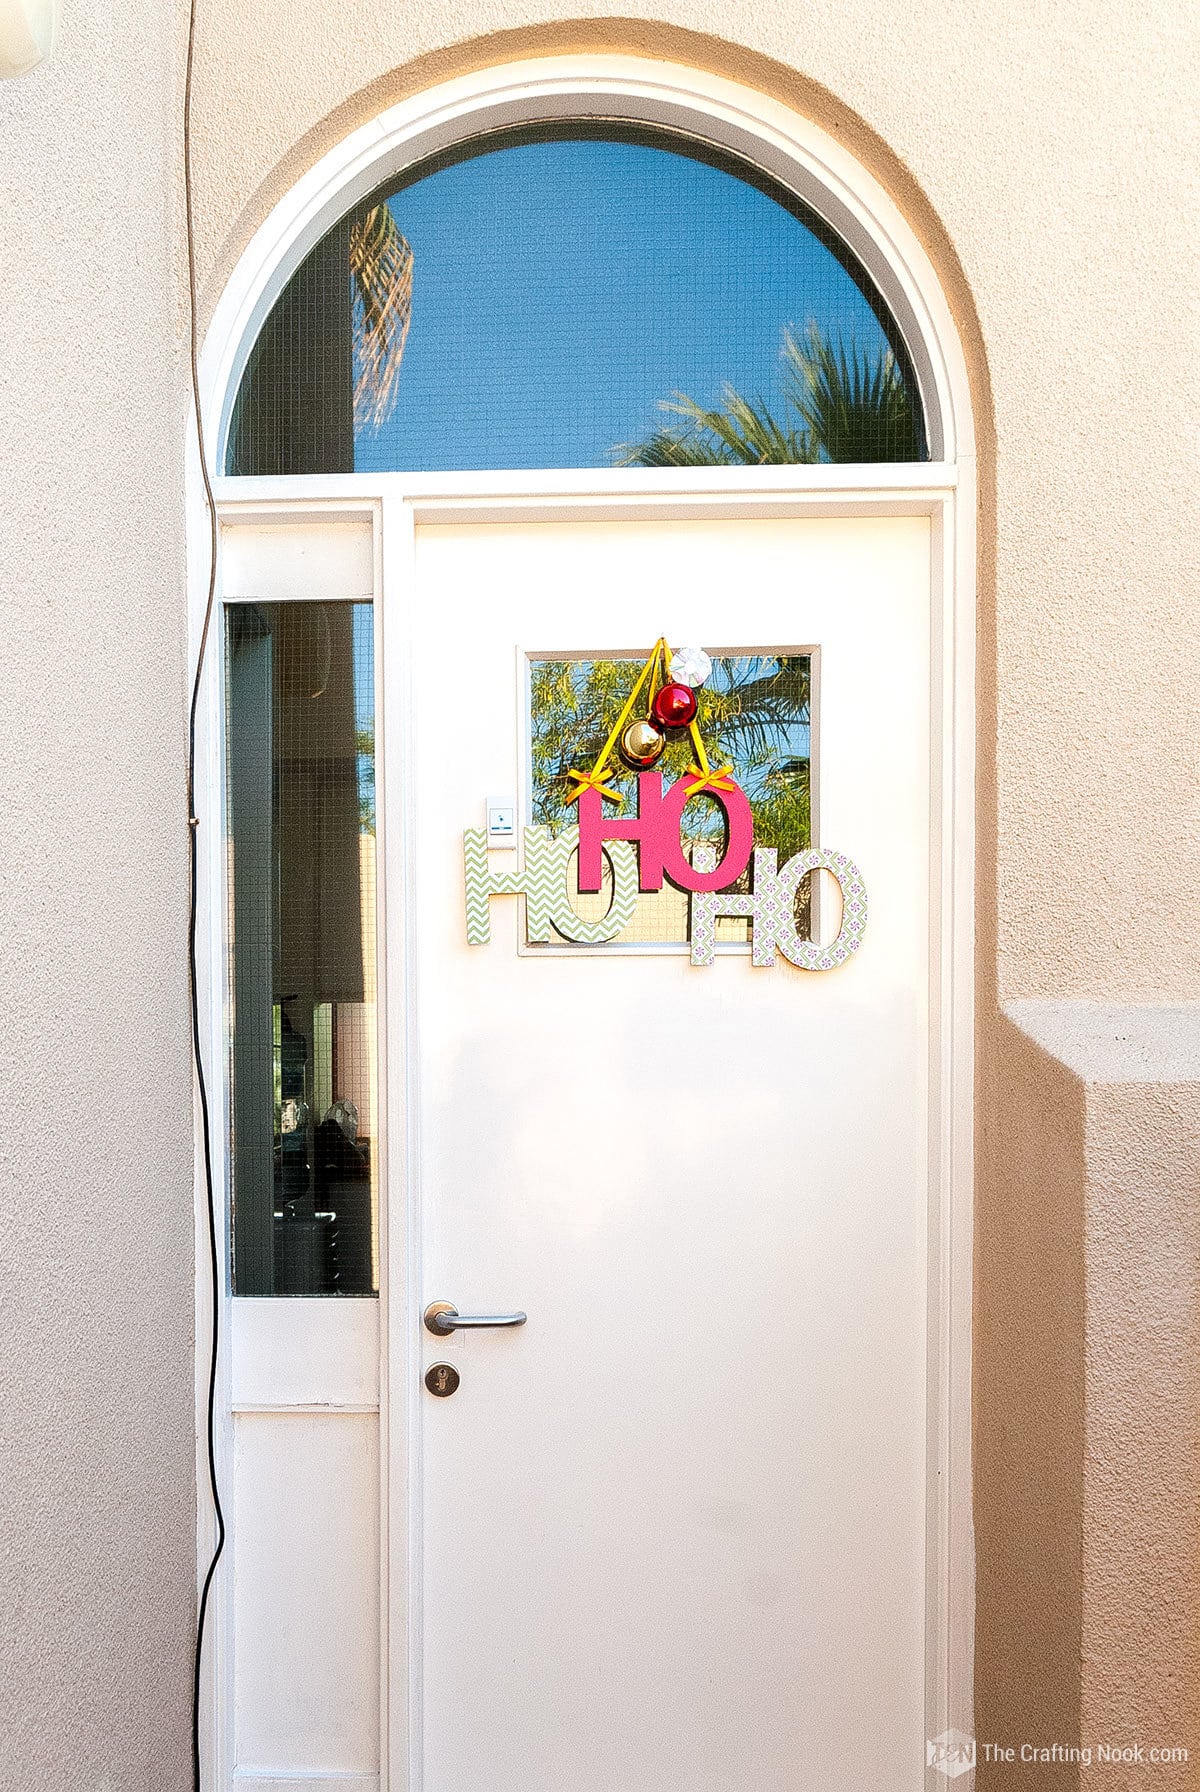
Get into the holiday season spirit with our easy and fun HO HO HO DIY Christmas Door Hanger! Get crafty and add a touch of whimsy to your home this season. Ho ho ho!
I love how this Christmas door hanger turned out! It had its work but was still easy and fun to make and adds a special holiday cheer. It was so worth it! The best part, I’m giving a free cut file and printable!

Table of Contents
Cute DIY Christmas Door Hanger + Cut File
It’s the time of year to spread joy during the holidays, and what could be a better way than making a simple and enjoyable DIY Christmas decor Door Hanger?
Can you imagine approaching your front door and seeing a cheerful message like “HO HO HO” that welcomes everyone to join in the festive mood?
You can make fun decorations for holiday decor using some basic supplies like foam board, pretty paper, and ribbon. Your neighbors will be jealous and your family will be happy.
Making your own Diy Christmas Door decorations is not only a fun activity, but it also makes your home decorations more unique to you.

You don’t have to be really good at crafting to do this project; it’s great for both beginners and experienced DIY lovers. Choose colorful and fun paper that matches your style and captures the holiday feel. Whether you like the classic reds and greens or prefer a more modern look with glitter and patterns, you can decide what you want.
I really wanted to make something that would welcome people to my mom’s house. Also, wanted something really cheerful and colorful.
I thought about making a wreath but I had this different idea in my head that I couldn’t help making it and I’m happy that I made it because his door hanger was the perfect addition.
How to Make a Ho Ho Ho Christmas Door Hanger
Get everyone in the family to join in and make it a fun activity to strengthen your connection with each other.
Before we begin, be sure to follow us on Pinterest, Facebook, Instagram, and YouTube, and also sign up for our email list (at the end of this post), so you’ll never miss a post!
Supplies:
- 5mm Foam Board
- White glue
- UHU Universal Glue
- Gold glitter
- 5mm Satin ribbon – Ised gold-ish.
- 2-3 Christmas Ornaments
- Printed patterned paper or scrapbook paper – your favorite designs and different colors.
Tools:
- Cutting Machine – Silhouette Cameo or Cricut. Alternatively, you can cut by hand.
- Scissors or Cutters
- Ruller
- Pencil
- Cutting mat
- Protective plastic or cardstock.
Instructions:
Prep Work
Step 1 – The first thing I did was create the design and cut file for the HO HO HO words. You can snag a free copy of the cut files and printable version below.
In this case, it was a super easy design since I used an H and an O, weld them together, and then duplicated it to make 3 HOs.
Step 2 – Print some lovely patterned papers or chose your favorite scrapbook papers. Mines are from Sherry K Designs.

You can Snag the HO Cut File HERE
Step 3 –Cut the HO HO HO with the Silhouette or print it 3 times and cut it with scissors or a cutter.

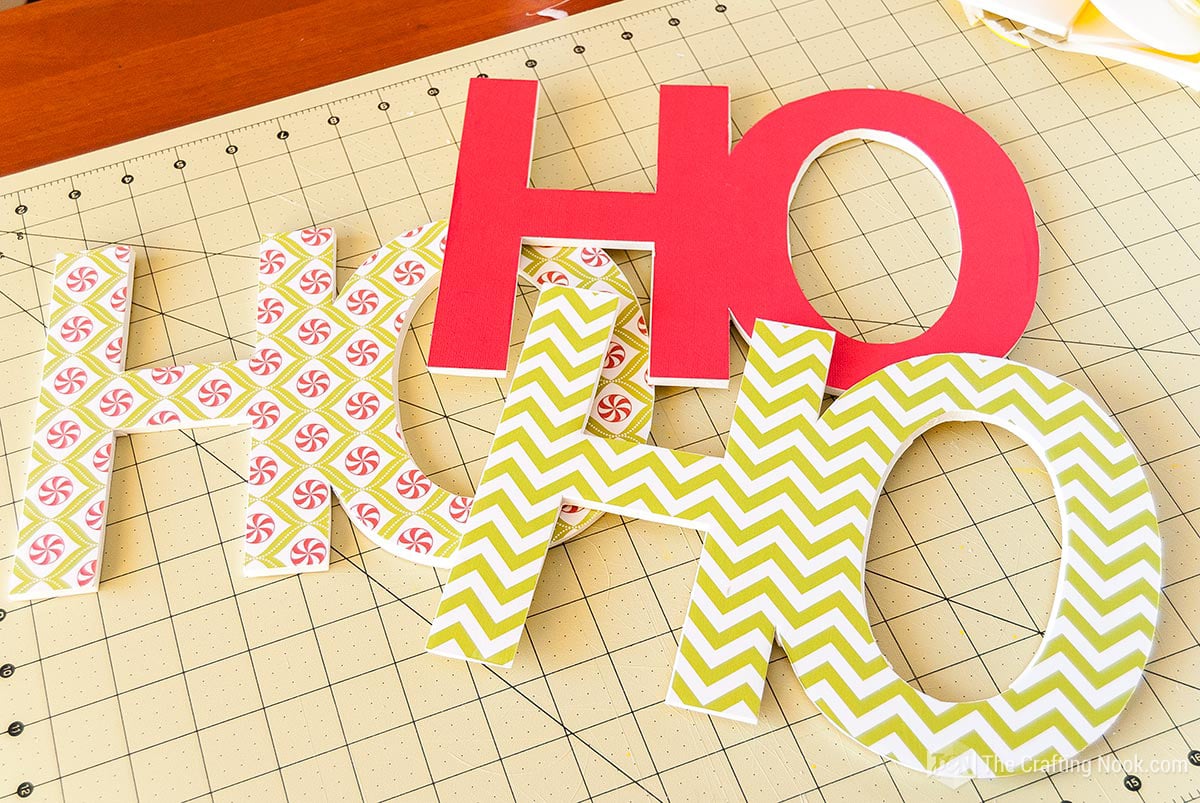
Create the 3-HO
Step 4 – Apply mod podge on the foam board and carefully place each HO on top. Ise your scrapper to remove any bubbles. Then apply another coat on top of the paper and let it dry.

Step 5 –Carefully cut with a cutter the foam board around each Ho Ho Ho.

Step 6 – Then start cutting each HO detail very carefully.
This part is a little bit tricky even though the foam board is so soft and light. You need to apply some strength carefully, especially on the rounded edges.
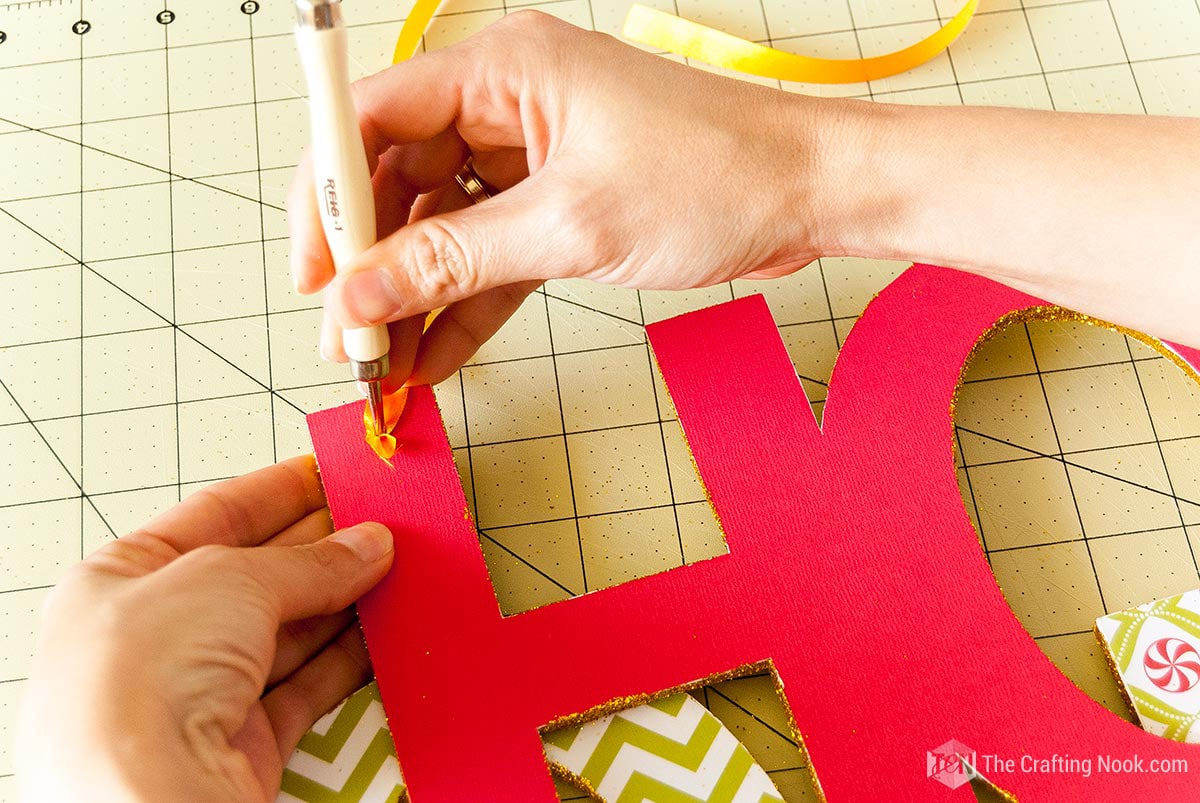
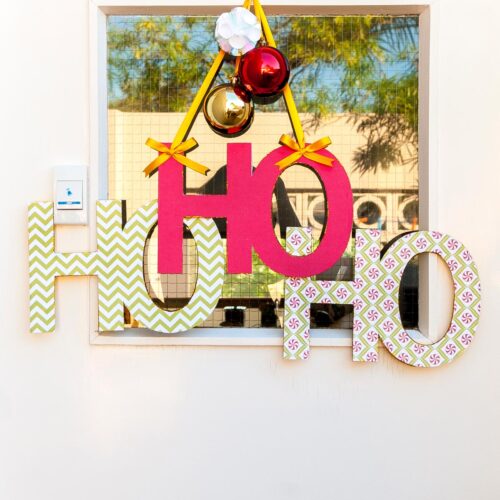
Step 7 – Once you finish all 3 HOs, use white glue on the edges of each HO to apply some gold glitter and hide the foam board’s ugly side.
You can also use mod podge, I used white glue because it was easier to apply.

Step 8 – Let it dry for about 2 hours.

Time to Assemble the Doo Hanger
Step 9 – Make a composition with all 3 HOs and glued them with UHU or Hot Glue gun and let it dry well.

I placed one on top of the other two and all in different levels.

Step 10 – Once it’s dry and strong enough, make a couple of small holes on one of the HOs (the one that would be at the top) to insert the satin ribbon to hang the Ho Ho Ho.
Step 11 – Make a knot to each ribbon end on the back side.

Step 12 – Optionally, make a cute ribbon bow to hide the holes. Here you can also use other types of decor like snowflakes, rhinestones, buttons, etc.

Step 13 – Glue it exactly on top of the hole and ribbon with hot glue.

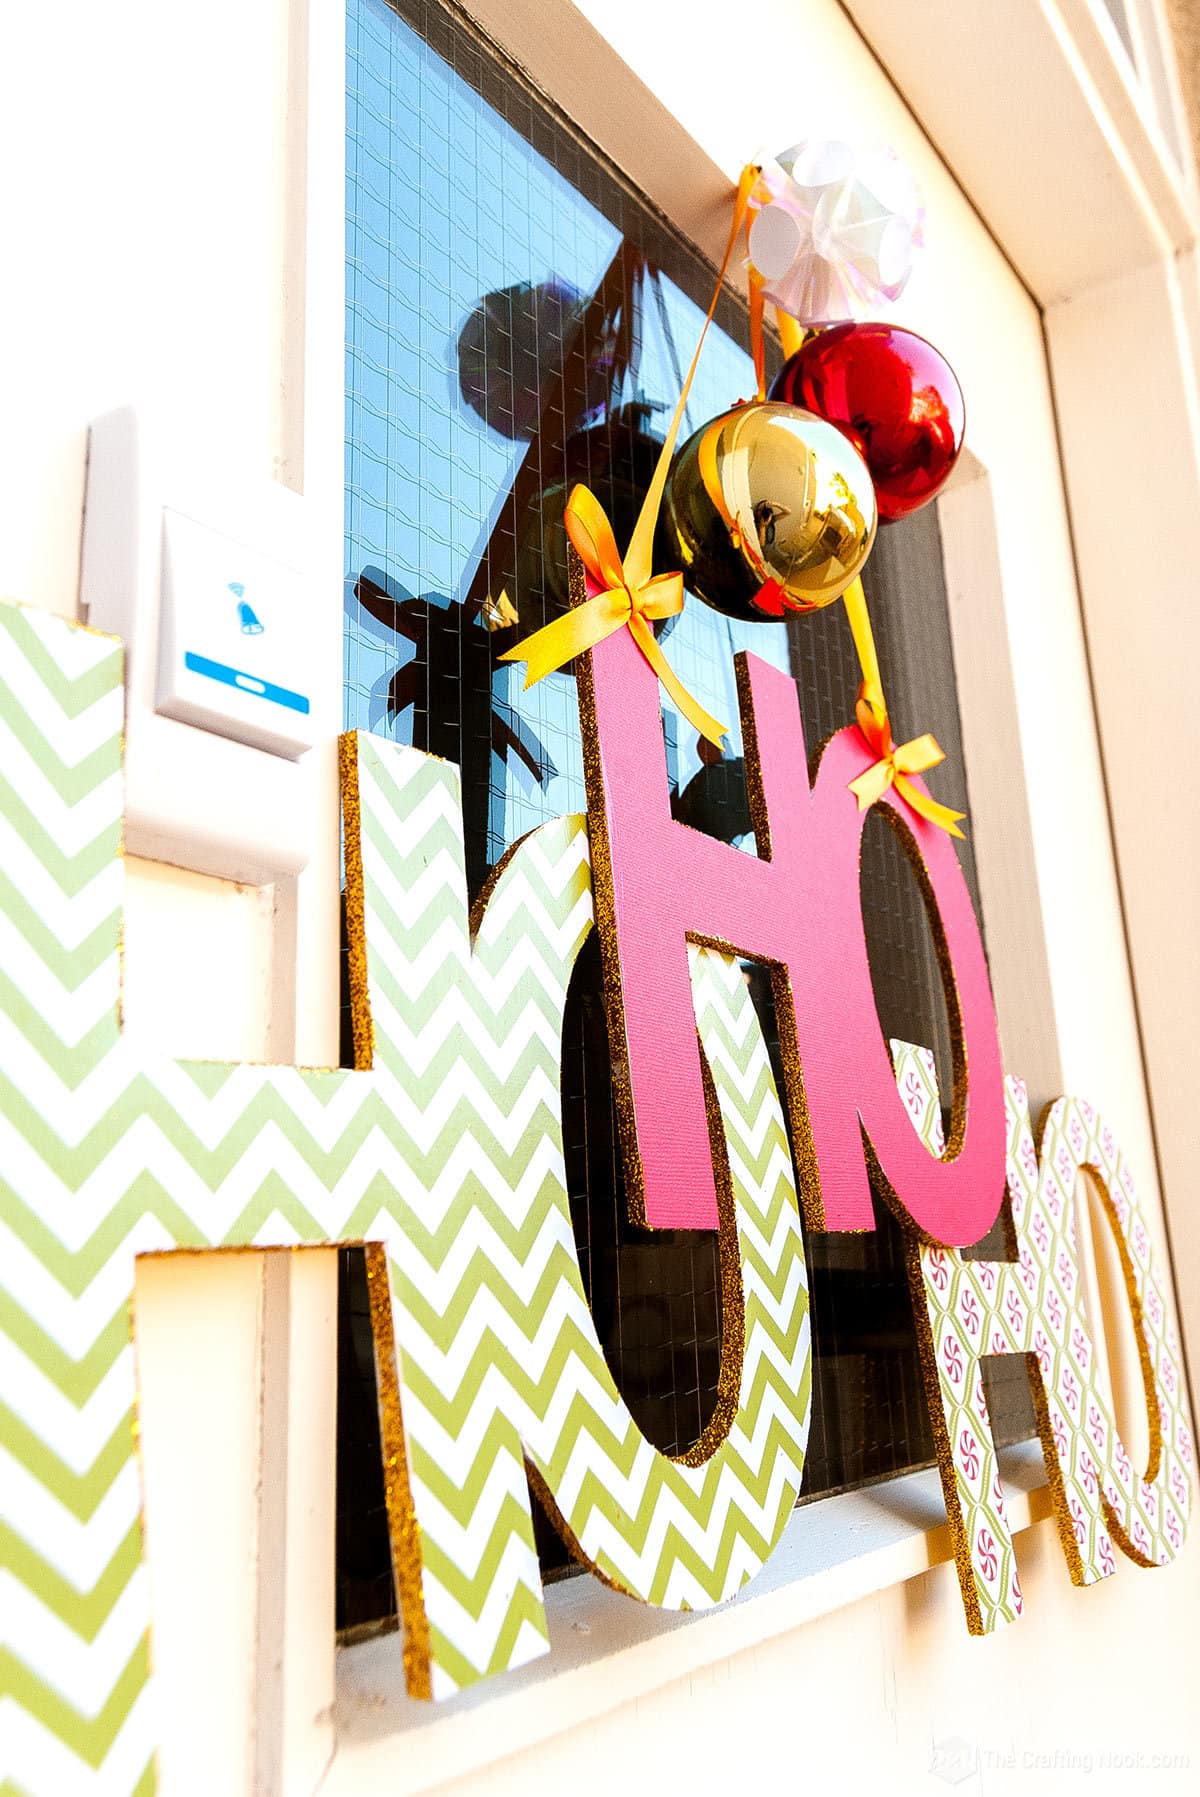
Step 14 – The final touch was adding some Christmas ornaments on the hanger. Tadaaaaa…
Step 15 – It’s done! Now let’s hang it on the door!

Crafting Tips
- Create an old-fashioned, worn-out look by roughening up the edges of your scrapbook paper with sandpaper or a tool to gently scratch the edges before sticking it to the foam board.
- Add some sparkly touches to your design with shiny foil accents. You can use a Silhouette Cameo machine to cut out shapes or letters from foil transfer sheets. Then, you can stick them onto a foam board by either heating them or using adhesive. The shiny effect will make your door hanger really noticeable.
- Choose flocked or textured paper for a special and interesting feel. These special papers have a soft or raised texture that makes your door hanger look more interesting and unique. Try different designs and materials to find the best one for your project.
- Instead of keeping the foam board edges plain or using glitter, you can paint them in colors that go well with your overall design. You can use acrylic or craft paint in a matching color and gently apply it to the sides of the foam board. This little thing will make your door hanger look good and complete.
- Create depth by stacking multiple layers of foam board to make certain elements pop. This technique is perfect for making Santa’s hat or a dimensional border around the door hanger.
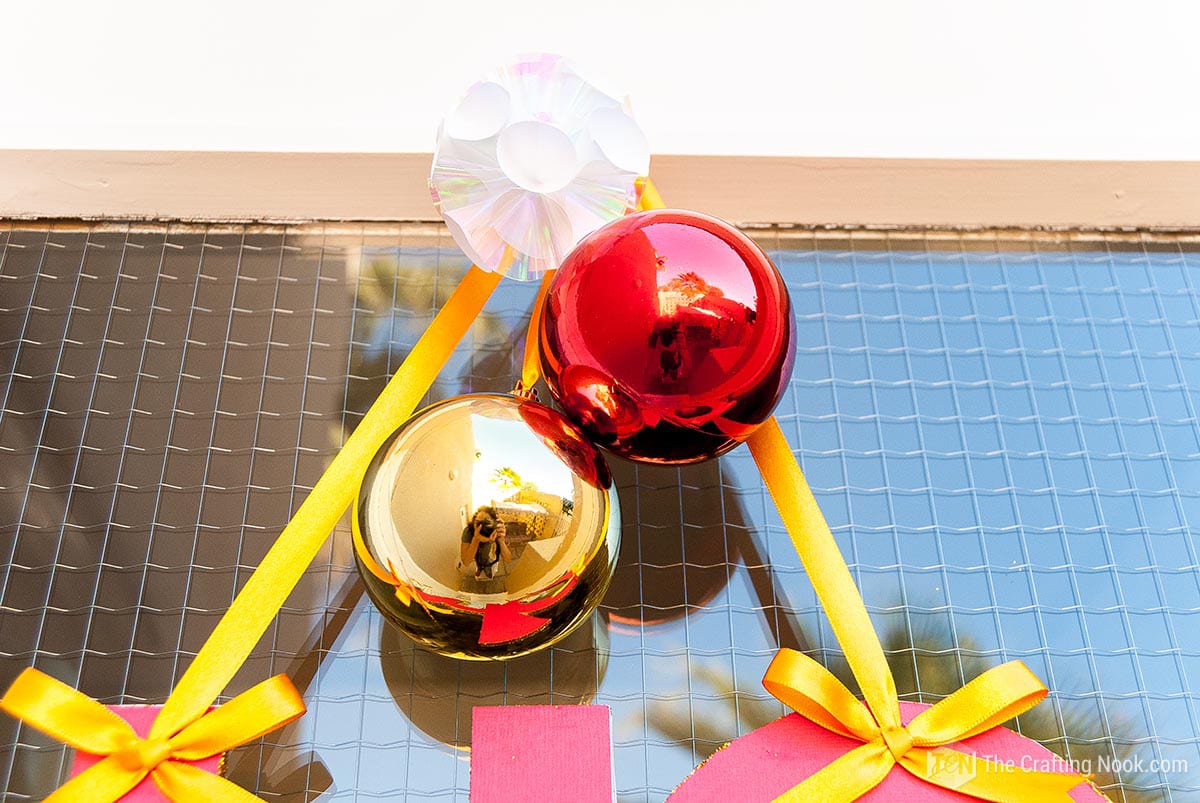
I couldn’t help being silly when I found myself reflecting on the ornaments LOL Ooooh!!!!!!!

LOL!!!
There you have it, my HO HO HO Christmas Door Hanger! What do you think???? Like it????
Frequently Asked Questions
Even though the designed scrapbook paper looks nice, you can still use regular paper too. Make sure it is strong enough to keep its form when stuck on the foam board.
I recommend mod podge or UHU universal glue because they don’t wrinkle the paper. But I’ve heard people using other types of glue with good results. It’s about trying out and seeing what works with your specific materials.
Yes, definitely. Although many craft people like using the Silhouette Cameo, other cutting machines can still do a good job for this project. However, this project can be made without any cutting machine.
Sure. Feel free to use your imagination and add additional decorations such as ribbons, bells, berries, fabric, or sparkly details to make your door hanger look even more festive. Just make sure they are securely attached.
It depends on different things, like how much experience you have making crafts and how complicated the design is. It usually takes a few hours to finish, which includes cutting, sticking, drying, and decorating.
Yes as long as you don’t live in a rainy place or if your front door has a porch or any type of protection from the rain.
More Christmas Projects to Try
If you enjoyed this HO HO HO Christmas Door Hanger tutorial, you might also love these other Christmas project ideas too:


✂️ Tutorial
HO HO HO DIY Christmas Door Hanger + Cut File
Tools
- Cutting Machine – Silhouette Cameo or Cricut. Alternatively, you can cut by hand.
- Scissors or Cutters
- Ruller
- Pencil
- Cutting mat
- Protective plastic or cardstock.
Supplies
- 5 mm Foam Board
- White glue
- UHU Universal Glue
- Gold glitter
- 5 mm Satin ribbon – Ised gold-ish.
- 2-3 Christmas Ornaments
- Printed patterned paper or scrapbook paper – your favorite designs.
Instructions
PREP WORK
- The first thing I did was create the design and cut file for the HO HO HO words.
- In this case, it was a super easy design since I used an H and an O, weld them together, and then duplicated it to make 3 HOs.
- Print some lovely patterned papers or chose your favorite scrapbook papers. Mines are from Sherry K Designs.
- You can Download the HO Cut File HERE
- Cut the HO HO HO with the Silhouette or print it 3 times and cut it with scissors or a cutter.
CREATE THE 3-HO
- Apply mod podge on the foam board and carefully place each HO on top. Ise your scrapper to remove any bubbles. Then apply another coat on top of the paper and let it dry.
- Carefully cut with a cutter the foam board around each Ho Ho Ho.
- cutting the letters with a cutter
- Then start cutting each HO detail very carefully.
- This part is a little bit tricky even though the foam board is so soft and light. You need to apply some strength carefully, especially on the rounded edges.
- Once you finish all 3 HOs, use white glue on the edges of each HO to apply some gold glitter and hide the foam board’s ugly side.
- You can also use mod podge, I used white glue because it was easier to apply.
- Let it dry for about 2 hours.
TIME TO ASSEMBLE THE DOO HANGER
- Make a composition with all 3 HOs and glued them with UHU or Hot Glue gun and let it dry well.
- I placed one on top of the other two and all in different levels.
- Once it’s dry and strong enough, make a couple of small holes on one of the HOs (the one that would be at the top) to insert the satin ribbon to hang the Ho Ho Ho.
- Make a knot to each ribbon end on the back side.
- Optionally, make a cute ribbon bow to hide the holes. Here you can also use other types of decor like snowflakes, rhinestones, buttons, etc.
- Glue it exactly on top of the hole and ribbon with hot glue.
- The final touch was adding some Christmas ornaments on the hanger. Tadaaaaa…
- It’s done! Now let’s hang it on the door!
Share and PIN ME!!!

Til’ next time…


FREE WORKBOOK
Keeping your Sweet Home Organized
Learn how to create intentional habits and simple routines to Keep Your Home Organized. Plus freebies, printables, exclusive content, and tips.
Disclaimer: By clicking on the “Yes” button above you are giving me your consent to collect and use your information according to the law and My Policy Privacy. Zero Spam I promise!
It turned out super cute. Pinning to my wreath. Board. I love how u made in 3D. Thanks for linking up to the all things pretty Thursday link up.
This is so cute! Thank you for sharing.
This is so festive and fun! I love the glittered edges! I’m featuring this on my blog today.http://www.sumossweetstuff.com/2013/12/showcase-saturday-christmas.htmlThanks for linking up to the Block Party!Sumo:)
How cute it this!? I’m inspired :) Found you on Jessi’s linky party!
Love this idea! Would love to have you link up at Link’n Blogs link party. :)http://iputabirdonit.blogspot.com/2013/12/linkn-blogs-4.html?m=1xoDanielaPut A Bird On Itp.s. Your blog is so cute!
Love these :) Great tutorial. Thanks for linking up to Snickerdoodle Sunday!
Really cute–and you picked great patterns!
Such a cute and easy idea! Love it!
Again, thanks for joining the Link Up this week!
Very nice. You make that look so easy. Love the colors!
This is so clever! Thank you for linking up at Sewlicious Home Decor! :)Marti
Thanks so much for stopping by Marti
Hugs
Great idea with the Styrofoam backing and silhouette words!
Thanks Emily! That was the easiest way I could find to make them LOL
XOXO
This is so cute, I love the size and the balls hanging on it. I pinned it!
Merry Christmas,
Wanda Ann @ Memories by the Mile
Thanks so much Wanda, I’m so glad you like it! Yayyyy Merry Christmas to you too!
Hugs
That is the CUTEST.I love letters, don’t you? Hope you are having a great Christmas Season. Linda
Thanks SOOOO much Linda. I do love letters a lot! Hope you are having a lovely Christmas season too dear!
XOXO