DIY Craft and Knitting Bag ORGANIZER + Free Pattern
This post may contain affiliate links. Please read our Disclosure Policy.
This Knitting Bag Organizer is one complete and fun solution to keep all the knitting or crocheting supplies in one place while working on specific projects. Learn how to make it here.
Organization seems to be in the air. It’s well known that when we start a new year we want like, new goals, new beginnings, and of course organizing things.

Table of Contents
Craft and Knitting Bag Organizer Sewing Pattern
My mom loves knitting but she always keeps her current projects in one of those supermarket storage bags. It’s ok, I have nothing against those bags BUT I thought how about a storage solution where she can organize the tools and accessories, wool, knitting needles, crochet hooks, and yarn she’s currently using so it’s easy to reach out for anything she needs?
That inspired me to make this cute Craft and Knitting Bag Organizer so she could do just that. I made sure she would have larger compartments and interior pockets for tool case and yarn storage with a cute design that would have enough space even for larger projects.
Please bear with me since this project was made on my first attempt. I created the pattern as I went on so I had to fix things on the go.
Sometimes the photo will not show exactly what I’m saying and I apologize for that but sometimes I took the photo and then fixed it and forgot to take it again. I’ll try to explain the best I can.
While I was planning how to make this craft bag, I was unsure about how to make it a bit different. So, I went looking for ideas and came across mymondaymakes.co.uk and I LOVED how she used the bias binding on the outside her cute tote bag. I decided that this would be my way to go.
You can use this for a knitting bag, knitting organizer, craft organizer, or crochet organizer too. It will be helpful and cute however you use it.
Bag Organizer Pattern:
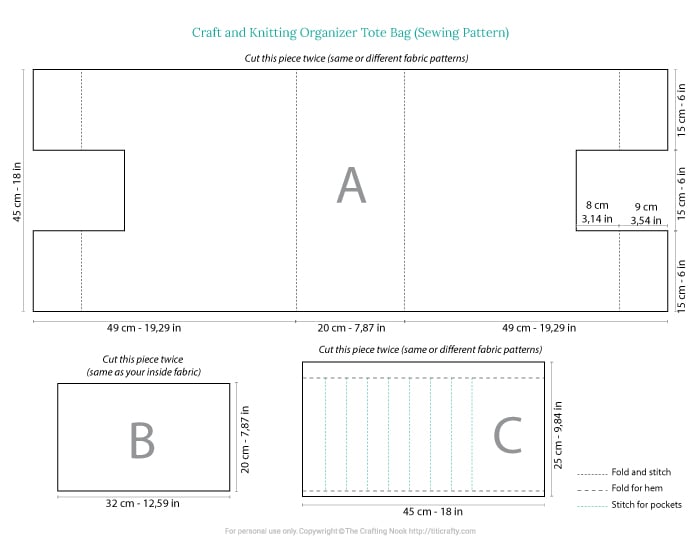
Then I started designing the knitting bag pattern, which you can get if you would like HERE
How to make this Knitting BAG Organizer
So, let’s start sewing and organizing, shall we?
Supplies:
- 118 x 45 cm (46,45 x 18 in) cute fabric for outside
- 118 x 45 cm (46,45 x 18 in) cute fabric for inside
- 118 x 45 cm (46,45 x 18 in) batting
- 32 x 20 cm (12,59 x 7,87 in) cute fabric for the sides (cut 2x for outside, 2x for inside)
- 30 x 20 cm (12 x 7,87 in) batting {cut 2x}
- 45 cm x 25 cm (18 x 10 in) cute fabric for pockets
- 5 mt (16 ft) coordinated color bias binding
- 2 straight wood handles {45 cm – 18 in} OR 2 cm diameter, 46 cm wood stick, and 2 pieces 3 cm diameter 2 mm flat MDF circles to make them.
- Fabric mark-and-be-gone markers.
- 12 in 2,5 mm elastic band.
Tools:
- Sewing machine
- Pins
- scissors
- Magic fabric markers
- Screwdriver * If making the handles yourself.
Instructions
- Ok, so the first thing I did was cut all the pieces.
- Once I had them all cut, I started with the inside pockets (piece C).
- Fold the fabric lengthwise top and bottom. Top one, fold 1 cm first, press, then fold again at 2 cm, and press again. Pin in place. Bottom one-fold at 1 cm, press.

- Stitch top hem.
- Design your pockets. Draw from top to bottom leaving the needed space in between. For example, if there is an organizing box you want to fit in then measure its width and add about 2 cm (1 in), and draw the line.
- Then for your pens, knitting hooks, and needles, leave enough space so they will fit after stitching. I left about 2,5 cm or 1 inch.

- Place the inside pocket to the inside fabric, matching up the bottom line and side raw edges.
- Pin to secure then baste stitch the bottom in place.


- Stitch along each line. Set this piece aside.

- Now place the outside fabric right side facing up on top of your batting or interfacing. Make sure you match the sides and all edges. Pin in place.
- Stitch the bottom line and the line where approximately would be the pocket edge {that should be on the other side once finished}. You can put all 3 pieces together to make marks and be sure then remove the inside piece.

- I decided that I wanted horizontal and diagonal stitch designs on the bag, you can make any design you like. Since I can’t stitch with the pockets, I started the design on the outside only where the pockets should be for now.
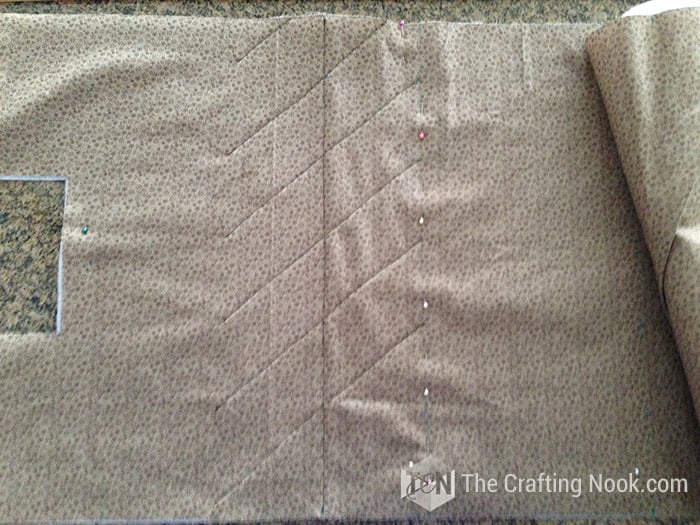
- Then place your batting or interfacing piece on top of your lining piece wright side facing down. Make sure your design stitches and the pockets are aligned and that all edges match.
- Finish the design stitches all over the piece. Set this piece aside.

Organizer Bag Sides:
I wanted the sides to be a little ruffled on the top edges. So I used an elastic band.
- Match one 32 x 20 cm (12,59 x 7,87 in) of outer fabric with one 32 x 20 cm (12,59 x 7,87 in) of inner fabric. Sew them together, right sides facing, along the top edge. Press.


- Turn them over with wrong sides facing and stitch along 1 cm away from the edge.

- Place the batting or interfacing between both fabrics with matching edges. Press. Pin in place.
- Insert the elastic band through the top stitch space with the help of a pin. Pin each end of the elastic band in place. Repeat with the other side.

- To join the side panels to the main panel, pin one raw long edge of the side panel to the main panel piece, right sides together with the binding strip over the top.
- Pin the panels together.

- Sew around the main panel and binding. Then fold the binding over to enclose all of the raw edges, pin and sew, tucking in the raw ends of the binding.
- Repeat along all the edges to attach the second side panel. You will go over the handle strips too.


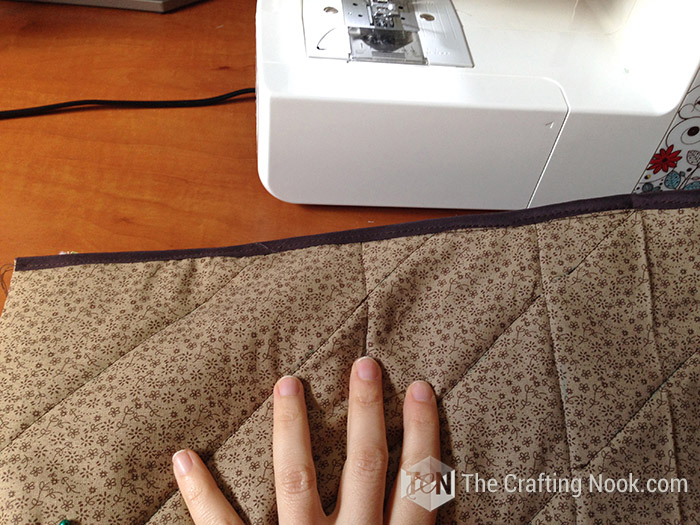

- When finished fold the handle strips inward aligning the top edges to the base of the handle hole.
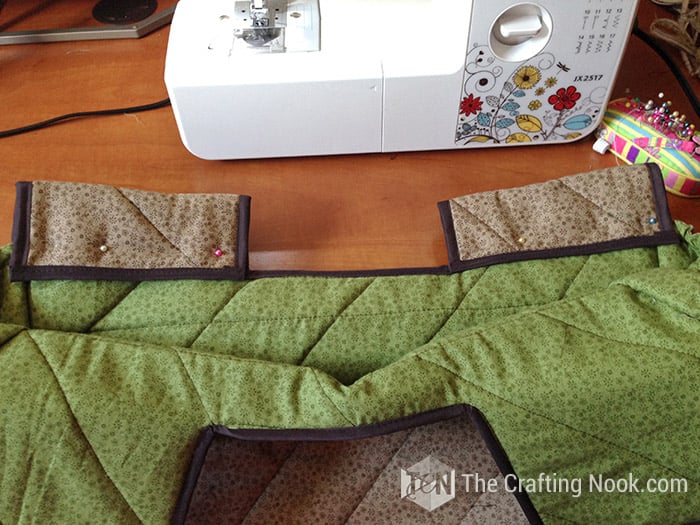
- Stitch along the binding.
There you go!

Bag Handles.
- I couldn’t find them ready at the store so I made it myself.
- I found some MDF circles and a rounded stick. Cut at 45 cm (18 in). The circles are 2,5 cm in diameter and the stick is 2 cm in diameter.
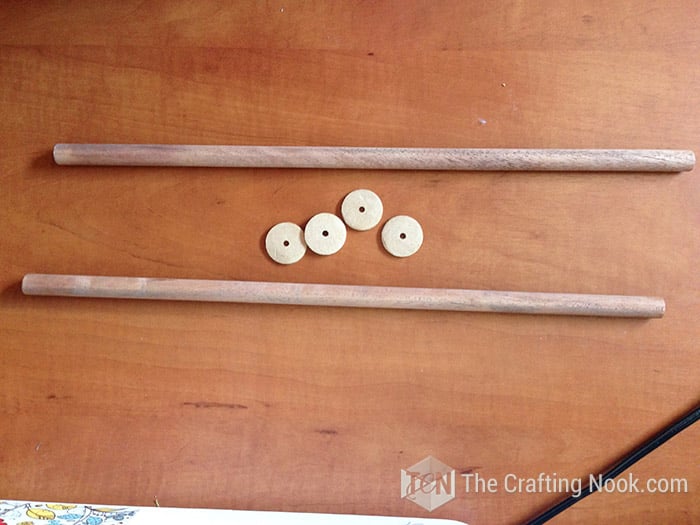
- Screwed the circles to each end of the stick trying to match the center as much as I could.

¡Done!

- Insert your handles through the handle pockets you just made and TADAAAA!!!!
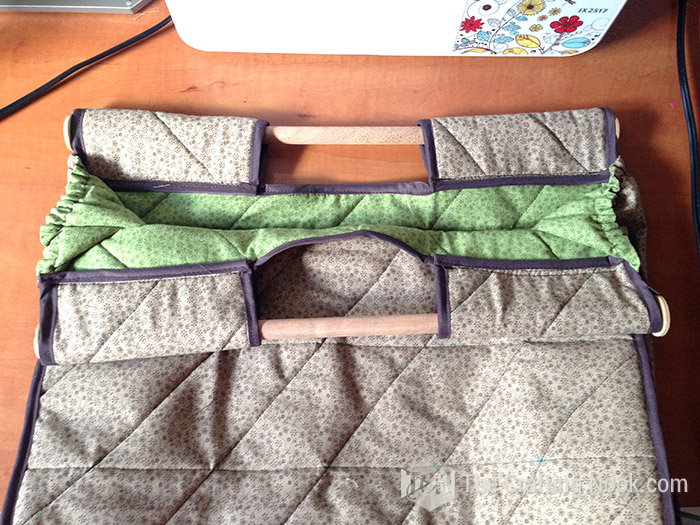
Your knitting Bag Organizer is ready for you!

This Knitting Bag might seem tricky but it’s actually super easy. It took me about a couple of hours in total once I had the pattern design and ready.
My mom loved it and I was super happy with how it turned out!


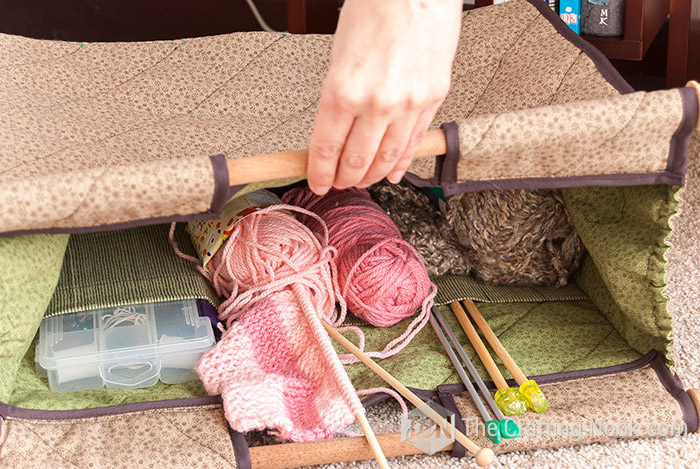
Not bad for a newbie sewer right?
Frequently Asked Questions
Include a lining of heavy or thin, starched fabric. Between the bag exterior and the lining, you can add elements like heavy-duty iron-in interfacing, which stiffens fabric, as well as padded iron-in lining, which both stiffens and adds bulk that helps purses retain their structure or you can use batting.
Yes, you can but keep in mind that without some type of interfacing, a sewn bag would simply collapse into a little pile of fabric.
You can use interfacing fabric, fusible fleece, muslin, or felt-like batting (cotton), but to keep the structure the batting gives, I’ve used felt and it has worked well.
More Sewing Projects to Try
If you like this Knitting Bag organizer tutorial, you might also love these other fun sewing projects too:
✂️ Tutorial

DIY Knitting Bag Organizer with free pattern
Tools
- Sewing Machine
- Pins
- scissors
- Magic fabric markers
Supplies
- 118 x 45 cm 46,45 x 18 in cute fabric for outside
- 118 x 45 cm 46,45 x 18 in cute fabric for inside
- 118 x 45 cm 46,45 x 18 in batting
- 32 x 20 cm 12,59 x 7,87 in cute fabric for the sides (cut 2x for outside, 2x for inside)
- 30 x 20 cm 12 x 7,87 in batting {cut 2x}
- 45 cm x 25 cm 18 x 10 in cute fabric for pockets
- 5 mt 16 ft coordinated color bias binding
- 2 straight wood handles {45 cm – 18 in} OR 2 cm diameter 46 cm wood stick, and 2 pieces 3 cm diameter 2 mm flat MDF circles to make them.
- Fabric mark-and-be-gone markers.
- 12 in 2 5 mm elastic band.
Instructions
- Ok, so the first thing I did was cut all the pieces.
- Once I had them all cut I started with the inside pockets (piece C).
- Fold the fabric lengthwise top and bottom. Top one, fold 1 cm first, press, then fold again at 2 cm, and press again. Pin in place. Bottom one fold at 1 cm, press.
- Stitch top hem.
- Design your pockets. Draw from top to bottom leaving the needed space in between. For example, if there is an organizing box you want to fit in then measure its width and add about 2 cm (1 in), and draw the line.
- Then for your pens, knitting hooks, and needles, leave enough space so they will fit after stitching. I left about 2,5 cm or 1 inch.
- Place the inside pocket to the inside fabric, matching up the bottom line and side raw edges.
- Pin to secure then baste stitch the bottom in place.
- Stitch along each line. Set this piece aside.
- Now place the outside fabric right side facing up on top of your batting or interfacing. Make sure you match the sides and all edges. Pin in place.
- Stitch the bottom line and the line where approximately would be the pocket edge {that should be on the other side once finished}. You can put all 3 pieces together to make marks and be sure then remove the inside piece.
- I decided that I wanted horizontal and diagonal stitch designs on the bag, you can make any design you like. Since I can’t stitch with the pockets I started the design on the outside only where the pockets should be for now.
- Then place your batting or interfacing piece on top of your lining piece wright side facing down. Make sure your design stitches and the pockets are aligned and that all edges match.
- Finish the design stitches all over the piece. Set this piece aside.
ORGANIZER BAG SIDES:
- I wanted the sides to be a little ruffled on the top edges. So I used an elastic band.
- Match one 32 x 20 cm (12,59 x 7,87 in) of outer fabric with one 32 x 20 cm (12,59 x 7,87 in) of inner fabric. Sew them together, right sides facing, along the top edge. Press.
- Turn them over with wrong sides facing and stitch along 1 cm away from the edge.
- view of fabric
- Place the batting or interfacing between both fabrics with matching edges. Press. Pin in place.
- Insert the elastic band through the top stitch space with the help of a pin. Pin each end of the elastic band in place. Repeat with the other side.
- To join the side panels to the main panel, pin one raw long edge of the side panel to the main panel piece, right sides together with the binding strip over the top.
- Pin the panels together.
- Sew around the main panel and binding. Then fold the binding over to enclose all of the raw edges, pin and sew, tucking in the raw ends of the binding.
- Repeat along all the edges to attach the second side panel. You will go over the handle strips too.
- image of a piece of fabric
- When finished fold the handle strips inward aligning the top edges to the base of the handle hole.
- Stitch along the binding.
- There you go!
- Crafting Tote bag ready
BAG HANDLES.
- I couldn’t find them ready at the store so I made it myself.
- I found some MDF circles and a rounded stick. Cut at 45 cm (18 in). The circles are 2,5 cm in diameter and the stick is 2 cm in diameter.
- Screwed the circles to each end of the stick trying to match the center as much as I could.
- Insert your handles through the handle pockets you just made and TADAAAA!!!!
- Your knitting Bag Organizer is ready for you!
Share and PIN ME

Til’ next time…


FREE WORKBOOK
Keeping your Sweet Home Organized
Learn how to create intentional habits and simple routines to Keep Your Home Organized. Plus freebies, printables, exclusive content, and tips.
Disclaimer: By clicking on the “Yes” button above you are giving me your consent to collect and use your information according to the law and My Policy Privacy. Zero Spam I promise!
