DIY Monogrammed Zippered Pillow Cover (An Easy Tutorial for the Total Beginner)
This post may contain affiliate links. Please read our Disclosure Policy.
Easy tutorial for beginners to learn how to make a zippered pillow cover and stencil it with a cute Monogram. It’s a lot easier than you might think. This Zippered Pillow cover is simple to make and will spruce up your Home.
If you have been around long enough, you might have noticed I have a thing for pillows. I make pillow covers every time I have the chance or the budget. I think creative and personalized Pillow covers add character to our homes.
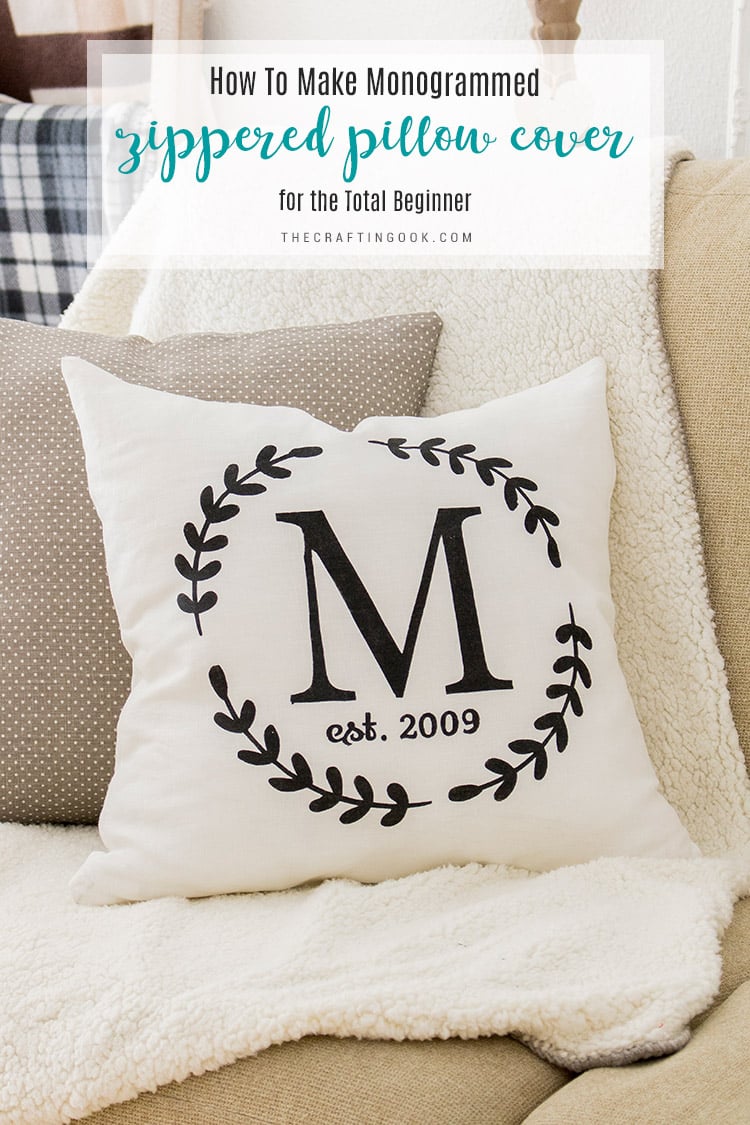
Table of Contents
Easy Monogrammed Zippered Pillow Cover for beginners
Several years back, actually, when I was a teen, I decided I had to teach myself how to make pillow covers on my own so I could decorate my bedroom my way.
Fancy pillows did not make the budget cuts and my mom was not willing to buying me those pretty pillows I loved. So, I found fabric and would make my own (Thankfully, my mom used to sew a lot back then so I usually had fabric around).

I started with envelope pillows, using a method I could spot on my mom’s sofa pillows {read my tutorials here (One piece) and here (3 pieces) if those method interests you instead}.
It still works well, but I sometimes I want the pillows to be able to turne around and not see the opening right there or I want to have different decorations on each side so I preferred the look of zipper-bottomed pillows.
I’m going to start off by saying that I’m not a professional sewist, I’m not a pro and I don’t know if this is THE perfect method but it worked wonderfully for me. So, if I could make this pillow cover and stencil it, you definitely can too.
Now, this is a really basic tutorial. However, I’m going to assume you know how to work your sewing machine. Even though I have sewn here and there, I still consider myself a VERY beginner sewer and can’t do much outside of a straight line. If you can do that and follow directions well, you’re a winner.
I also understand not everyone has a cutting machine, so if you don’t have one, you can find pretty Letter and floral stencils at your local craft stores. You can definitely create a gorgeous pillow cover. So, if you are using stencils, scroll down until I finish painting for the Pillow cover tutorial.
How to Make a Monogrammed Zippered Pillow Cover
Supplies:
- Fabric – You will need 2 pieces per pillow cut to the same dimensions as your pillow insert leaving 1/2 inch seam allowance only on one side (where the zipper goes)
- A Pillow Insert.
- A Zipper – I used the same length as the pillow insert
- Freezer Paper (or a stencil of your choice)
- Black Fabric Paint
- Foam brush
Tools:
- A Sewing Machine
- A zipper foot
- Iron or heat press.
- Thread, pins, and scissors
Instructions:
Step 1: Prep Work
The first thing you need to do is cut 2 pieces of fabric, one for the front of the pillow and one for the back.
I like to cut my fabric to the dimensions of my pillow insert + 1 cm (1/2 inch) seam allowance only on one side where the zipper will be.
This way it fits the pillow form nice and slightly snug. If you like it tighter, don’t add the 1cm and just cut to the exact dimensions of my pillow insert.
Step 2: Creating The monogram Design
I used my Silhouette Studio to design the Monogram. Since it reads most of your fonts, you can choose your favorite. I used a serif one that I love. Then I found a cute curvy floral stem and using the tracing tool I converted it on a cut-able shape. Adjusted a few lines to be look smoother and it was done!
Then I created a circle with the stem shape duplicating it and adjusting position and angle. It took me 4 stems in total.
Placed the M (Medina Family) in the center and right below the M, I added est. 2009 which is the year we got married.
The Monogram was ready. I just adjusted the size to the maximum the machine could cut (12×12 Inches).
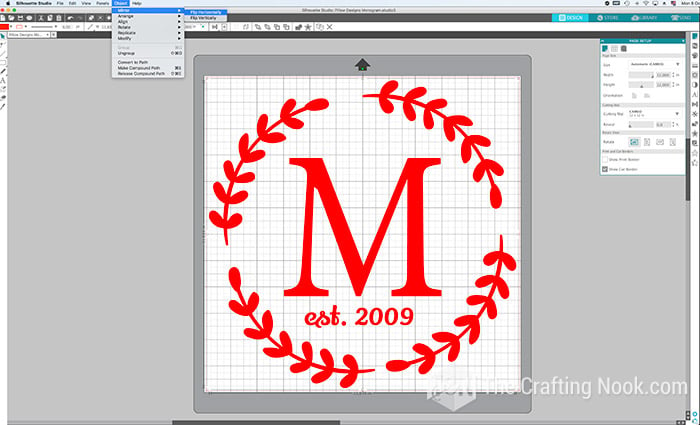
Then when using Freezer paper it’s important to remember that the waxed side should be facing up. For this reason is critical to remember to flip the design before cutting. For this, you just need to select the whole design and go to Object > Mirror > Flip Horizontally.

Step3: Cut the design
Now you can send to cut. I used Copy Paper setting, BUT I set the blade to 1 instead the default 2.

Once cut, carefully remove from mat the main design, leaving the inner parts for now.
Step 4: Stencil the fabric
Take one piece of your fabric, iron it well and mark the center. Place carefully your freezer paper stencil wax side facing down on the fabric as centered as you can.

Iron it (again carefully) onto your the fabric.

Then add those little inner shapes (like the inner cero and nine pieces) to the correct places and iron them down.

Step 5: Paint the monogram
I protected a small cutting mat with plastic and taped the fabric to it. You can use cardboard too.
Add some paint on a paper place or piece of paper. With your foam brush spread the paint all over your design making sure you don’t paint beyond the edges.

Quick Tip: Use a foam brush and paint the stencil giving soft taps with the brush to avoid pushing paint below the freezer paper. When you bush the normal way braging up and down the brush you inevitably push paint through the edges of the stencial and this causes the fuzzy edge-leak look that dows not look pretty.
Let it dry for a few minutes and peel off the stencil and all the inner parts.

Let it dry completely. Usually, it takes about 30 minutes to an hour but make sure you read the paint directions just in case.

Step 6: Install the Zipper
Fold about 1 cm (1/2 Inch – the side you left the extra seam allowance) wrong sides together of the bottom side of your fabric and Iron it.
Do this on both pieces.

Then align your 2 pieces of fabric (folded sides together) and your place your zipper on top as centered as possible.

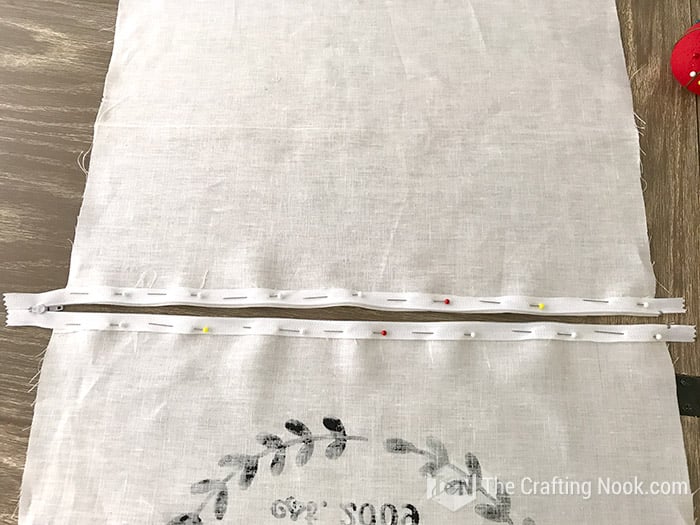
Now, place the zipper face down directly on top of the folded side from end to end to the folded edge. Make sure to line it up with the basted stitch and pin in place both sides making sure the 2 fabric pieces are still aligned.

If you turn it you will see the zipper is not visible.


My zipper was slightly larger than my pillow size so I centered it.
Once you finish pining zipper in place you will get something like this:
Ok now. Take a deep breath. I know you can do this!
The first thing you need to do is to put your zipper foot on. Hold your zipper foot in your hand. Do you see how it almost looks like 1/2 of a regular foot? When you attach it to your machine, you’ll want the “missing side” closest to the zipper and sew down that side of the zipper, then you’ll switch it and do the other side.
I also found out easier to work with the zipper unzipped. I mean all open.
We are ready. Be sure you are back to a regular straight stitch and start at the end of the zipper farthest away from the zipper handle sewing just like you would any other straight line, but keep it as close to the zipper teeth as possible.
Also remove pins as you move on.

When you get to the zipper pull, you won’t be able to keep going because it takes up some space. So stop just a little bit away from it, keeping your needle down in the fabric (if possible.) Lift your foot and carefully zip the zipper past the foot, lower your foot and continue to the end of the zipper. Backstitch to end your stitch.
For the other side, I do the same I did but switch the needle position to the other side.

When you finish the other side, YOU MADE IT! You installed a zipper!!!!!

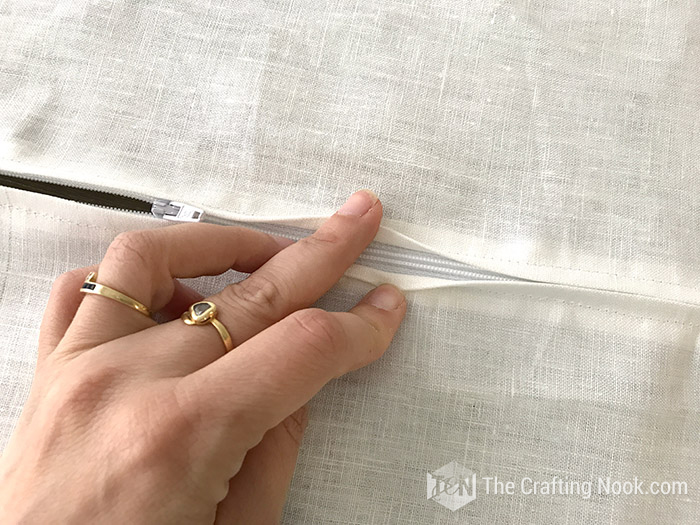
Woohoo!
But before moving on we need a final touch to the zipper. Zip the pillow all the way shut and about 1 cm (1/2 Inch) from the fabric edge, stitch across the zipper along the edge. Just a few stitches about an inch long onto the zipper.
Do this on both ends making sure the zipper is inbetween both ends.


After you zipped the pillow part way in the step above, you will want to cut off any overhang on the zipper track
Step 7: Stitch your Pillow Cover
Next up, I zip the pillow about three-fourths of the way shut. Your fabric squares should still line up nicely when you do this. If off a little – you should be okay. But if you see some significant shifting at this point (which it shouldn’t) you will need to unpick one of the zippers sides with seam ripper and redo it.

Go back to your machine, put your regular foot back on and sew the remaining raw edges leaving a 1/4 inch seam allowance, cutting across diagonally at the corners.
Then zigzag stitch the raw edge of the fabric (serge without a serger) to make sure the fabric won’t fray. This will give your edges a finished look and keep them from fraying.

You’re ready to turn your zippered pillow cover right side out! My favorite part!
I usually use my scissor tips to helpfully push out the edges (but very carefully!) you don’t want to rip your beautiful new pillow cover!


Now, get a throw pillow insert in there and enjoy!!!
Already feeling like meking more throw pillow covers already? I hear ya!

Sewing Tips
* Iron on the freezer paper with the waxed side facing down onto the fabric and with close attention to detail, making sure all the edges are sealed!
* Don’t let the paint completely dry before peeling off the freezer paper. Wait just a few minutes and remove it.
* Heat set your paint once it’s dry! place a piece of cloth or parchment paper over the design and iron it to seal the paint.
* Cutting the corners of your pillowcase will ensure that when you turn it inside out and add a pillow insert, you’ll be able to get crisp corners on your finished pillow. It’s not hard, just when you approach a corner, stop with your needle down about an inch from the corner. Then turn your fabric so you sew your stitch at a 45-degree angle. Once you’re done, cut the corners off before moving on your zig-zag stitch to finish the edge.
* Cutting your fabric the same dimensions as your pillow insert will ensure a snug fit and that your pillow is nice and plump without “dog ears” at the corners.
* Always zig-zag stitch the edges of your fabric (serge without a serger) to make sure your edges a finished look and keep them from fraying.
It wasn’t that hard, was it?
Well, first times are always harder, but I’m telling you, it gets easier as you make more pillow covers. If you already made some pillow covers in the past, you know what I’m talking about!

Frequently Asked Questions
Plastic (nylon coil) zippers are better for cushion covers than metal ones as they are smoother and easier to sew. A matching thread is always best.
This sewing tutorial is great for all levels. It’s easy enough for beginners and super fun and quick to make if you’re already an expert!
Envelope pillow covers are perfect for square pillows of any size, but it works on rectangular or even circular pillows by adjusting the size and shape of the fabric based on the size of your specific pillow insert.
Absolutely! As long as the fabric you choose is washable, your pillow cover will be totally washable. If you decorated them then follow washing instructions from the material used.
Yes, Freezer paper also makes amazing stencils, especially if you’re stenciling onto fabric. Freezer paper is thicker than parchment or wax paper and makes a strong stencil. It is dull on one side and shiny on the other.
Definitely Yes. Any fabric that can be ironed onto qualifies for freezer paper stenciling. Because freezer paper is polycoated on one side, it will adhere to fabric with an iron to help bring your design to life.
Shiny side DOWN!!! Always!!!
More Pillow Cover ideas to try
If you like this Zippered Pillow Cover tutorial, you might also love these other sewing project ideas too:
✂️ Tutorial

DIY Monogrammed Zippered Pillow Cover (An Easy Tutorial for the Total Beginner)
Tools
- A Sewing Machine
- A zipper foot
- Iron or heat press.
- Thread, pins, and scissors
Supplies
- Fabric – You will need 2 pieces per pillow cut to the same dimensions as your pillow insert leaving 1/2 inch seam allowance only on one side where the zipper goes
- A Pillow Insert.
- A Zipper – I used the same length as the pillow insert
- Freezer Paper or a stencil of your choice
- Black Fabric Paint
- Foam brush
Instructions
STEP 1: PREP WORK
- The first thing you need to do is cut 2 pieces of fabric, one for the front of the pillow and one for the back.
- I like to cut my fabric to the dimensions of my pillow insert + 1 cm (1/2 inch) seam allowance only on one side where the zipper will be.
- This way it fits the pillow form nice and slightly snug. If you like it tighter, don’t add the 1cm and just cut to the exact dimensions of my pillow insert.
STEP 2: CREATING THE MONOGRAM DESIGN
- I used my Silhouette Studio to design the Monogram. Since it reads most of your fonts, you can choose your favorite. I used a serif one that I love. Then I found a cute curvy floral stem and using the tracing tool I converted it on a cut-able shape. Adjusted a few lines to be look smoother and it was done!
- Then I created a circle with the stem shape duplicating it and adjusting position and angle. It took me 4 stems in total.
- Placed the M (Medina Family) in the center and right below the M, I added est. 2009 which is the year we got married.
- The Monogram was ready. I just adjusted the size to the maximum the machine could cut (12×12 Inches).
- Then when using Freezer paper it’s important to remember that the waxed side should be facing up. For this reason is critical to remember to flip the design before cutting. For this, you just need to select the whole design and go to Object > Mirror > Flip Horizontally.
STEP 3: CUT THE DESIGN
- Now you can send to cut. I used Copy Paper setting, BUT I set the blade to 1 instead the default 2.
- Once cut, carefully remove from mat the main design, leaving the inner parts for now.
STEP 4: STENCIL THE FABRIC
- Take one piece of your fabric, iron it well and mark the center. Place carefully your freezer paper stencil wax side facing down on the fabric as centered as you can.
- Iron it (again carefully) onto your the fabric.
- Then add those little inner shapes (like the inner cero and nine pieces) to the correct places and iron them down.
STEP 5: PAINT THE MONOGRAM
- I protected a small cutting mat with plastic and taped the fabric to it. You can use cardboard too.
- Add some paint on a paper place or piece of paper. With your foam brush spread the paint all over your design making sure you don’t paint beyond the edges.
- Let it dry for a few minutes and peel off the stencil and all the inner parts.
- Let it dry completely. Usually, it takes about 30 minutes to an hour but make sure you read the paint directions just in case.
STEP 6: INSTALL THE ZIPPER
- Fold about 1 cm (1/2 Inch) wrong sides together of the bottom side of your fabric and Iron it.
- Do this on both pieces.
- Then align your 2 pieces of fabric (folded sides together) and your place your zipper on top as centered as possible.
- Now, align your zipper from end to end to the folded edge on top of the folded side. Pin in place both sides making sure the 2 fabric pieces are still aligned.
- If you turn it you will see the zipper is not visible.
- My zipper was slightly larger than my pillow size so I centered it.
- Once you finish pining zipper in place you will get something like this:
- The first thing you need to do is to put your zipper foot on. Hold your zipper foot in your hand. Do you see how it almost looks like 1/2 of a regular foot? When you attach it to your machine, you’ll want the “missing side” closest to the zipper and sew down that side, then you’ll switch it and do the other side.
- I also found out easier to work with the zipper unzipped. I mean all open.
- We are ready. Be sure you are back to a regular straight stitch and start at the end of the zipper farthest away from the zipper handle sewing just like you would any other straight line, but keep it as close to the zipper teeth as possible.
- Also remove pins as you move on.
- When you get to the zipper pull, you won’t be able to keep going because it takes up some space. So stop just a little bit away from it, keeping your needle down in the fabric (if possible.) Lift your foot and carefully zip the zipper past the foot, lower your foot and continue to the end of the zipper. Backstitch to end your stitch.
- For the other side, I do the same I did but switch the needle position to the other side.
- When you finish the other side, YOU MADE IT! You installed a zipper!!!!!
- But before moving on we need a final touch to the zipper. Zip the pillow all the way shut and about 1 cm (1/2 Inch) from the fabric edge, stitch across the zipper along the edge. Just a few stitches about an inch long onto the zipper.
- Do this on both ends making sure the zipper is inbetween both ends.
- After you zipped the pillow part way in the step above, you will want to cut off any overhang on the zipper track
STEP 7: STITCH YOUR PILLOW COVER
- Next up, I zip the pillow about three-fourths of the way shut. Your fabric squares should still line up nicely when you do this. If off a little – you should be okay. But if you see some significant shifting at this point (which it shouldn’t) you will need to unpick one of the zippers sides and redo it.
- Go back to your machine, put your regular foot back on and sew the remaining edges with a 1/4 inch seam allowance, cutting across diagonally at the corners.
- Then zig-zag stitch the edge (serge without a serger) to make sure the fabric won’t fray. This will give your edges a finished look and keep them from fraying.
- You’re ready to turn your zippered pillow cover right side out! My favorite part!.
- I usually use my scissor tips to helpfully push out the edges (but very carefully!) you don’t want to rip your beautiful new pillow cover!
- Now, get a pillow insert in there and enjoy!!!
Notes
Is there any other interesting Zippered Pillow Cover methods?
Yes indeed.
- Corey from Hey There Home has one that I LOVE.
- Sarah, from Life on Virginia Street, also has a great tutorial.
Share and PIN ME

Til’ next time…


FREE WORKBOOK
Keeping your Sweet Home Organized
Learn how to create intentional habits and simple routines to Keep Your Home Organized. Plus freebies, printables, exclusive content, and tips.
Disclaimer: By clicking on the “Yes” button above you are giving me your consent to collect and use your information according to the law and My Policy Privacy. Zero Spam I promise!
