DIY Winter Scene in a Jar. 2 Easy Snowy Scene Decor Ideas
This post may contain affiliate links. Please read our Disclosure Policy.
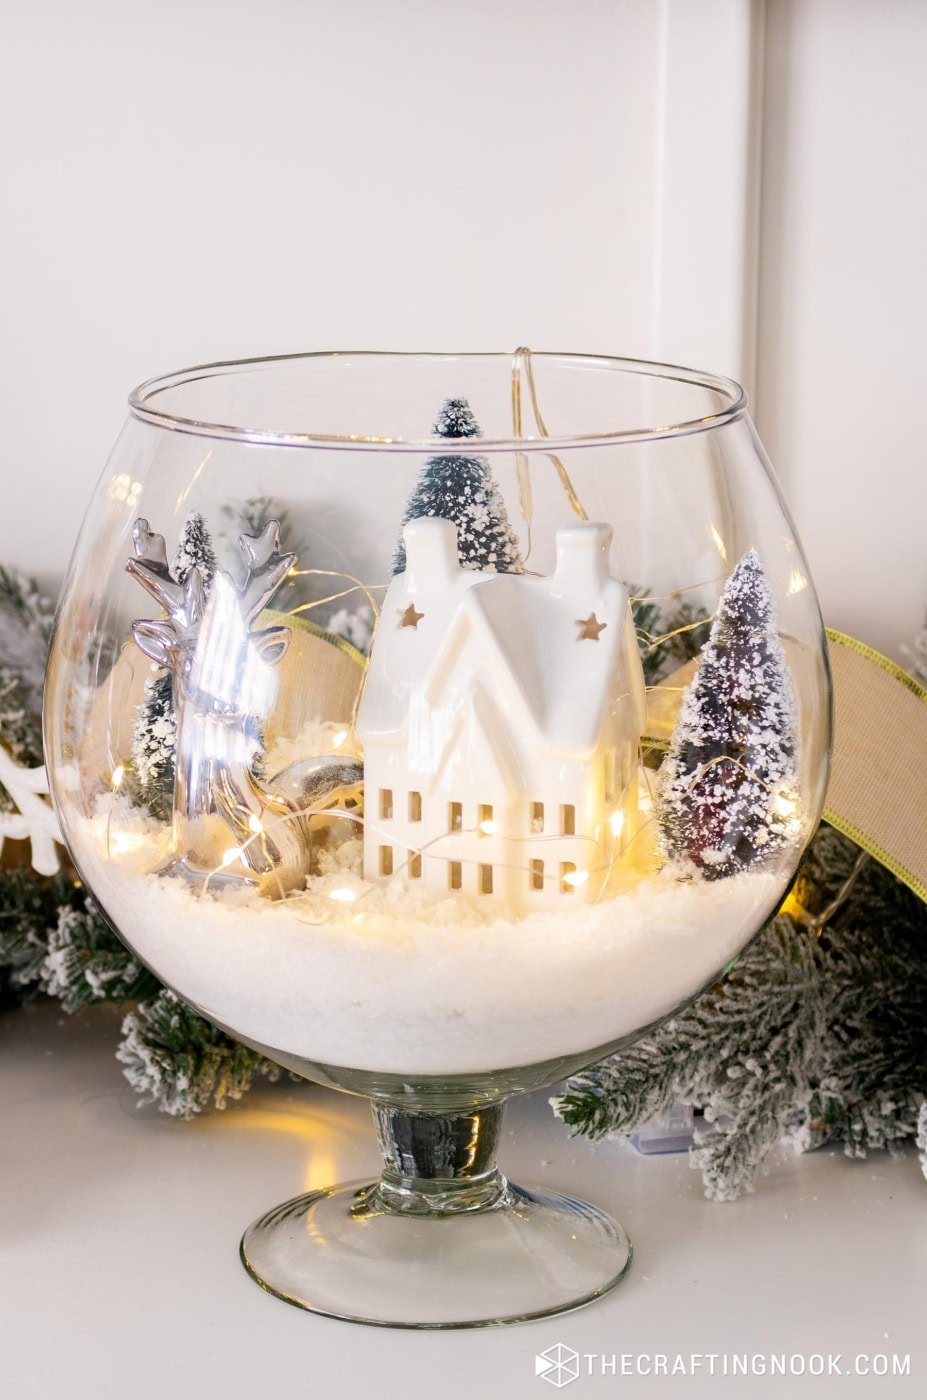
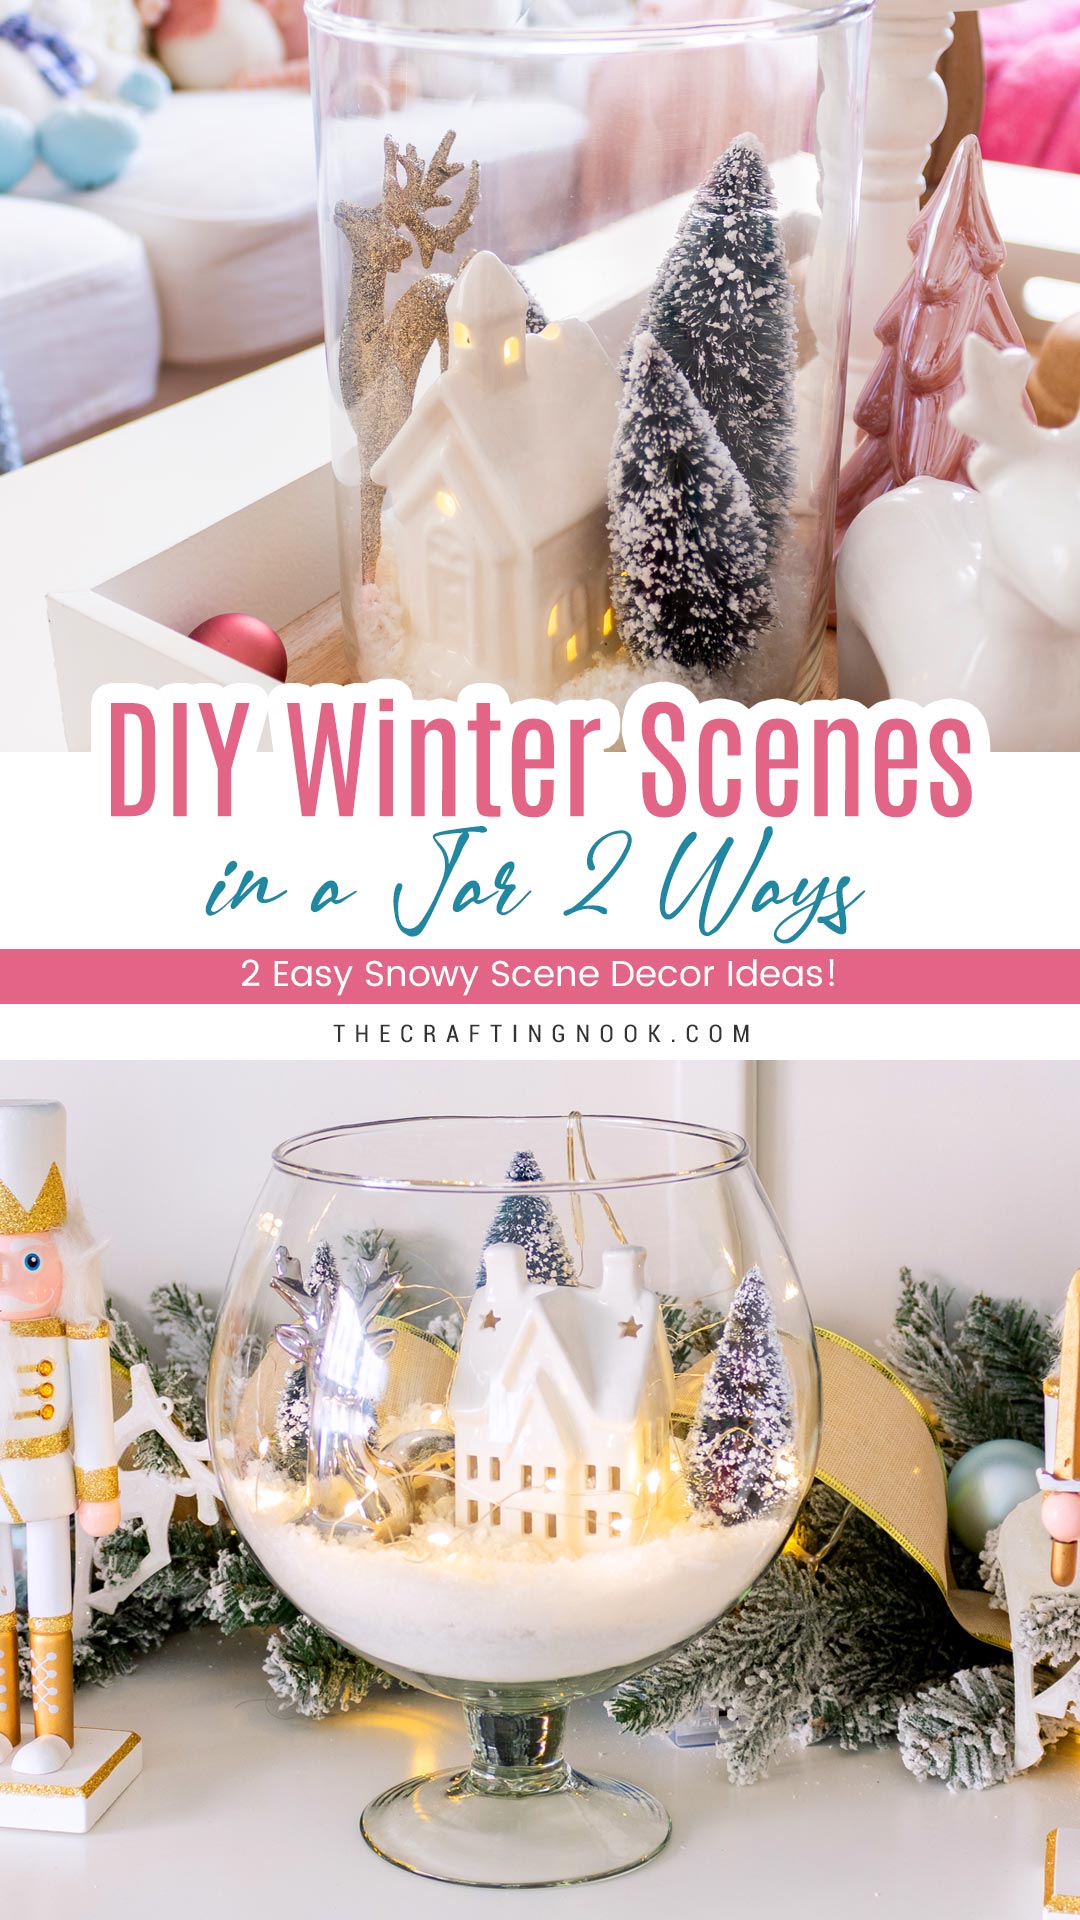
I created 2 super cute and dreamy winter scenes in a jar with these two easy Christmas decor ideas using a vase, snow, mini trees, and a glowing ceramic house. Learn how here.
I swear I didn’t plan on making more Christmas villages this year… but then I walked past my jars and vases, and suddenly they were begging for a little snow and a tiny glowing house.

My brain in December has one very strong personality trait: “Ooh, that jar would look adorable with snow in it.”You know how it goes. One minute you’re cleaning up the coffee table, and the next you’re building a whole winter scene like it’s the most natural thing in the world.
Table of Contents
2 Super cute and Easy Snowy Scene Decor Ideas
I can’t help it. Something about this season makes me want to create little glowing winter moments around the house — nothing fancy, just simple snowy scenes that make you smile every time you walk by.
These little snowy moments are so simple, but they bring such a soft, cozy glow to the room, and honestly, they’re the quickest Christmas decor you can put together.
Today I’m sharing two ways to make a winter scene in a jar (or vase!), both easy and really fun, take less than 10 minutes, and the result is this dreamy little winter village moment you can display anywhere.
So, if you’ve been wanting simple Christmas jar decorations, a cute winter scene in a vase, or a quick DIY winter village idea, these two projects are such a fun place to start.
How to Make a Winter Scene in a Jar
Below you’ll find two different ways to create these snowy little worlds — both easy, budget-friendly, and perfect for beginners.
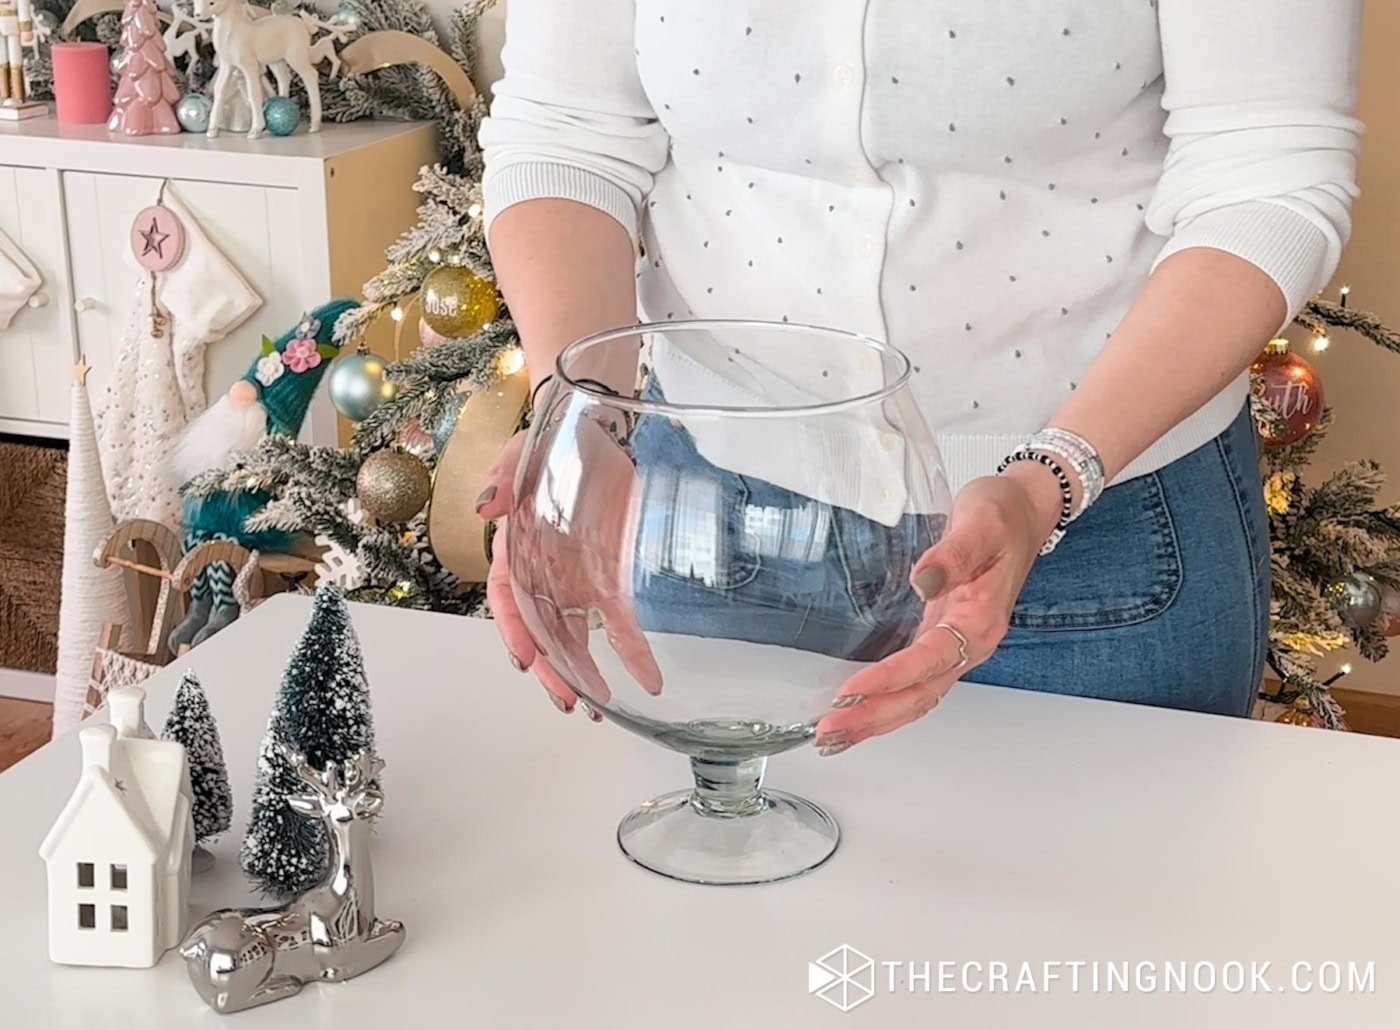
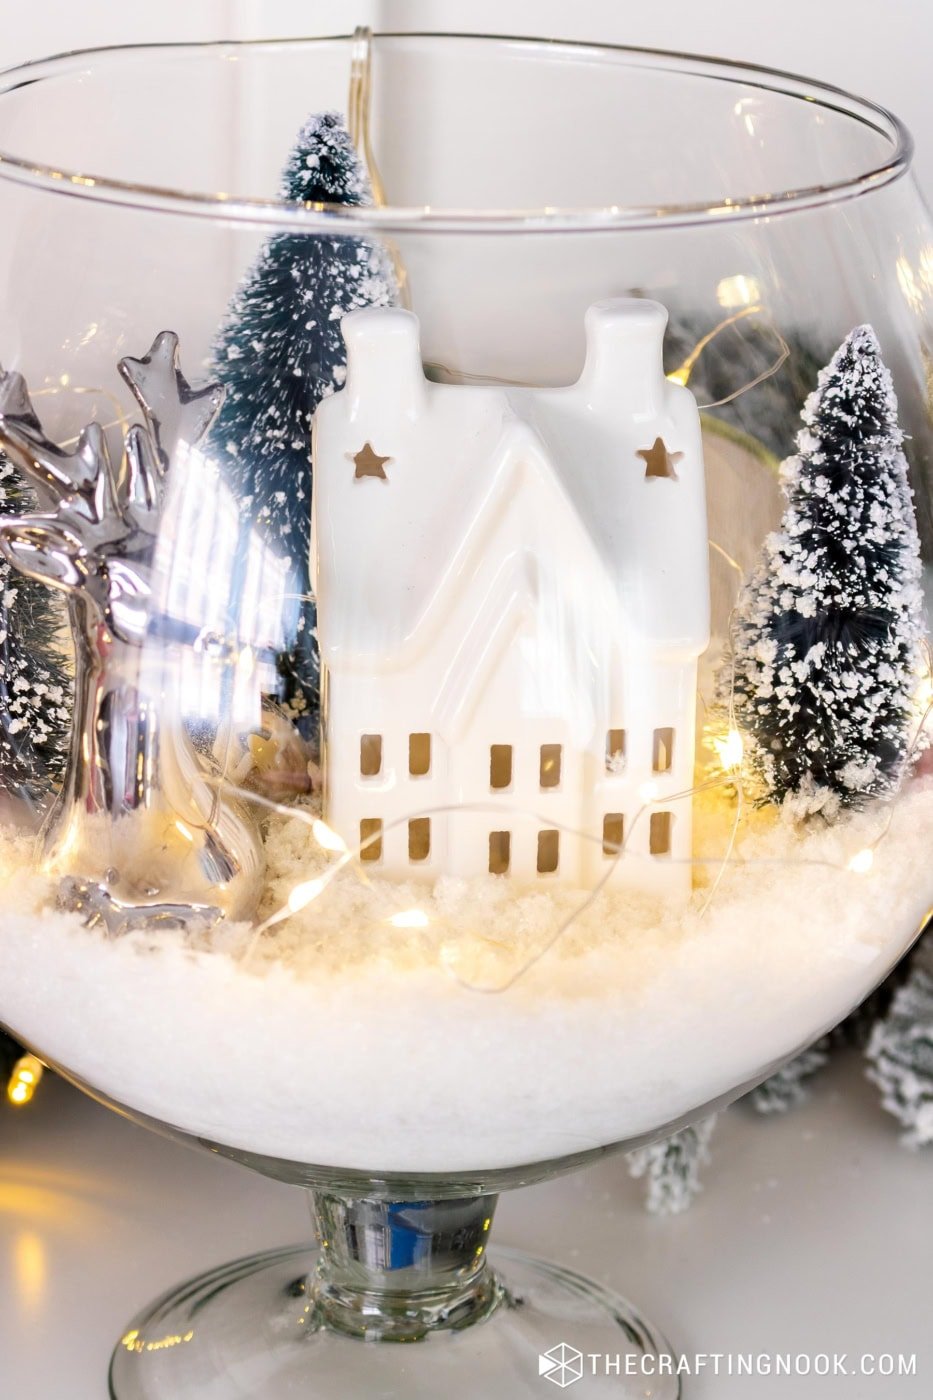
Idea 1: Winter Scene in a Vase (Glass Bowl)
This version has a softer, rounder look — perfect as a glass bowl Christmas decoration or for styling next to nutcrackers, garlands, and mantel decor.
Supplies
- Glass bowl or wide vase
- Ceramic houses (or any small winter house)
- Bottle-Brush trees (or any type of trees that fit your theme)
- Glittery deer or small figurines
- Artificial snow
- LED tea lights or micro fairy lights
Instructions:
Step 1: Prepare your bowl
Set your glass bowl on a flat surface so it’s easy to build your little winter village. Make sure it’s clean and shiny!
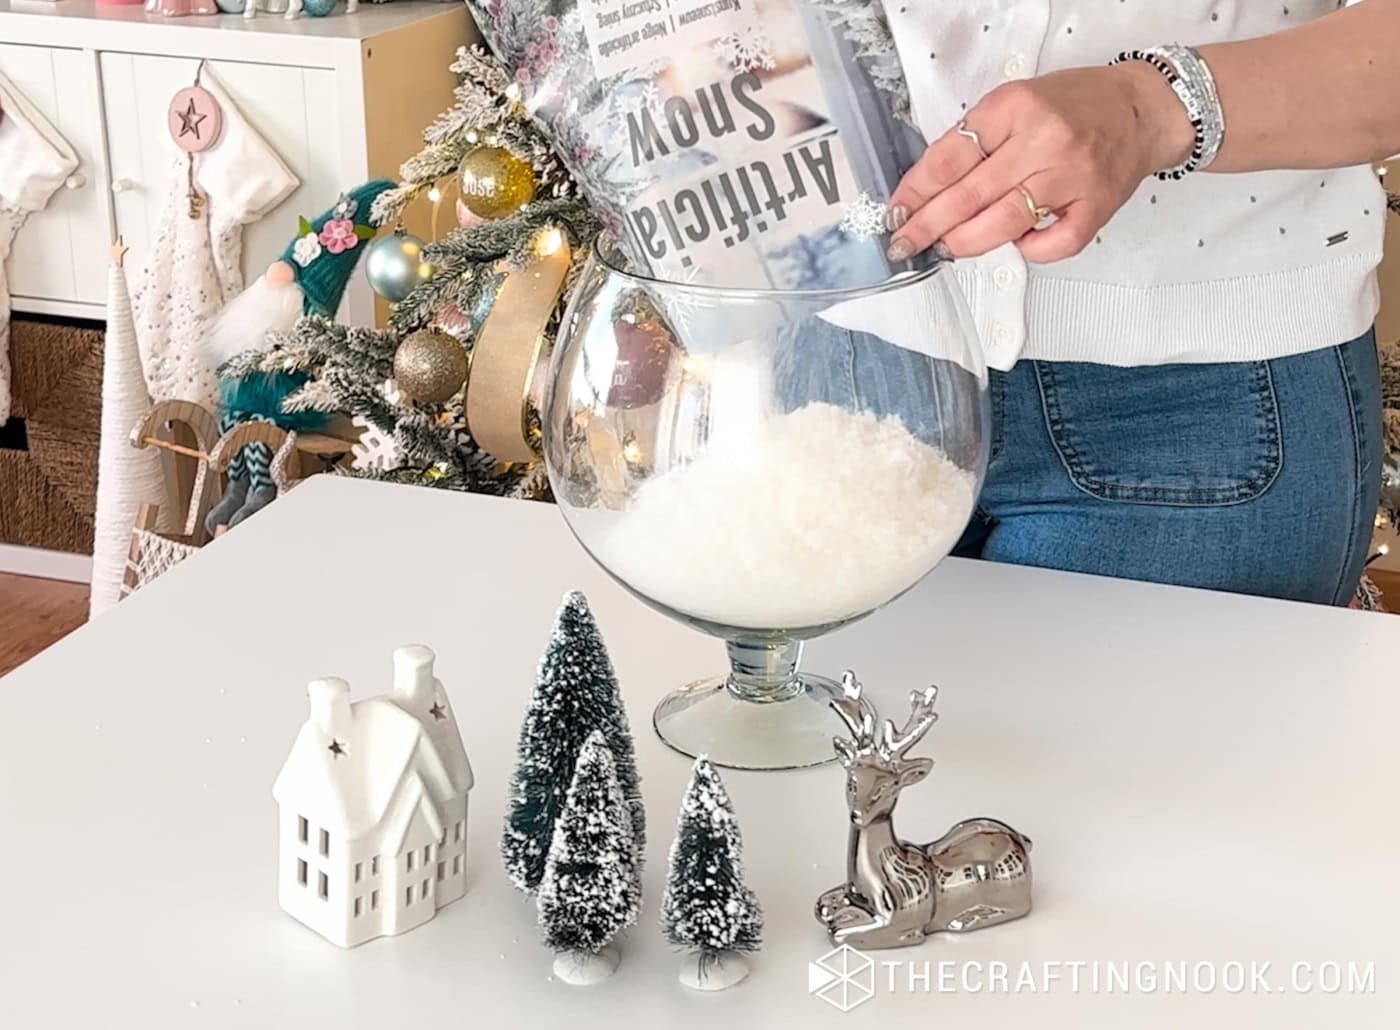
Step 2: Add artificial snow
Pour a generous layer of artificial snow into the bottom of the bowl. Enough so the house and trees “sit into it” rather than on top of it.
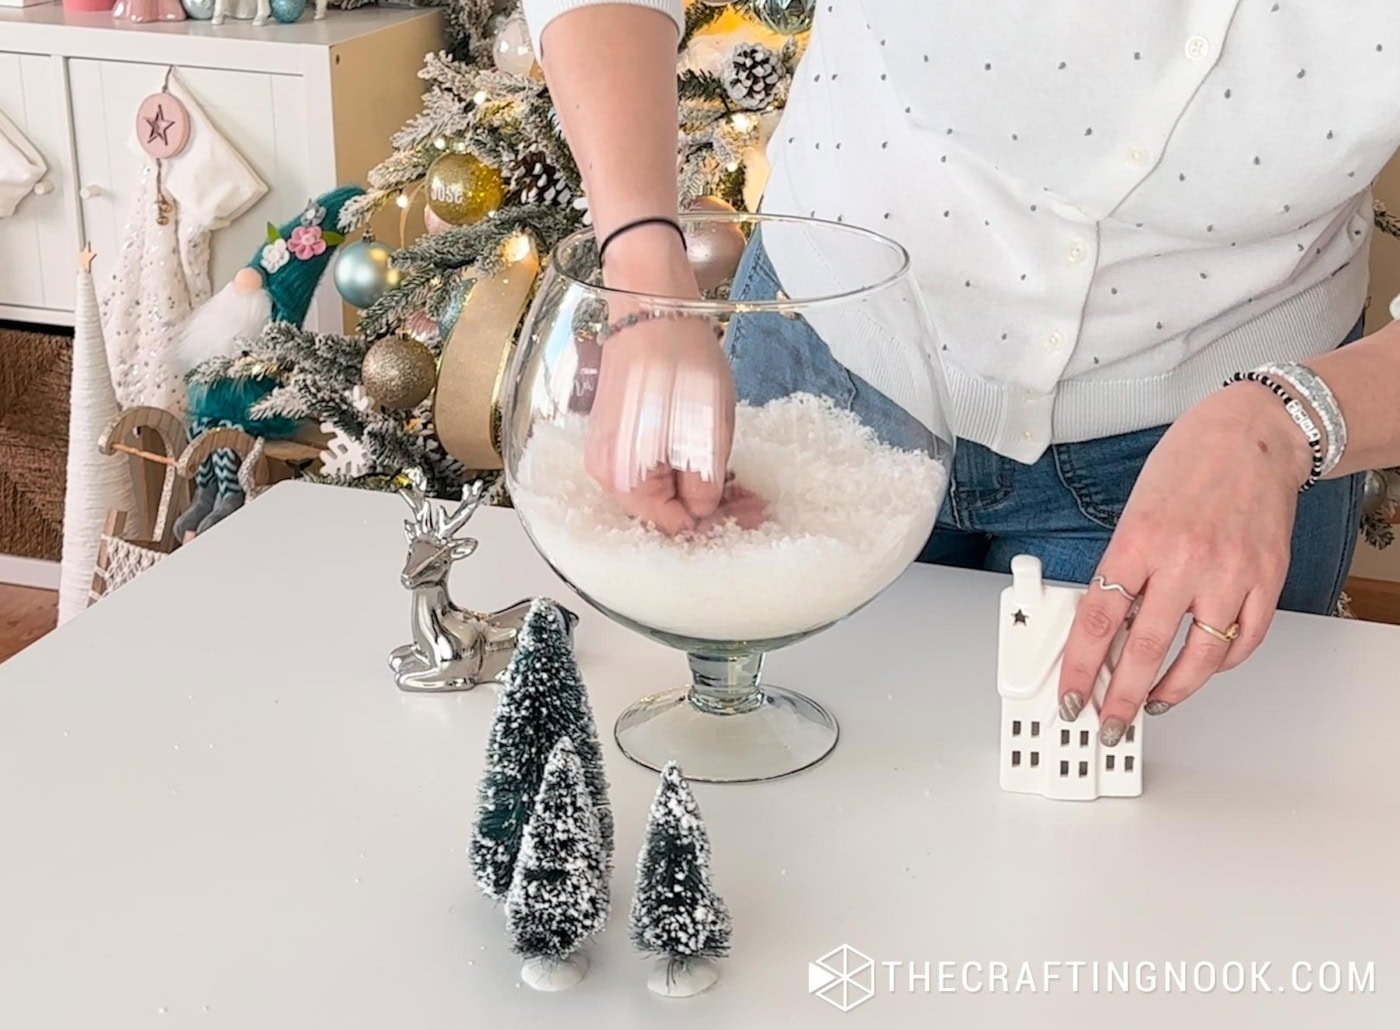
Step 3: Place your ceramic house
Nestle the house into the snow so it looks grounded and cozy. Turn on your LED tea light or fairy lights first (if they have it) so it glows through the windows.
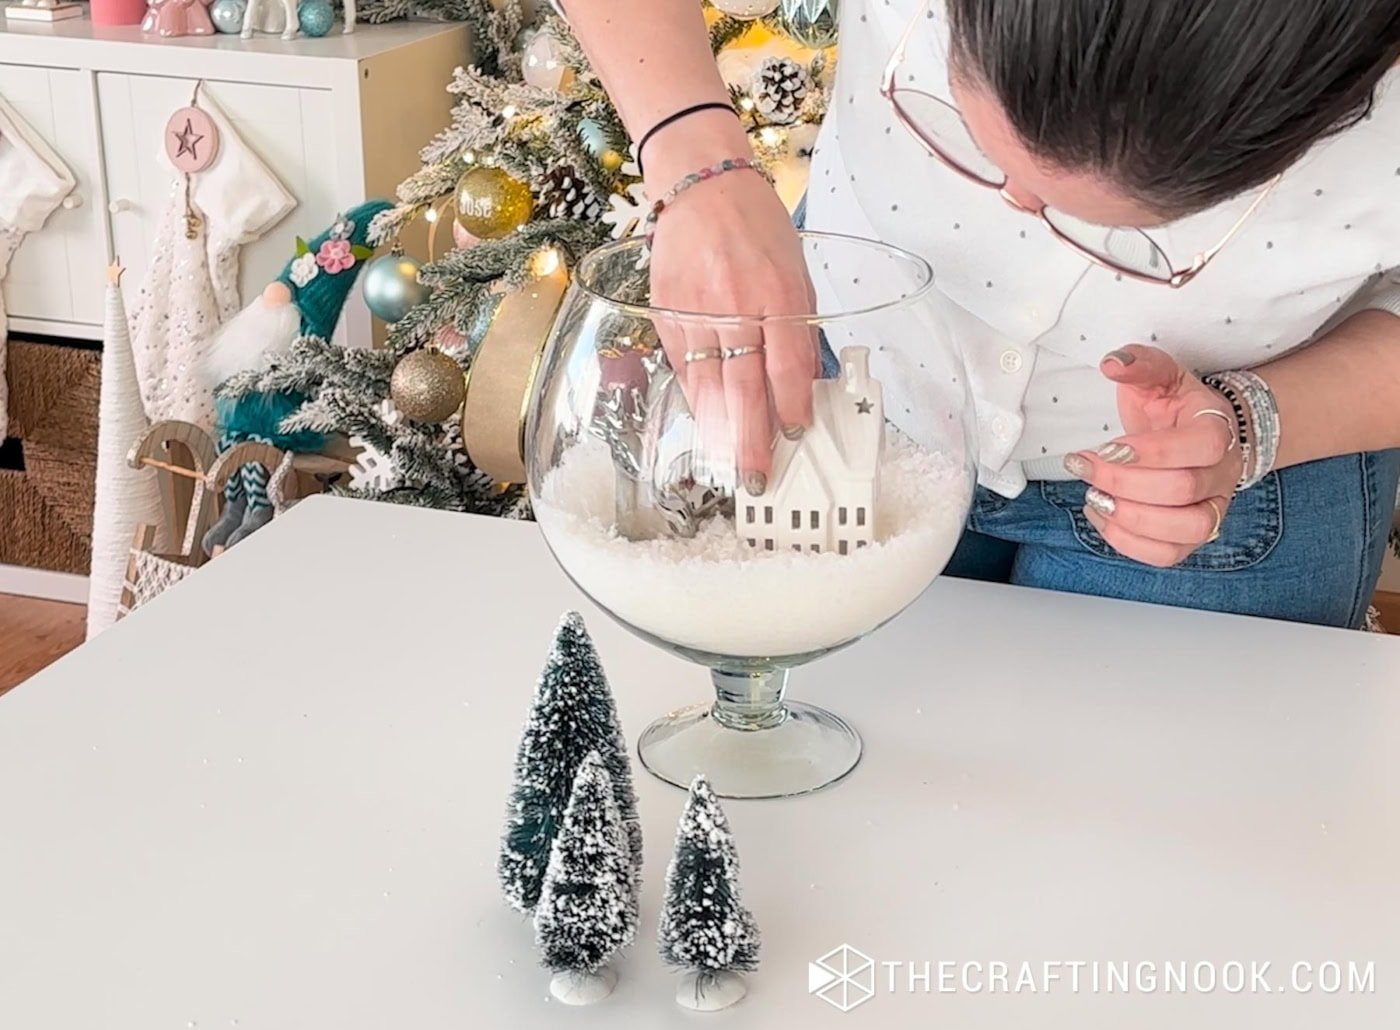
Step 4: Add Cute trees
Arrange your snowy trees behind and slightly around the house. Play with height and spacing until it feels balanced.
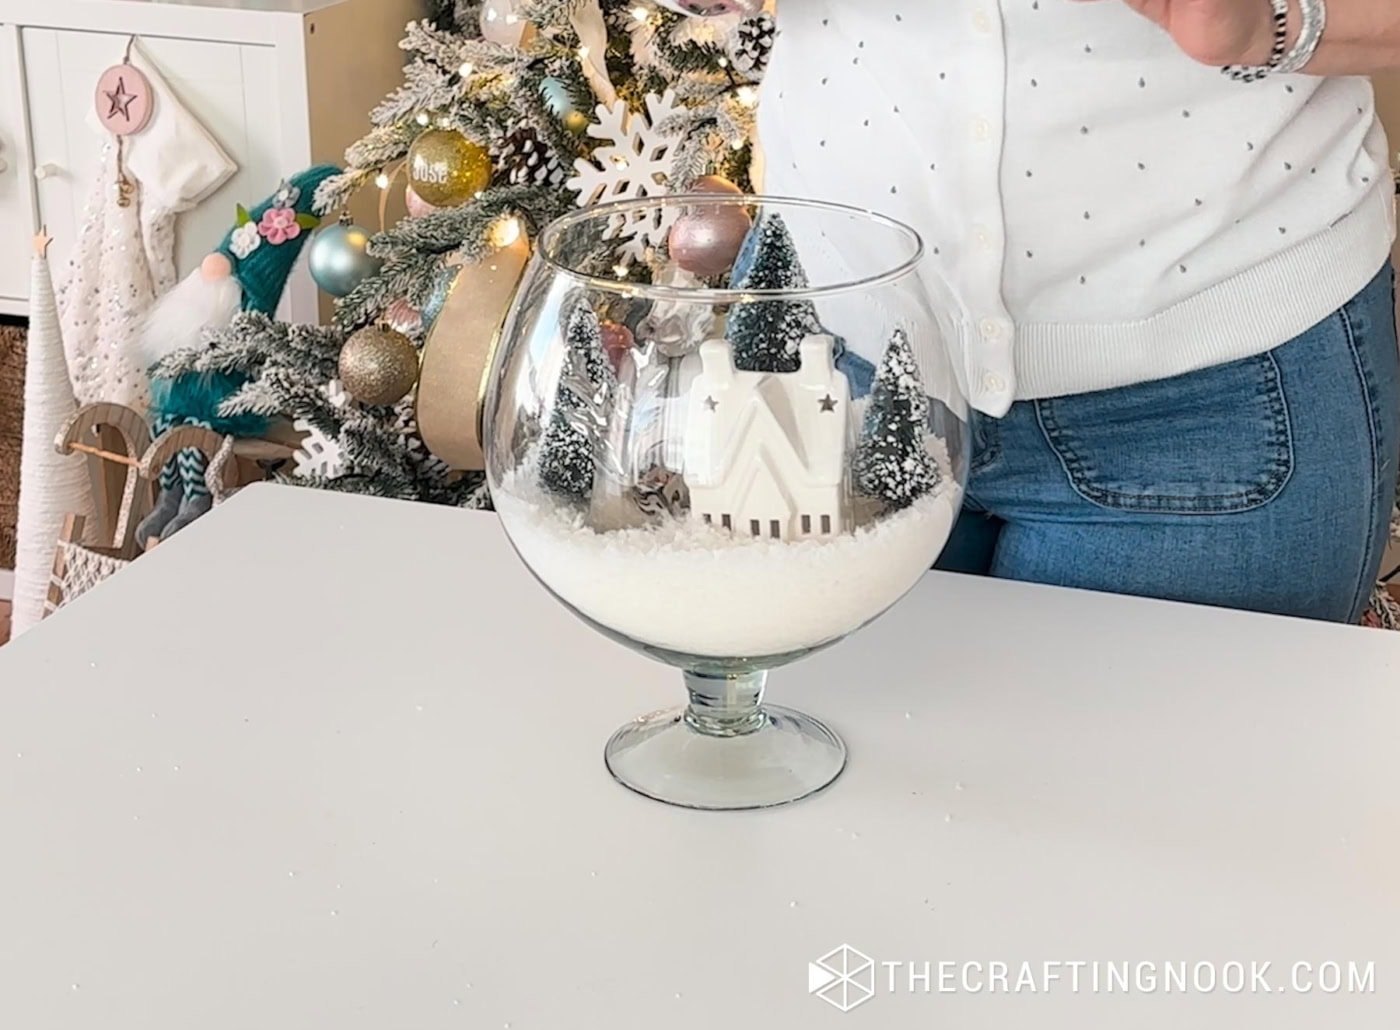
Step 5: Add the decorative deer
Place your metallic or glitter reindeer at the side of the house. This little touch adds texture and brightness and just completes the village feel.
Step 6: Add lights (optional! but magical!)
Tuck fairy lights around the house and trees. The glow bouncing inside the glass makes everything come alive at night.

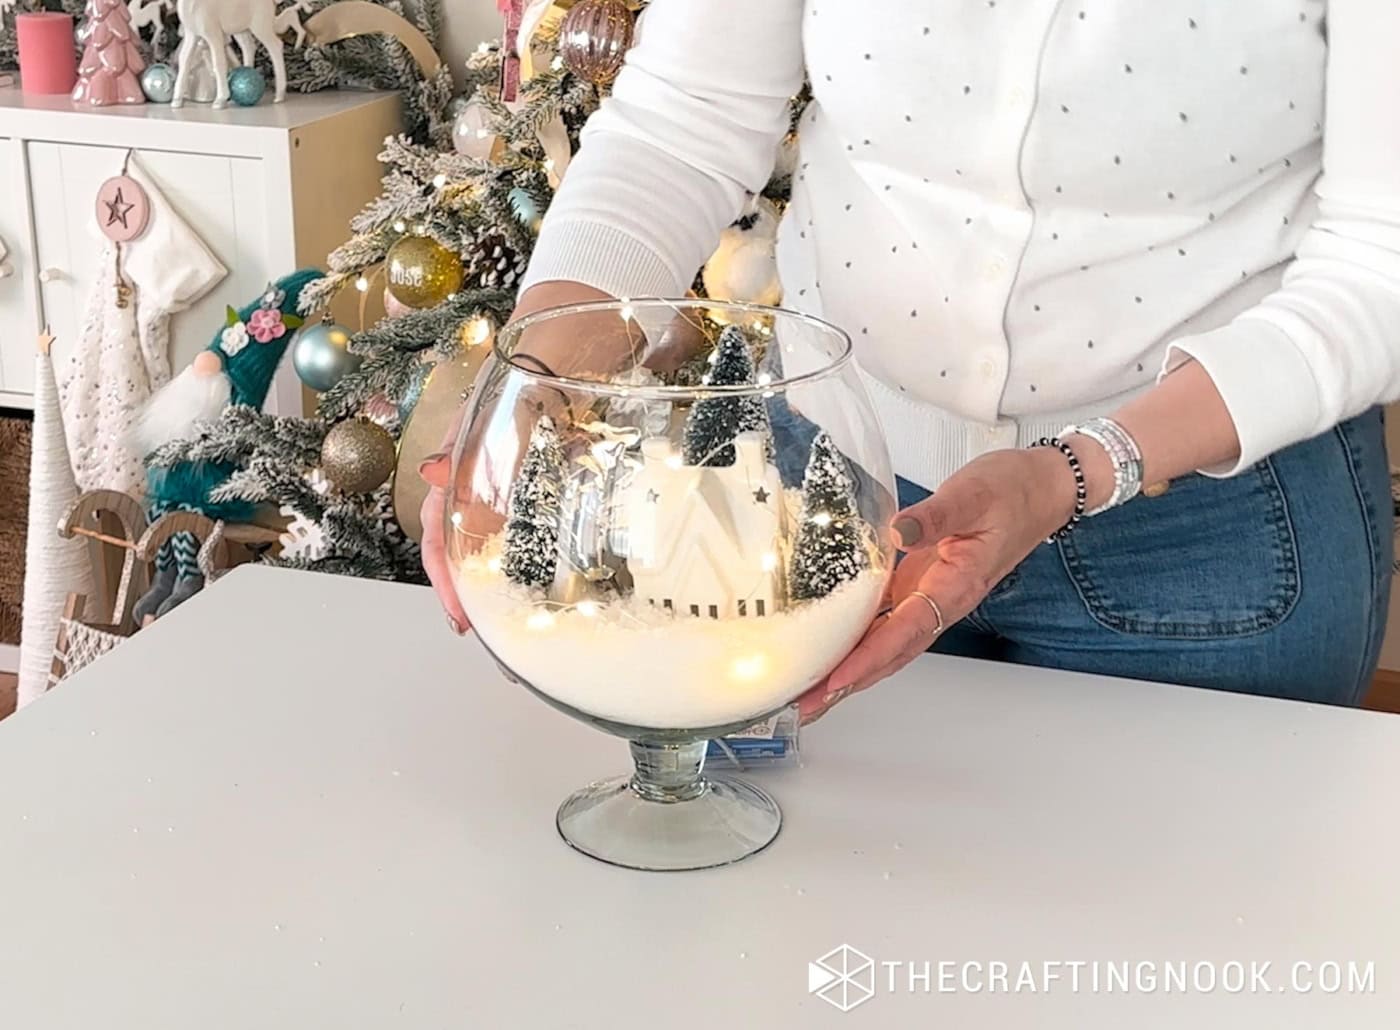
Put it in your preferred place and voila!
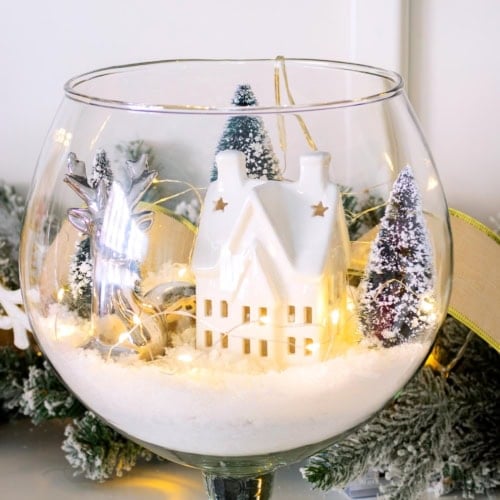
Idea 2: Winter Scene in a Jar (Cylinder Vase)
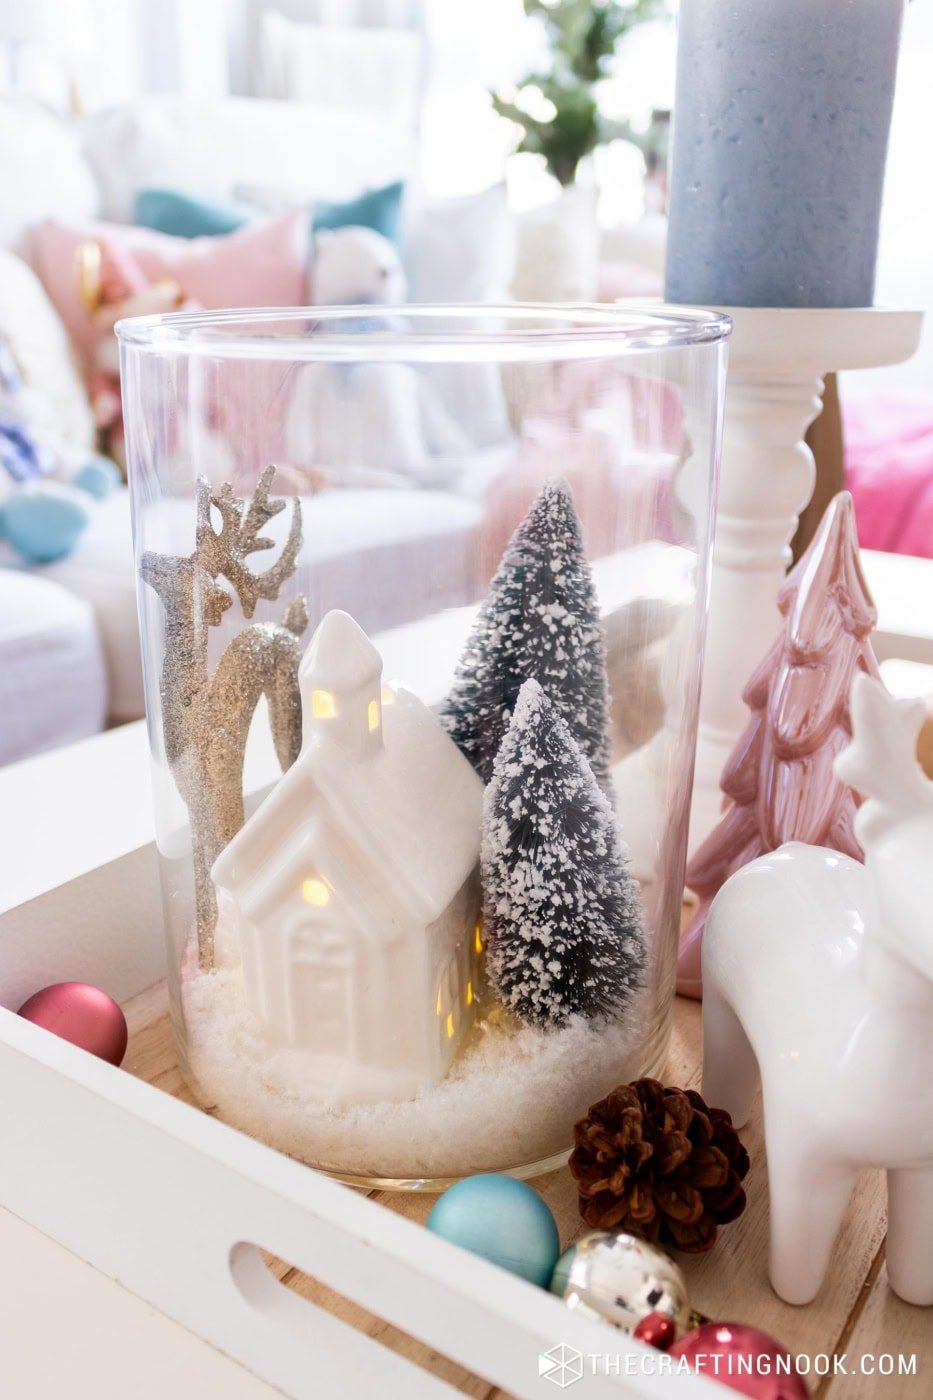
If you want something a bit more compact, this winter scene jar is perfect. It’s easy, elegant, and fits anywhere — trays, shelves, small tables, even your desk.
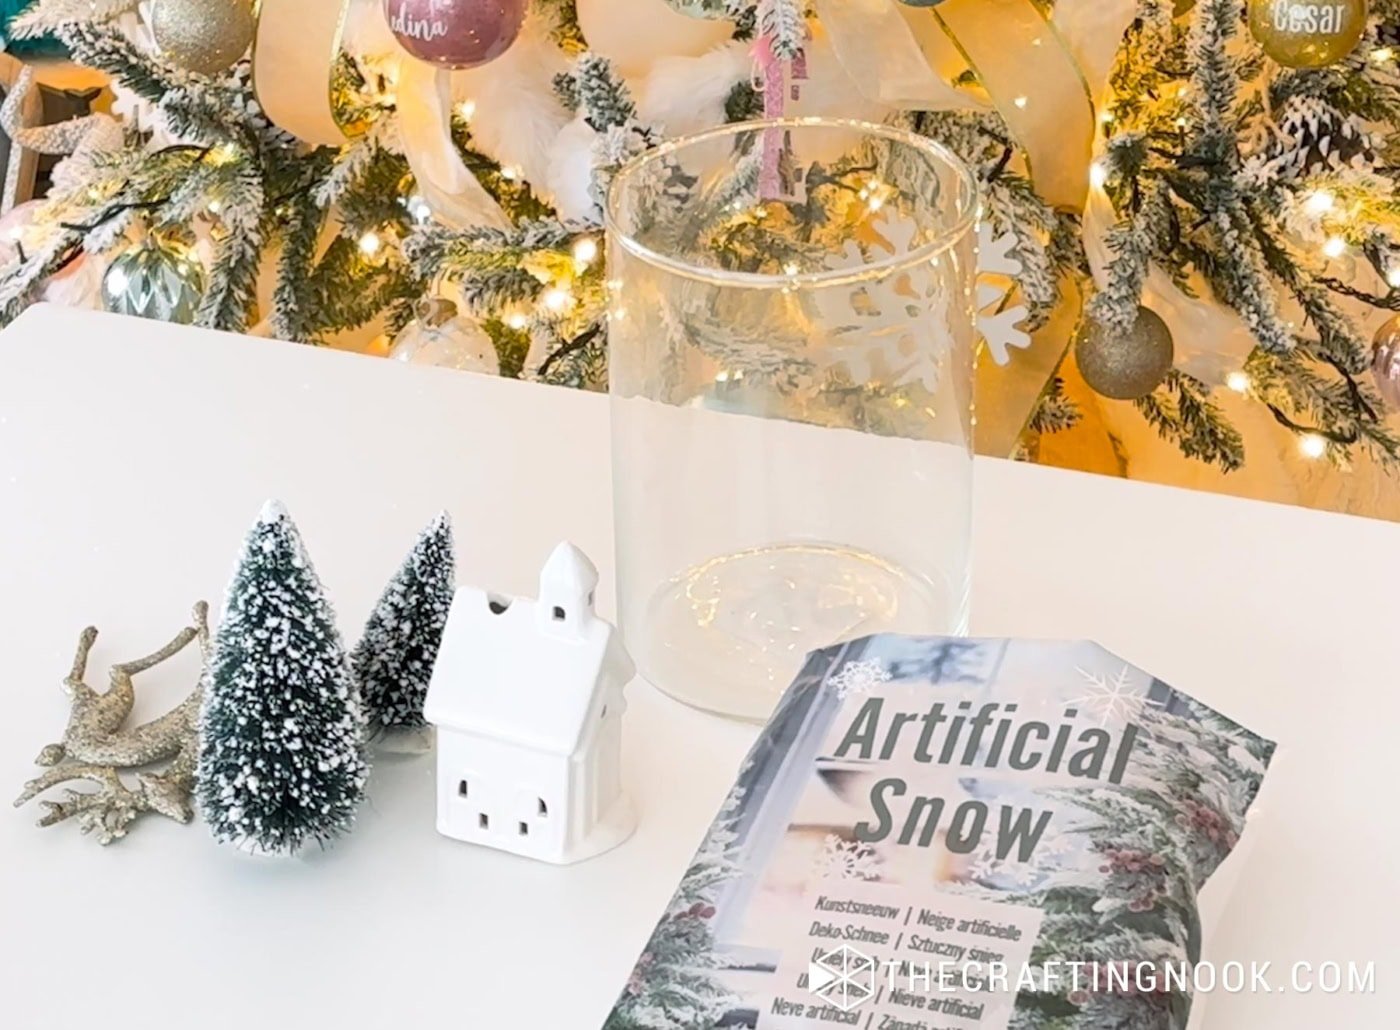
Supplies:
- Tall glass cylinder vase or large jar
- Ceramic house, preferably with LED tea lights inside (or any small winter house)
- Bottle-Brush trees (or any type of trees that fit your theme)
- Small deer figurine
- Artificial snow
Instructions:
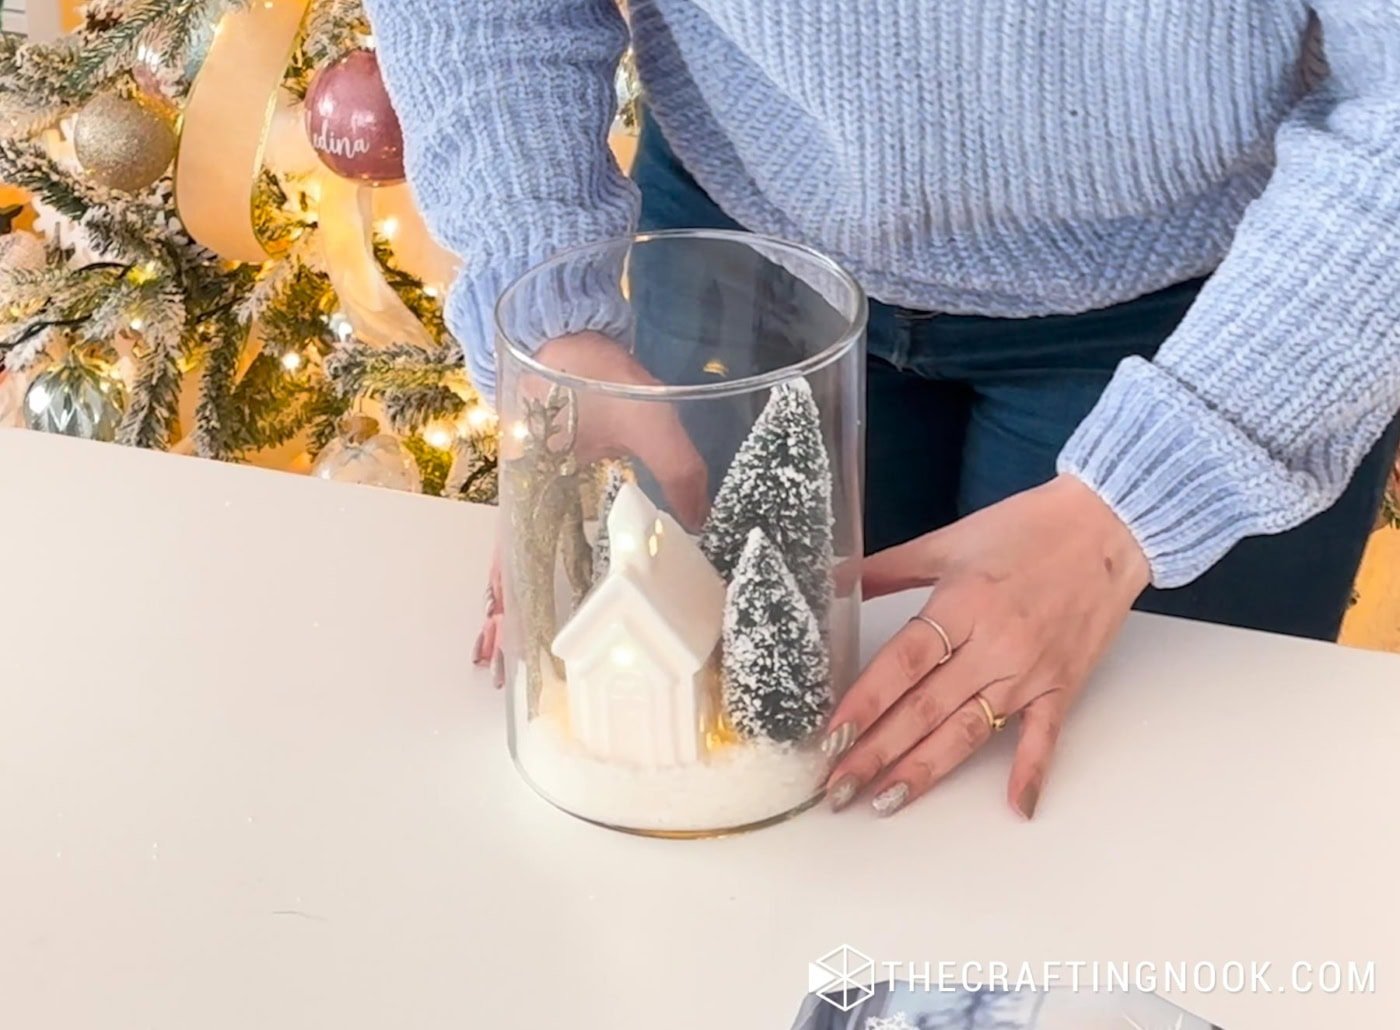
Step 1: Set up your jar and materials
Lay out your pieces so you can see your “mini village” before building.
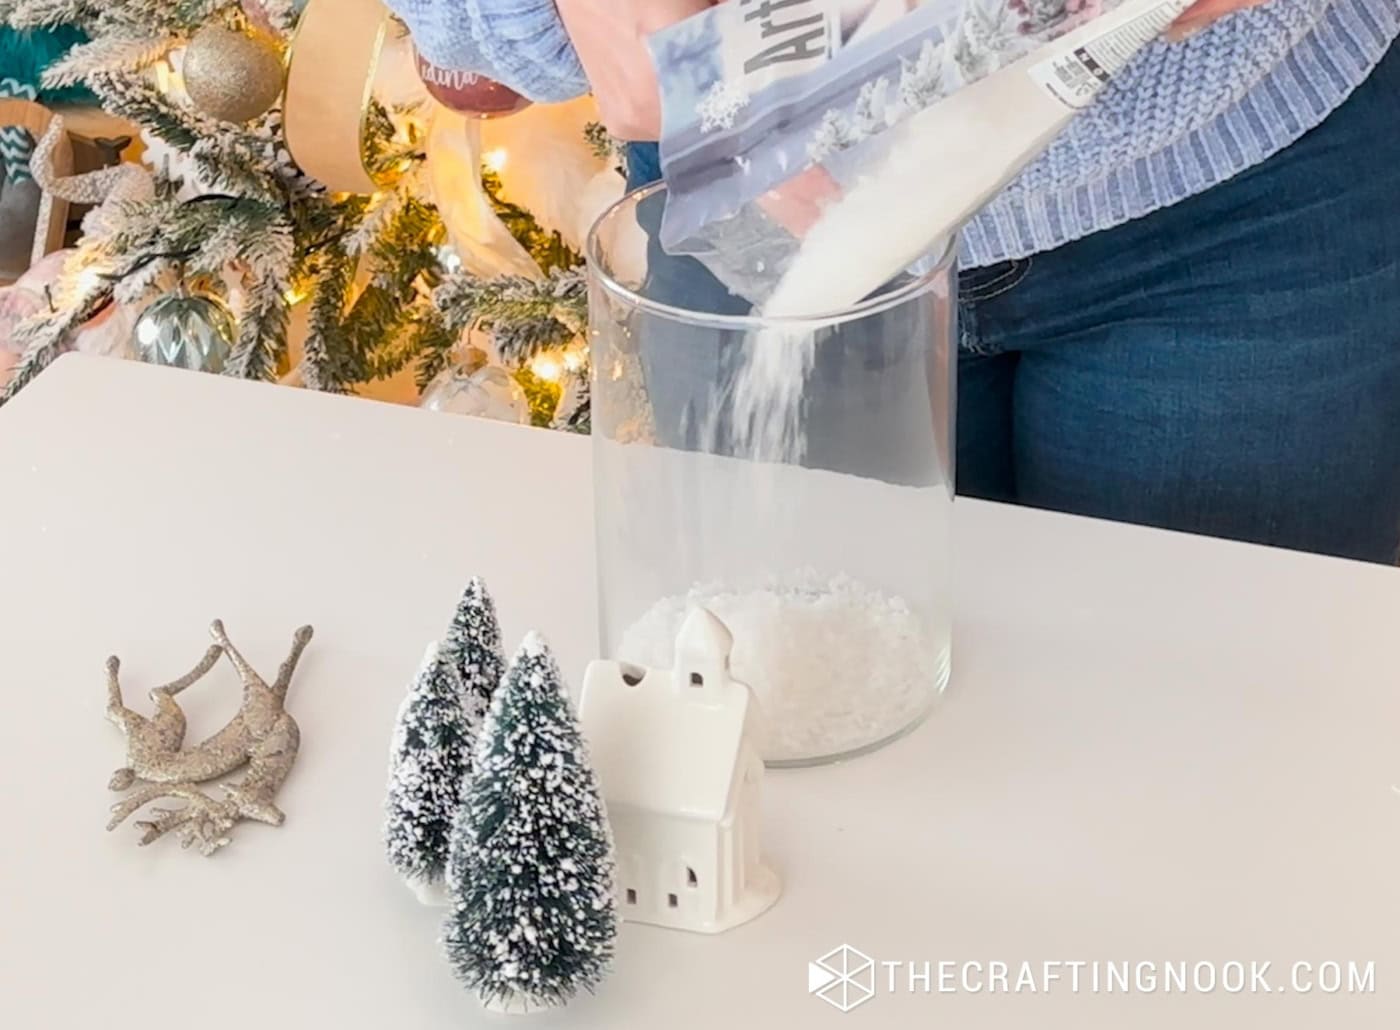
Step 2: Add your artificial snow
Pour about 1–2 inches of snow into the jar. Enough to bury the bases of the trees and house.
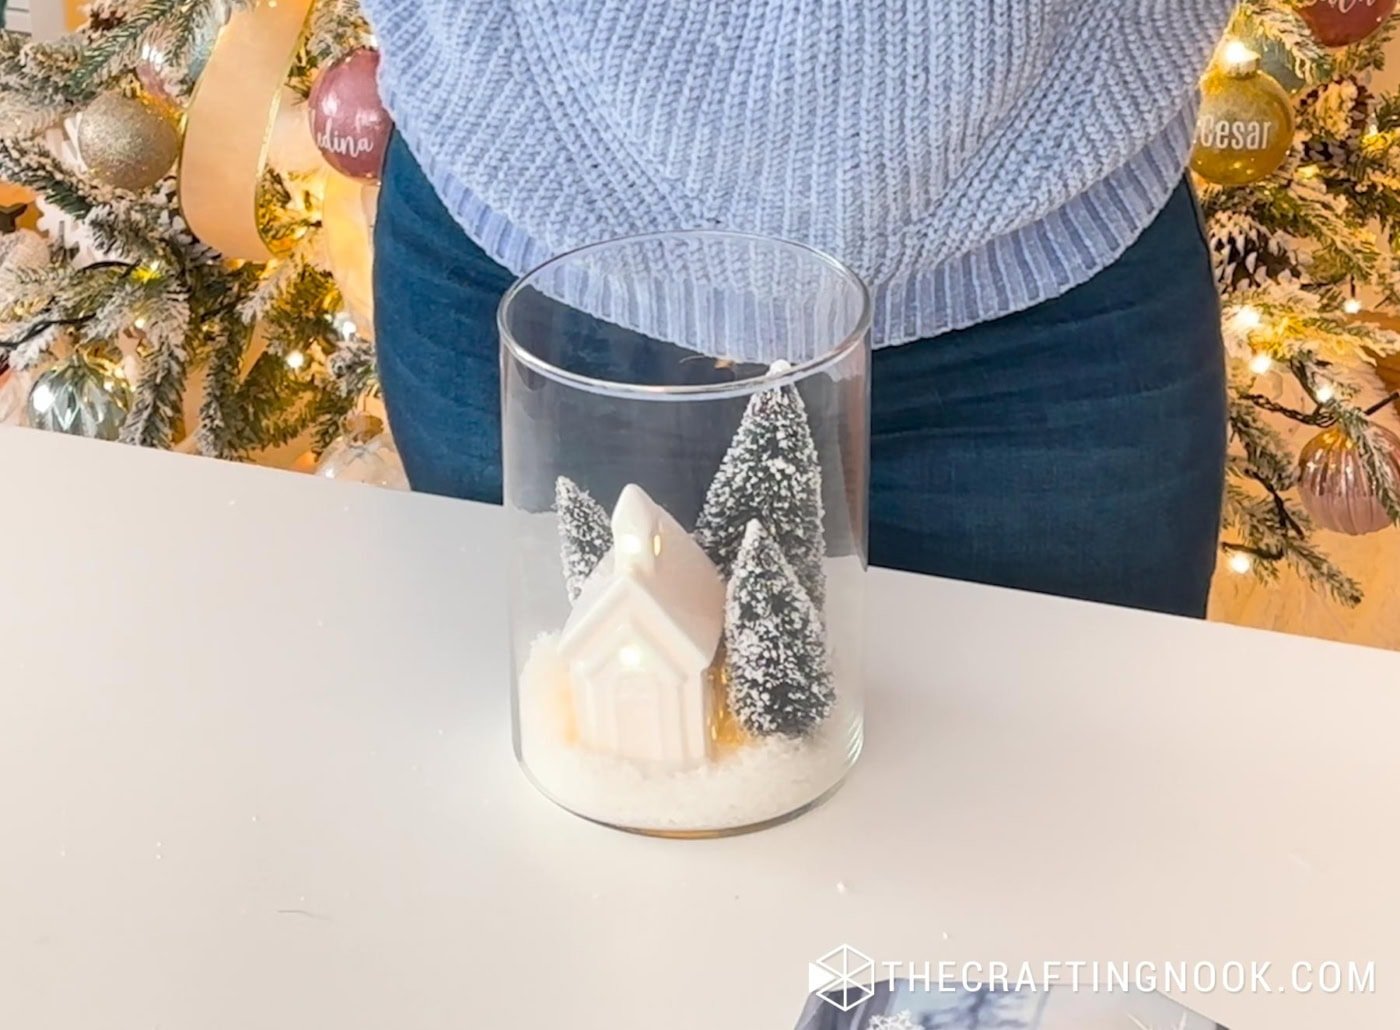
Step 3: Add the Cute house and trees
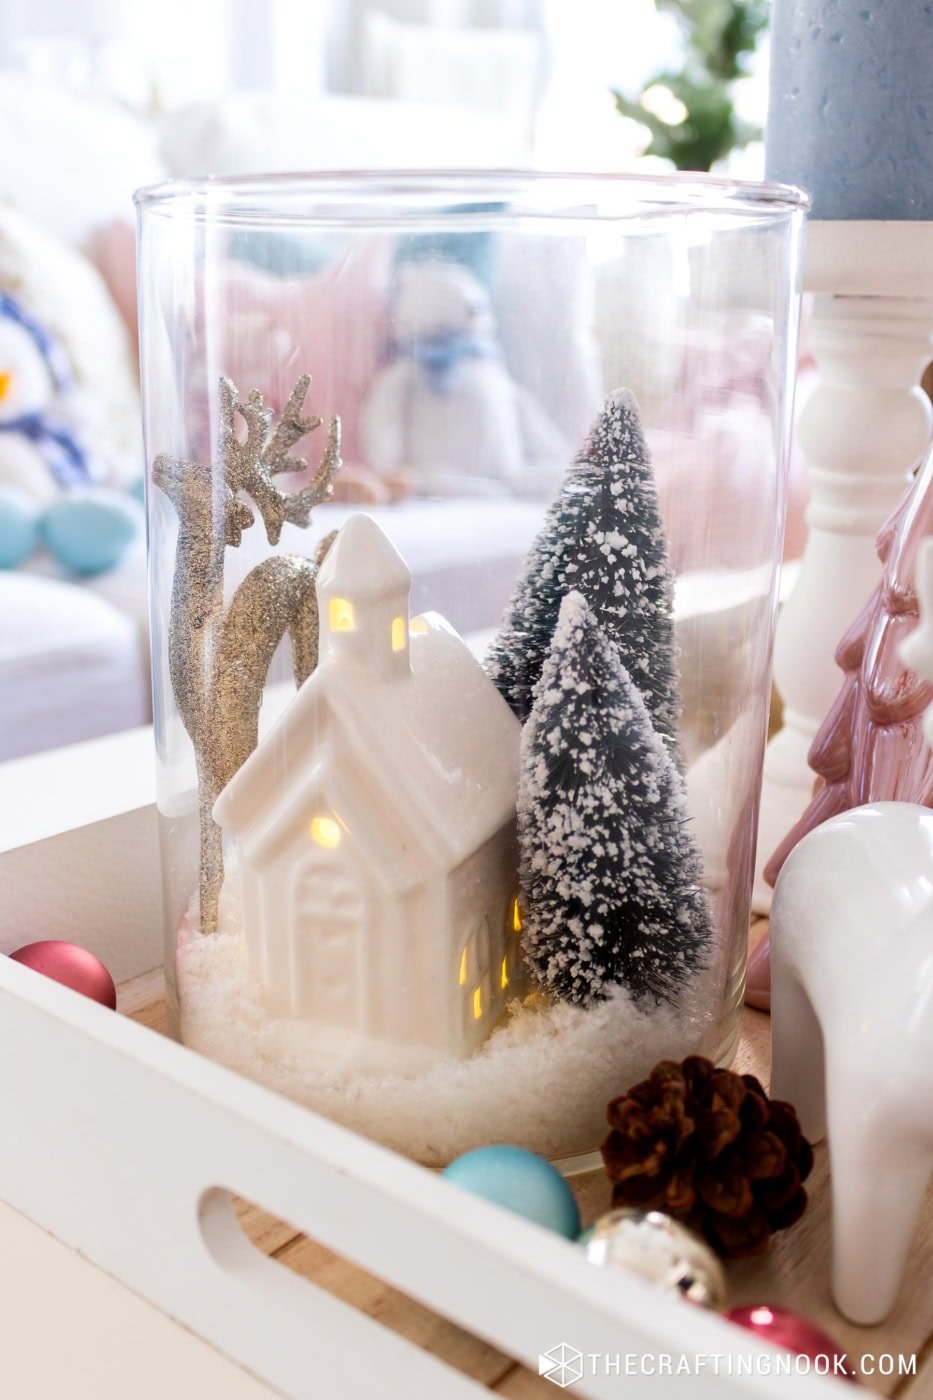
Place the house slightly toward the front or center. Turn on your LED tea light so that warm glow shows through the windows. Also, add the taller trees behind the house and smaller ones in front or to the side. Layering creates depth, which looks beautiful through the glass.
Step 5: Add your deer
This instantly gives it that magical winter village look. Position it facing the house or nestled between the trees.
Step 6: Final Touches
Sprinkle a little extra snow if needed, and tuck any lights around the base so they don’t show through the glass from the wrong angle.
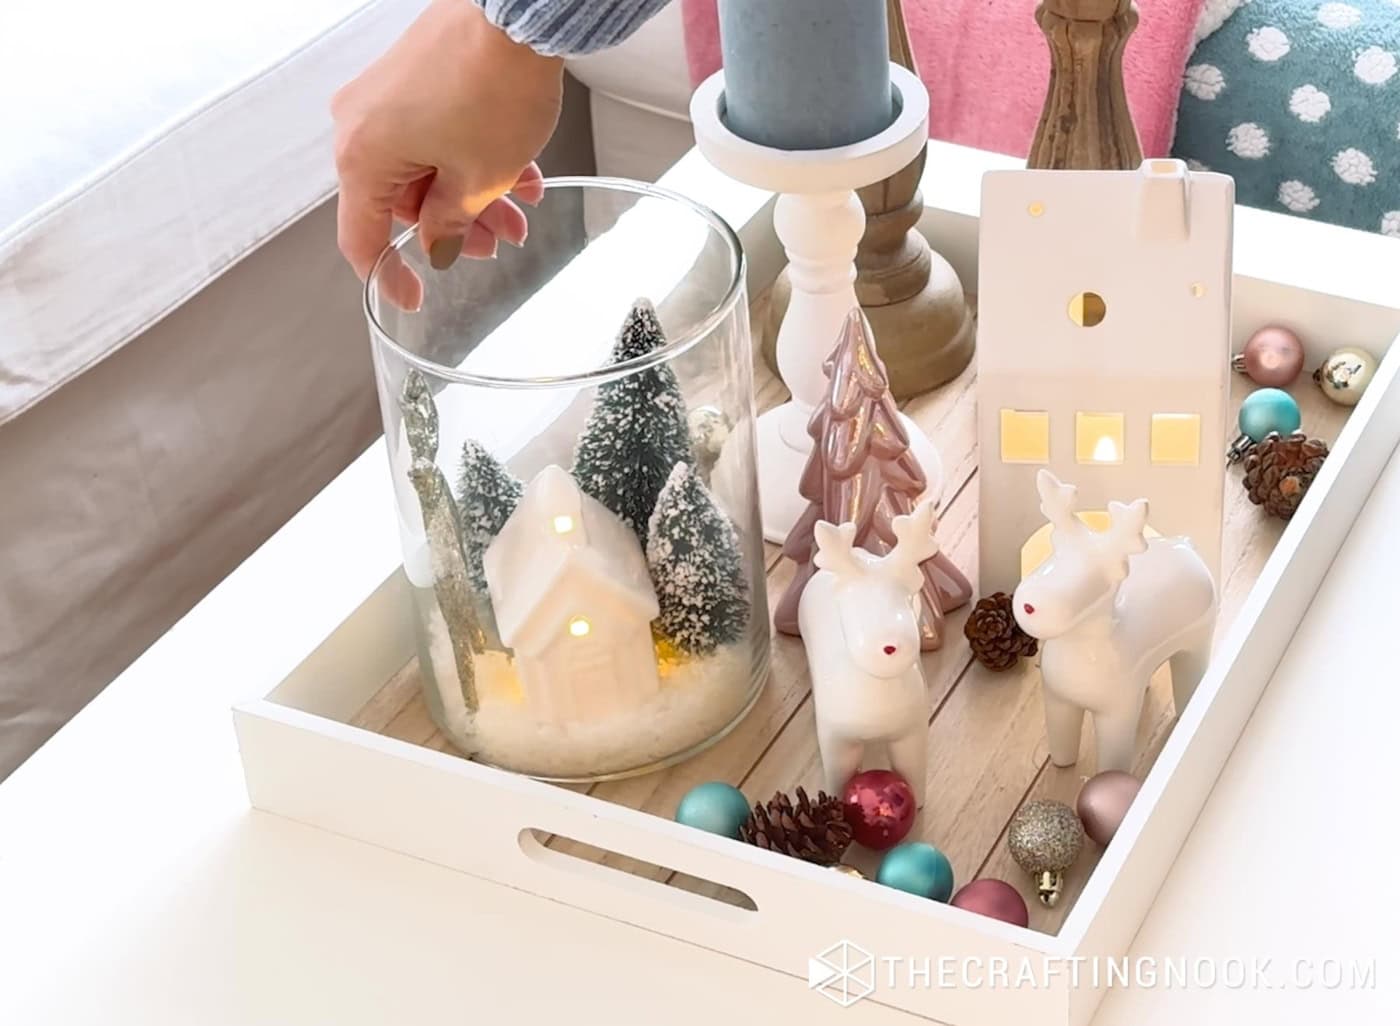
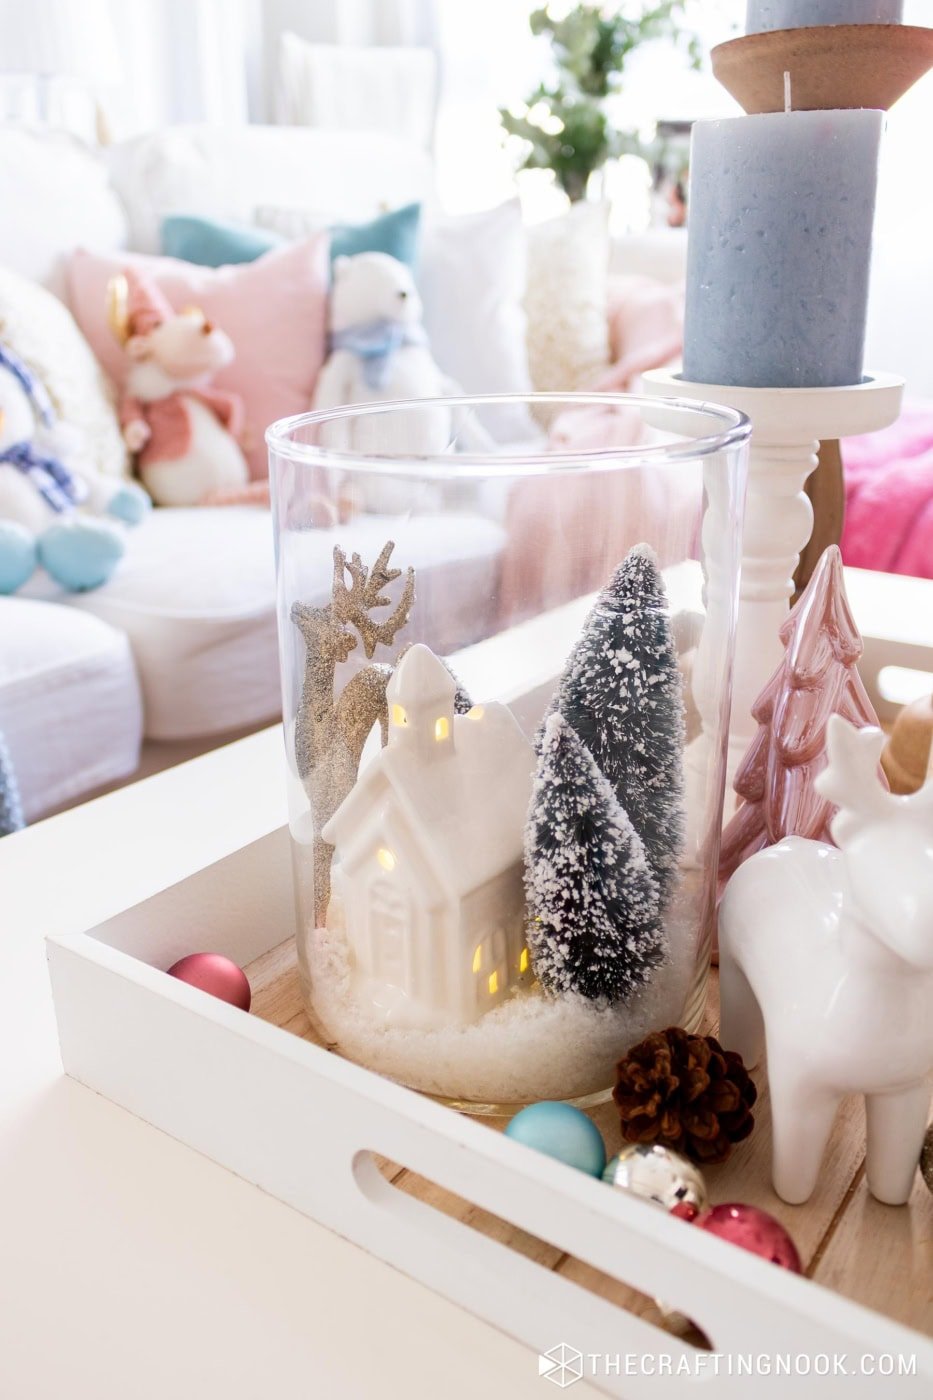
Step 7: Place it on a tray or shelf
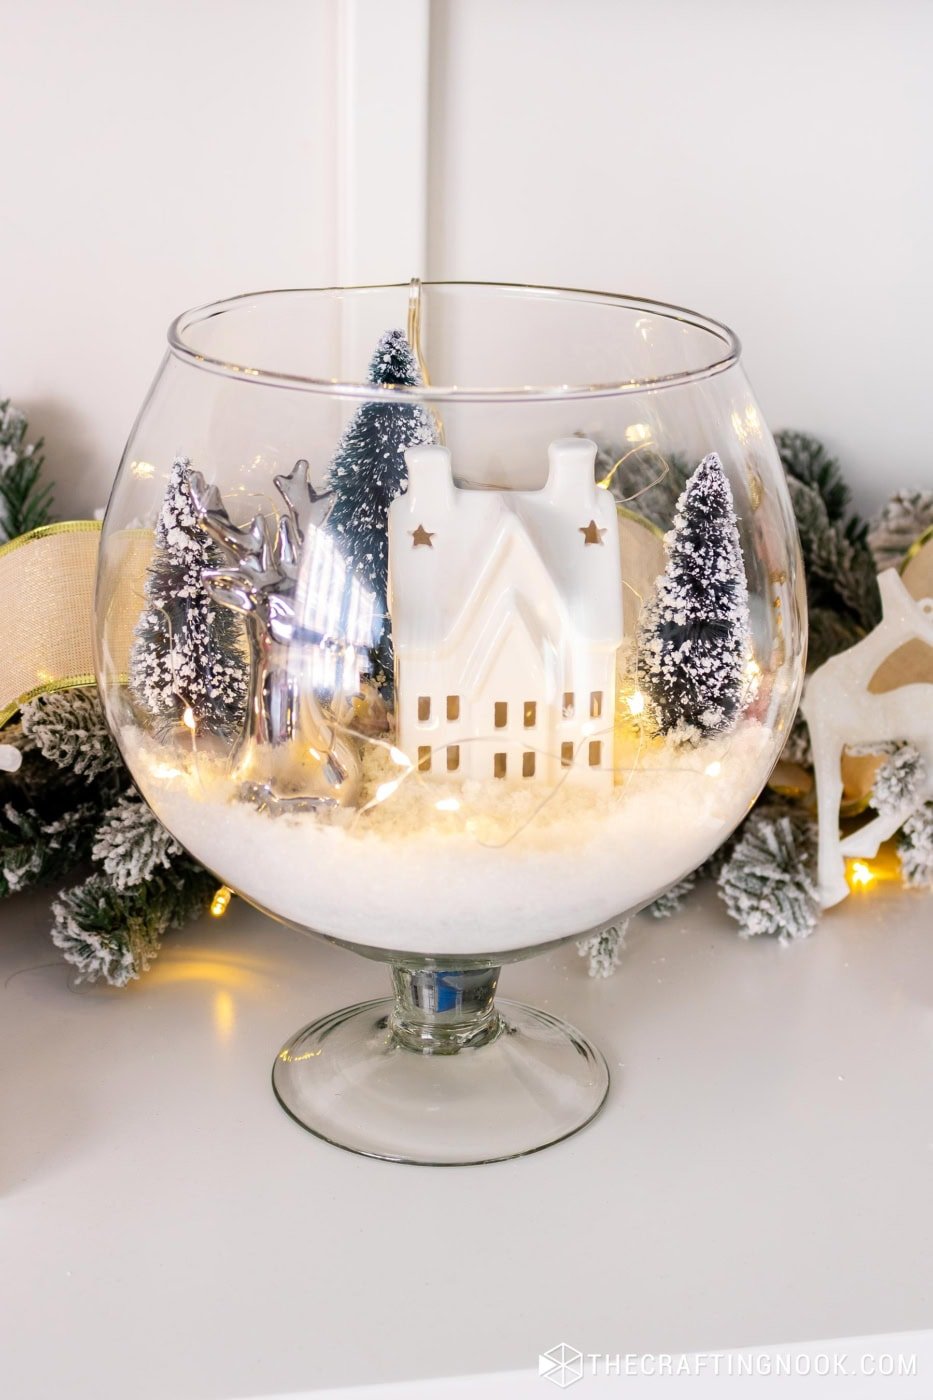
Now your snowy scene jar is ready to rock! It looks adorable in a vignette with candles, mini ornaments, or pinecones.
I put it on my vignette on my coffee table!
And this is how it turned out! Such a simple and easy project and look how cute it is!
These little winter villages might be simple, but they bring so much magic to your holiday decor. Whether you make the glass bowl version, the snowy scene jar, the tray one, or all of them (trust me, it’s hard to stop at one!), they’re such a sweet way to add that cozy, glowing winter magic to any corner of your home.

Let me know which version you try first — I love seeing your creations!
Tips & Variations
- Use different containers: Trifle bowls, hurricane vases, apothecary jars… anything clear works.
- Swap the house: Tealight churches, wood houses, paper houses, ceramic cottages — totally interchangeable.
- Add mini ornaments: Small baubles around the base look adorable.
- Try flocked trees only: For an even more wintery feel.
- Make it kid-friendly: Skip glass and use plastic jars or acrylic containers.
FAQs
The fine, fluffy kind looks most realistic, but chunky snow works too if you like more texture. And even salt will do the trick.
Nope — only LED tea lights or fairy lights. Real flames and artificial snow don’t mix.
Craft stores, dollar stores, IKEA, Amazon… pretty much everywhere once the holiday season hits. And you can also make your own cute paper houses.
Absolutely — just pour it into a zip bag when packing up.
More Christmas Projects to Try
Loving this Winter Scene in a Jar tutorial? You might also love these other gorgeous Christmas project ideas too:


✂️ Tutorial
DIY Winter Scene in a Jar. 2 Easy Snowy Scene Decor Ideas
Supplies
Idea 1: Winter Scene in a Vase (Glass Bowl)
- Glass bowl or wide vase
- Ceramic house or any small winter house
- Bottle-Brush trees or any type of trees that fit your theme
- Glittery deer or small figurines
- Artificial snow
- LED tea lights or micro fairy lights
Idea 2: Winter Scene in a Jar (Cylinder Vase)
- Tall glass cylinder vase or large jar
- Ceramic house preferably with LED tea lights inside (or any small winter house)
- Bottle-brush trees or any type of trees that fit your theme
- Small deer figurine
- Artificial snow
Instructions
Idea 1: Winter Scene in a Vase (Glass Bowl)
Step 1: Prepare your bowl
- Set your glass bowl on a flat surface so it’s easy to build your little winter village. Make sure it’s clean and shiny!
Step 2: Add artificial snow
- Pour a generous layer of artificial snow into the bottom of the bowl. Enough so the house and trees “sit into it” rather than on top of it.
Step 3: Place your ceramic house
- Nestle the house into the snow so it looks grounded and cozy. Turn on your LED tea light or fairy lights first (if they have it) so it glows through the windows.
Step 4: Add Cute trees
- Arrange your snowy trees behind and slightly around the house. Play with height and spacing until it feels balanced.
Step 5: Add the decorative deer
- Place your metallic or glitter reindeer at the side of the house. This little touch adds texture and brightness and just completes the village feel.
Step 6: Add lights (optional! but magical!)
- Tuck fairy lights around the house and trees. The glow bouncing inside the glass makes everything come alive at night.
- Put it in your preferred place and voila!
Idea 2: Winter Scene in a Jar (Cylinder Vase)
Step 1: Set up your jar and materials
- Lay out your pieces so you can see your “mini village” before building.
- Tall cylinder jar filled with artificial snow, ceramic house, and bottle brush trees.
Step 2: Add your artificial snow
- Pour about 1–2 inches of snow into the jar. Enough to bury the bases of the trees and house.
Step 3: Add the Cute house and trees
- Place the house slightly toward the front or center. Turn on your LED tea light so that warm glow shows through the windows. Also, add the taller trees behind the house and smaller ones in front or to the side. Layering creates depth, which looks beautiful through the glass.
Step 5: Add your deer
- This instantly gives it that magical winter village look. Position it facing the house or nestled between the trees.
Step 6: Final Touches
- Sprinkle a little extra snow if needed, and tuck any lights around the base so they don’t show through the glass from the wrong angle.
Step 7: Place it on a tray or shelf
- Now your snowy scene jar is ready to rock! It looks adorable in a vignette with candles, mini ornaments, or pinecones.
- I put it on my vignette on my coffee table!
Share and PIN ME!!!
Til’ next time…


FREE WORKBOOK
Keeping your Sweet Home Organized
Learn how to create intentional habits and simple routines to Keep Your Home Organized. Plus freebies, printables, exclusive content, and tips.
Disclaimer: By clicking on the “Yes” button above you are giving me your consent to collect and use your information according to the law and My Policy Privacy. Zero Spam I promise!