Fall DIY Beaded Bracelets Tutorial
This post may contain affiliate links. Please read our Disclosure Policy.
Get crafty this fall with our easy beaded bracelets diy tutorial! Learn how to create stunning bracelets using elastic thread and a high-heel pendant. Perfect for adding a touch of style to your Fall outfits. Let’s get beading!
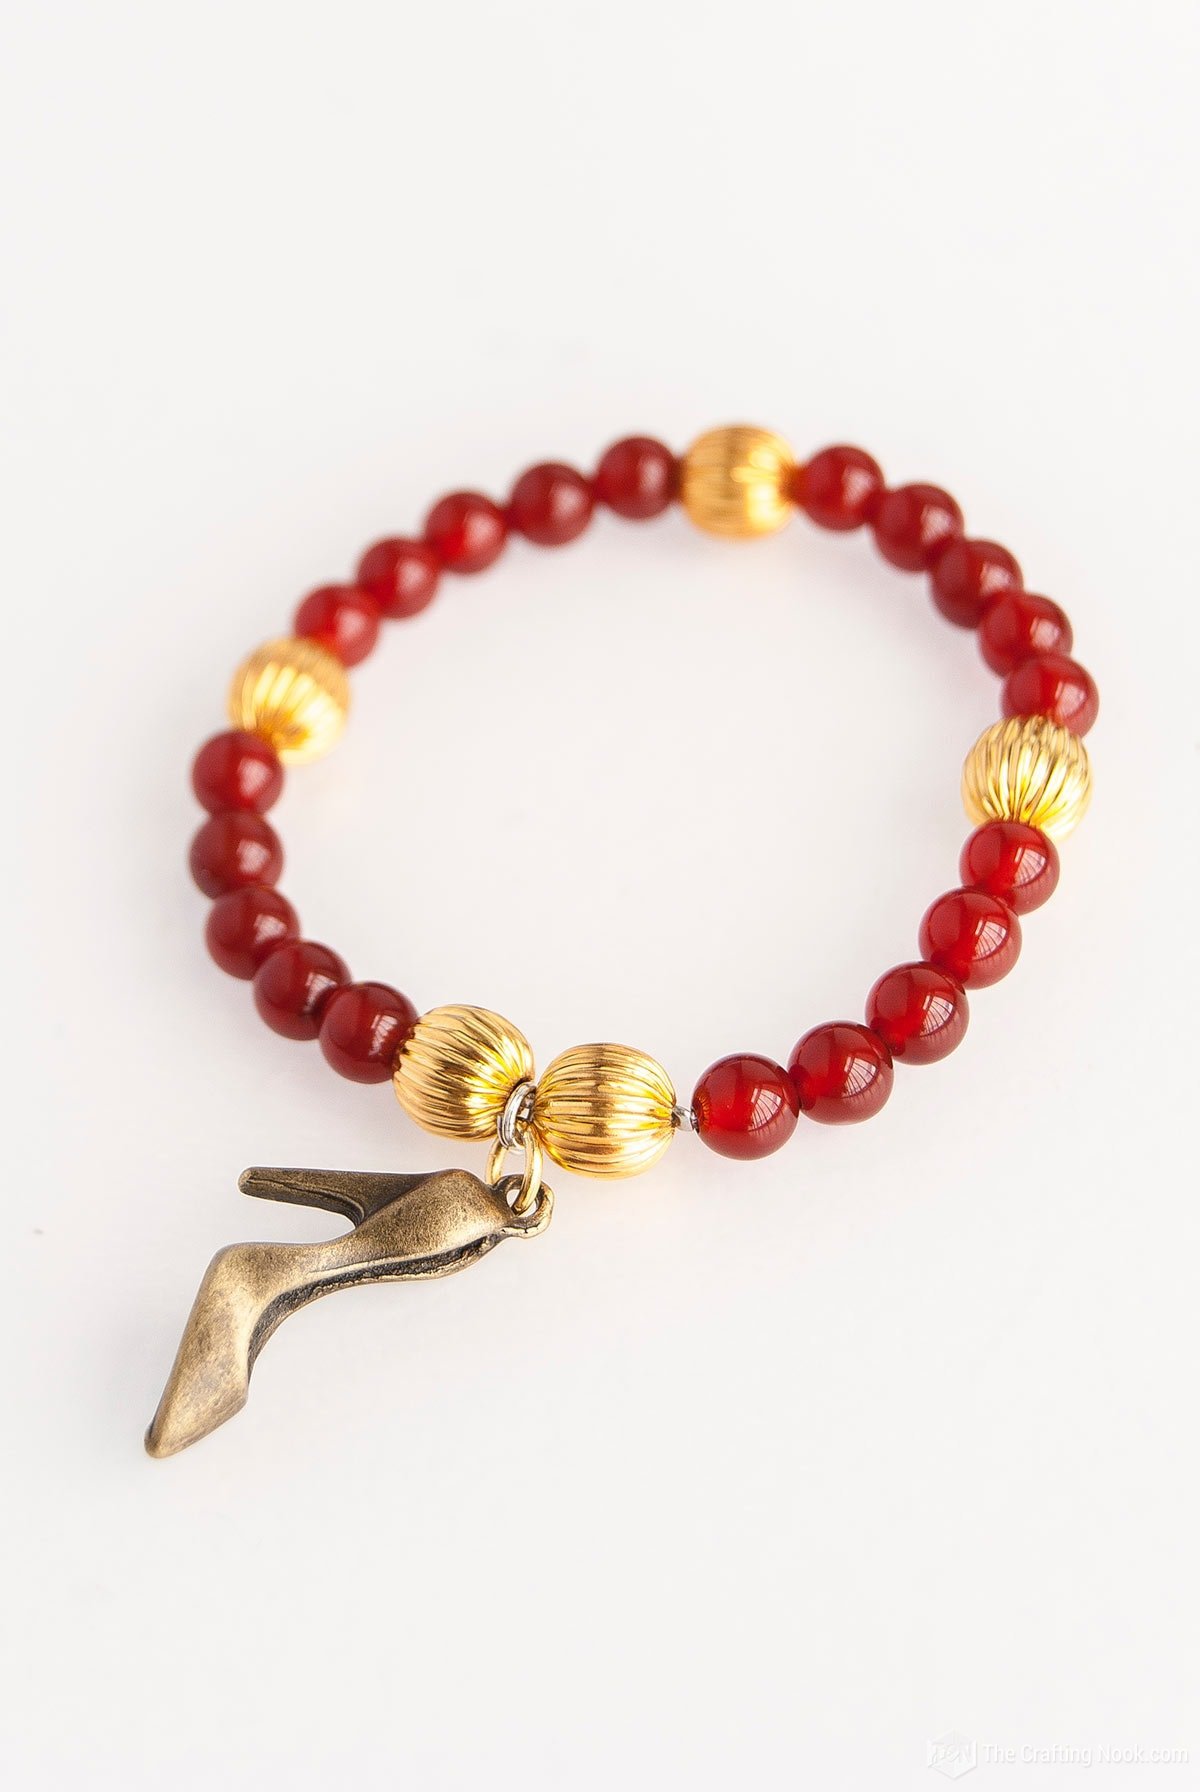
I can’t stop wearing this bead bracelet. I just love fall colors, don’t you? These fall beaded bracelets diy is the perfect touch to any outfit!

Table of Contents
Fall Beaded Bracelets DIY Tutorial
I can’t get enough of fall colors and sadly I don’t get to see it and live it often since where we live we don’t have 4 seasons. The few times I had the opportunity, I so enjoyed it!!!
That’s why I try to get in the mood and made this cute fall-inspired stretchy beaded bracelet with a pretty high heel pendant… there is nothing more girly than high heels, is there?
This is what I call 15-minute crafts!!! Super easy and fun to make I thought you might enjoy it and inspire you to make some too!
I remember when I was a kid I used to love making lots of these beaded DIY bracelets. I used them to make a big noisy stack of bracelets on my arms LOL.
Now I don’t use them all at once but I do love having crafty and pretty bracelets to wear depending on what outfit I’m wearing. This one was really cute, easy and fun to make!

Why making handmade Jewelry is so good
Making things has always been a fun way for people who want to be creative to take a break. Making something special out of regular items is truly magical.
I really love handmade jewelry. It’s not only about what we make but also the process of making it and the stories we add to each piece.
Making your own diy jewelry can be fun and bring happiness. Picking each bead carefully and threading every thread with great care.
This is a chance to add your own style to the design and make it one-of-a-kind. When you put on these bracelets, you will feel happy because you made them yourself and they look like fall.
How to make beaded bracelets
Hope yu get inspired and enjoy this jewelry-making tutorial! Let’s begin.
Supplies:
- Fall color beads {I used maple 5mm about 20 units}
- Gold beads {8mm 5 units}
- Jump rings
- High heels pendant {you can use any you like}
- Elastic cord
- 2 Crimp beads
Tools:
- Flat needle nose pliers
- Bent flat nose pliers
- Crimping pliers
- Scissors
- Optionally, beading needle

Step-by-Step Instructions:
Before we begin, be sure to follow us on Pinterest, Facebook, Instagram, and YouTube, and also sign up for our email list (at the end of this post), so you’ll never miss a post!
- I didn’t actually cut the elastic cord as the length of cord may vary depending on the beads you use. I just got the end of it and start inserting the beads. I do it like that so I don’t have much waste.
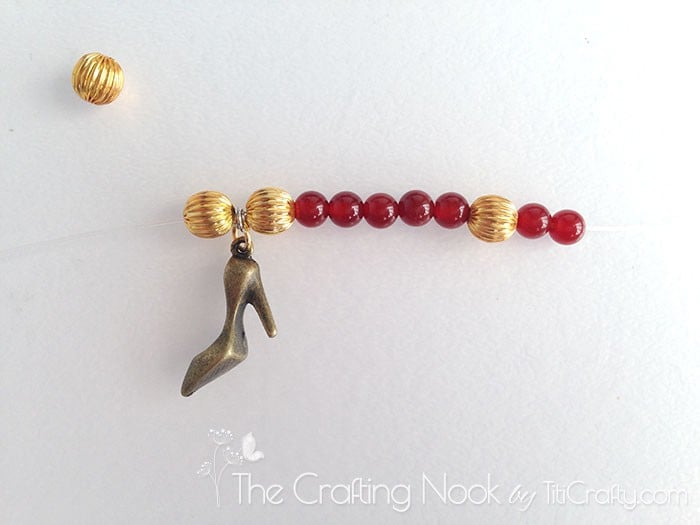
- So, I started with 2 gold beads and the pendant in the middle. For the pendant, I used 2 really small jump rings.
- Using your flat nose pliers and your bent flat nose pliers open the jump rings and insert the pendant. Close back your jump ring.
- When you use 2 jump rings it’s more difficult for the pendant to fall through the ring opening; or that the jump rings slip from the thread. Sadly and I apologize for that, I couldn’t find that kind of small jump ring in gold. That would be the best color.

- Then I started inserting 5 maple beads and then one Gold and so on. For my wrist, it worked perfectly with the 20 maple beads and 5 gold ones.
- Then I calculated how much thread I would need to close the DIY bracelet and cut it.
- Insert the crimp beads, one on each end.

- Make a double knot with both ends and insert each end back into the crimp bead. Another way to close it is using a surgeon’s knot which is very similar to a square knot, except you’ll loop the ends over twice instead of once.

- Slip a crimp cover over the knot so that the knot is inside the crimp and crimp it in place using a crimp tool or a flat nose plier.
- Do the same with the other end.
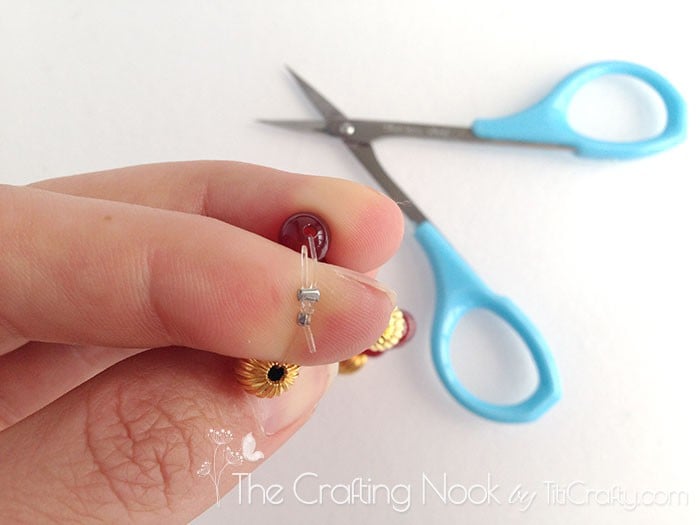
- Cut any thread left over leaving a tiny bit and insert it into the holes of the gold beads.

- Make as many as you like with different colors and combinations.
- There you go!!!! You have new pretty beaded bracelets diy.
Crafting Tips
- To keep beads in place while you work, put a piece of tape that sticks (like painter’s tape or washi tape) on your work surface with the sticky side facing up. Put the beads on the tape and make sure they are held tightly.
- Use little cups or sections to sort your beads by size or color and stay organized to save time. It helps you find certain beads easily for your bracelet and stop them from moving and disappearing.
- Use clear nail polish to protect your high-heel pendant from getting scratched or damaged. Just apply a thin layer over the surface. This easy trick will keep your pendant looking perfect for many years.
- To place small or delicate beads in the right spot, you can use a toothpick to help lift and position them. Using this technique helps you keep a better grip on things and stops them from falling or getting misplaced.

There are infinite possibilities here. If I had found some pretty fall leaves I would have used them for sure! So, if you do find it you will get an, even more, Fall-inspired bead bracelet!
Frequently Asked Questions
The simplest way is to use a flexible tape or string to measure your wrist. Make it a little longer to make space for the beads and the clasp. Remember that elastic thread can stretch, so it’s best to make it a bit longer than too short.
To keep the beads in place, make a knot at the end of the string and leave a short piece hanging. You can use clear nail polish or glue to make the knot more secure. You can use a tool like a bead stopper, a crimp, or a little tape to stop the beads from falling off while you’re working.
Yes, using different sizes and shapes of beads can make your bracelet look more interesting. Remember that if bigger beads mixed with smaller beads, it might change how the bracelet fits and hangs. Try combining things in different ways until you find a balance that works well with your personal style.
You can pick beads with colors like orange, brown, yellow, or green to match your fall clothes. It will make your bracelet look seasonal.
More Handmade Jewelry To Try
If you like this crafty beaded bracelet DIY tutorial, you might also love these other handmade jewelry projects too:


Some really cool handmade jewelry pieces from my favorite bloggers:
- Leather Wrap Bracelets with Charm by Amy Latta Creations.
- DIY Studded braid bracelets by A Pumpkin and a Princes.
- T-shirt yarn bracelets by Blue Bear Wood.
✂️ TutOrial

Fall DIY Beaded Bracelets Tutorial
Tools
- Flat Nose Pliers
- Bent flat nose pliers
- Crimping pliers
- scissors
Supplies
- Fall color beads {I used maple 5mm about 20 units}
- Gold beads {8mm 5 units}
- Jump rings
- High heels pendant {you can use any you like}
- Elastic thread
- 2 Crimp beads
Instructions
- I didn’t actually cut the elastic thread. I just got the end of it and start inserting the beads. I do it like that so I don’t have much waste.
- So, I started with 2 gold beads and the pendant in the middle. For the pendant, I used 2 really small jump rings.
- Using your flat nose pliers and your bent flat nose pliers open the jump rings and insert the pendant. Close back your jump ring.
- When you use 2 jump rings it’s more difficult for the pendant to fall through the ring opening; or that the jump rings slip from the thread. Sadly and I apologize for that, I couldn’t find that kind of small jump ring in gold. That would be the best color.
- Then I started inserting 5 maple beads and then one Gold and so on. For my wrist, it worked perfectly with the 20 maple beads and 5 gold ones.
- Then I calculated how much thread I would need to close the DIY bracelet and cut it.
- Insert the crimp beads, one on each end.
- Make a double knot with both ends and insert each end back into the crimp bead.
- Push the crimp bead close to the knot and crimp it in place.
- Do the same with the other end.
- Cut any thread left over leaving a tiny bit and insert it into the holes of the gold beads.
- Make as many as you like with different colors and combinations.
- There you go!!!! You have new pretty beaded bracelets diy.
Share and PIN ME!!!

Now it’s your turn! Have you made elastic DIY bracelets before? If so, I would love to hear tips and tricks to make it better! Tell me all about your experience in the comments!
Til’ next time…


FREE WORKBOOK
Keeping your Sweet Home Organized
Learn how to create intentional habits and simple routines to Keep Your Home Organized. Plus freebies, printables, exclusive content, and tips.
Disclaimer: By clicking on the “Yes” button above you are giving me your consent to collect and use your information according to the law and My Policy Privacy. Zero Spam I promise!
Love the little high heel! These will be perfect for my goddaughters for the holidays.
Thank you so much Susan! I’m so excited that you like it… I’m sure your goddaughters will love if you make some for them!!!
XOXO
What an adorable bracelet! Love it! :) And thanks so much for your sweet comment on my Rolo Cookies! Totally made my day!
What a fun bracelet. I love the colors!
This is such a cute bracelet!
I always love the rich colors of fall season. This is a great bracelet to wear and show them off!
Thank you so much Kim!!!!
Hugs
What a cute bracelet! I can definitely see the fall inspiration there too!
Thank you girly!!! Glad you like it!
XOXO
This is such a fun piece! Thanks for the great tutorial!
Thank you Kristi! I’m so happy you liked it!
Hugs
This is so beautiful and fun! I wear heels almost every day so this would be perfect. I think this is going on my Christmas wish list. Love it!
hahaha so cool! I love high heels too!! glad you like this!
XOXO
What a cute little charm and I totally love the colors!
Thank you Lydia!!!! XOXO lots