DIY Photo Wooden Pencil Holder With Holes
This post may contain affiliate links. Please read our Disclosure Policy.
If you love photography, and you love to do do-it-yourself projects, you will love this photo wooden pencil holder. It’s a practical, thoughtful, and easy-to-make gift.
Daughter-father moments are to cherish and keep in our memories forever. I’m so thankful because technology has given us this particular gift. Back when I was a child, I could only have a few photos because not everyone had a camera and it was also expensive to develop films.

Today we can take pictures with almost everything LOL. No one moment goes without getting saved and I’m so thankful for that!
Table of Contents
Photo Wooden Block Pencil Holder
My girl was so unexpected and got us off guard, especially my hubby, so each moment between them was so precious and full of love. That inspired me to create something that he could take to the office or keep it on his desk and always remind him of how much he’s loved by that little princess!
I made this cute memory keepsake photo wooden pencil holder and I love how it turned out!!!
This is a simple craft and yet so full of love and precious moments. It seemed the perfect gift for my hubby who is a wonderful and loving father.
This can make a great Father’s Day gift, Christmas gift, or any day gift just because! Kids will love this type of diy pencil holder too.
It’s unique because no one’s moments are the same as others and also because we always add our personal touch. So, we will hardly find another one the same anywhere.

Why make a memory keepsake pencil holder?
You see… Let me give you some context so you get the intention and meaning of this special craft.
The relationship between my little girl and her daddy is like those we see in movies. She cares for him and needs him in such a way that amazes me every day.
We had to be apart from him for almost 2 years. One of the hardest times for her and of course for me. I’m sure it was extremely harder for her. Her entire personality changed even though she was so little to remember when we said goodbye.
She went from being a sweet and quiet girl to a crying, rebel, and mostly sad girl. She stopped trusting people and only trusted me. The rest of the world seemed to not exist and whenever I wasn’t around she would cry and push everyone away and that includes her grandma, uncle, and grandpa.
When hubby finally came back home, Em did a 180º turnaround. It was like she came back to life. She started to trust people more, no more crying or yelling at anyone, no more fighting with her uncle {a 13 YO boy} and she stopped challenging me.
She went back to being a happy and loving little girl. Her world was all broken apart while daddy was gone and now seems like it was whole and fixed again. It never stops amazing me.
On his first Father’s Day back with us, I wanted to give him something special. I definitely wanted daddy to keep Em and me close to him always.
This photo wooden pencil holder will do the job perfectly!
Hope you like this simple project as much as I do.

How to make this cute Photo Wooden Pencil Holder
Before we begin, be sure to follow us on Pinterest, Facebook, Instagram, and YouTube, and also sign up for our email list (at the end of this post), so you’ll never miss a post!
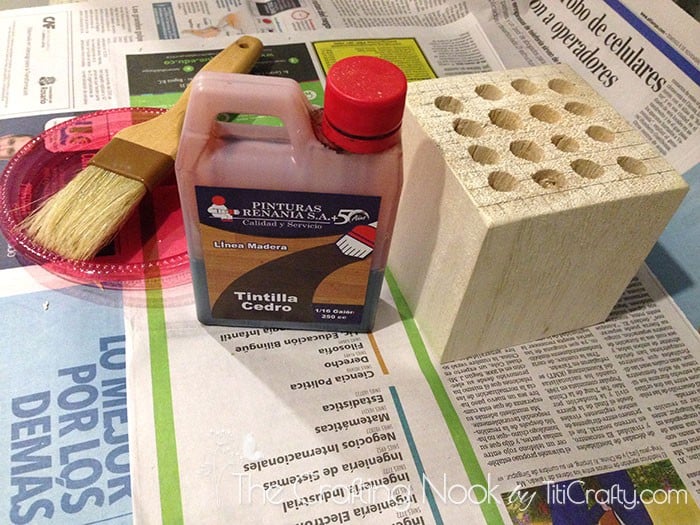
Supplies:
- Piece of wood: Wooden block (about 5” or 10 cm)
- Wood dye (I used cedar color)
- Brush
- Spray Adhesive
- Mod Podge or white glue diluted in water.
- Foam brush.
- 400 grit sandpaper
Tools:
- Drill and a really thick wood drill bit.
- Pencil, ruler, and marker.
- Scissors or Craft knife
Instructions:
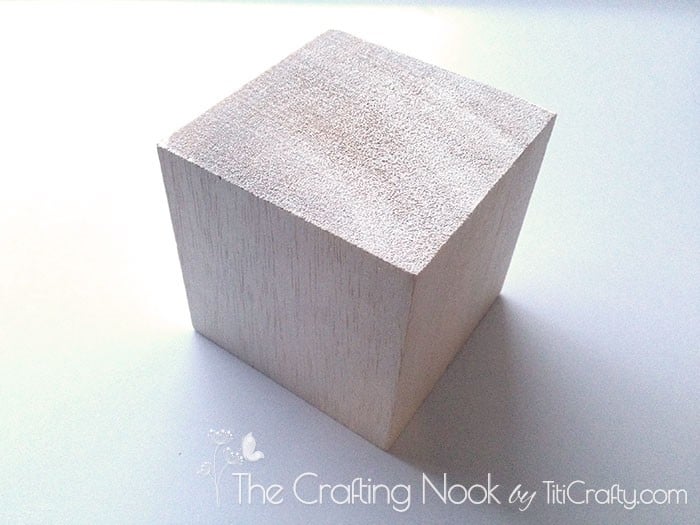
Step 1: Prepping the wood block
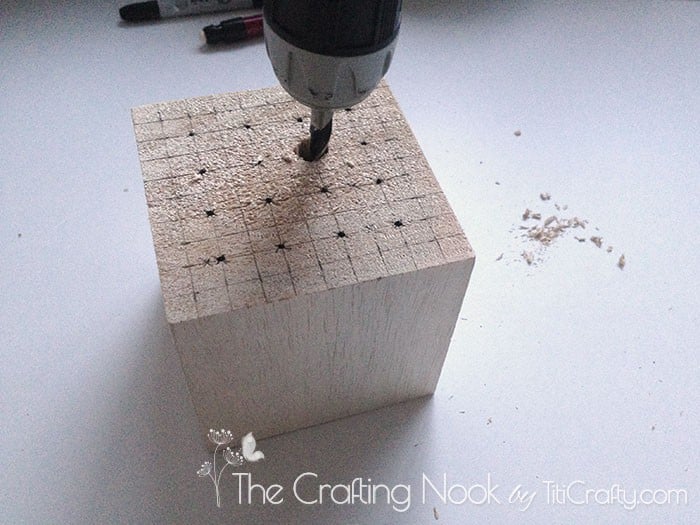
First step is to sand your block down on all sides and make a grid with a pencil on one side of the cube. I made the grid 1 cm (1/2 inch) separation.
Then with the marker make a mark every 2 squares.
You can make a grid in whatever spacing you prefer. Just make sure when you drill the holes, there’s enough space between them.

Step 2: Drilling the holes in the block
Prepare the drill with a drill bit. I recommend choosing one slightly larger than a pen. In my case, I started with one I thought it would let a pen fit but I end up using a ½. Either way, I definitely recommend making the first holes with a 3/16 and then using the 1/2.
You might be wondering: Why?
Because going for the thick one first sometimes moves in the first push making the hole a bit off place.

Make sure you are going in at as much of a 90-degree angle as possible and that the bit doesn’t go all the way through. If it does, make a mark with a sharpie so you know the maximum depth you can go.
Start drilling hole by hole. It might not look perfect. We are not perfect, and neither is the wood so, be patient. As you get the holes done you can go and fix those you don’t like much.

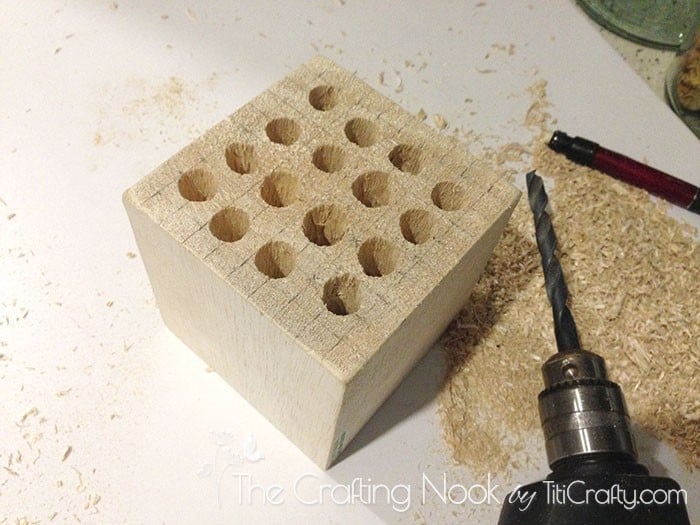
Once the holes have been drilled, sand the top again to remove any splintering caused by the drill bit.
When finished, clean your space because it will be full of sawdust everywhere.
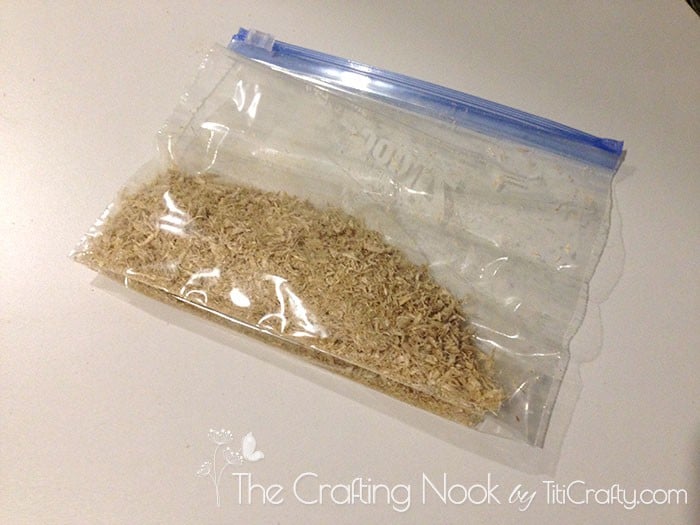
I saved all the sawdust. It could be useful on another project… {wink, wink!!!}
Also, clean your block as well.
Step 3: Stain your wooden block
First thing: Protect the surface with some paper or plastic and work outside or really close to an open window.
Pour some paint on a plastic plate and start painting your block. The good about this type of paint is that the wood absorbs it leaving all the wood design visible. LOVE it!
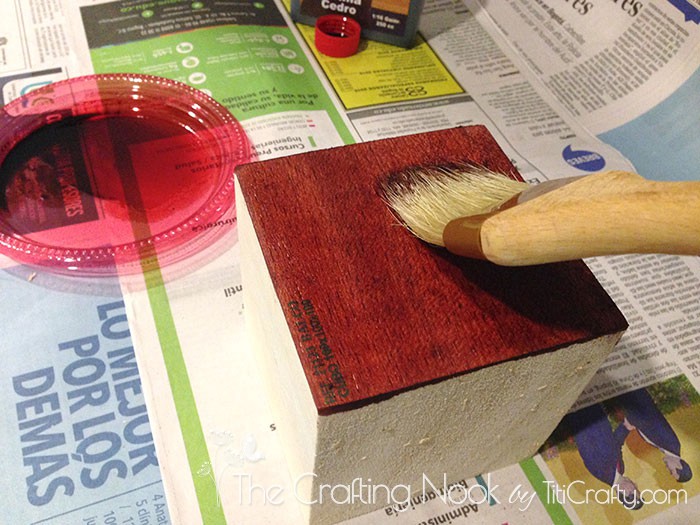
With a small brush, paint inside the holes too.

You are done for now. Let it dry for a couple of hours close to a window or outside since this paint has a strong scent.
Step 4: Prepare and Print The photos.
Measure your wooden block well and prepare your photos to print about 1 cm (1/2 inch) smaller than the area of your block’s sides.
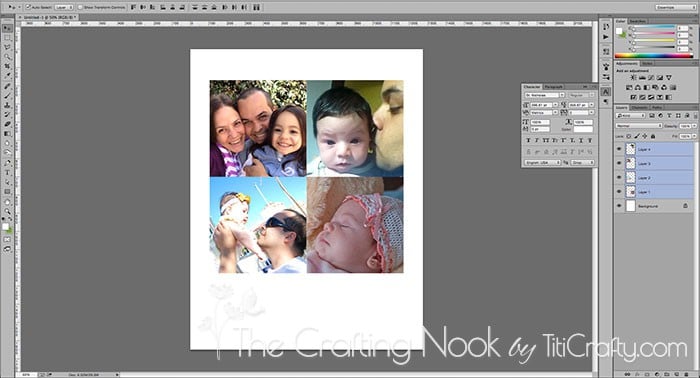
If the cube is 10 cm then make each photo 9 cm so the block works as a wooden frame.
You will need 4 photos – one for each side of the block.
Print them preferably with a waterproof dye printer like EPSON or in a professional print shop. The reason is that you need to seal the photos and if the printer dye is water base the photos will get damaged.
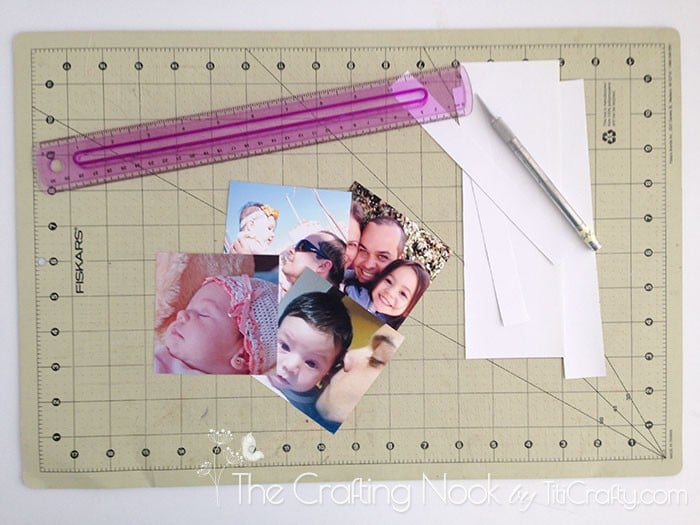
Cut each photo.
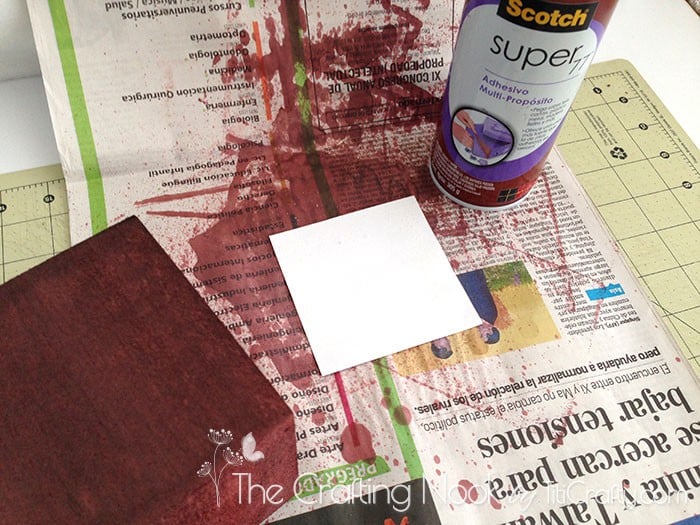
STEP 5: GLUE AND SEAL THE PHOTOS ON THE PENCIL HOLDER
In a protected place, spray some adhesive on the back of each photo. Aternatively, you can use mod podge to glue the photos to the block.
Then place the photos centered on each side of the cube. Let them dry.

And finally, apply a coat of mod podge or your glue mixture with a foam brush all over each photo. This will seal and protect the photos from wearing and sunlight.
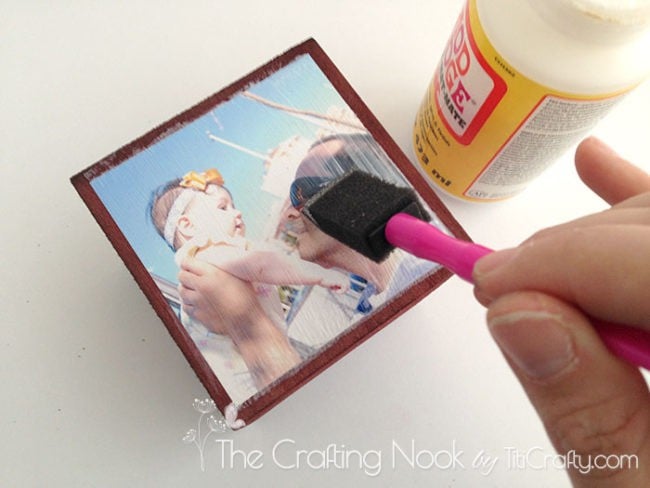
Try to clean up the borders of the photo to keep the wood dye color clean.

Let it dry for 30-60 minutes and TADAAAAAA!!!!

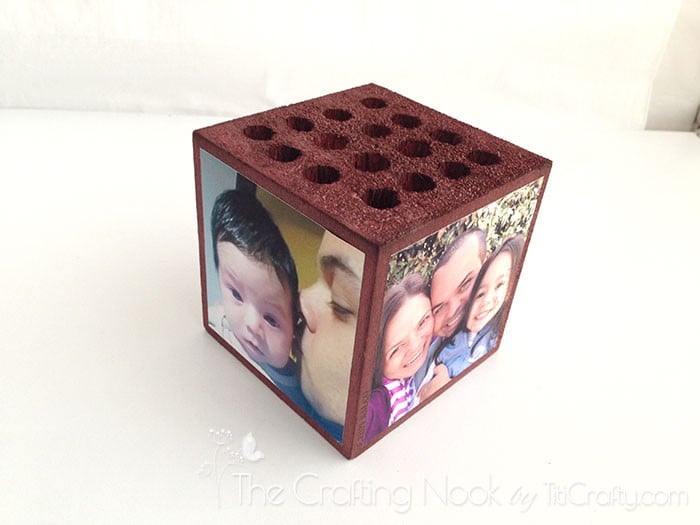
There you go! A super adorable and cute DIY Pencil Holder for daddy to keep it always close, in his office, nightstand, or home desk.

Hope you liked this craft as much as I enjoyed making it. It’s not hard at all to make and I’m sure any daddy or grandparent will so love getting it as a gift!
But I have a question for you now, how important are your memories? How do you keep them??? Let me know all about it in the comments!
Frequently Asked Questions
Almost any you can put your hands on. Pieces of scrap wood is great, you can also get some blogs in the wood craft section of your local craft store, pine wood, or wood logs among other ideas.
Wood drill bits for sure. Don’t ever try with a different one because the hole will not have a proper finish.
I would say that depends. You can make them as big as you like. I wanted the holes tight so the pin and pencils would stay straight, but you can use larger ones. I would say anything from 9/16″ to 1/2″. But be sure to measure the pens and pencils that you will be using to find what drill bit size you need.
More Wooden Crafts to Try
If you liked this DIY wooden pencil holder tutorial, I’m sure you will also love these other wood craft ideas too:


✂️ Tutorial

DIY Photo Wooden Pencil Holder With Holes
Tools
- Drill and a really thick wood drill bit.
- Pencil, ruler, and marker.
- Scissors or Craft knife
Supplies
- Piece of wood: Wooden block about 5” or 10 cm
- Wood dye I used cedar color
- Brush
- Spray Adhesive
- Mod Podge or white glue diluted in water.
- Foam brush.
- 400 grit sandpaper
Instructions
STEP 1: PREPPING THE WOOD BLOCK
- First step is to sand your block down on all sidesmake and make a grid with a pencil on one side of the cube. I made the grid 1 cm (1/2 inch) separation.
- Then with the marker make a mark every 2 squares.
- You can make a grid in whatever spacing you prefer. Just make sure when you drill the holes, there’s enough space between them.
STEP 2: DRILLING THE HOLES IN THE BLOCK
- Prepare the drill with a drill bit. I recommend choosing one slightly larger than a pen. In my case, I started with one I thought it would let a pen fit but I end up using a ½. Either way, I definitely recommend making the first holes with a 3/16 and then using the 1/2.
- You might be wondering: Why?
- Because going for the thick one first sometimes moves in the first push making the hole a bit off place.
- Make sure you are going in at as much of a 90-degree angle as possible and that the bit doesn’t go all the way through. If it does, make a mark with a sharpie so you know the maximum depth you can go.
- Start drilling hole by hole. It might not look perfect. We are not perfect, and neither is the wood so, be patient. As you get the holes done you can go and fix those you don’t like much.
- Once the holes have been drilled, sand the top again to remove any splintering caused by the drill bit.
- When finished, clean your space because it will be full of sawdust everywhere.
- I saved all the sawdust. It could be useful on another project… {wink, wink!!!}
- Also, clean your block as well.
STEP 3: STAIN YOUR WOODEN BLOCK
- First thing: Protect the surface with some paper or plastic and work outside or really close to an open window.
- Pour some paint on a plastic plate and start painting your block. The good about this type of paint is that the wood absorbs it leaving all the wood design visible. LOVE it!
- With a small brush, paint inside the holes too.
- You are done for now. Let it dry for a couple of hours close to a window or outside since this paint has a strong scent.
STEP 4: PREPARE AND PRINT THE PHOTOS.
- Measure your wooden block well and prepare your photos to print about 1 cm (1/2 inch) smaller than the area of your block’s sides.
- If the cube is 10 cm then make each photo 9 cm so the block works as a wooden frame.
- You will need 4 photos – one for each side of the block.
- Print them preferably with a waterproof dye printer like EPSON or in a professional print shop. The reason is that you need to seal the photos and if the printer dye is water base the photos will get damaged.
- Cut each photo.
STEP 5: GLUE AND SEAL THE PHOTOS ON THE PENCIL HOLDER
- In a protected place, spray some adhesive on the back of each photo. Aternatively you can use mod podge to glue the photos to the block.
- Then place the photos centered on each side of the cube. Let them dry.
- And finally, apply a coat of mod podge or your glue mixture with a foam brush all over each photo. This will seal and protect the photos from wearing and sunlight.
- Try to clean up the borders of the photo to keep the wood dye color clean.
- Let it dry for 30-60 minutes and TADAAAAAA!!!!
- There you go! A super adorable and cute DIY Pencil Holder for daddy to keep it always close, in his office, nightstand, or home desk.
Share and PIN ME

Til’ next time…


FREE WORKBOOK
Keeping your Sweet Home Organized
Learn how to create intentional habits and simple routines to Keep Your Home Organized. Plus freebies, printables, exclusive content, and tips.
Disclaimer: By clicking on the “Yes” button above you are giving me your consent to collect and use your information according to the law and My Policy Privacy. Zero Spam I promise!
This is so cute! I’m very scattered when it comes to pens and highlighters at work! I find them everywhere, including my hair and pockets so this would be a great way to keep track of them and display adorable pictures of my kids! Thanks for sharing :)