How to Make a Rustic DIY Wall Sconce Light
This post may contain affiliate links. Please read our Disclosure Policy.
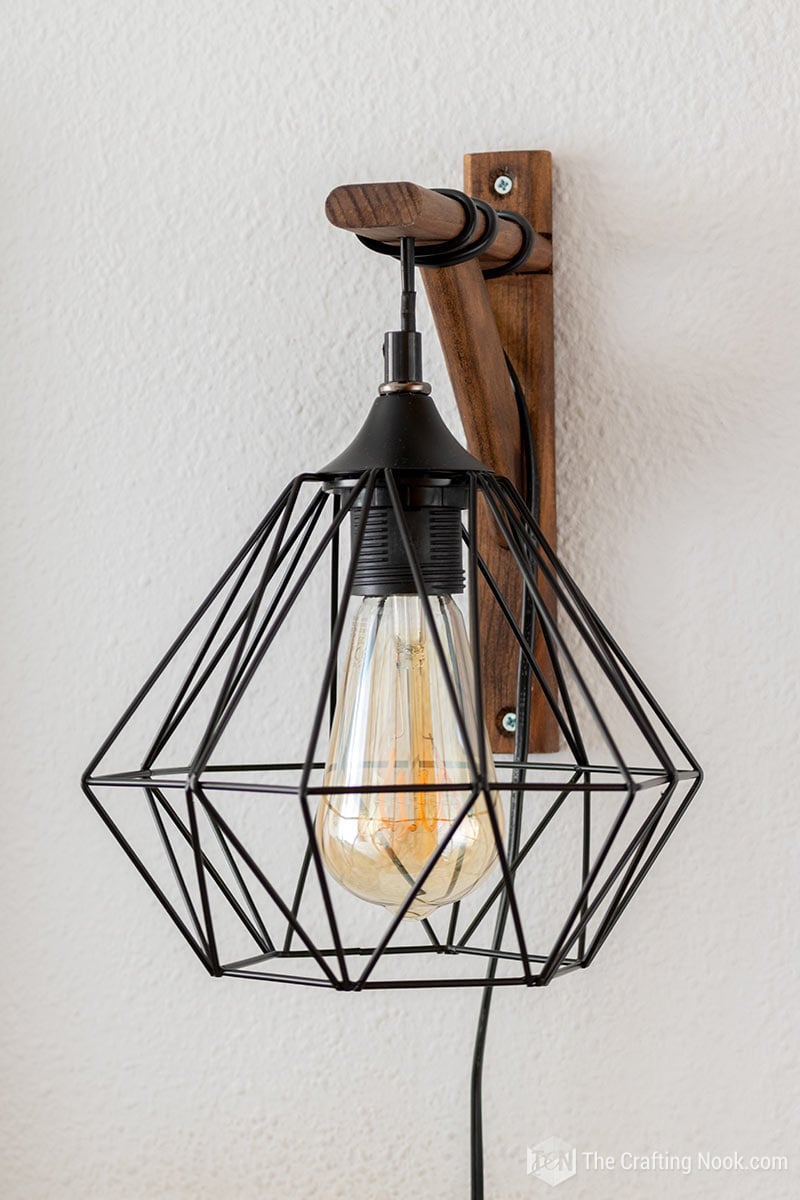
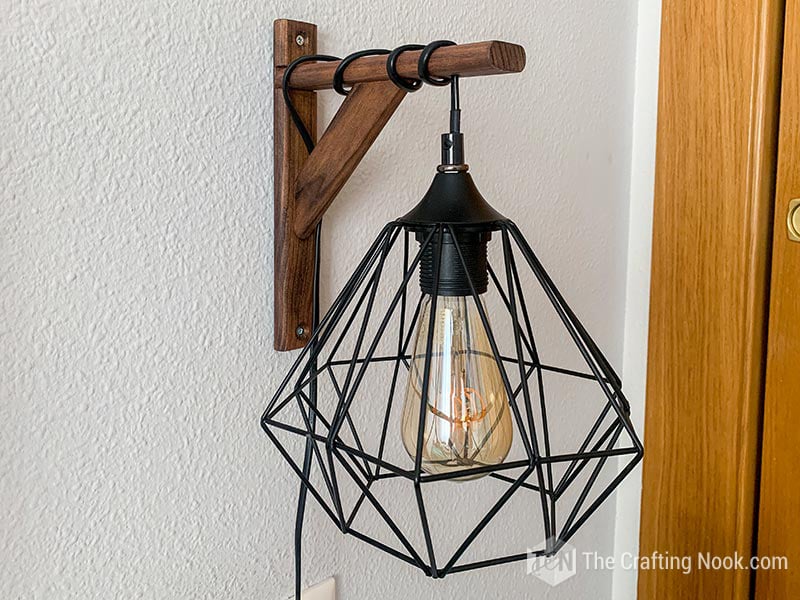
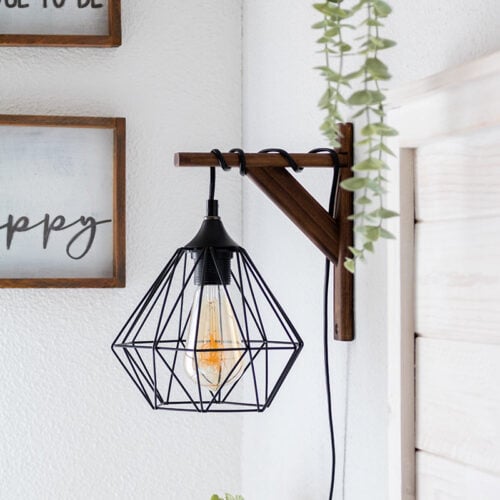
This rustic DIY wall sconce light is a simple, beginner-friendly project I made using a wood bracket as the base for the sconce. By starting with a pre-made bracket, you skip complicated cuts and measurements, which makes this project much easier than building a sconce structure from scratch.
In this step-by-step tutorial, I’ll show you exactly how to turn that wood bracket into a functional wall sconce light, including the tools and materials you’ll need, how to prep and assemble the pieces, how to wire the light safely using a plug-in kit, and how to install it on the wall.

Table of Contents
Easy RUSTIC Craft: DIY wall sconce Light
This project sat on my to-do list longer than I expected because I kept thinking it would require more complicated woodworking. Once I realized I could use a simple wood bracket as the base, everything clicked. The build became much more approachable, and the rest of the project came together easily from there.
How to Make an Easy DIY Wall Light Fixture
Project snapshot
- Type of project: Woodworking
- Time commitment: 3-4 hrs.
- Technique type: Wood stain
- Budget range: Low
- Skill level: Beginner
- Finished result: Decorative, functional
- Mess level: Sawdust warning 😄
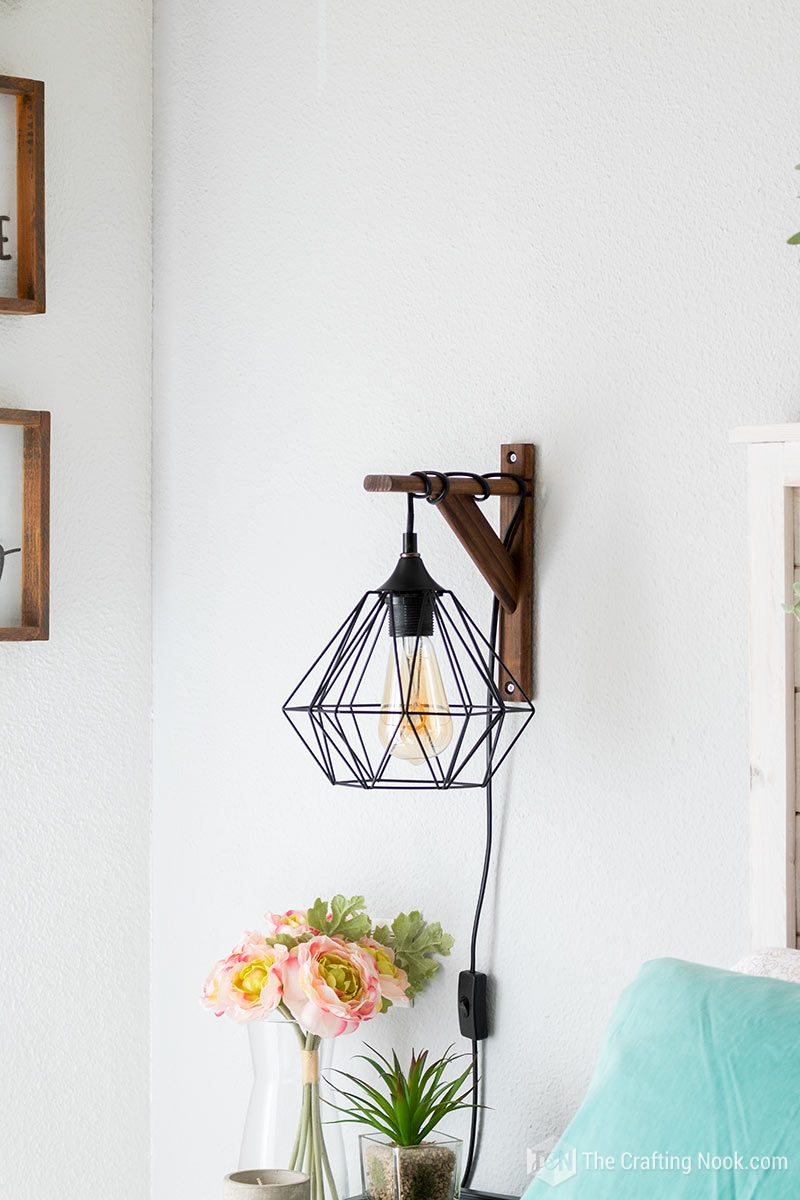
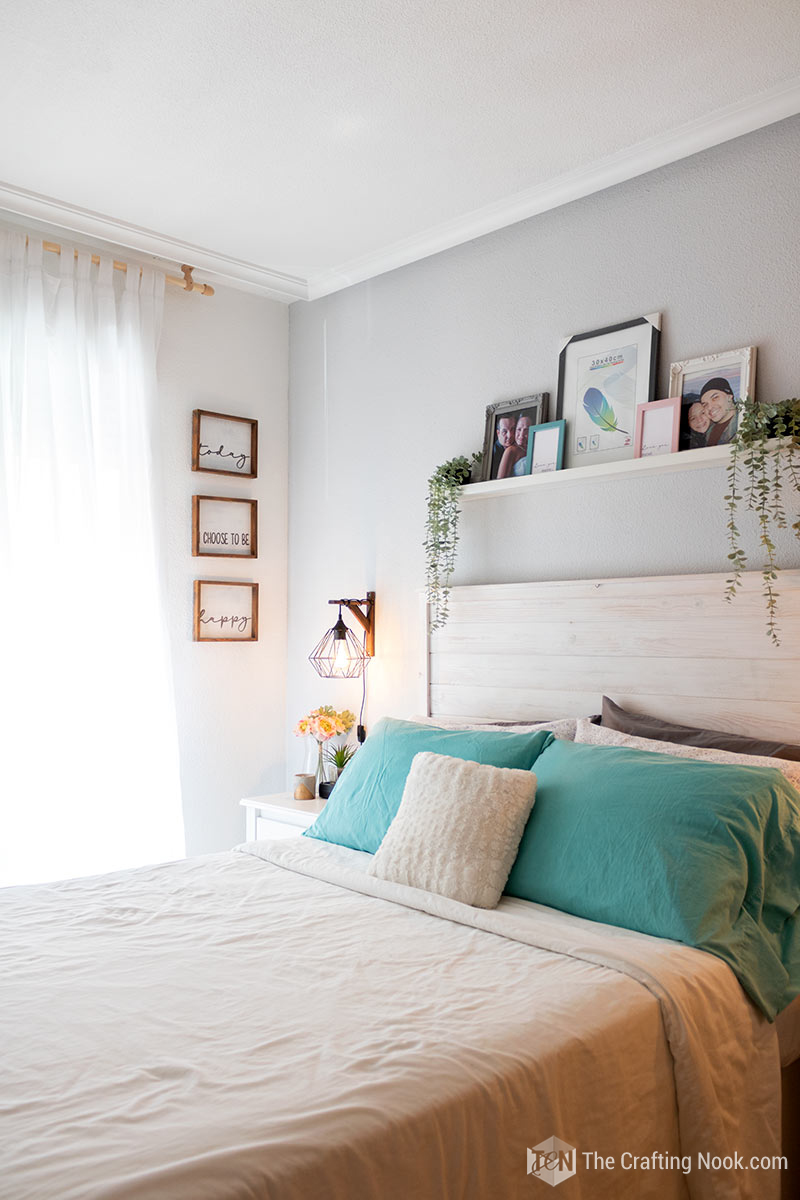
I just didn’t like my standing lamp and wanted a lighting fixture that would save me space on the nightstand and look amazingly good.
Using a pre-made wood bracket as the base keeps this project simple and eliminates the need for advanced woodworking.
Here’s how I did it!!!
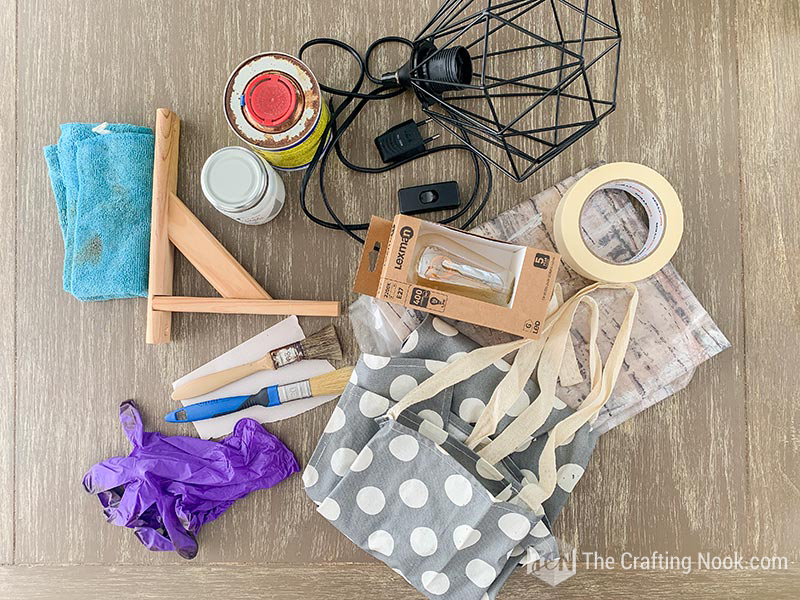
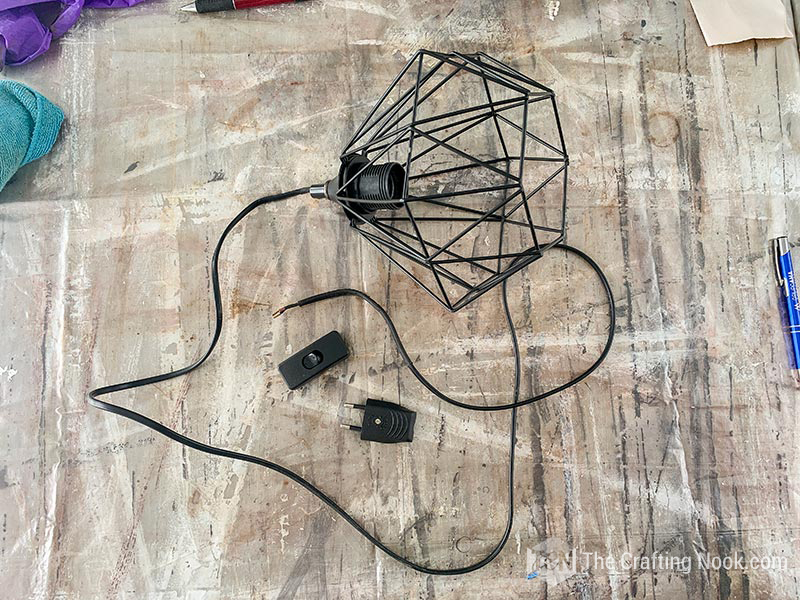
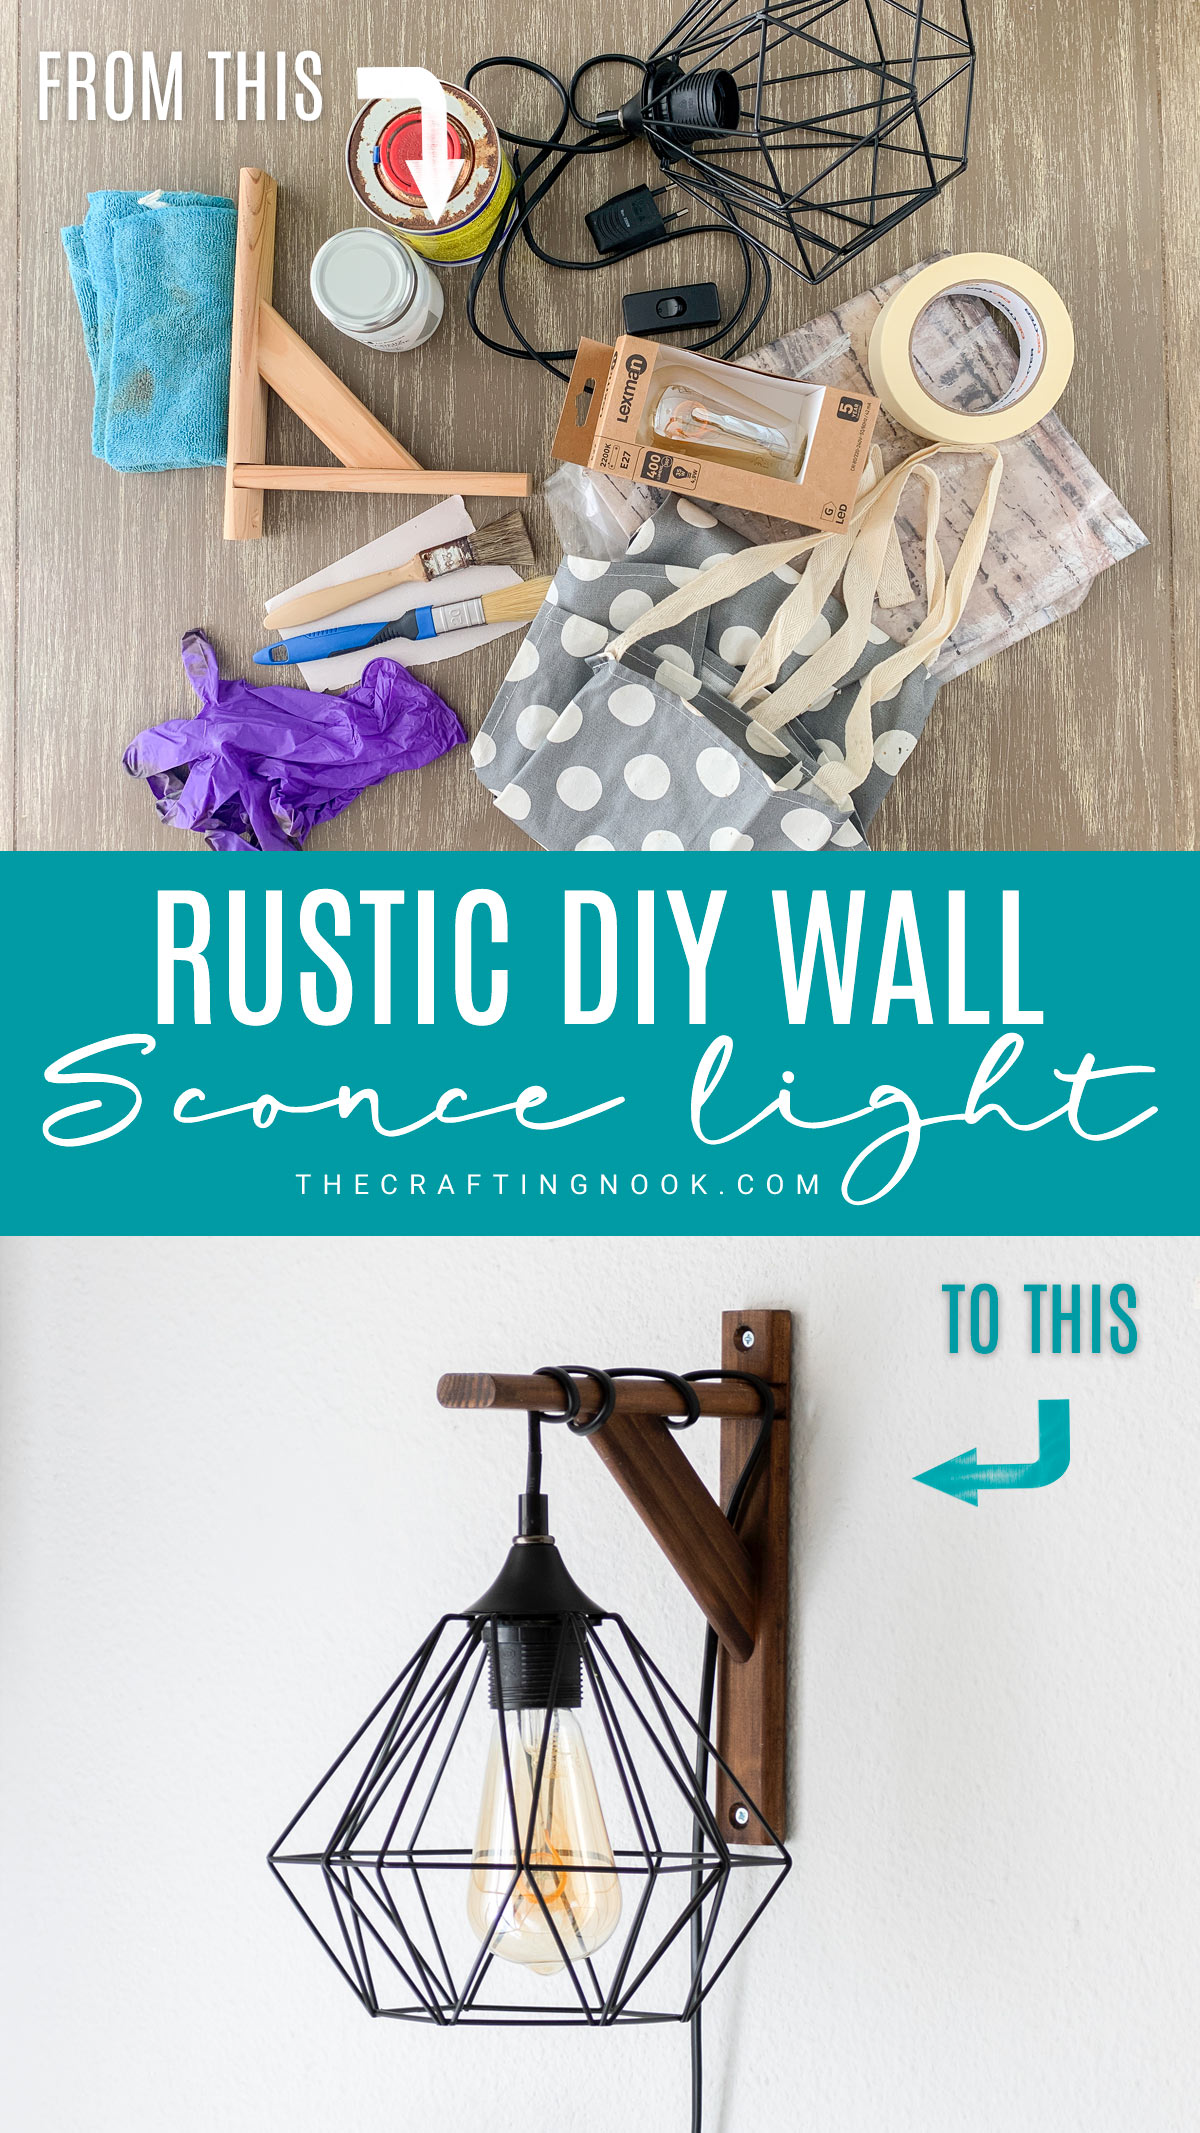
Supplies:
- Pendant light kit (You can find really inexpensive ones on amazon and Ikea)
- Switch and plug (if the light kit doesn’t include it)
- Metal Wire Cage Lamp Guard
- A vintage Lightbulb
- Wooden Shelf Brackets
- Walnut wood stain
- Wood sealer
- Cheap brushes
- Sandpaper (400 gritt)
- Protective wear (Plastic apron, latex gloves, and plastic cover)
- Cloth
- Masking tape
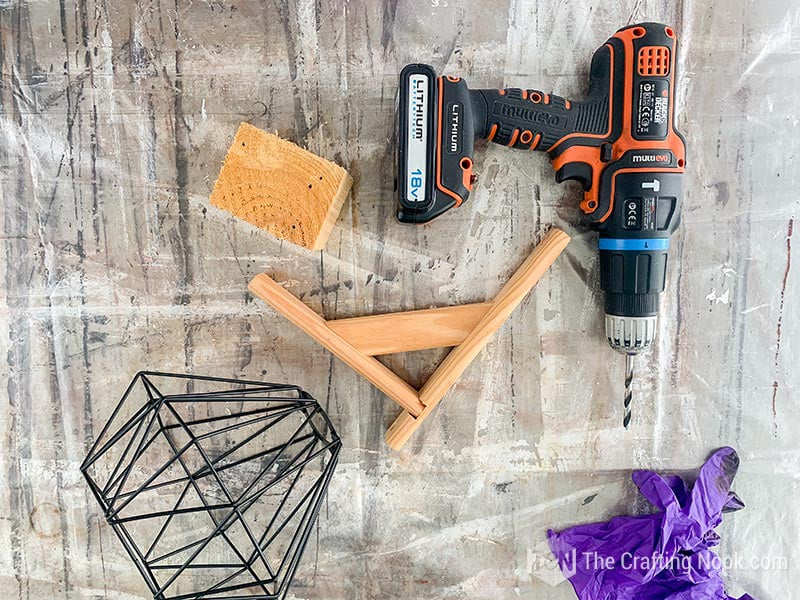
Tools:
- Drill
- Wood drill bit
- Concrete drill bit if it’s the case.
- Screwdriver
- Screws
Step-by-step Instructions:
I created a quick video tutorial to make it easy for you! However, if you are more of a photo step-by-step kind of person just scroll down and keep reading!
a little DIY hack I used
Although you can super easily make your own sconce with just 2 or 3 pieces of wood boards (or buy it already made), I decided to just use 2 wooden shelf brackets instead. You can find a pair for around $15 on amazon and I bet you can find them even cheaper, either on sale or in shops like Dollar tree.
I just wanted to make it as easy as possible and doable for anyone with or without tools or any crafty skill level.
Step 1: Prep The Work Area
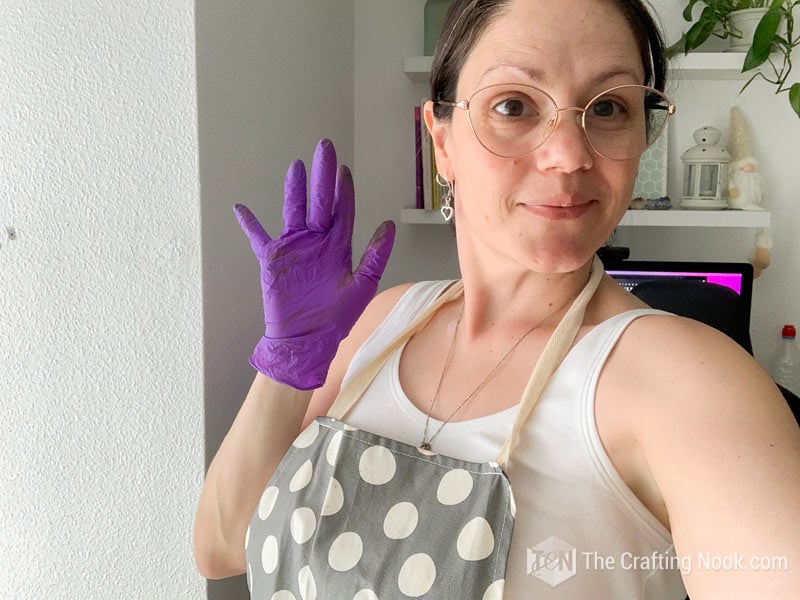
Cover your work surface with a plastic sheet or drop cloth to protect it from stain and sealer.
Wear latex or nitrile gloves when handling stain and wood sealer.
Before you begin, lay out all your materials and tools so everything is within reach. This helps avoid mistakes once staining starts.s handy.
Step 2: Drill the Wire Holes in the Brackets
Because shelf brackets are not designed for wiring, the top board may not have a hole or may have one that’s too small. If needed, mark where the wire should pass through. I used the light cage as a reference to center the hole correctly.
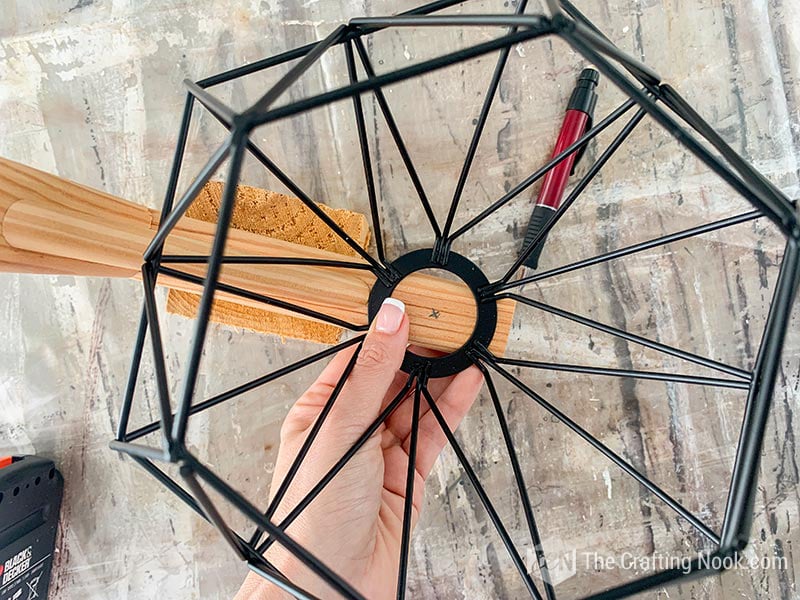
Place a scrap wood block or wood cube underneath the bracket to support it while drilling.

If the wood feels fragile or prone to splitting, start with a pilot hole using a small drill bit. I used a 2 mm wood drill bit first, then switched to the drill bit size needed for my cord.

The final drill bit size will depend on the thickness of your lamp cord. The hole should be just large enough for the wire to pass through smoothly without forcing it.
Step 3: Sand the Shelf Brackets
After drilling the holes, sand each shelf bracket to remove splinters and smooth the surface. Pay special attention to edges and corners, where rough spots are more likely.
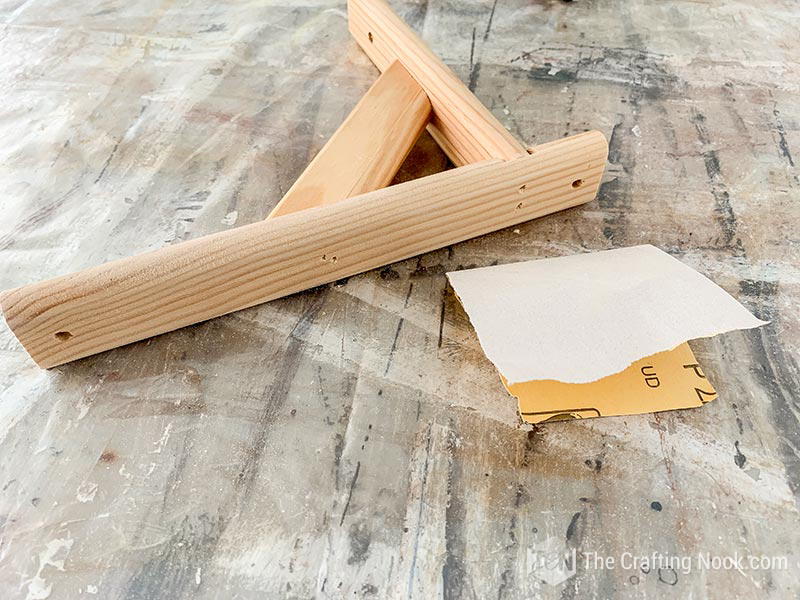
Use sandpaper to reach tight areas as best as possible, especially near the drilled hole and along the edges.
Once sanding is complete, wipe each bracket thoroughly with a dry cloth to remove all dust before staining.
Step 4: Stain and Seal the Brackets.
Before you begin, protect your clothing and work area. Wear gloves and, if needed, a plastic apron to avoid staining accidents.
Apply wood stain evenly to each bracket. I used two coats of walnut wood stain. Instead of wiping off the excess, I let the wood absorb the stain fully to achieve a deeper, richer finish.
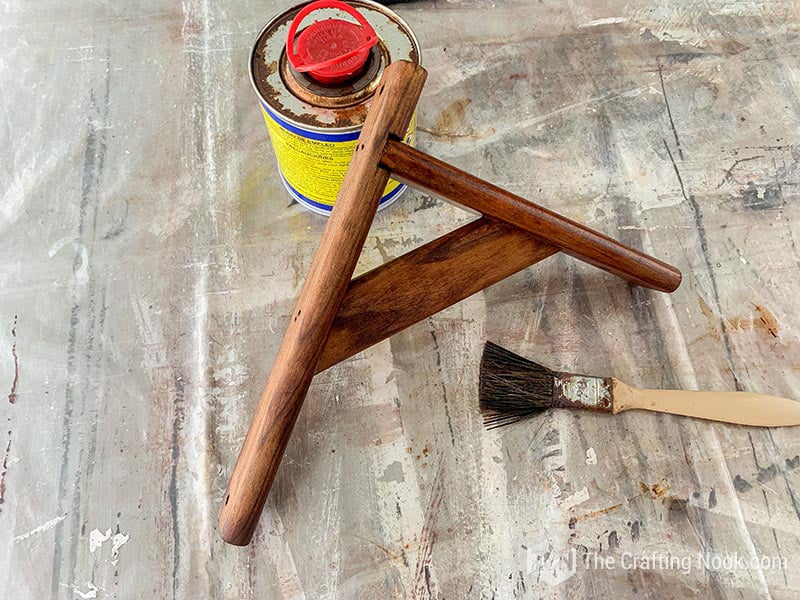
Allow the stain to dry until it no longer transfers when touched. Drying time will vary by brand and environment, so follow the manufacturer’s recommendations.
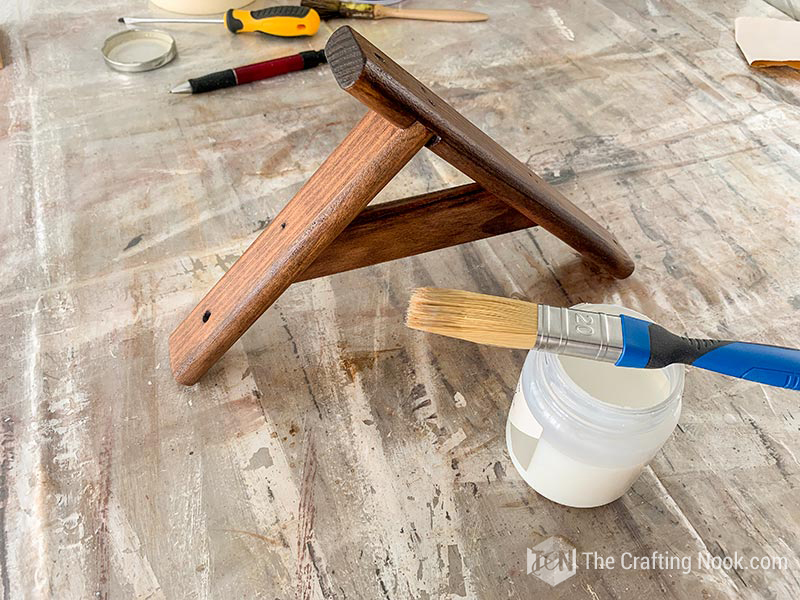
Once dry, apply a matte wood sealer. This extra step helps prevent fading and protects the wood from humidity, sunlight, and general wear over time.
Let the sealer dry completely according to the product instructions before moving on to assembly.
Step 5: Wire the Wall Sconce
Most plug-in lamp kits do not come with the plug or switch attached, which allows the cord to fit through the drilled hole. If your kit includes them, disconnect the plug and switch from the cord before continuing.
Insert the cord through the hole in the bracket from the bottom up.

Reattach the switch and plug following the instructions included with your lamp kit. Each kit may be slightly different, so always follow the manufacturer’s directions.
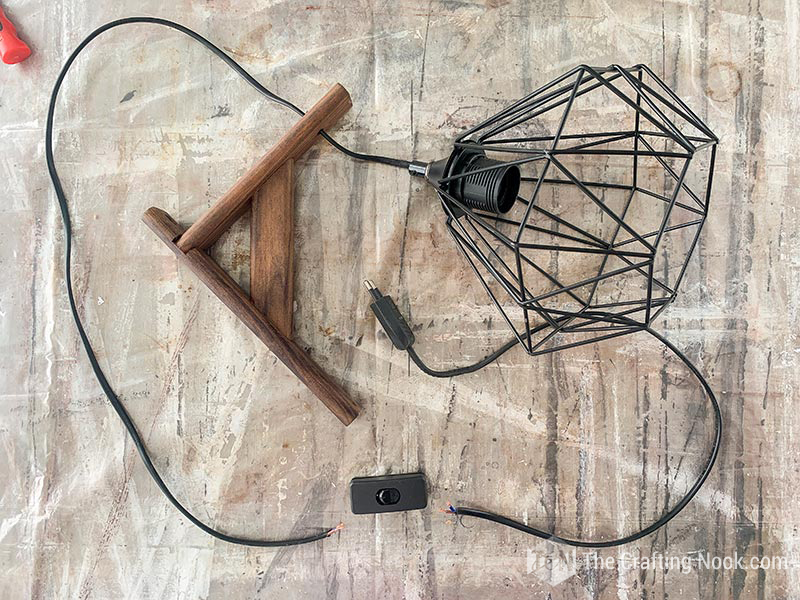
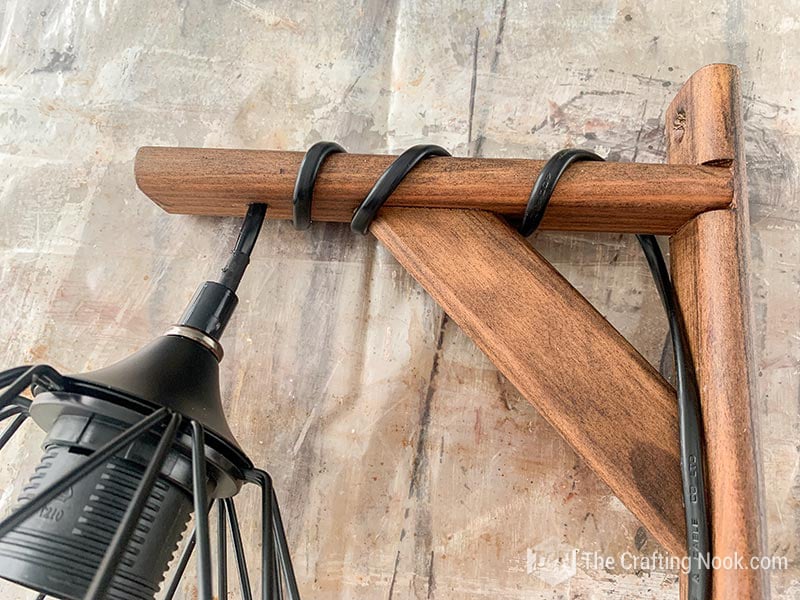
Once assembled, decide how far you want the socket and shade to hang below the bracket. Wrap the cord around the bracket as needed to achieve the desired length.
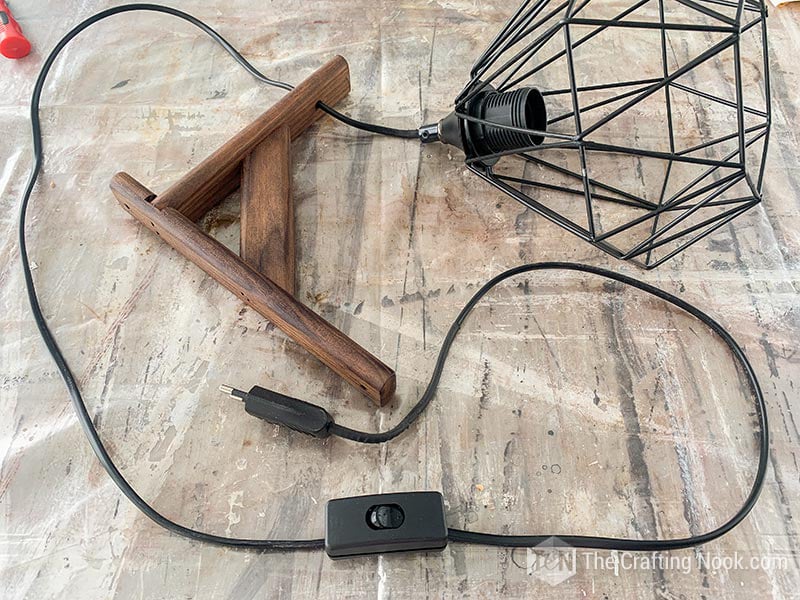
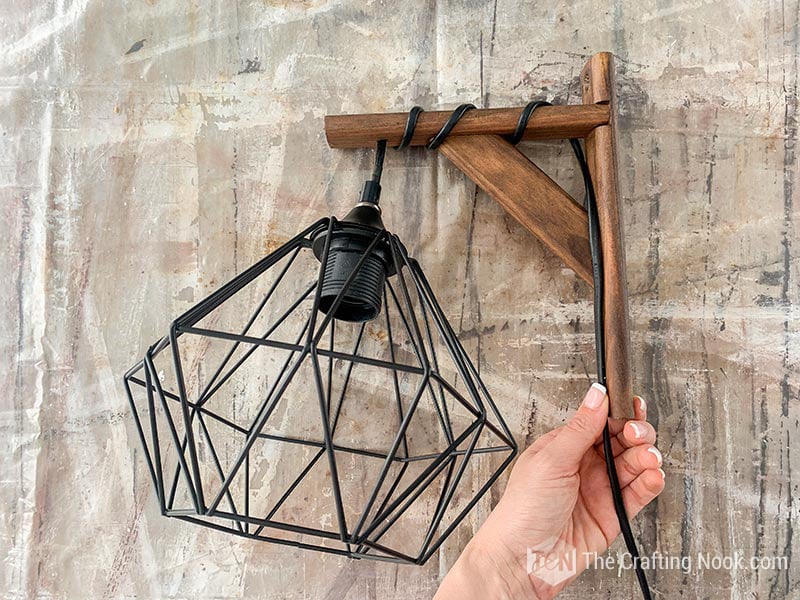
In my case, the light cage hangs about one inch below the bracket, but this can be adjusted based on your preference and cord length.
Step 6: Install the Wall Sconce on the Wall
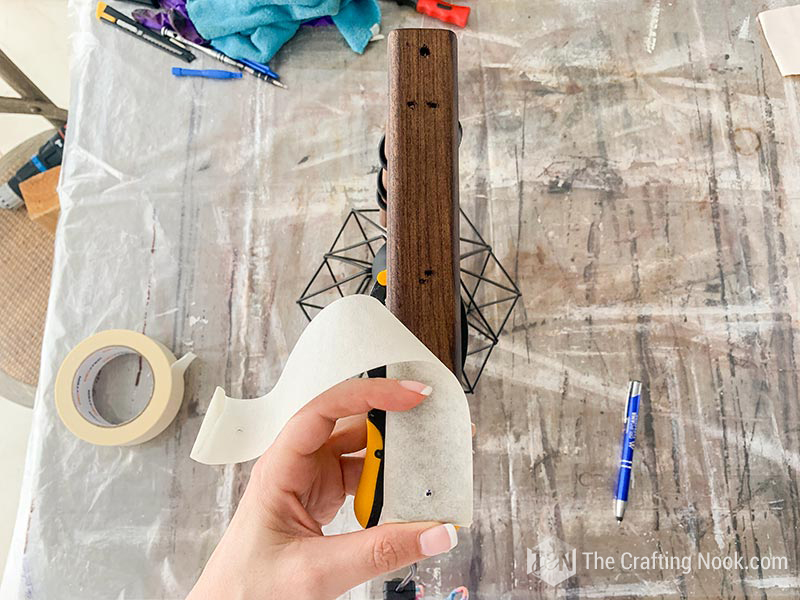
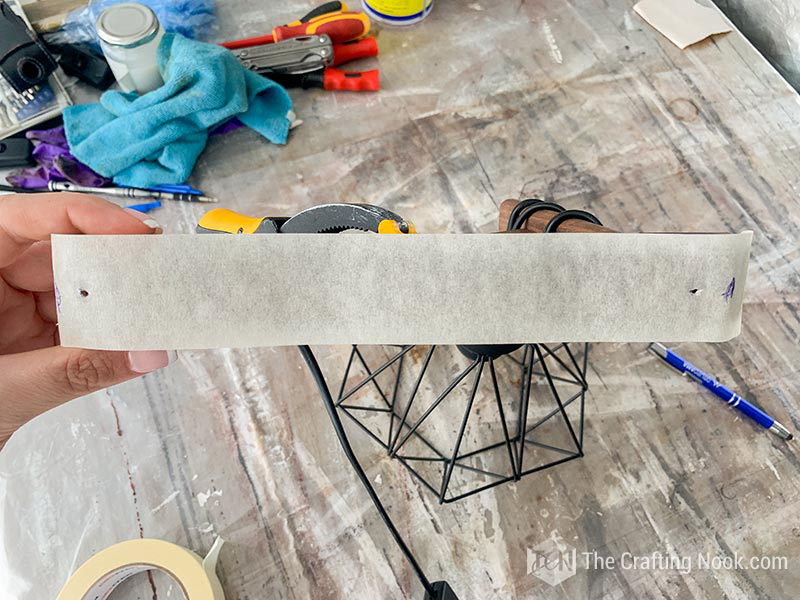
To mark the drilling points accurately, place masking tape over the mounting holes on the back of the bracket and poke small holes through the tape where the screws will go.
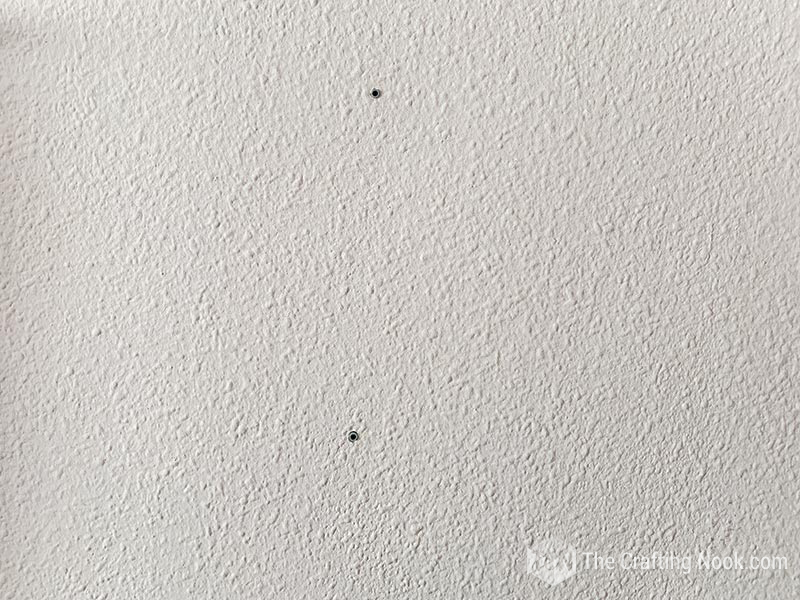
Use a level to position the tape on the wall, making sure the bracket will be straight.

Drill the holes using the correct drill bit for your wall type. For concrete walls, use concrete drill bits. For drywall or other surfaces, choose appropriate anchors and hardware.
Secure the shelf bracket to the wall using a screwdriver or drill, making sure it is firmly attached before hanging the light.

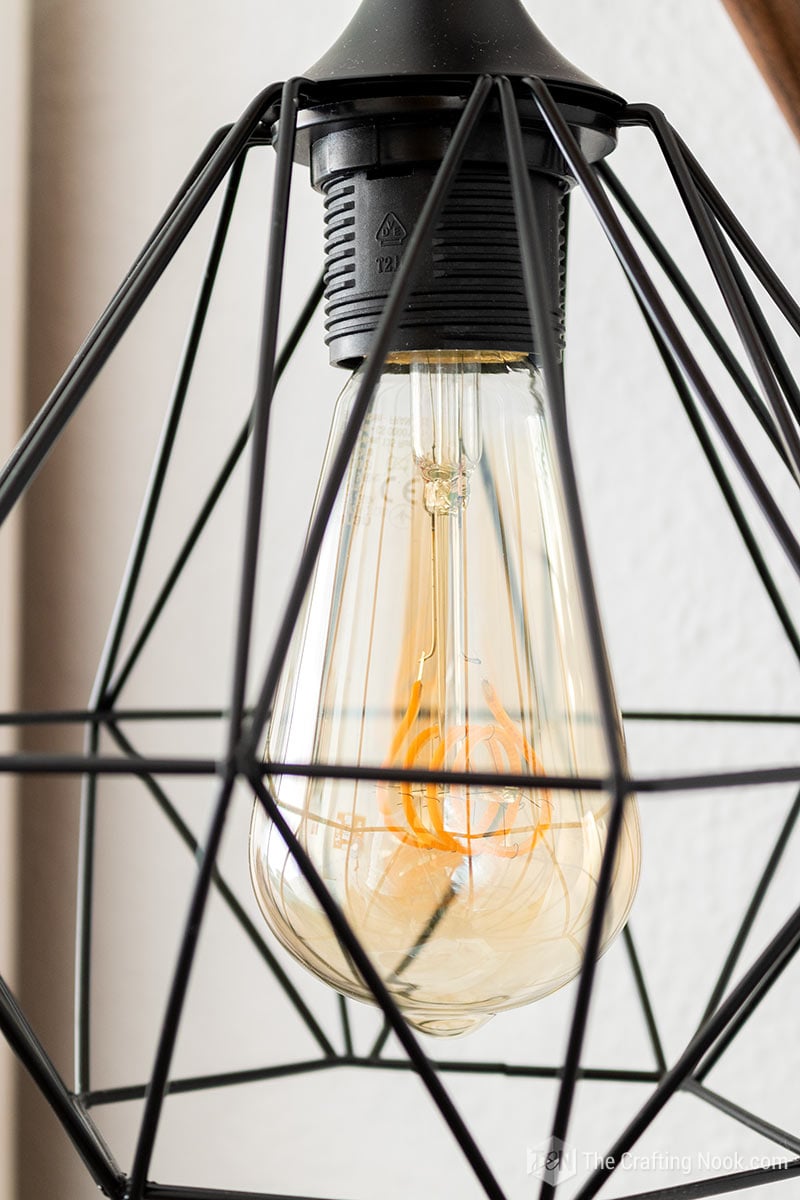
Step 7: Install the Light Bulb and Test the Sconce
Finally, install the light bulb into the socket. I used a vintage-style LED bulb with warm light and low brightness, which works well for ambient lighting.
Make sure the bulb’s wattage does not exceed the maximum recommended for your lamp kit.
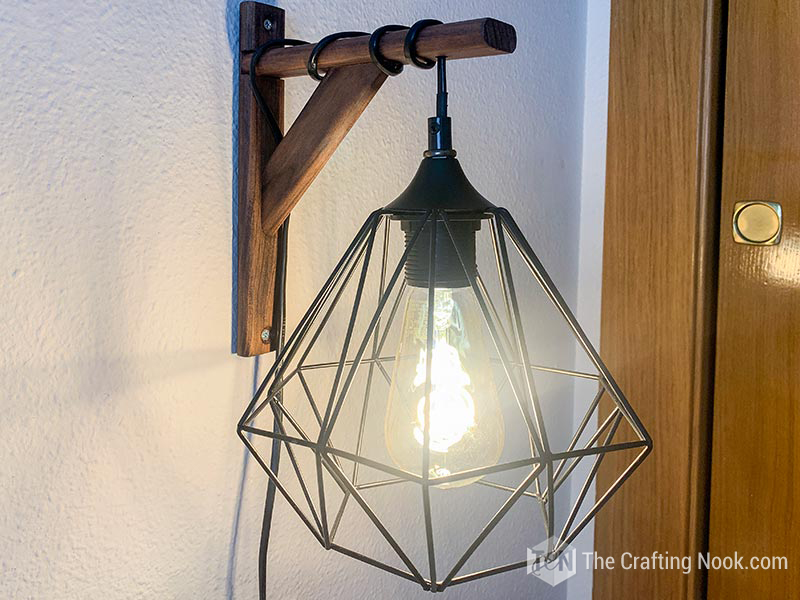
Once the bulb is installed, plug in the cord and test the light. If everything turns on properly and the fixture feels secure, your DIY wall sconce is complete.
NOTE: If the light does not turn on, double-check the switch wiring and ensure all connections are secure before unplugging and adjusting.
Crafting Tips
- Test-fit the cord before staining. Before applying stain or sealer, run the cord through the drilled hole once to make sure it fits smoothly. It’s much easier to adjust the hole size before finishing the wood.
- Sand lightly between stain coats if needed. If the wood grain raises after the first coat of stain, a quick light sanding with fine-grit sandpaper can help keep the finish smooth.
- Let finishes fully cure before wiring. Even if stain or sealer feels dry to the touch, give it enough curing time so it doesn’t transfer onto the cord during assembly.
- Choose LED bulbs for heat control. LED bulbs stay cooler than incandescent bulbs, which makes them a safer option for a compact wall sconce like this.
Voila!!!!
How cute is it????

Once installed, this wall sconce completely changed the feel of the room and freed up space on my nightstand.
Alternatives and Variations
Bracket alternatives:
If you can’t find a wooden shelf bracket, metal brackets can also work. Keep in mind that drilling metal requires different drill bits and more care.
Finish options:
Instead of stain, you can paint the brackets for a more modern or cottage-style look. Chalk paint or matte acrylic paint both work well on wood.
Cord length variations:
A longer cord allows the light to hang lower for a more dramatic look, while a shorter cord keeps the sconce compact and minimal.
Shade styles:
This project works with open wire cages, small fabric shades, or even exposed bulbs. Just make sure the shade size doesn’t interfere with the bracket or wall.
Hardwired version:
This tutorial uses a plug-in light kit for simplicity. If you prefer a hardwired sconce, the wood bracket structure still works, but wiring should be handled by a licensed electrician.
Frequently Asked Questions
No. This tutorial uses a plug-in light kit, which does not require an electrician. If you choose to hardwire the sconce, that work should be done by a licensed professional.
Yes. Any sturdy wood bracket with enough surface area for drilling and mounting can work. Just make sure the wood is thick enough to support the wiring and hardware.
This sconce can be installed on drywall, wood, or concrete walls. Always use the correct drill bits and anchors for your wall type to ensure a secure installation.
I am a renter, so it can definitely be, depending on how you install it. Using wall anchors and a plug-in cord allows the sconce to be removed later with minimal wall repair.
LED bulbs with warm light and low wattage work best. Always stay within the wattage limits recommended by your lamp kit.
More Decorative Woodworking Projects to Try
If you enjoyed this gorgeous wall sconce light tutorial, you might also love these other decorative woodworking project ideas too:
✂️ Tutorial
Rustic DIY wall sconce light Tutorial
Tools
- Drill
- Wood drill bit
- Concrete drill bit if it’s the case.
- Screwdriver
- Screws
Supplies
- Pendant light kit You can find really inexpensive ones on amazon and Ikea
- Switch and plug if the light kit doesn’t include it
- Metal Wire Cage Lamp Guard
- A vintage Lightbulb
- Wooden Shelf Brackets
- Walnut wood stain
- Wood sealer
- Cheap brushes
- Sandpaper 400 gritt
- Protective wear Plastic apron, latex gloves, and plastic cover
- Cloth
- Masking tape
Instructions
Step 1: Prep The Work Area
- Cover your work surface with a plastic sheet or drop cloth to protect it from stain and sealer.
- Wear latex or nitrile gloves when handling stain and wood sealer.
- Before you begin, lay out all your materials and tools so everything is within reach. This helps avoid mistakes once staining starts.s handy.
Step 2: Drill the Wire Holes in the Brackets
- Because shelf brackets are not designed for wiring, the top board may not have a hole or may have one that’s too small. If needed, mark where the wire should pass through. I used the light cage as a reference to center the hole correctly.
- Place a scrap wood block or wood cube underneath the bracket to support it while drilling.
- If the wood feels fragile or prone to splitting, start with a pilot hole using a small drill bit. I used a 2 mm wood drill bit first, then switched to the drill bit size needed for my cord.
- The final drill bit size will depend on the thickness of your lamp cord. The hole should be just large enough for the wire to pass through smoothly without forcing it.
Step 3: Sand the Shelf Brackets
- After drilling the holes, sand each shelf bracket to remove splinters and smooth the surface. Pay special attention to edges and corners, where rough spots are more likely.
- Use sandpaper to reach tight areas as best as possible, especially near the drilled hole and along the edges.
- Once sanding is complete, wipe each bracket thoroughly with a dry cloth to remove all dust before staining.
Step 4: Stain and Seal the Brackets.
- Before you begin, protect your clothing and work area. Wear gloves and, if needed, a plastic apron to avoid staining accidents.
- Apply wood stain evenly to each bracket. I used two coats of walnut wood stain. Instead of wiping off the excess, I let the wood absorb the stain fully to achieve a deeper, richer finish.
- Allow the stain to dry until it no longer transfers when touched. Drying time will vary by brand and environment, so follow the manufacturer’s recommendations.
- Once dry, apply a matte wood sealer. This extra step helps prevent fading and protects the wood from humidity, sunlight, and general wear over time.
- Let the sealer dry completely according to the product instructions before moving on to assembly.
Step 5: Wire the Wall Sconce
- Most plug-in lamp kits do not come with the plug or switch attached, which allows the cord to fit through the drilled hole. If your kit includes them, disconnect the plug and switch from the cord before continuing.
- Insert the cord through the hole in the bracket from the bottom up.
- Reattach the switch and plug following the instructions included with your lamp kit. Each kit may be slightly different, so always follow the manufacturer’s directions.
- Once assembled, decide how far you want the socket and shade to hang below the bracket. Wrap the cord around the bracket as needed to achieve the desired length.
- In my case, the light cage hangs about one inch below the bracket, but this can be adjusted based on your preference and cord length.
Step 6: Install the Wall Sconce on the Wall
- To mark the drilling points accurately, place masking tape over the mounting holes on the back of the bracket and poke small holes through the tape where the screws will go.
- The masking tape places and holes marked.
- Use a level to position the tape on the wall, making sure the bracket will be straight.
- Drill the holes using the correct drill bit for your wall type. For concrete walls, use concrete drill bits. For drywall or other surfaces, choose appropriate anchors and hardware.
- Secure the shelf bracket to the wall using a screwdriver or drill, making sure it is firmly attached before hanging the light.
Step 7: Install the Light Bulb and Test the Sconce
- Finally, install the light bulb into the socket. I used a vintage-style LED bulb with warm light and low brightness, which works well for ambient lighting.
- Make sure the bulb’s wattage does not exceed the maximum recommended for your lamp kit.
- Once the bulb is installed, plug in the cord and test the light. If everything turns on properly and the fixture feels secure, your DIY wall sconce is complete.
Notes
a little DIY hack I used
Although you can super easily make your own sconce with just 2 or 3 pieces of wood boards (or buy it already made), I decided to just use 2 wooden shelf brackets instead. You can find a pair for around $15 on amazon and I bet you can find them even cheaper, either on sale or in shops like Dollar tree.Some other wall lamps and sconces I love from my favorite bloggers:
- DIY Wireless Wall Sconce by Chatfield Court.
- Easy Wooden DIY Wall Sconces with Tea Lights by DIY Inspired.
- Wireless Wall Sconces With LED puck light by Simply 2 Moms.
If you loved this diaper stacker tutorial, don’t forget to pin and share it with friends!

Til’ next time…


FREE WORKBOOK
Keeping your Sweet Home Organized
Learn how to create intentional habits and simple routines to Keep Your Home Organized. Plus freebies, printables, exclusive content, and tips.
Disclaimer: By clicking on the “Yes” button above you are giving me your consent to collect and use your information according to the law and My Policy Privacy. Zero Spam I promise!