DIY Etched Glass Jar Gift for St. Patrick’s Day
This post may contain affiliate links. Please read our Disclosure Policy.
This Etched glass jar and Sketch Pen Tutorial is perfect for a gift for this St. Patrick’s Day. You’ll find many tips and tricks to use your Silhouette!
Can you believe how fast time is flying… St. Patrick’s Day is around the corner already!

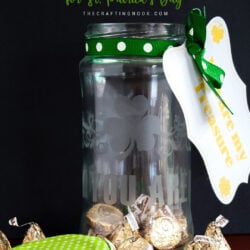
So I thought it would be a good idea to make a cute craft to celebrate it and also tell someone how lucky I am to have the family I have with a “LUCKY YOU ARE MINE” Etched glass jar full of delicious golden Hershey’s Kisses as a gift!
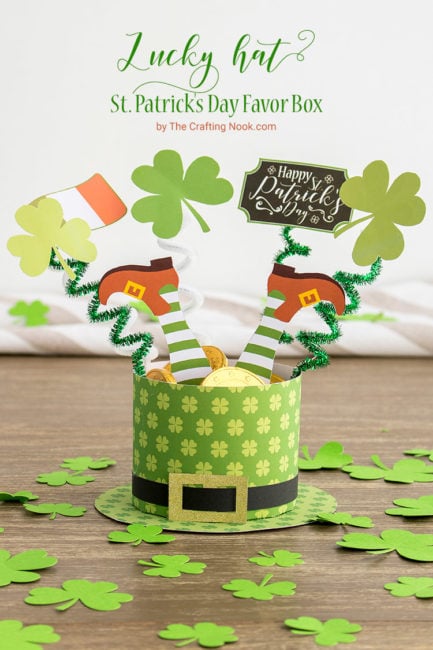
You might also love these other St. Patrick’s Day ideas: Lucky Hat St. Patrick’s Day Favor Box, DIY Hidden Pot of Gold St Patrick’s Day Shadow Box, and DIY Lucky Shamrock Frame for St Patrick’s Day.
Table of Contents
St. Patrick’s Day DIY Etched Glass Jar Gift Tutorial
This is a cute project that can be taken to any occasion. But since St. Patrick’s Day is coming I wanted to create something fun for my family! Also, I must say is my first time etching glass and I LOVE IT!!!!
So for this project, I used the awesome tutorial from my good friend Lauren of The Thinking Closet. She made it so easy to follow and get awesome results! The first time we always do some mistakes but that’s good to make it better next time, right?
One of the best things about etching glass is that it’s not expensive and can be done at home by anybody. It is also permanent which makes it a better option than applying vinyl.
This makes a great gift, especially a personalized gift as you can put names on the pieces and make it even more special.
How to make a DIY Etched Glass Jar
Supplies:
- An empty and clean glass jar (mason jar glasses work too)
- Glass etching cream (I used armour etch) – found in any craft store and amazon.
- Paint brush or foam brush
- Stencil vinyl
- Transfer tape
- Silhouette sketch pens (or any marker with the adjustment kit)
- White cardstock
- A cute St. Patrick’s Day Design (got mine from Silhouette store)
- Washi tape
- Ribbon (the same width ad your jar’s lid ehight)
- Protective gloves and glasses.
- Paper towel
- Candies (I used Golden Hershey’s)
Tools:
- A Silhouette cutting machine (You could use a cricut too but this tutorial is using Silhouette)
- A hook tool
- A scrapper
Step by Step Instructions:
Before we begin, be sure to follow us on Pinterest, Facebook, Instagram, and YouTube, and also sign up for our email list (at the end of this post), so you’ll never miss a post!
Always clean the glass you wish to etch. To do this, take rubbing alcohol and apply it to all surfaces of the glasses. After rubbing alcohol on the surfaces of the glass, rinse with water and dry.
Step 1: Creating the design
Ok so, Firstly, I created the design for my own stencil to etch on the Jar.
I reused an old jar but if you have empty mason jars will work too.
I also designed a cute tag as well.
For the Jar, I used this cute swirly clover from Silhouette Store and wrote:
“LUCKY YOU ARE MINE”
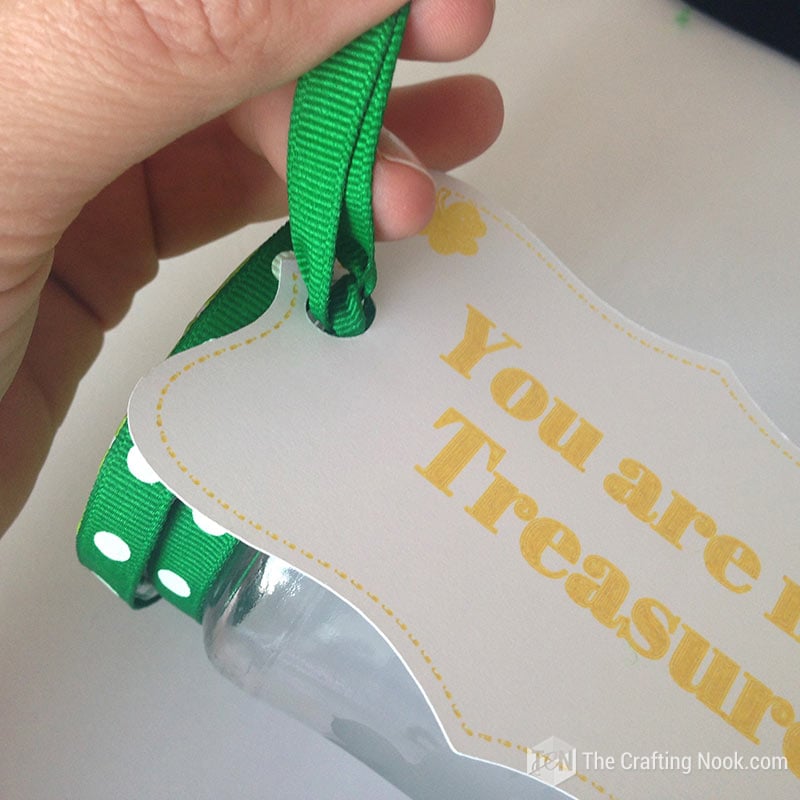
Then for the Tag, I decided to make it using my sketch pens. I used the Gold one and wrote:
“YOU ARE MY TREASURE”

Once it was ready I proceeded to cut the jar design first.
Step 2: Preparing the Stencil
Since I didn’t have stencil vinyl material I used white vinyl instead.

Using my hook I weed all the inner design leaving all the rest in place because that is what will be etched.
Apply transfer tape to the design.
Placing the transfer tape on top of the vinyl. Use your scraper tool to smooth the transfer tape atop your stencil as you go.
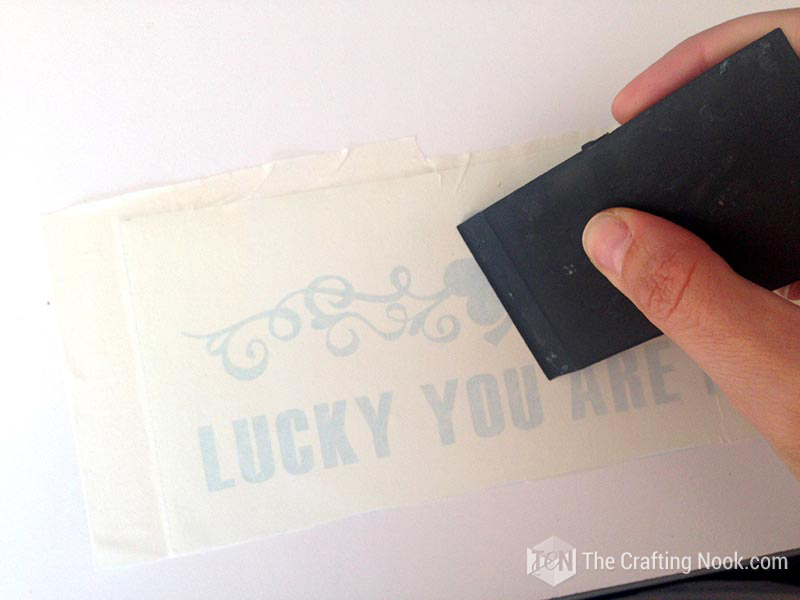
Some air bubbles might remain, but as long as you smooth out the ones closer to the edges of your stencil, you should be good to go.
Then apply the stencil to the jar {or any glassware you are using}.
This is really the scariest part for me because the jar is all curvy and I wasn’t sure how it would adhere there. So, I just started with one end and tried to evenly apply the rest along the way making sure it was centered, then with a scraper tool to smoothly make it even across the whole Jar {glassware}.
Peel away the transfer tape really slowly just to make sure all parts of the stencil remain on the glass, If something didn’t, just put the transfer back, and with the scrapper do some pressure and peel back away. Then with a finger press out any air bubbles near the edges of your stencil.
Step 3: Etching the Jar glass
Next step, apply the etching cream to your glassware.
The fun part!
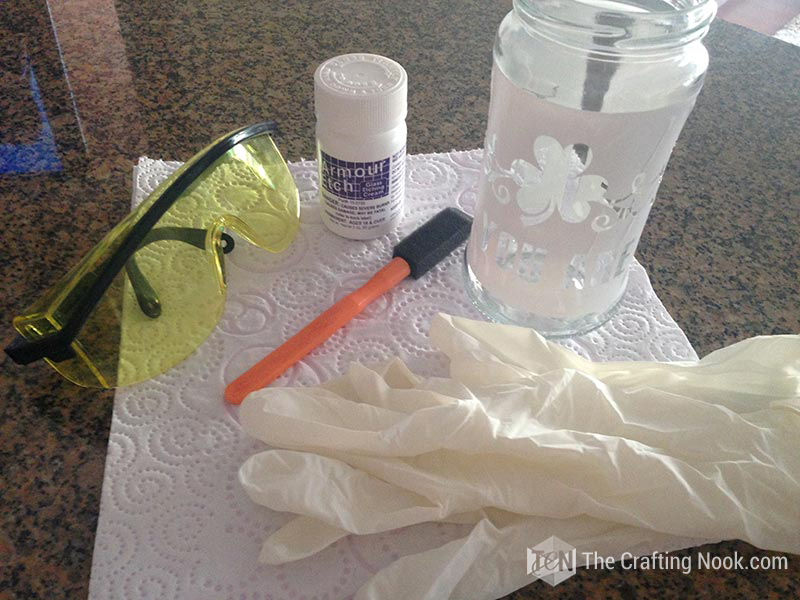
It’s important that for this step you are using rubber gloves and protective glasses.
Also, it’s preferable to do this outside if possible or in a really ventilated area since this product contains strong chemicals and you don’t want to have any direct contact with it.
Lauren even recommends that if you ever get a headache while working with it, take a break. I didn’t thankfully!
Before following any of my instructions, make sure you read the manufacturer’s instructions for your safety.
Shake the bottle to smooth out any clumps and then tap out a generous amount of the etching cream onto the negative spaces in your stencil.

I followed Lauren’s advice on using a foam brush, it definitely gives more control over the spreading of the cream. Thanks, Lauren!!!!
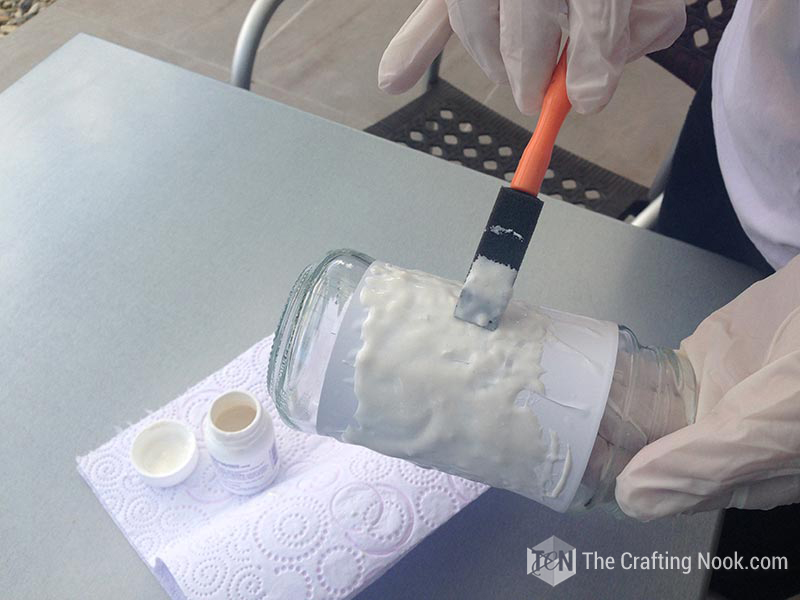
Not sure if height affects the exposure of this project but I found myself leaving it like for over 3 to 4 minutes and as you can see the design is barely visible. Maybe the timing also varies between brands. Silhouette brand suggests 30 to 40 seconds.
Anyway, Once you have an even, thick coat of etching cream across your design, set your timer not less than 3 minutes! You would be amazed how quickly that goes by LOL.
You will feel like you haven’t even set the jar on the table when the alarm will go off.
Once your time is up, you can use your scraper tool to remove the excess cream from your design and put it back in the bottle…. Ooooh yeah, let’s not waste!

Then with a towel remove all the etching cream residues.
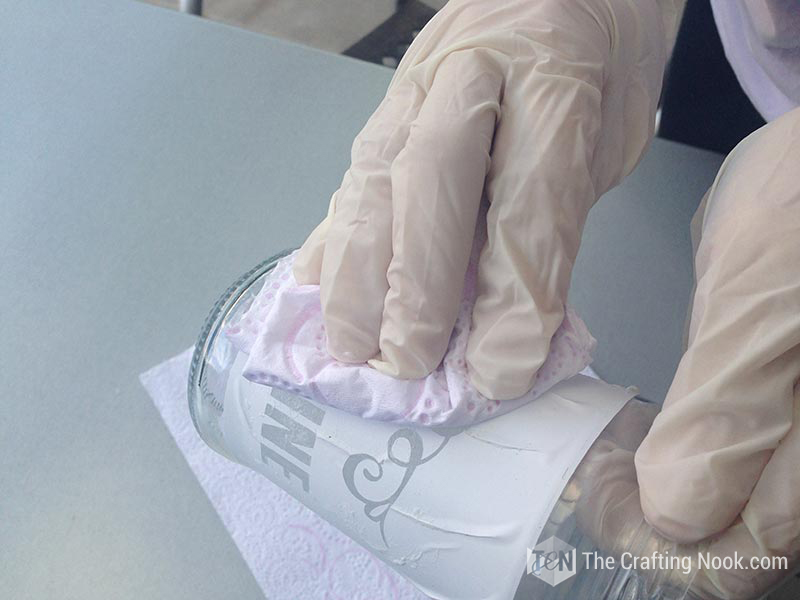
And finally, run the glass under some warm water in fiberglass or Stainless steel sink. Avoid doing this step on a porcelain sink as the cream may damage it.
Still wearing my gloves I removed all the cream and used a rag to dry it. It’s good to be careful not to take some cream onto places we don’t want to etched, it starts the process really fast, learned the hard way!
Now it’s time to remove the vinyl or stencil material. With regular vinyl, it doesn’t take much force but I’ve heard that with stencil material it’s a bit harder.
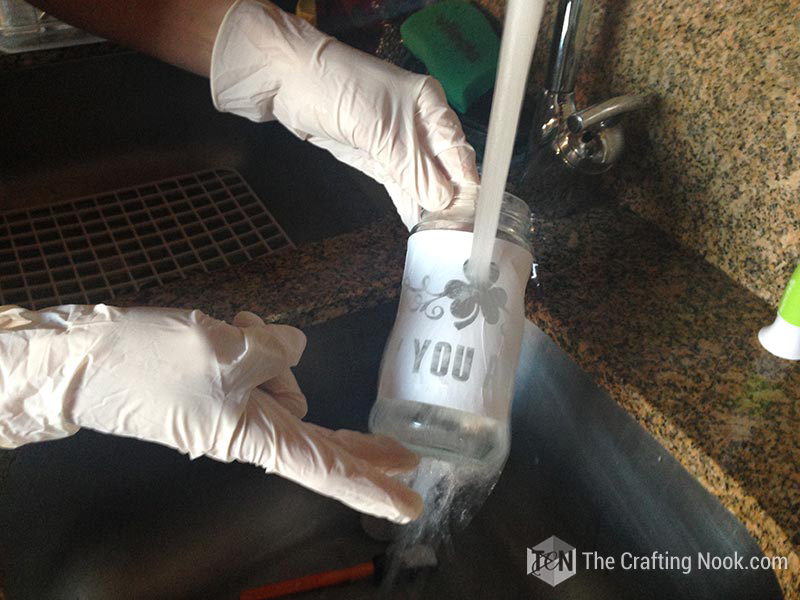
Wash off completely under running water and let it dry well!
I learned that while wet I couldn’t see the design well, so wait until dry to see if it’s there. Here you have your etched glass jar!

Step 4: Decorating the Jar Lid
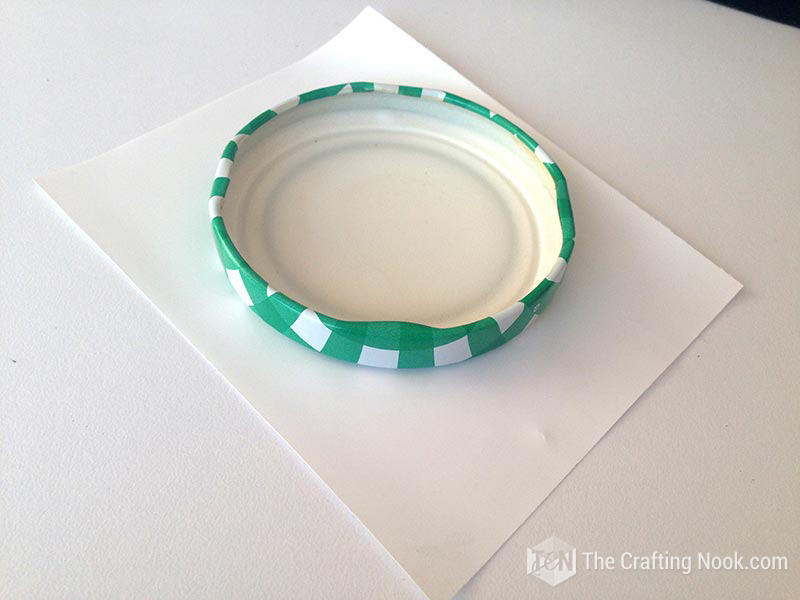
I had this little problem with the jar lid because it had a logo and a plaid design. Not pretty.
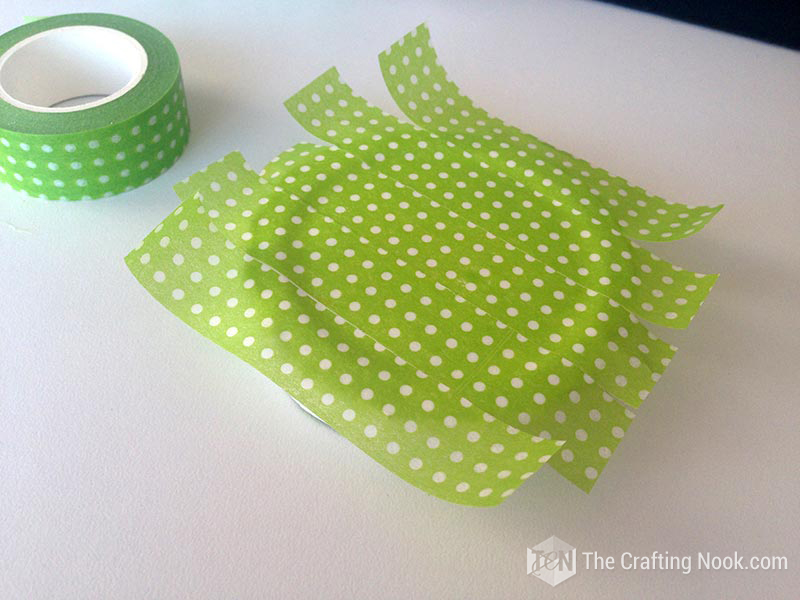
So I fixed that super quick. Just placed a piece of a white vinyl circle a bit larger than the lid on the top.
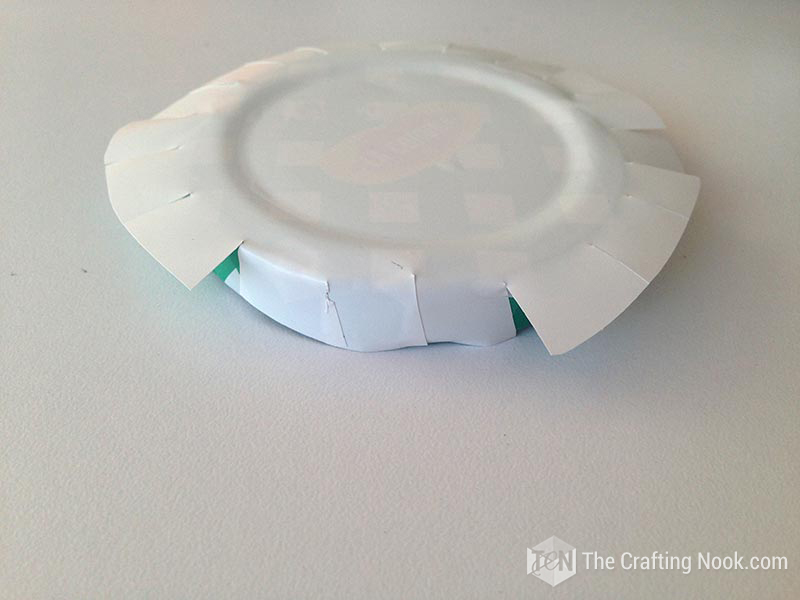
Did some cuts from edges to the lid and fold those tabs to cover the sides.
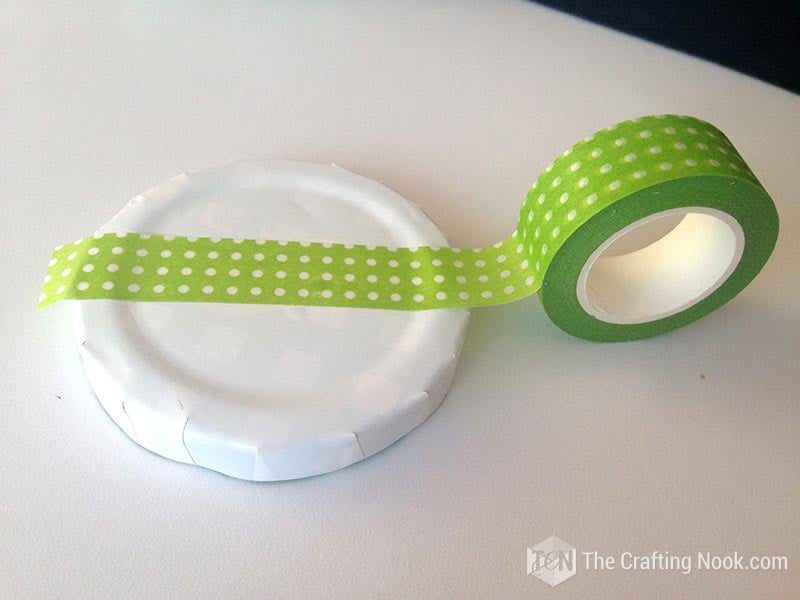
Then with washi tape, I covered all the lid and did the same process for the sides.
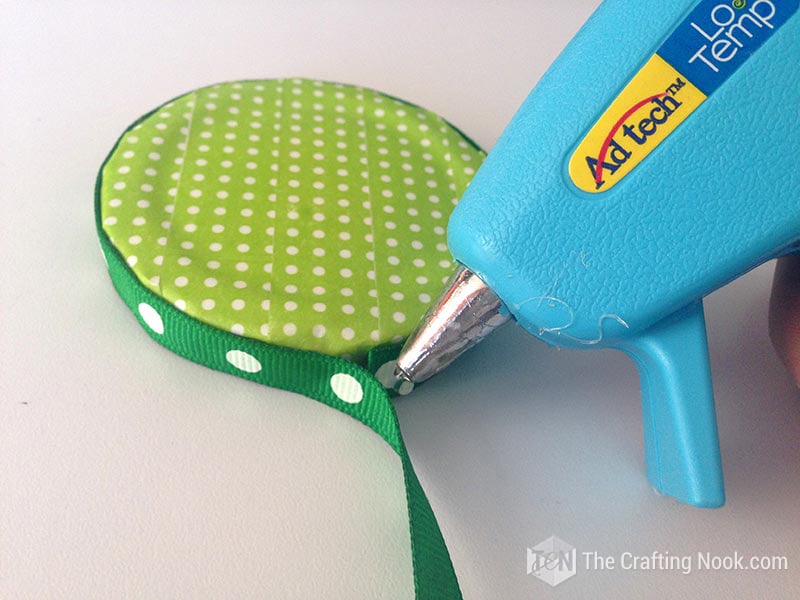
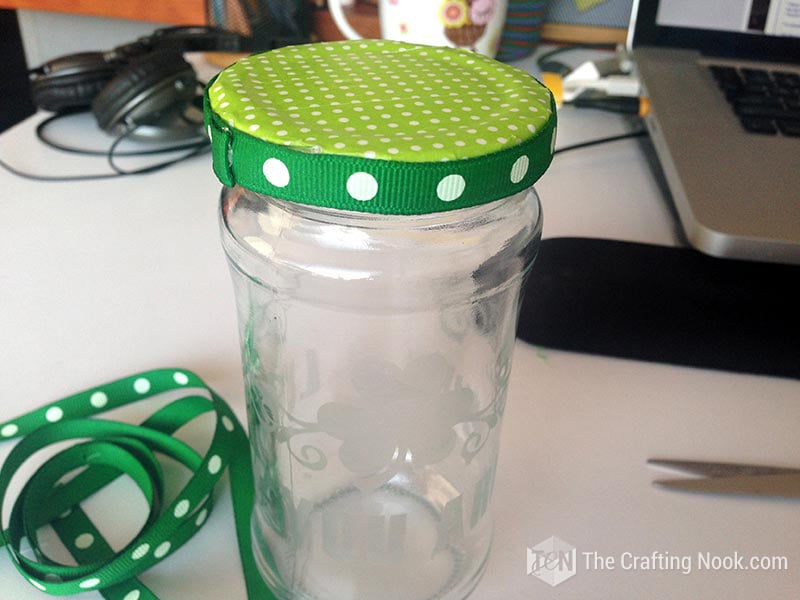
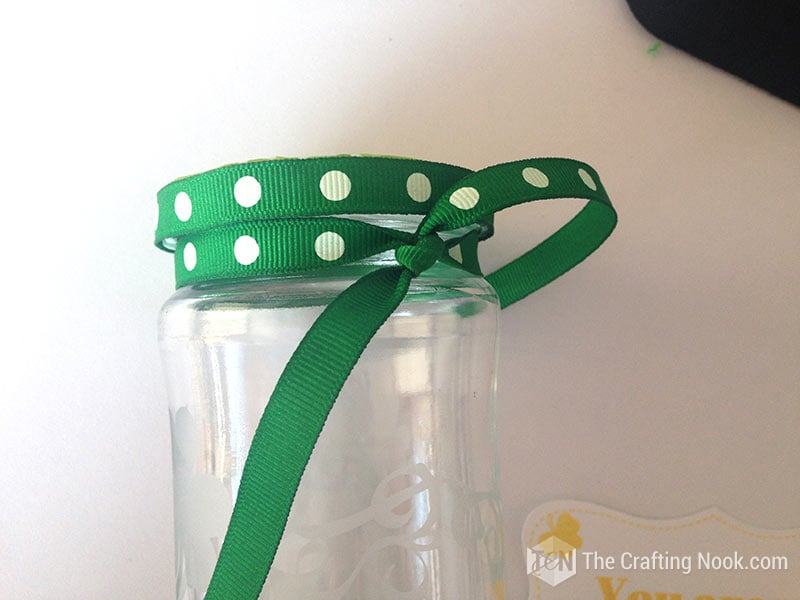
With a cute green ribbon, I covered the sides. That’s it!!!! A cute Jar lid!


Step 5: Creating the gift tag
Ok so, Now to the Tag! 2 Tutorials in one! Cools isn’t it? Click to next page to keep crafting!
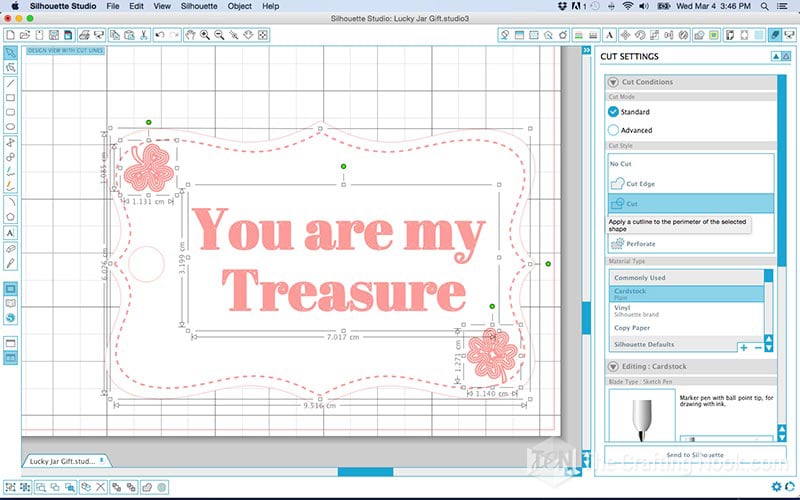
Once the design was ready, I defined what was going to be cut and what was going to be painted with sketch pens.
The tag shape and the hole for the ribbon set to cut and the frame, message, and clovers set to NO-CUT


Then without moving the tag either on the mat or on the Silhouette Studio I set up what I wanted to be in sketch pens.
I made these dashed lines around. Then placed a couple of clovers and placed my sentiment in the middle.
The thing is that I wanted my text and my clovers to be filled and for that, I found an awesome tutorial over at The Silhouette School. Melissa shows us 4 Ways to Fill Fonts with sketch pens. I not only used this tutorial for my fonts but for my clovers too!
I used the Offset way… It’s awesome!
Once your design is ready you need to zoom in really, really close!
With your design highlighted click the ‘Offset’ tool button and then select ‘internal offset.’ You’ll see the offset appear inside the letters.
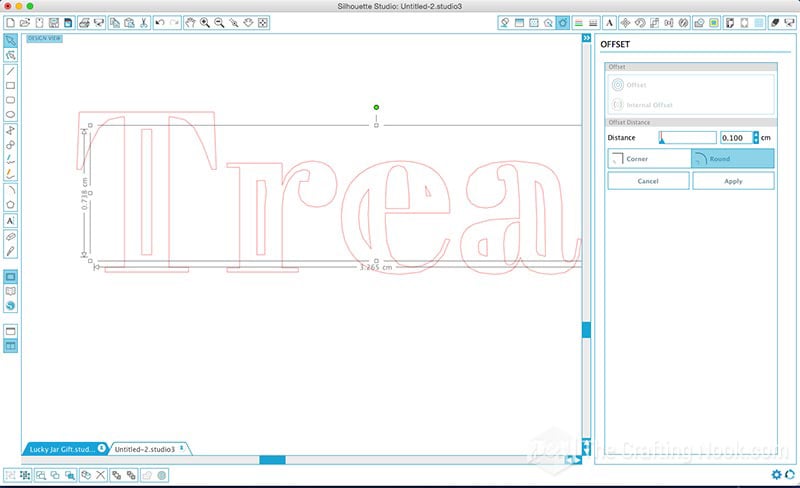
The inset originally is too far away from the original outline, so we need to reduce the distance and drop that value down so the internal line is very close to the original outline.
Click apply.
It’s hard to see that there are two lines there but if you want a real fill it needs to be really close.
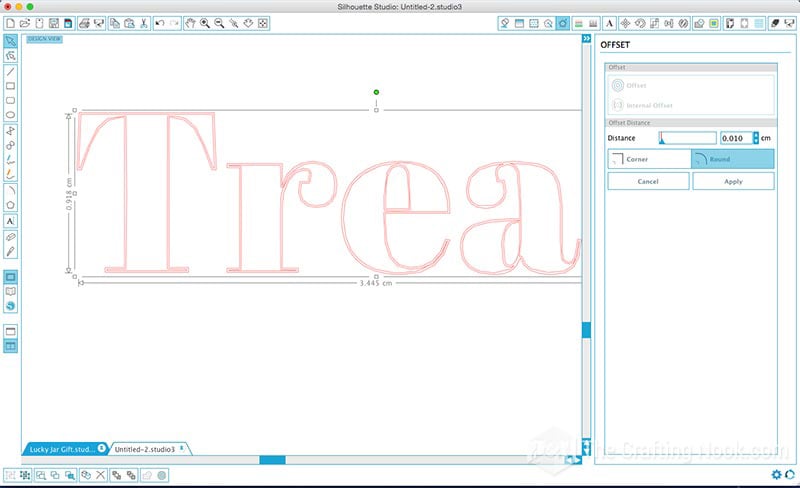
Repeat this process again with an inset at a slightly further distance.
Be sure to click apply after every inset.
I did it about 5 times. From experience, I should have made the inset tighter but in the end, I liked the results =D.

Just keep in mind that if you are zoomed in really close, you can see the tiny gaps between the lines but when you zoom out, check out what happens!!! =D Cool right?
For best results make sure you start out your design with the final size so you don’t have to resize and re-adjust the fill.
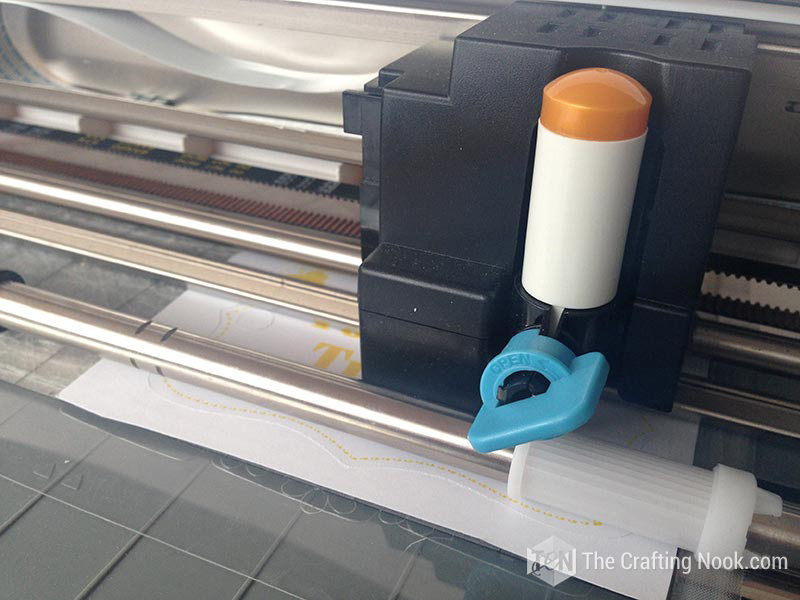
Then I just sent to cut {ehem to paint} {remember not to move your design or tag from place} specifying in the silhouette settings that I’m using sketch pens, and voila!

Now just use the same ribbon you used for your lid and make a knot, Insert the tag and make a bow! Tadaaaa!

You can fill the jar with anything you like… I used almond Hershey’s kisses because they were golden!

You are ready to go!!!!
Crafting Tips
Always clean the glass you wish to etch. To do this, take rubbing alcohol and apply it to all surfaces of the glasses. After rubbing alcohol on the surfaces of the glass, rinse with water and dry.
Try not to use so much etching cream. In this case, less is more for sure. Make sure your vinyl adheres without air bubbles so that the etching cream does not leak underneath the stencil.
If you get air bubbles underneath the vinyl, you can use a hair drier (not too hot) to add some heat to the vinyl and scrape the air out.
Cute or what?


What do you think??? Like this Etched Glass Jar project??? Have you etched glass before??? If so tell me all about it in the comments below!
Frequently Asked Questions
Glass etching is a glass art technique that consists of applying acidic, caustic, or abrasive substances to the surface of the glass in order to roughen its texture in selected areas with the end goal of creating a design.
There’s so much you can do with glass etching. You can add text and design to simple glassware like cups and jars at home, to creating full-fledged, mind-blowing art pieces and decorations for museums and churches.
If you’ve seen etched glass before, then you probably know it has an intriguing appearance. The “frosted” look, produced by abrading glass, has a very fancy and elegant feel that doesn’t look flashy or obtrusive, but instead delicate and decorative.
One of the best things about etching glass is that it’s not expensive and can be done at home by anybody. It is also permanent which makes it a better option than applying vinyl.
Glass etching is a very popular craft and DIY project. You can use glass etching to create personalized drinking glasses, etched wine glasses, monogrammed baking dishes, vases, glass water bottles, and so much more. The glass etching process is easy, fun, and inexpensive!
More St. Patrick’s Day Craft Projects to try
If you enjoyed this Cute Etching Glass Jar tutorial, you might also love these other St. Patrick’s Day Project ideas too:


✂️ Tutorial
DIY Etched Glass Jar Gift for St. Patrick’s Day
Tools
- A Silhouette cutting machine (You could use a cricut too but this tutorial is using Silhouette)
- A hook tool
- A scrapper
Supplies
- An empty and clean glass jar mason jars work too
- Glass etching cream I used armour etch
- Paint brush or foam brush
- Stencil vinyl
- Transfer tape
- Silhouette sketch pens or any marker with the adjustment kit
- White cardstock
- A cute St. Patrick’s Day Design got mine from Silhouette store
- Washi tape
- Ribbon the same width ad your jar’s lid ehight
- Protective gloves and glasses.
- Paper towel
- Candies I used Golden Hershey’s
Instructions
STEP 1: CREATING THE DESIGN
- Ok so, Firstly, I created the design for my own stencil to etch on the Jar.
- I reused an old jar but if you have empty mason jars will work too.
- I also designed a cute tag as well.
- For the Jar, I used this cute swirly clover from Silhouette Store and wrote:
- “LUCKY YOU ARE MINE”
- Then for the Tag, I decided to make it using my sketch pens. I used the Gold one and wrote:
- “YOU ARE MY TREASURE”
- Once it was ready I proceeded to cut the jar design first.
STEP 2: PREPARING THE STENCIL
- Since I didn’t have stencil vinyl material I used white vinyl instead.
- Using my hook I weed all the inner design leaving all the rest in place because that is what will be etched.
- Apply transfer tape to the design.
- Placing the transfer tape on top of the vinyl. Use your scraper tool to smooth the transfer tape atop your stencil as you go.
- Applying transfer tape to the design
- Some air bubbles might remain, but as long as you smooth out the ones closer to the edges of your stencil, you should be good to go.
- Then apply the stencil to the jar {or any glassware you are using}.
- This is really the scariest part for me because the jar is all curvy and I wasn’t sure how it would adhere there. So, I just started with one end and tried to evenly apply the rest along the way making sure it was centered, then with a scraper tool to smoothly make it even across the whole Jar {glassware}.
- Peel away the transfer tape really slowly just to make sure all parts of the stencil remain on the glass, If something didn’t, just put the transfer back, and with the scrapper do some pressure and peel back away. Then with a finger press out any air bubbles near the edges of your stencil.
STEP 3: ETCHING THE JAR GLASS
- Next step, apply the etching cream to your glassware.
- The fun part!
- It’s important that for this step you are using rubber gloves and protective glasses.
- Also, it’s preferable to do this outside if possible or in a really ventilated area since this product contains strong chemicals and you don’t want to have any direct contact with it.
- Lauren even recommends that if you ever get a headache while working with it, take a break. I didn’t thankfully!
- Before following any of my instructions, make sure you read the manufacturer’s instructions for your safety.
- Shake the bottle to smooth out any clumps and then tap out a generous amount of the etching cream onto the negative spaces in your stencil.
- I followed Lauren’s advice on using a foam brush, it definitely gives more control over the spreading of the cream. Thanks, Lauren!!!!
- applying etching cream with brush process image
- Not sure if height affects the exposure of this project but I found myself leaving it like for over 3 to 4 minutes and as you can see the design is barely visible. Maybe the timing also varies between brands. Silhouette brand suggests 30 to 40 seconds.
- Anyway, Once you have an even, thick coat of etching cream across your design, set your timer not less than 3 minutes! You would be amazed how quickly that goes by LOL.
- You will feel like you haven’t even set the jar on the table when the alarm will go off.
- Once your time is up, you can use your scraper tool to remove the excess cream from your design and put it back in the bottle…. Ooooh yeah, let’s not waste!
- Then with a towel remove all the etching cream residues.
- And finally, run the glass under some warm water in fiberglass or Stainless steel sink. Avoid doing this step on a porcelain sink as the cream may damage it.
- Still wearing my gloves I removed all the cream and used a rag to dry it. It’s good to be careful not to take some cream onto places we don’t want to etched, it starts the process really fast, learned the hard way!
- Now it’s time to remove the vinyl or stencil material. With regular vinyl, it doesn’t take much force but I’ve heard that with stencil material it’s a bit harder.
- Wash your jar well and let it dry!
- I learned that while wet I couldn’t see the design well, so wait until dry to see if it’s there. Here you have your etched glass jar!
STEP 4: DECORATING THE JAR LID
- I had this little problem with the jar lid because it had a logo and a plaid design. Not pretty.
- So I fixed that super quick. Just placed a piece of a white vinyl circle a bit larger than the lid on the top.
- Did some cuts from edges to the lid and fold those tabs to cover the sides.
- Then with washi tape, I covered all the lid and did the same process for the sides.
- With a cute green ribbon, I covered the sides. That’s it!!!! A cute Jar lid!
- STEP 5: CREATING THE GIFT TAG
- Ok so, Now to the Tag! 2 Tutorials in one! Cools isn’t it? Click to next page to keep crafting!
- Once the design was ready, I defined what was going to be cut and what was going to be painted with sketch pens.
- The tag shape and the hole for the ribbon set to cut and the frame, message, and clovers set to NO-CUT
- Then without moving the tag either on the mat or on the Silhouette Studio I set up what I wanted to be in sketch pens.
- I made these dashed lines around. Then placed a couple of clovers and placed my sentiment in the middle.
- The thing is that I wanted my text and my clovers to be filled and for that, I found an awesome tutorial over at The Silhouette School. Melissa shows us 4 Ways to Fill Fonts with sketch pens. I not only used this tutorial for my fonts but for my clovers too!
- I used the Offset way… It’s awesome!
- Once your design is ready you need to zoom in really, really close!
- With your design highlighted click the ‘Offset’ tool button and then select ‘internal offset.’ You’ll see the offset appear inside the letters.
- The inset originally is too far away from the original outline, so we need to reduce the distance and drop that value down so the internal line is very close to the original outline.
- Click apply.
- It’s hard to see that there are two lines there but if you want a real fill it needs to be really close.
- Working on the inset feature to fill the letters
- Repeat this process again with an inset at a slightly further distance.
- Be sure to click apply after every inset.
- I did it about 5 times. From experience, I should have made the inset tighter but in the end, I liked the results =D.
- The word completely filled with layers of insets
- Just keep in mind that if you are zoomed in really close, you can see the tiny gaps between the lines but when you zoom out, check out what happens!!! =D Cool right?
- For best results make sure you start out your design with the final size so you don’t have to resize and re-adjust the fill.
- Then I just sent to cut {ehem to paint} {remember not to move your design or tag from place} specifying in the silhouette settings that I’m using sketch pens, and voila!
- Now just use the same ribbon you used for your lid and make a knot, Insert the tag and make a bow! Tadaaaa!
- You can fill the jar with anything you like… I used almond Hershey’s kisses because they were golden!
- You are ready to go!!!!
Share and Pin Me


Want to Check Out More Silhouette Projects?
My Silhouette Challenge buddies and I are all sharing projects on our blogs today, so peruse the projects below for a wealth of Silhouette inspiration!
1. The Stamp Doc // 2. Peanut Life Adventures // 3. Creative Ramblings // 4. Pitter and Glink // 5. The Thinking Closet // 6. Single Yet Married Mom // 7. unOriginalMom // 8. Sisters, What! // 9. Where The Smiles Have Been // 10. Adventures in All Things Food // 11. Practically Functional // 12. Weekend Craft // 13. Two Purple Couches // 14. Ribbons & Glue // 15. The Crafting Nook // 16. Simply Kelly Designs // 17. Confessions of an Overworked Mom
Til’ next time…


FREE WORKBOOK
Keeping your Sweet Home Organized
Learn how to create intentional habits and simple routines to Keep Your Home Organized. Plus freebies, printables, exclusive content, and tips.
Disclaimer: By clicking on the “Yes” button above you are giving me your consent to collect and use your information according to the law and My Policy Privacy. Zero Spam I promise!
What a sweet project! I could easily see switching out the shamrock for another symbol and using it for any number of gifts! And chocolate kisses… mmmm…. that makes me hungry!
Love how this turned out! So cute! Etching is something that is on my “to do” list. Thank you for sharing your wonderful project with VMG206 Brag About It!
This is great project. Good job on the curved surface too. Thanks for the step by step to decorating the lid
Thank you Pam! It was fun to make but also a bit scary LOL!!! Glad yo like it!
XOXO
This is such a cute project! I love how you decorated the lid, and like I said on FB, I must try etching now!
You will love etching Bethany! Is super fun and endless possibilities!
Thanks so much for stopping by!
XOXO
I love glass etching but I’ve never tried making my own stencils. What a great idea!
Thank you Ellen! I’m excited that you like this project! It’s definitely awesome to make my own stencils!
XOXO
The etching came out great. I haven’t been brave enough to try etching myself. I like how you used washi tape to decorate the lid too. Pinning!
Thank you so much Kelly! Oh yeah I didn’t like the original lid LOL I had to do something! Glad you like it!
XOXO