Easy DIY Origami Fortune Cookie for Valentine’s Day
This post may contain affiliate links. Please read our Disclosure Policy.
These origami fortune cookies are a simple and fun Valentine’s Day paper craft you can make in just a few minutes. They’re perfect for kids, classroom activities, or adding a sweet handmade touch to small gifts.
In this tutorial, I’ll show you how to fold origami fortune cookies step by step using basic paper and clear photos, no special tools required.

Table of Contents
How to make a Origami Fortune Cookies
Valentine’s Day is one of those moments that naturally invites small, thoughtful gestures. A handmade detail, a kind message, or a simple craft shared with someone you love can say more than a store-bought gift ever could.
These origami fortune cookies were born from that idea. I made them to decorate my space and to share with family and friends, each one hiding a sweet little message inside.
Yes, this project mixes two cultures. Origami comes from Japan, while fortune cookies are traditionally associated with Chinese culture. Even though these paper cookies don’t look exactly like edible fortune cookies, they open the same playful way, with a surprise message tucked inside, and that’s what makes them so fun.

This is a simple, beginner-friendly paper craft that works beautifully for Valentine’s Day, but it doesn’t have to stop there. You can use these origami fortune cookies for birthdays, party favors, classroom activities, bridal or baby showers, or any celebration where a personal message makes the moment feel more special.
One of the things I love most about this project is how accessible it is. You don’t need glue, scissors, or special tools. Just paper and your hands.
Project snapshot
- Project type: Paper craft / Origami
- Time needed: About 10–15 minutes per cookie
- Budget range: Low
- Skill level: Beginner
- Tools required: None
- Customization level: Fully customizable
Supplies:
- 3×3 inches – 7.5×7.5 cm Origami paper or any cute thin paper like scrapbook paper.
- Strips of paper with messages or treats {candies}. You can snag my secret messages here.
- Scissors and pencil or pen (If you plan on handwriting the messages yourself)
Paper Alternatives
Actual origami paper is ideal but you can use pretty much any paper for this particular project. I don’t really recommend cardstock since it’s heavier and not so easy to fold for small pieces. Here are some ideas:
- Plain paper
- Construction paper (lightweight)
- Scrapbook paper (lightweight)
- Even printed digital paper.
All papers need to be perfect squares for the origami to work.
Instructions:
Before we begin, take a look at the supplies and steps below. This is a simple paper-folding project, and once you make the first piece, the rest come together quickly.
I created a quick video tutorial to make it easy for you! However, if you are more of a photo step-by-step kind of person just scroll down and keep reading!
Step 1: Prep the Paper and Messages
You’ll need three square origami papers for each fortune cookie. I used three different patterns and colors, but you can mix and match however you like.

Cut a few small paper strips for your messages or fortunes and set them aside.

That’s all the prep you need.
Step 2: Fold the Origami Pieces
Each fortune cookie is made from three folded pieces, starting with one square at a time.
Place one square of paper pattern side down.

Fold the paper diagonally corner to corner. Crease well and unfold.

Fold diagonally in the opposite direction. Crease and unfold again.

Fold the right and left points inward so they meet the center crease line.

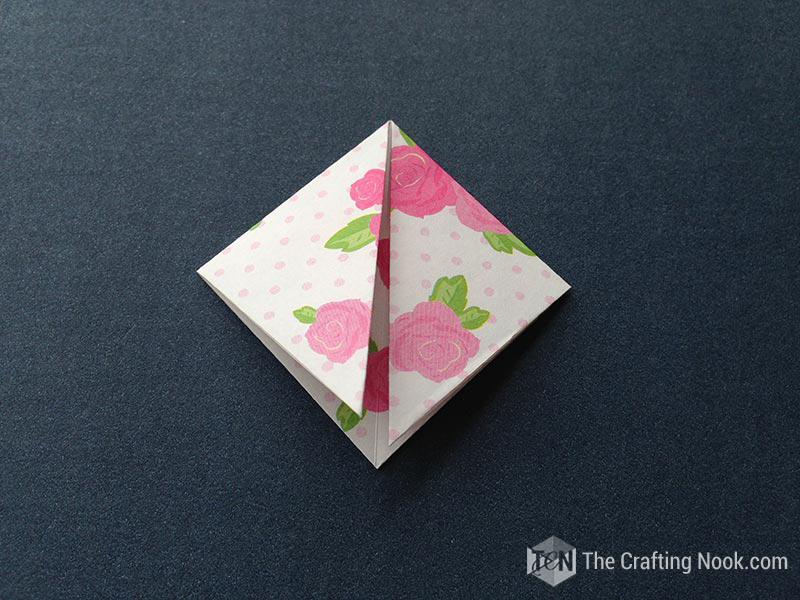
Unfold those folds.
Take one corner and fold it inward to meet the center line.

Fold the paper back along the diagonal crease.

At this point, you should have a folded triangular shape with clean creases on both sides.
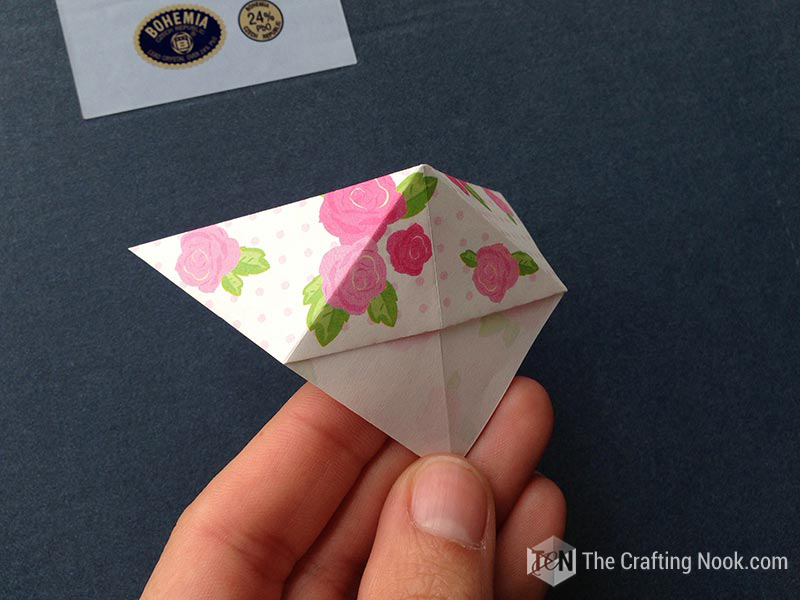

Repeat these steps with the other two squares.

Step 3: Assemble the Fortune Cookie
Take one folded piece and insert its two pointed ends into the pocket of another piece, sliding them between the folded layer and the flat side.

Push it in fully until the shape forms a diamond (rhombus).

Add the third piece the same way, but leave one flap open so you can insert your message or treat.

Place the folded message inside, then tuck in the final point to close the cookie.


Your origami fortune cookie is now assembled.

Step 4: Open the Fortune Cookie
To reveal the message, gently press up on both sides of the cookie.

It will pop open, showing what’s inside.
You can easily close it again and reuse it as many times as you like.

After I finished the first origami fortune cookie I got hooked and made about ten of these and place them on a cute dish and put on my table.

They turned out super cute and people love it they come and ask what’s that? Can I get one? LOL.

Crafting Tips
Use these tips to get clean folds and a better final shape.
- Origami only works properly with perfect squares. If you’re cutting your own paper, take a moment to measure carefully.
- Sharp folds help the pieces slide into each other more easily during assembly.
- Avoid very thick paper. Cardstock is usually too stiff and can make the cookie bulky or hard to close.
- Start with one test piece. Once you understand how the folds work, the remaining pieces come together much faster.
Alternatives and Variations
These origami fortune cookies are easy to adapt for different occasions and styles.
- Origami paper works best, but lightweight scrapbook paper or regular printer paper also works if cut into perfect squares.
- Write short notes, jokes, wishes, or affirmations. Keep them small so the cookie opens easily.
- While perfect for Valentine’s Day, these also work well as party favors, classroom activities, birthdays, baby or bridal showers, and small handmade gifts.
- Instead of messages, you can tuck in tiny candies or stickers, as long as they don’t add too much bulk.

Frequently Asked Questions
Origami is the art of folding paper into shapes using only folds, without cutting or glue. Most origami projects start with a square piece of paper, which is why paper shape matters for this tutorial.
Origami paper works best, but many lightweight papers will work for this project. Avoid cardstock, as it’s usually too thick and makes the folds bulky or hard to close.
Good options include:
-Regular printer paper
-Lightweight construction paper
-Lightweight scrapbook paper
-Printed digital paper
All paper must be cut into perfect squares for the origami to fold correctly.
You can place anything small and lightweight inside, such as:
-Folded messages or fortunes
-Small candies
-Stickers or confetti
-Tiny charms or pendants
Keep the contents small so the cookie can open and close easily.
No. This project only requires paper and your hands. No glue, scissors, or machines are needed.
What do you think, do you like these origami fortune cookies?
More Valentine’s Day Crafts to Try
If you enjoyed this Origami fortune cookie tutorial, you might love these other easy Valentine crafts too:


✂️ Tutorial

DIY Origami Fortune Cookie this Valentine’s Day
Tools
- scissors
- Printer
- Markers or pen (If you plan on handwriting the messages yourself)
Supplies
- 3 ×3 inches – 7.5×7.5 cm Origami paper or any cute thin paper like scrapbook paper.
- Strips of paper with messages or treats {candies}. You can snag my secret messages here.
Instructions
Step 1: Prep the Paper and Messages
- You’ll need three square origami papers for each fortune cookie. I used three different patterns and colors, but you can mix and match however you like.
- Cut a few small paper strips for your messages or fortunes and set them aside.
- That’s all the prep you need.
Step 2: Fold the Origami Pieces
- Each fortune cookie is made from three folded pieces, starting with one square at a time.
- Place one square of paper pattern side down.
- Fold the paper diagonally corner to corner. Crease well and unfold.
- Fold diagonally in the opposite direction. Crease and unfold again.
- Fold the right and left points inward so they meet the center crease line.
- Unfold those folds.
- Take one corner and fold it inward to meet the center line.
- Fold the paper back along the diagonal crease.
- At this point, you should have a folded triangular shape with clean creases on both sides.
- Repeat these steps with the other two squares.
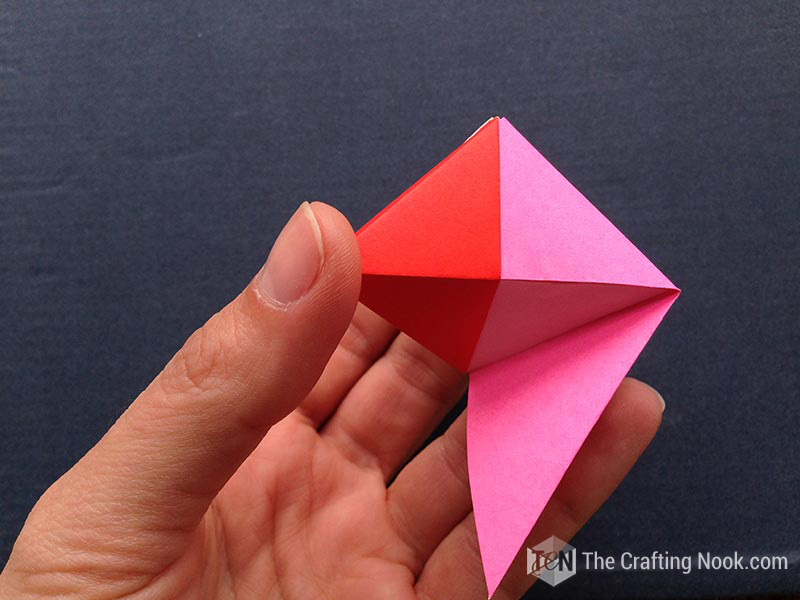
- All 3 origami pieces ready, one pink, one red and one patterned with flowers
Step 3: Assemble the Fortune Cookie
- Take one folded piece and insert its two pointed ends into the pocket of another piece, sliding them between the folded layer and the flat side.
- Push it in fully until the shape forms a diamond (rhombus).
- Add the third piece the same way, but leave one flap open so you can insert your message or treat.
- Place the folded message inside, then tuck in the final point to close the cookie.
- Your origami fortune cookie is now assembled.
Step 4: Open the Fortune Cookie
- To reveal the message, gently press up on both sides of the cookie.
- It will pop open, showing what’s inside.
- You can easily close it again and reuse it as many times as you like.
- Make as many origami fortune cookie as you like and place them in a bowl or in plastic bags to gift to your loved ones!
Video

Have you ever made an origami fortune cookie???
Tell me all about it on the comments below!
If you like this idea, make sure you share with your friends!

Til’ next time…


FREE WORKBOOK
Keeping your Sweet Home Organized
Learn how to create intentional habits and simple routines to Keep Your Home Organized. Plus freebies, printables, exclusive content, and tips.
Disclaimer: By clicking on the “Yes” button above you are giving me your consent to collect and use your information according to the law and My Policy Privacy. Zero Spam I promise!