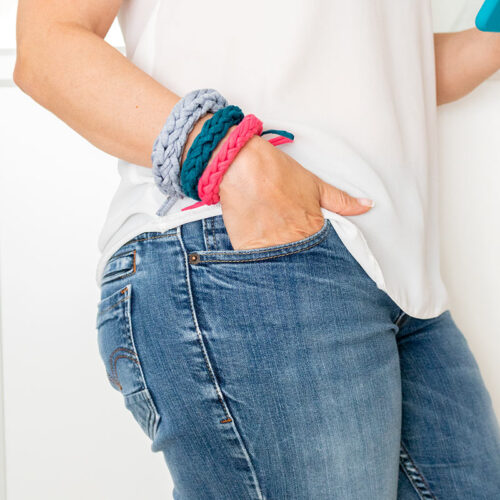
5-min DIY Finger Knitted Bracelet with Jersey T-Shirt
This post may contain affiliate links. Please read our Disclosure Policy.
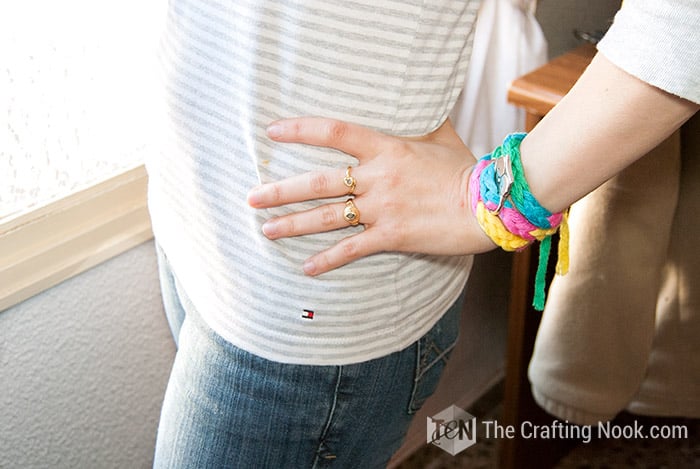
Bored with your regular accessory? Knit yourself a finger knitted bracelet with jersey t-shirt yarn, in just 5 minutes, even less! Learn more here.

Whenever Spring and summer are close, I’m eager to have a more colorful and brighter surrounding.
I had made years ago a cute finger knitting bracelet that I found so fun to make but I made it using only two fingers.
The truth is that it can be made with three and even four fingers and I thought it would be a good idea to share how to make them today.
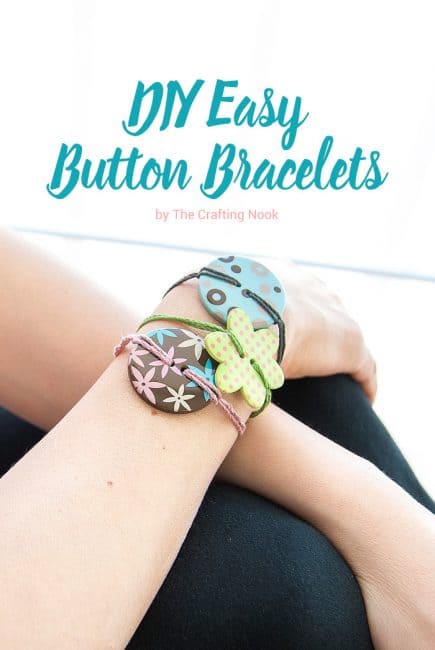
You might also love these other Handmade Jewelry ideas: DIY 5 Minutes Finger Knit Bracelet with Yarn, Easy DIY Braided Bracelet, and DIY Easy Button Bracelets.
Table of Contents
5-min DIY Finger Knitted Bracelet Tutorial with Jersey T-Shirt
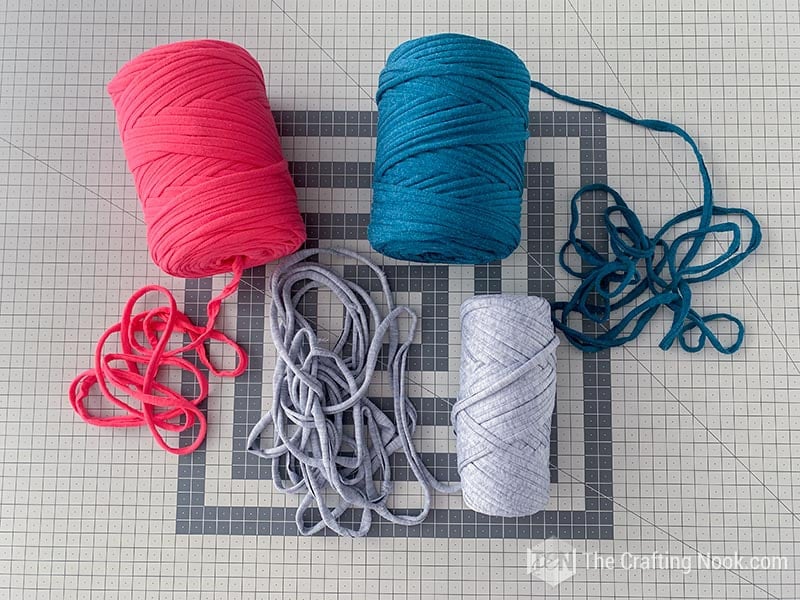
I originally saw this idea on V and CO and it looked so cute and simple to make. It was made of jersey cotton and the best part was that you only need jersey T-shirt yarn and your fingers to make it!!!
Oh! and of course, any ornament that you may want to use. I personally love to be able to knit something with my own hands which are probably the best and simplest tools of all and without using knitting needles.
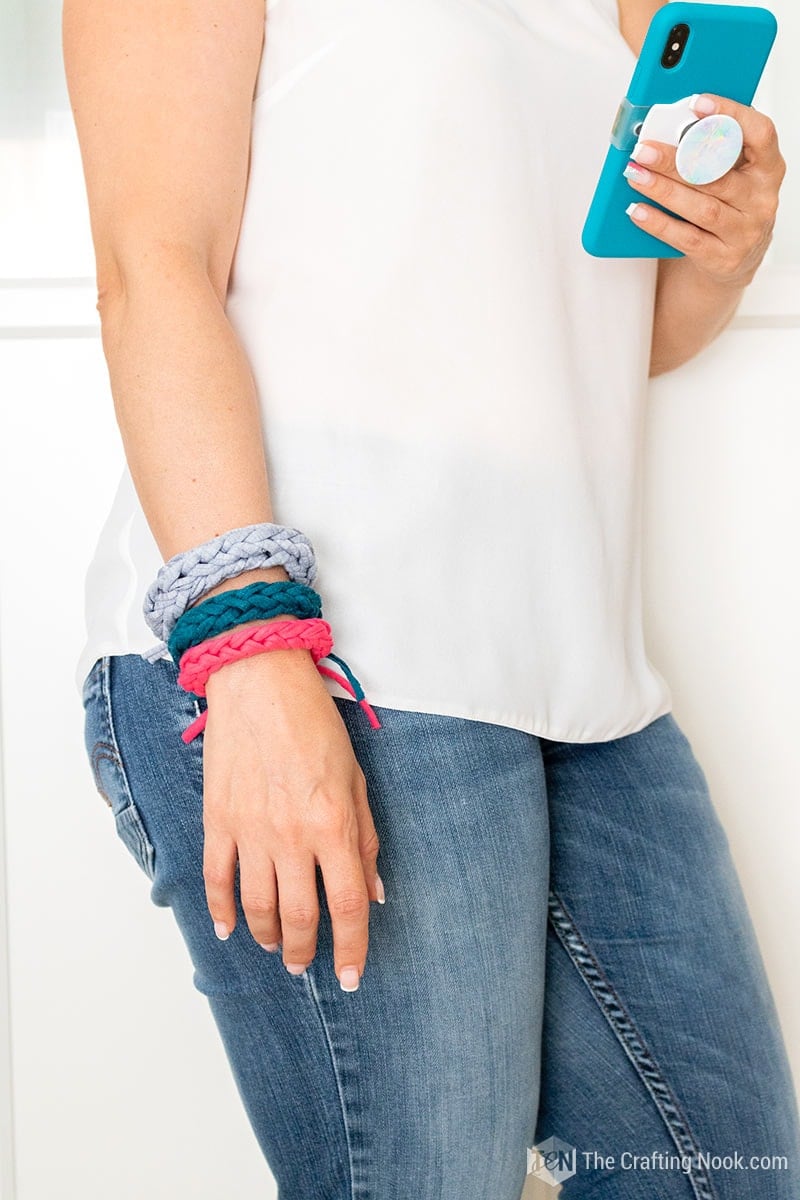
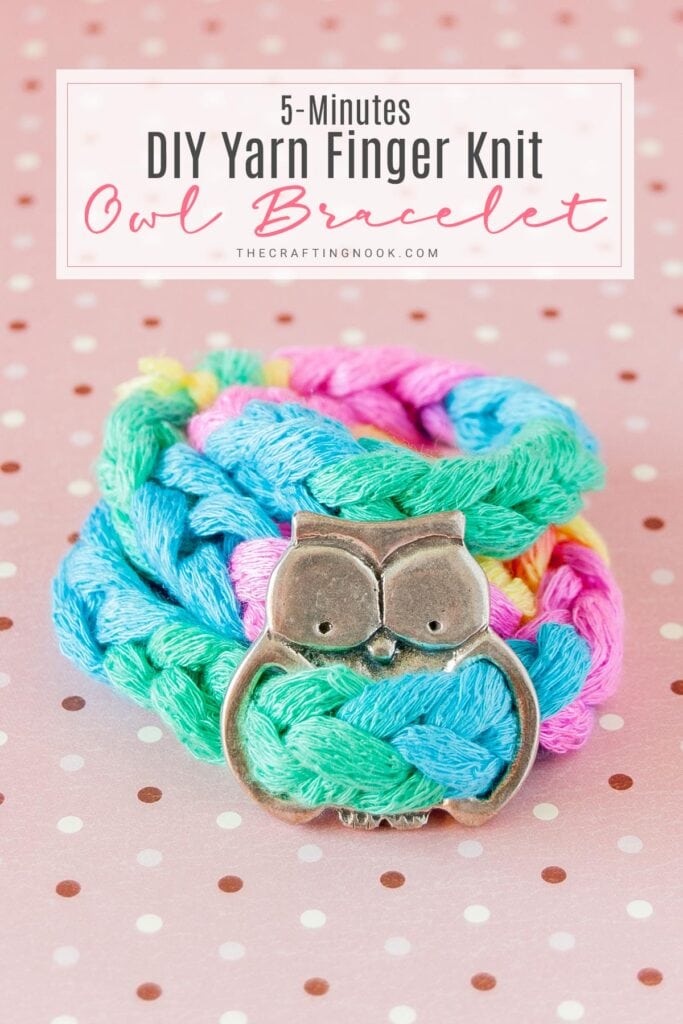
For my previous project I used a cute owl ornament and a longer chain wrapped around my wrist, but this time I decided to go simpler but colorful.
Once you get the hang of it you can make it super fast, that’s why I call it 5-minute craft!
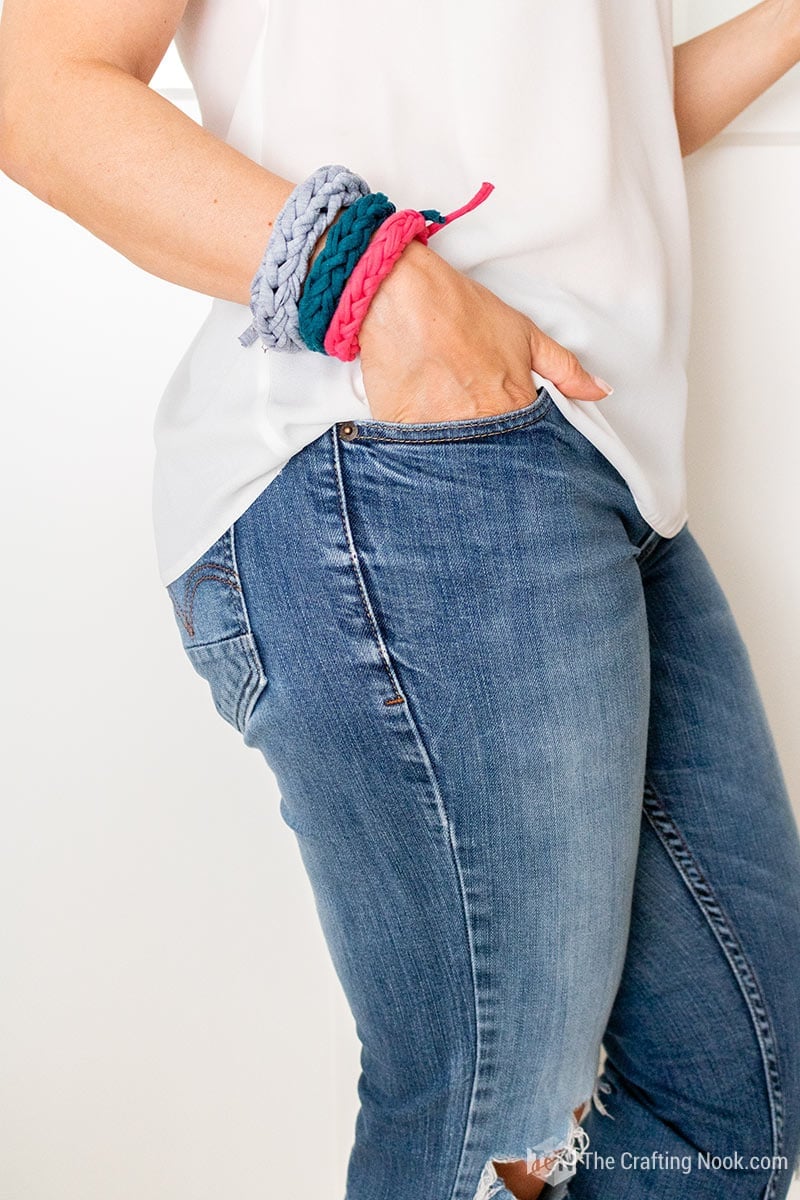
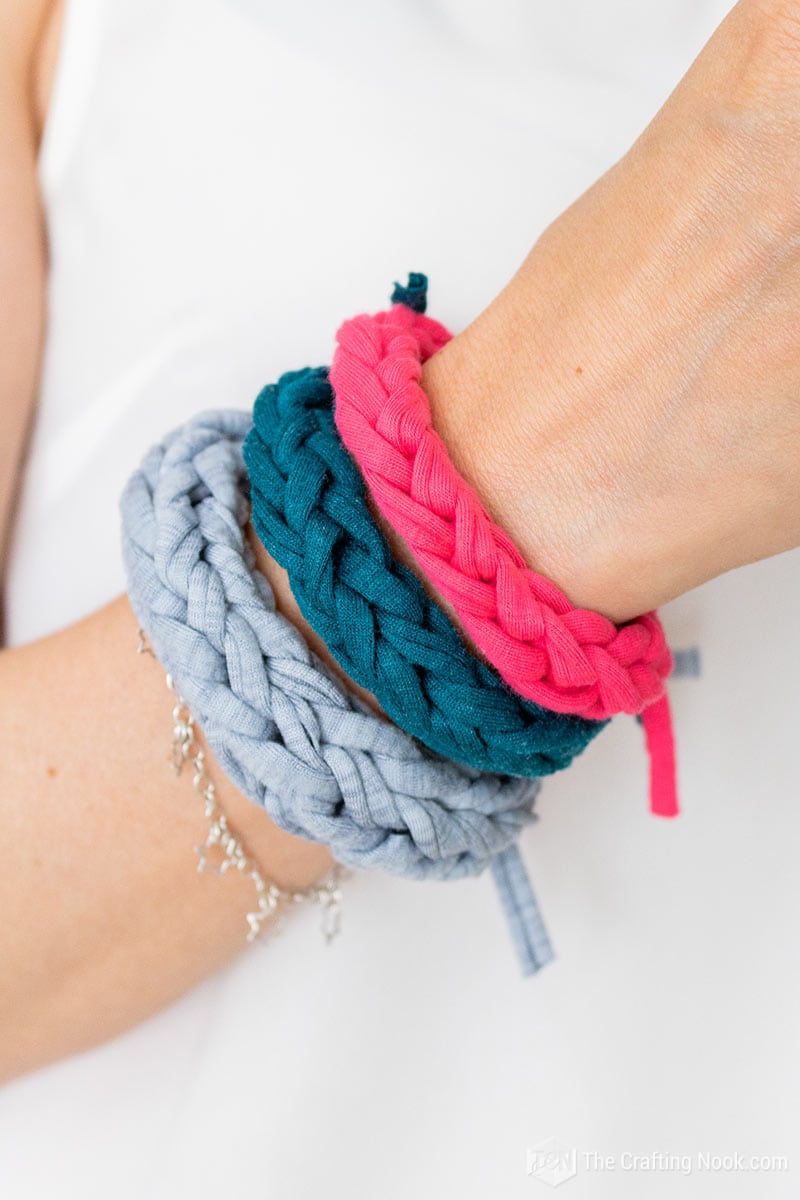
The good thing about Finger Knitting is that you can make so many fun accessories and also add fun variations. You can make necklaces, ankle bracelets, belts, headbands, and even scarves, and so much more.
It’s a great way to add a pop of color or statement piece to any outfit, and I love finger knitting as it is so easy to create. You can do this in tons of colors, and even different types of yarn or ribbon.
This craft makes a great project for total beginners, kids, and teens. Kids can improve motor skills and teens can create amazing new accessories to match their styles.
To be totally honest, this project totally reminded me of my childhood when I used to play a lot with finger knitting and even finger looping. Now, I get to craft it for a wearable piece of handmade accessory.
How to Make a T-Shirt Finger Knitted Bracelet
Before we begin, be sure to follow us on Pinterest, Facebook, Instagram, and YouTube, and also sign up for our email list (at the end of this post), so you’ll never miss a post!
Supplies:
- Jersey T-Shirt Yarn (or your favorite type of material, like yarn, your favorite fabric, cord, or anything yarn-like).
- * Ornaments or beads are optional.
Tools:
- Scissors
- Your hands!
Variations and alternatives
Instead of Jersey yarn, you can actually create your own yarn with old T-Shirts. Or you can use different types of yarn or ribbon, cord is fun too.
You can also use beads and ornaments to add your own special touch. Wooden beads always look so pretty!
I’m so happy with my new bracelets and I wanted to share them with you. This is how I made it:
Instructions:
As I mentioned before, this technique can be made with 2, 3, and 4 fingers. The more fingers you use, the thicker the bracelets get.
Here I’ll show you how to make them all with photos and video.
I usually don’t establish a specific measure, I just knit until I get the length I need.
I made a fun video tutorial for the 3 bracelets, but if you like a more photo bases step-by-step tutorial, scroll down and let’s get to it.
Let’s get started, follow these simple steps:
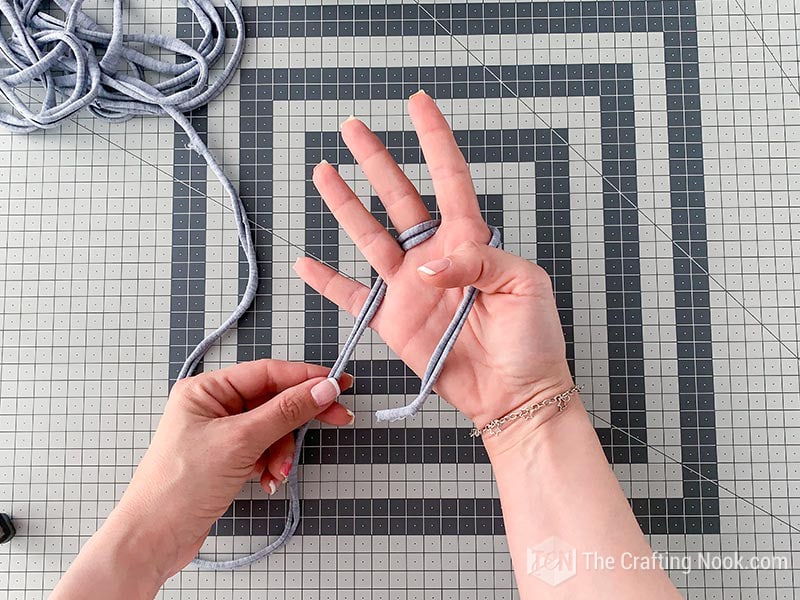
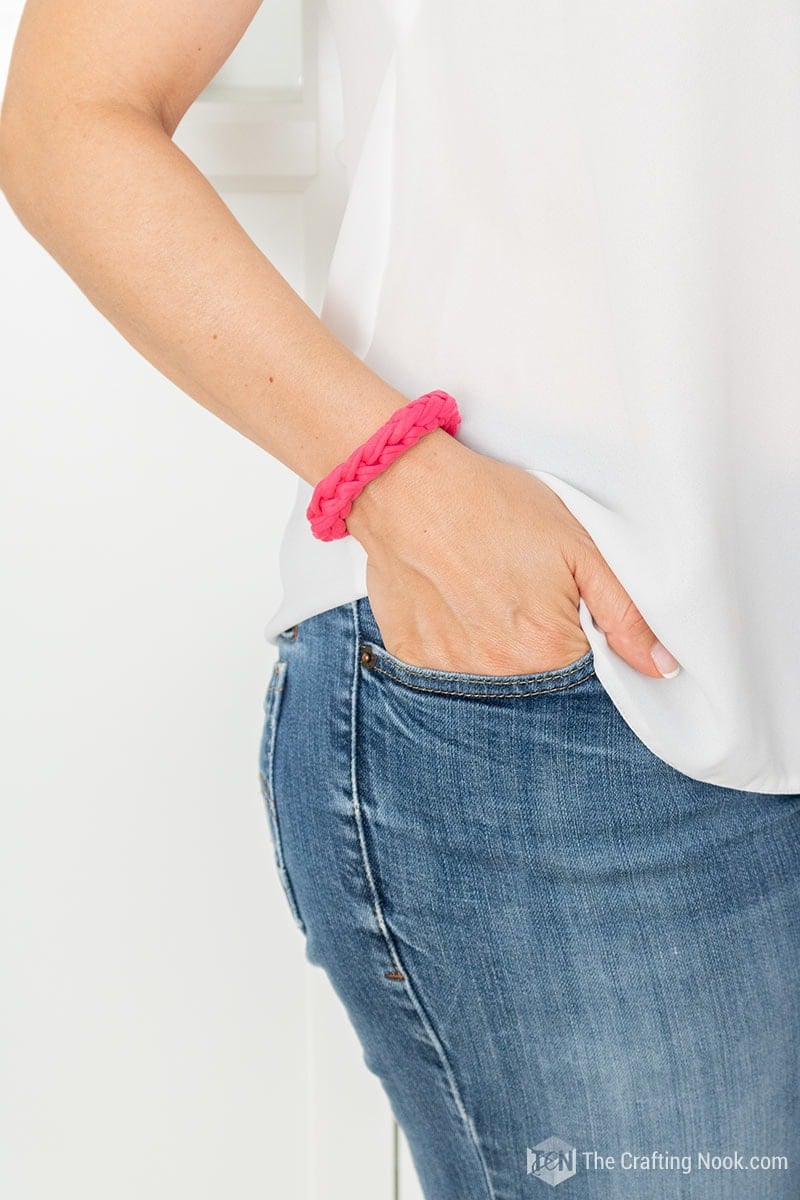
Method 1: Two-Fingers.

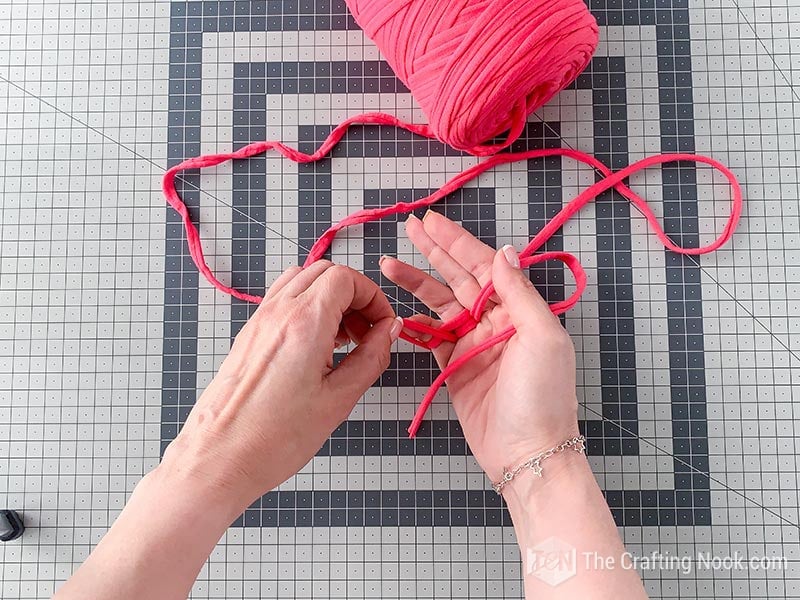
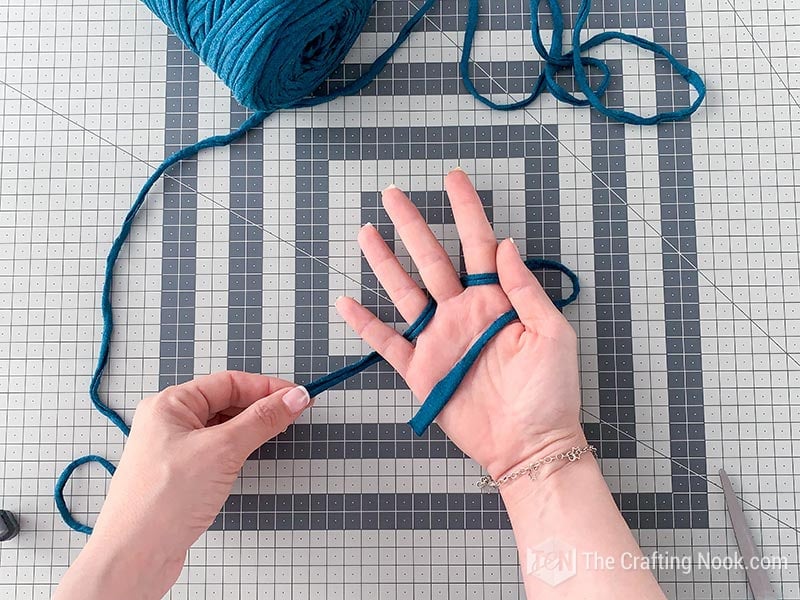
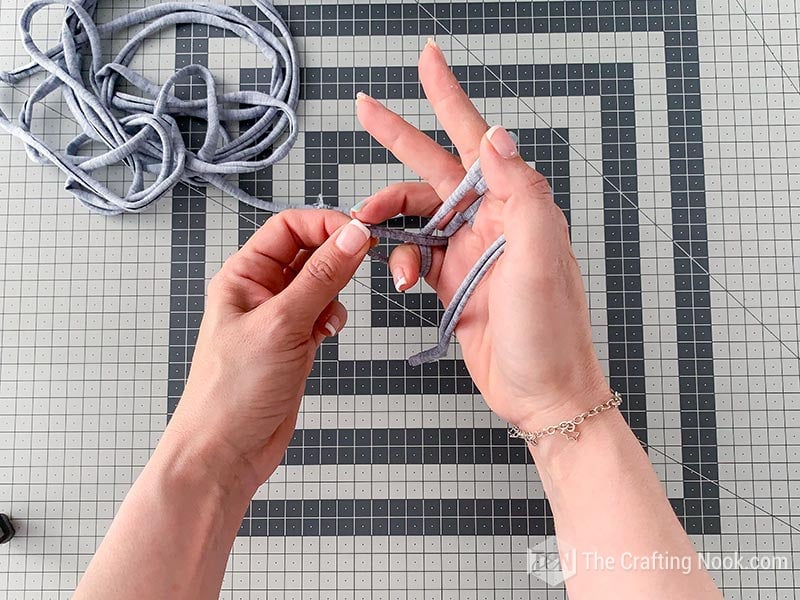
1. Get your jersey t-shirt yarn and we are now going to weave the strip in and out of our fingers.
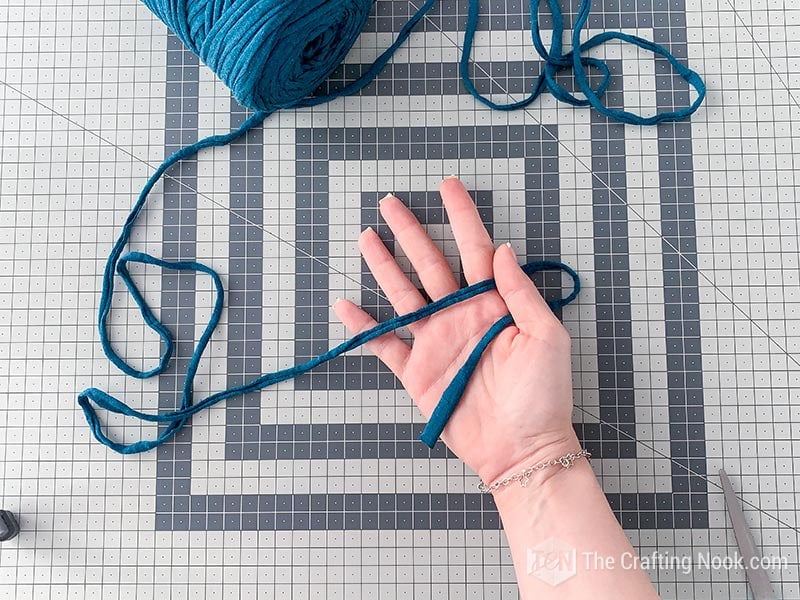
2. Firstly, we hold one end of the jersey yarn on your palm and secure it with your thumb just like in the pic.
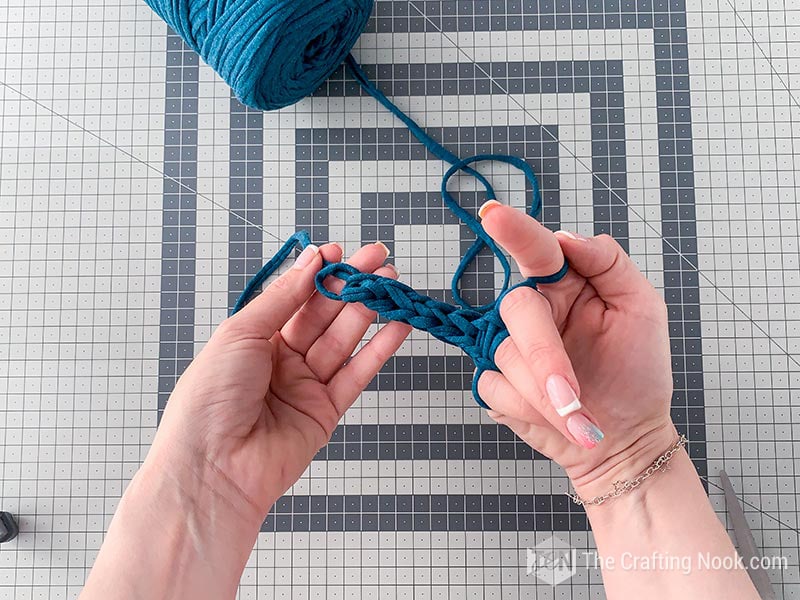
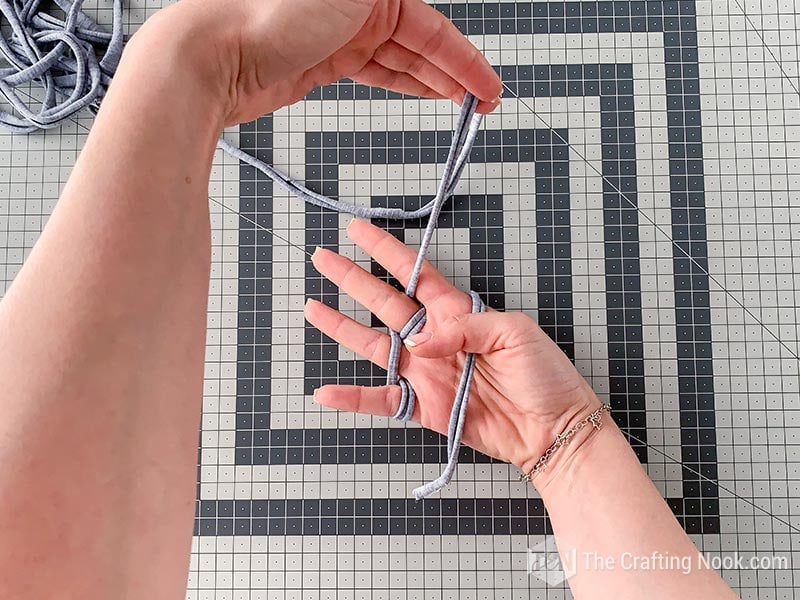
3. Then weave the strip in and out of our fingers, first behind your ring finger and then in front of your pinky.
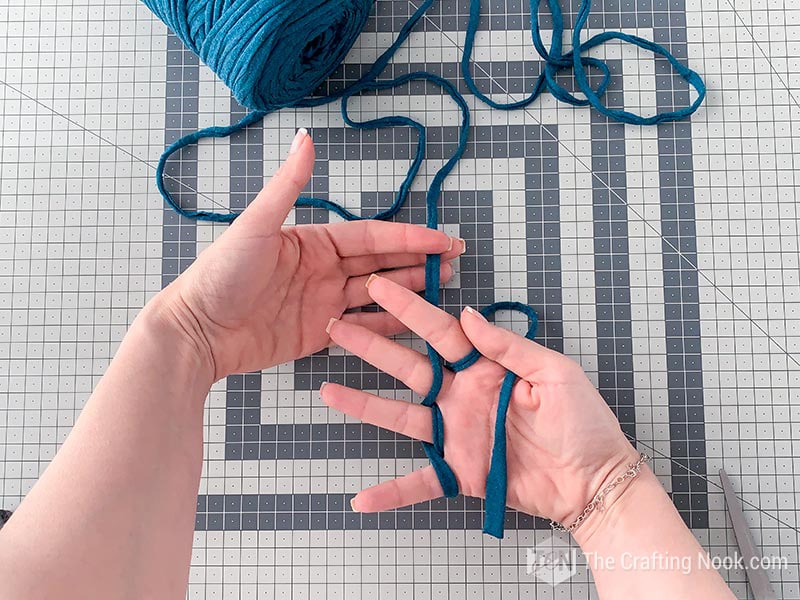
4. Next, go around the pinky and come back and loop back in front of your ring finger.
5. Come back around from behind of the pinky side to the front to make a big loop.

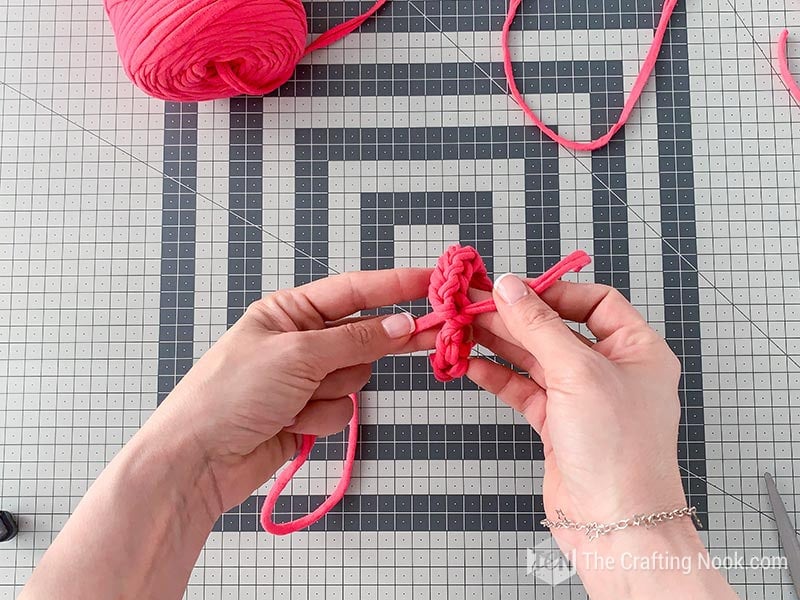
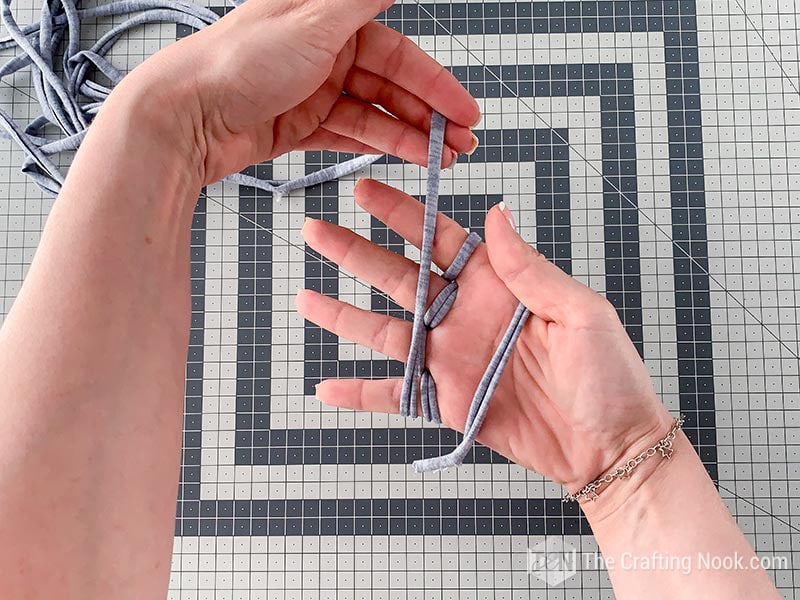
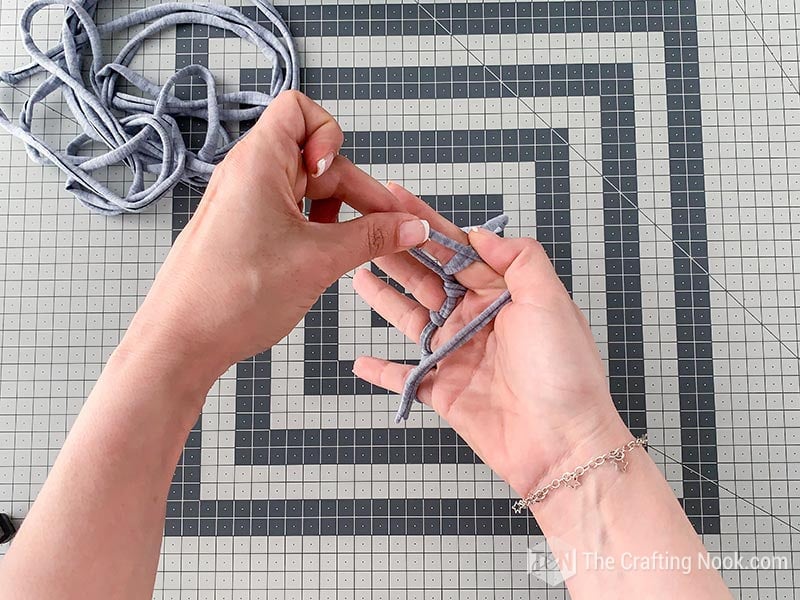
6. Now, take your weaved loops and go over your finger and big loop like the picture below.
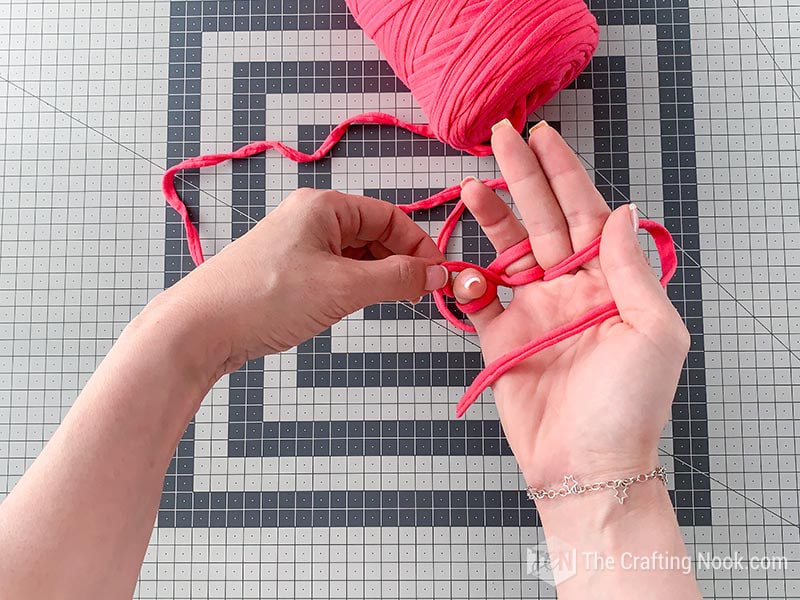
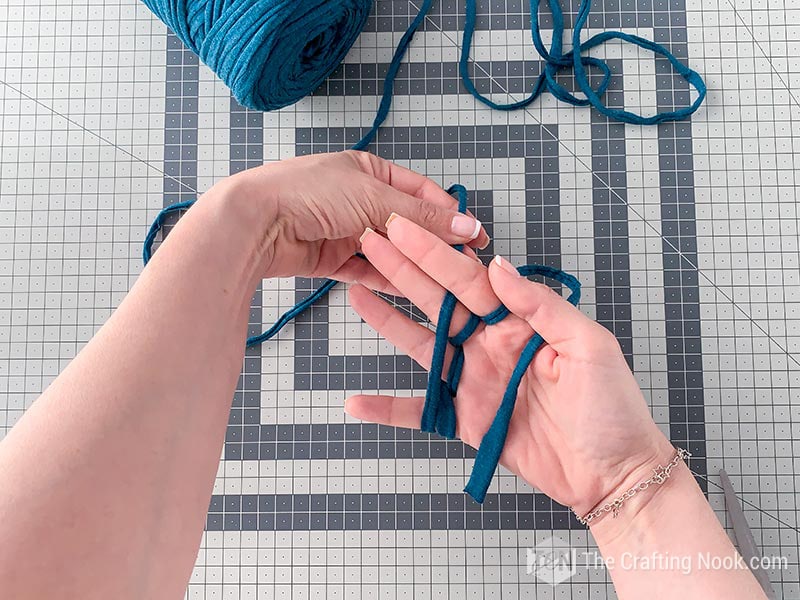
7. Repeat with the ring finger. Pull a little bit of the t-shirt yarn to adjust it, It’s not necessary to make it too tight

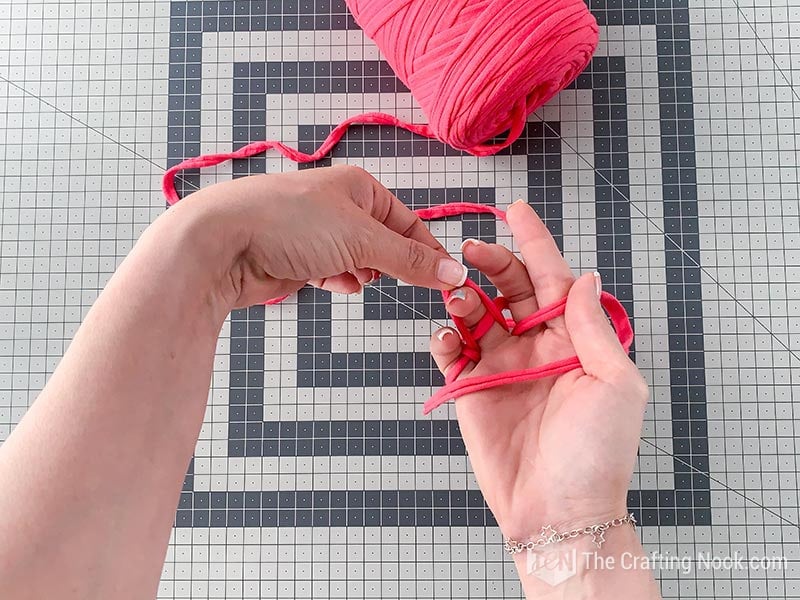

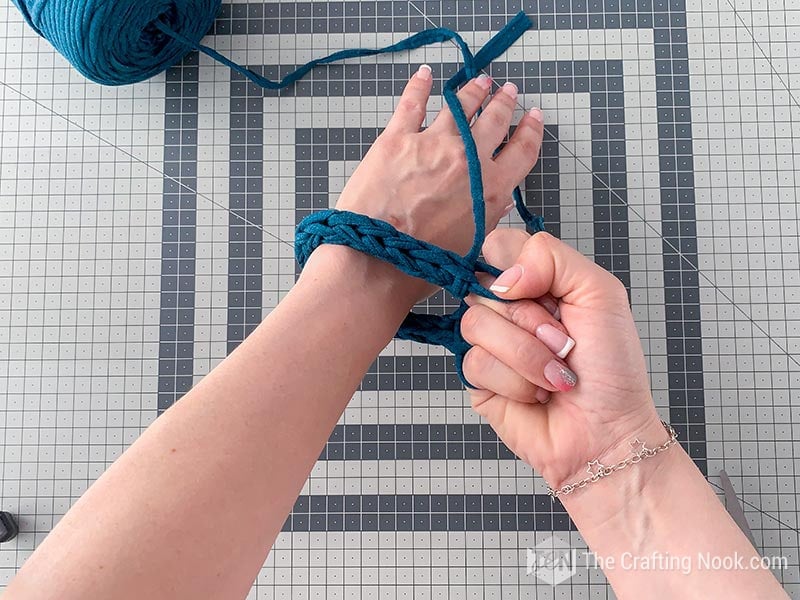
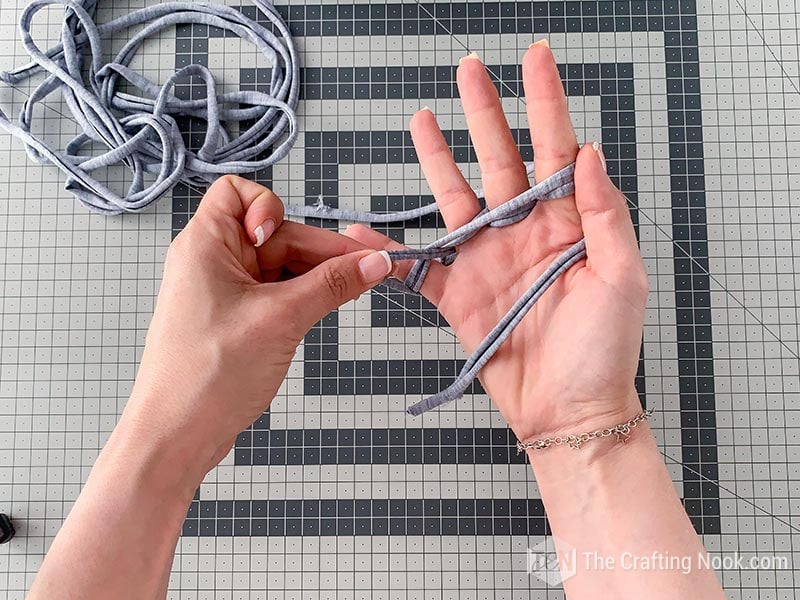
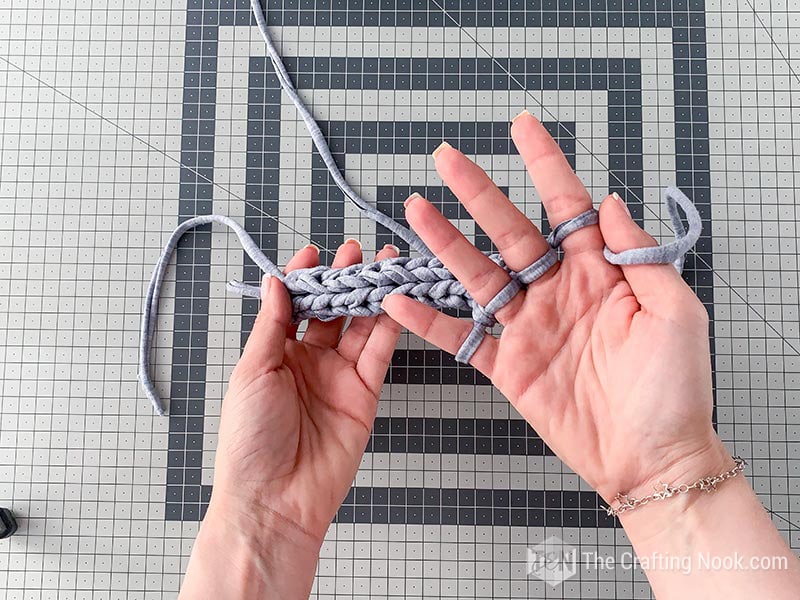
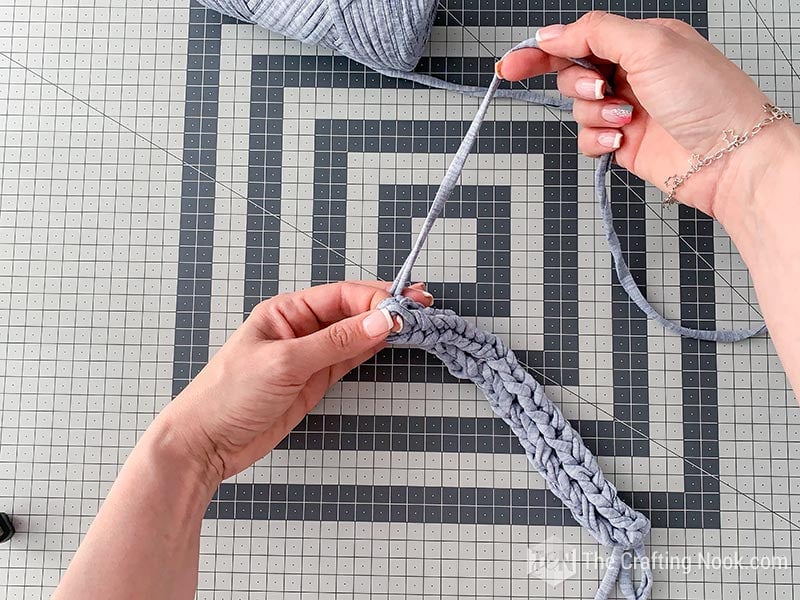
8. When you get to the end, or at the end of your first chain make a new loop from the back to the front and start the process all over again!
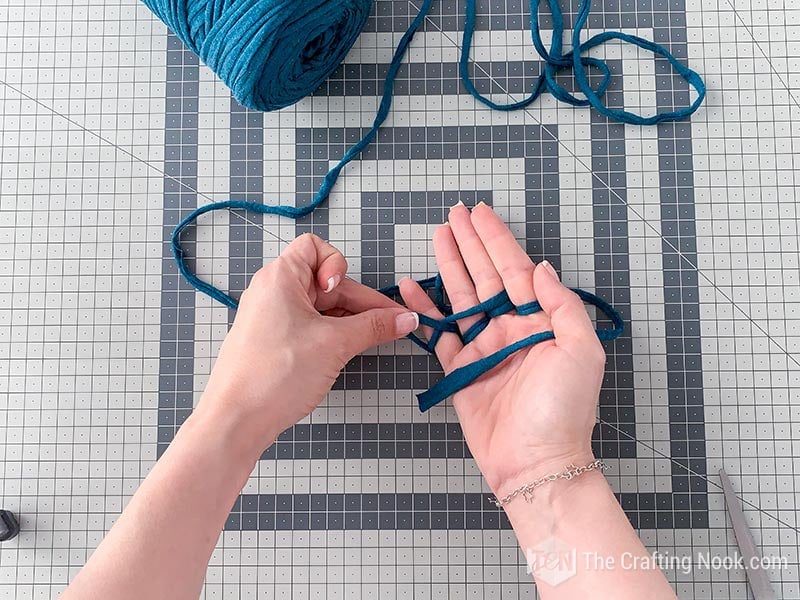
9. Every now and then, take your starting tail and gently pull, while your chain is still securely placed on your fingers so it makes the chain more defined and it gives you a better idea of how long you need to make your chain.

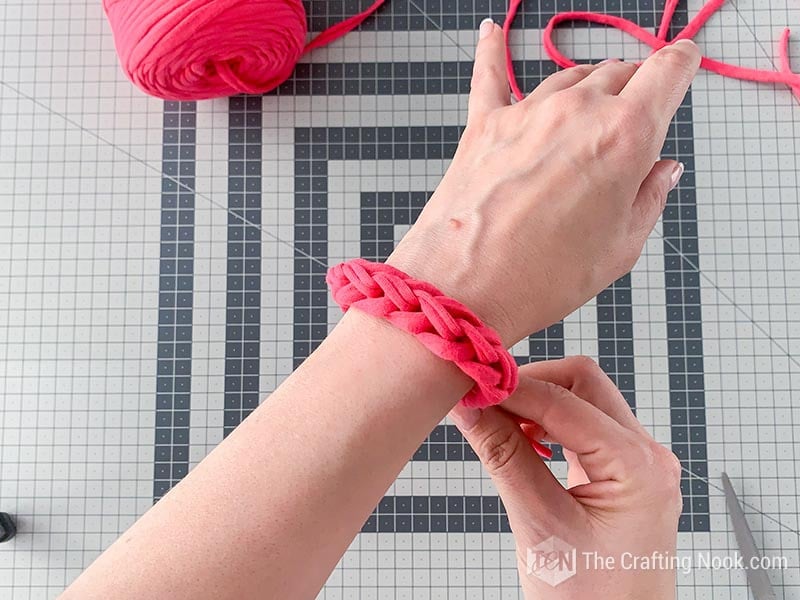
Keep checking out the length and see how long you need to make your chain, depending on your wrist size.
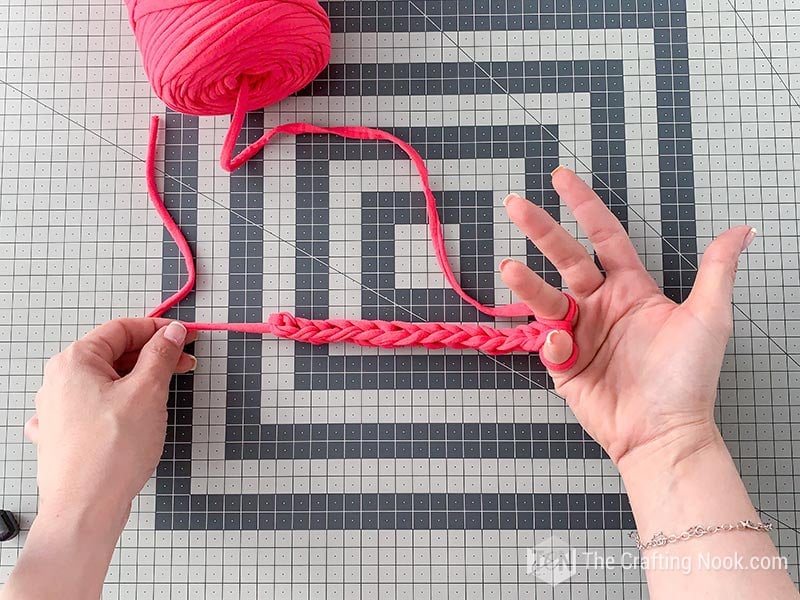
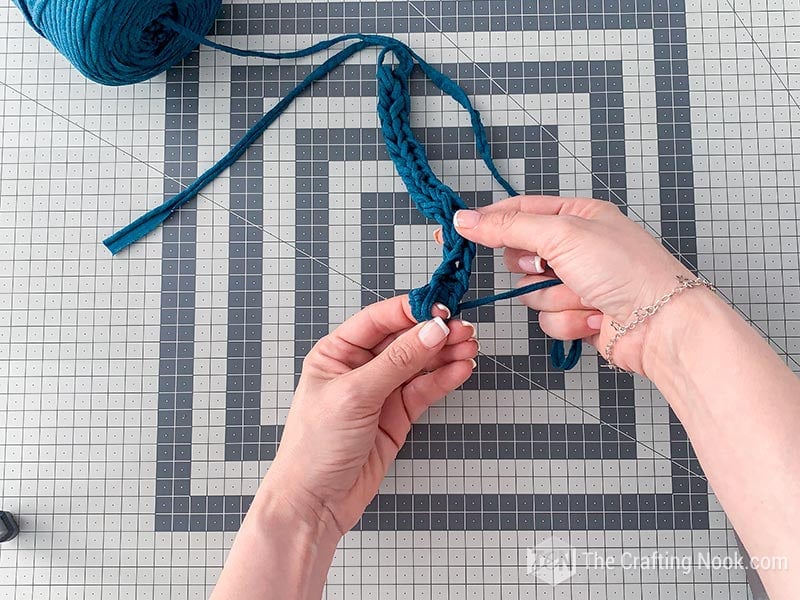
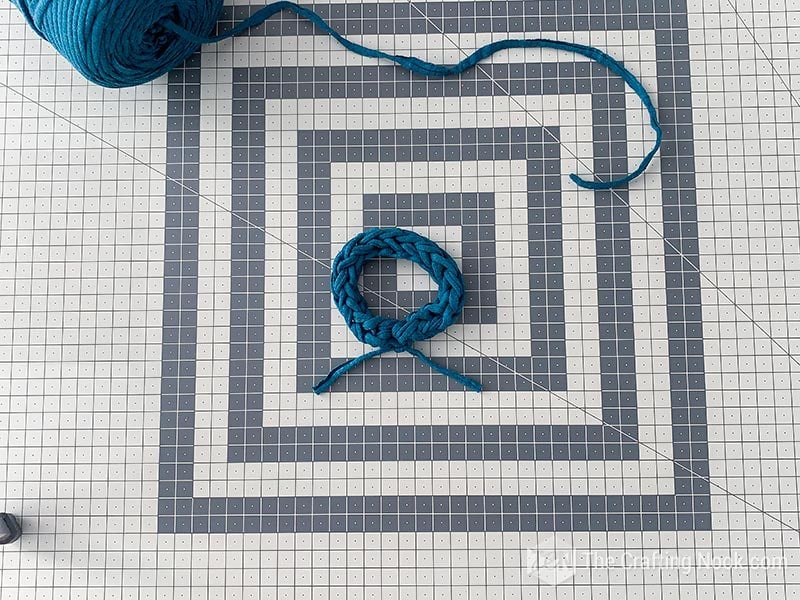
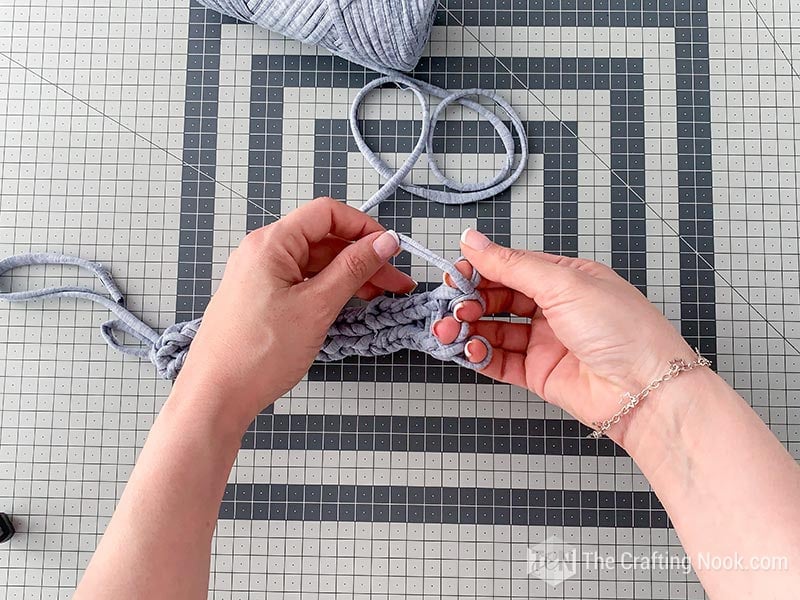
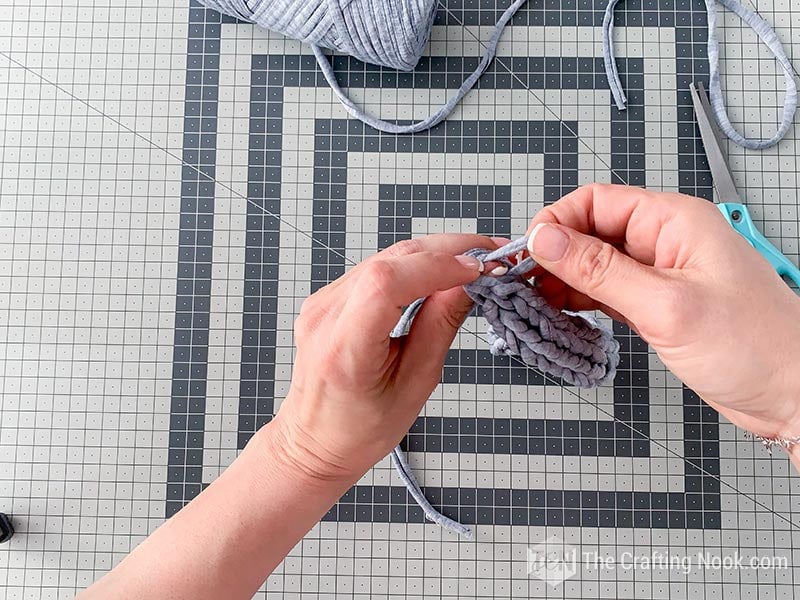
10. Once you’ve decided you have a long enough chain length, cut the t-shirt yarn leaving a few centimeters and carefully pull the loops off your fingers, making sure you don’t undo any of the chains by losing the loops.
11. You are going to get 2 loops.
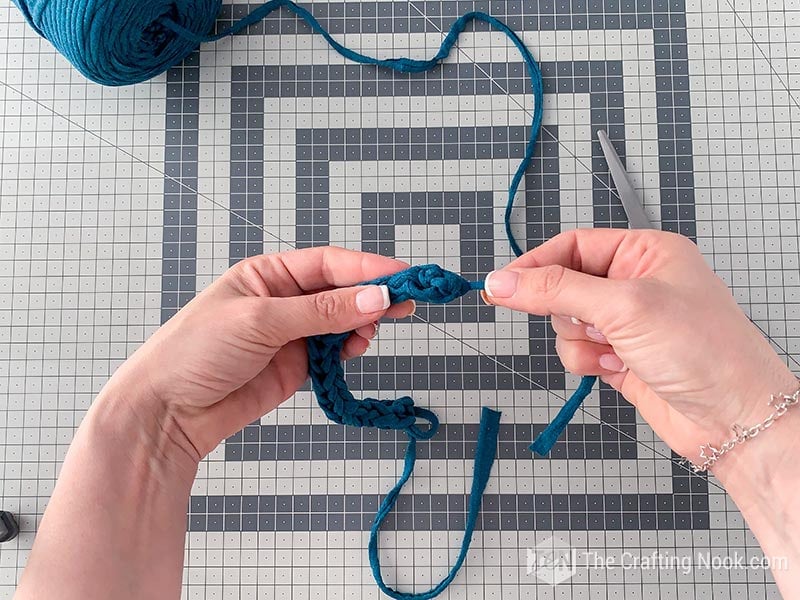
12. Take the end you just cut and slip it into both loops.
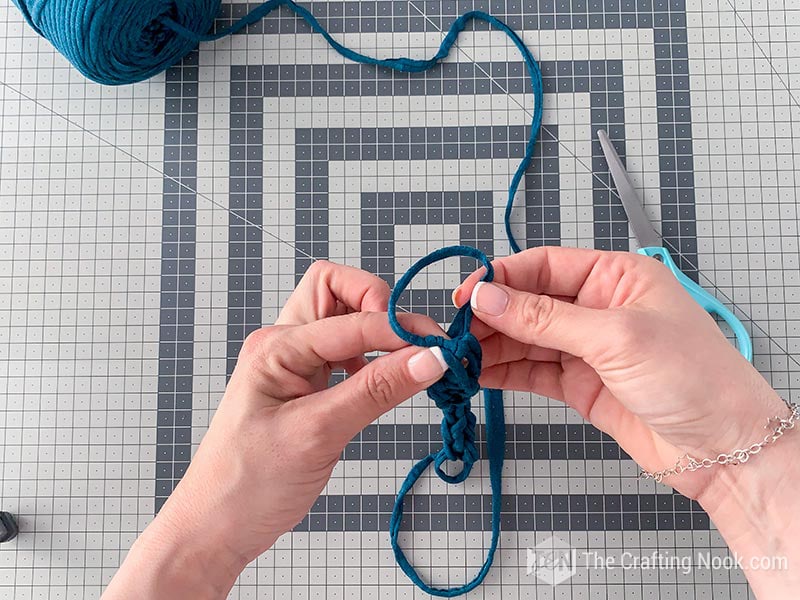
13. Pull all the way through, and carefully tug the end making a tight knot.
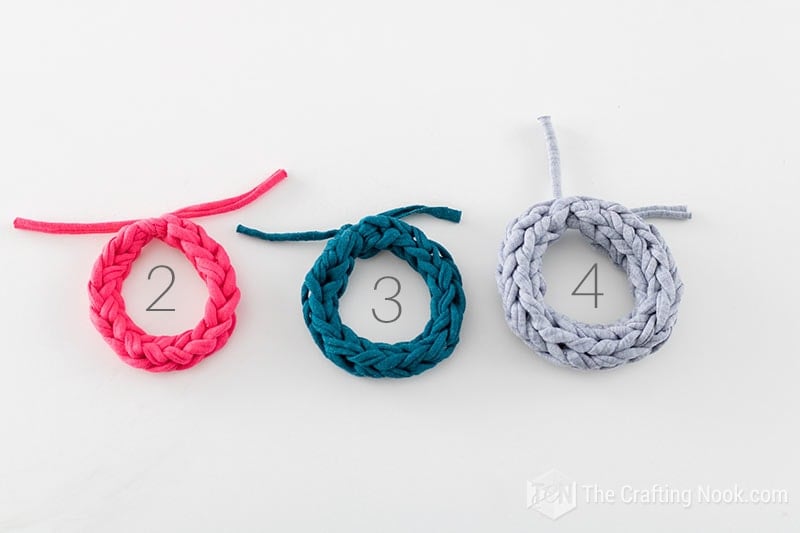
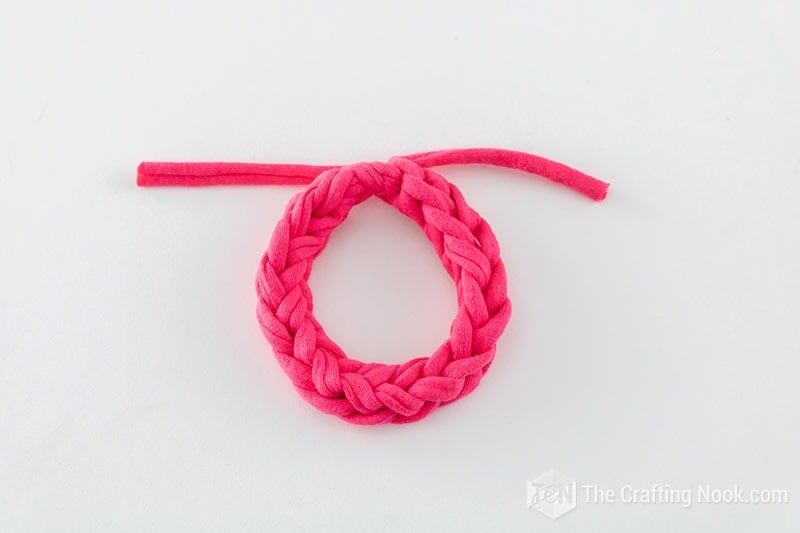
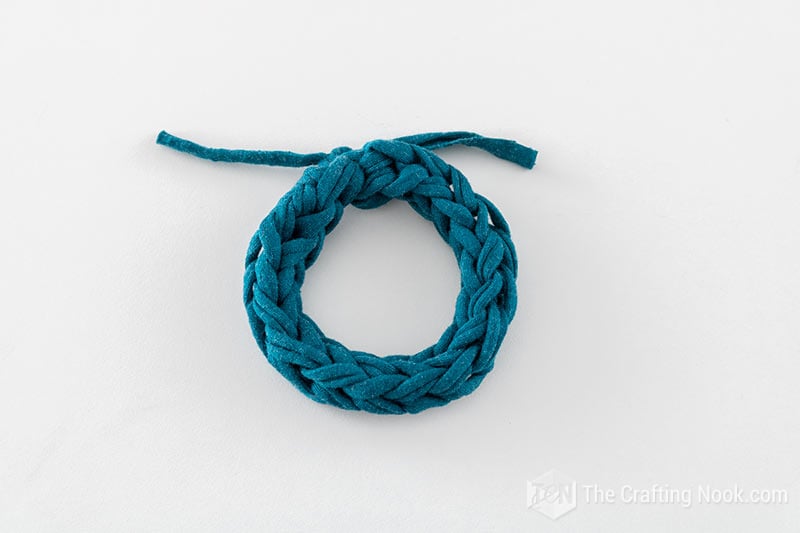
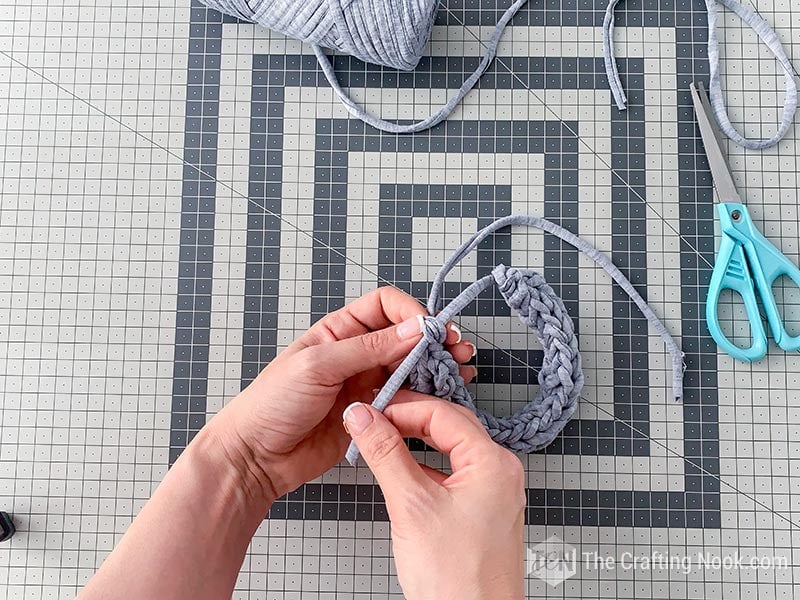
So you have the chain ready.
14. Lastly, tie off your bracelet with a knot.
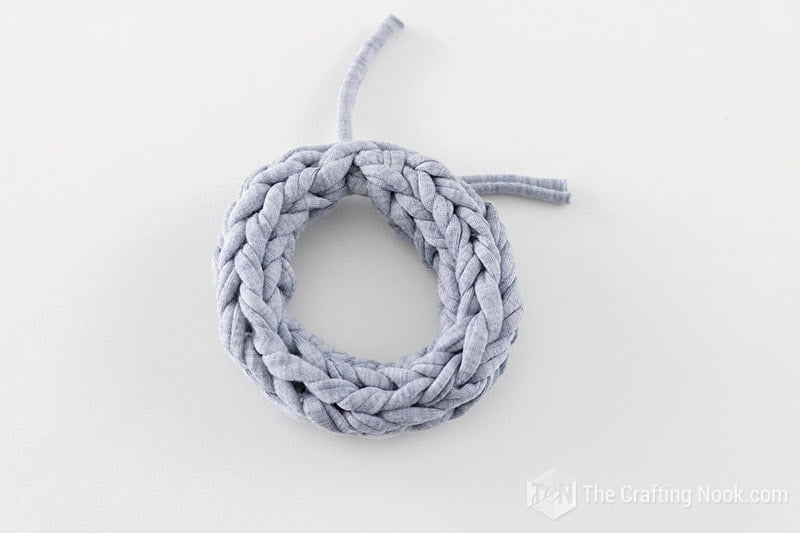
15. Cut off excess tails!

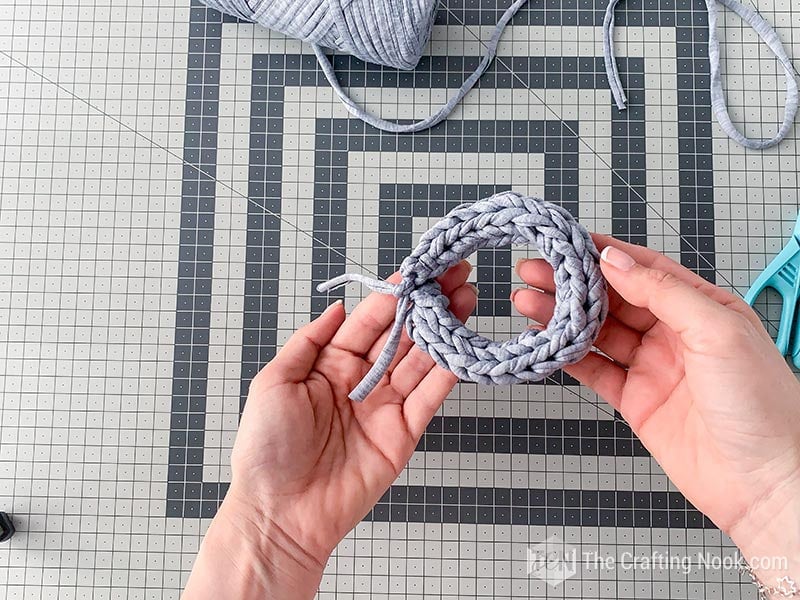
16. You are done!!!!
This is what you get.

Method 2: Three Fingers.

1. Again, the first thing we do is to secure one end of the jersey yarn just like in the pic.
2. Then weave the strip in and out of our fingers, first behind your middle finger, in front of your ring finger, and then behind your pinky.
3. Come back and loop back in front of your pinky finger, behind the ring finger, and in front of the middle finger.
4. Come back around from behind of the pinky side to the front to make a big loop.
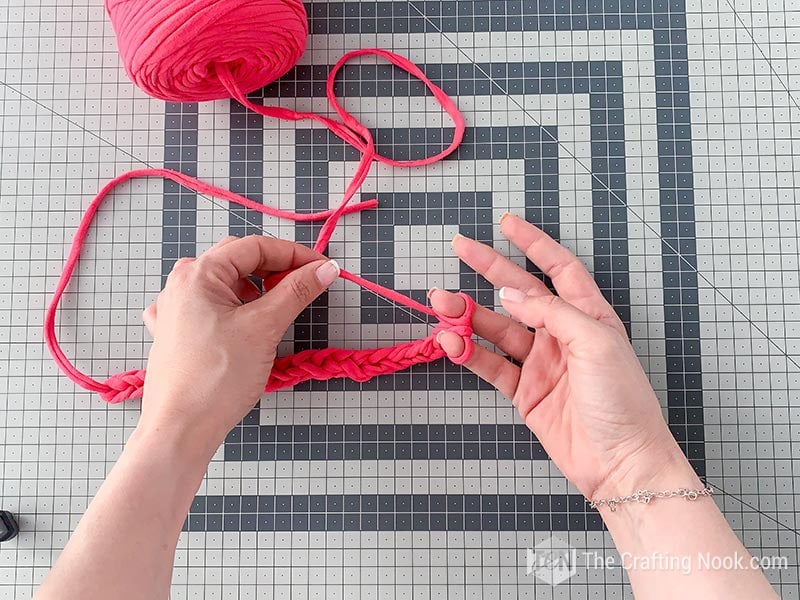
5. Now take your weaved loops and go over your finger and big loop like the picture below.

6. Then move to the next finger and then the next. Pull a little bit of the yarn to adjust it, It’s not necessary to make it too tight.
7. Make a new loop from behind of the pinky side to the front and start the process all over again!
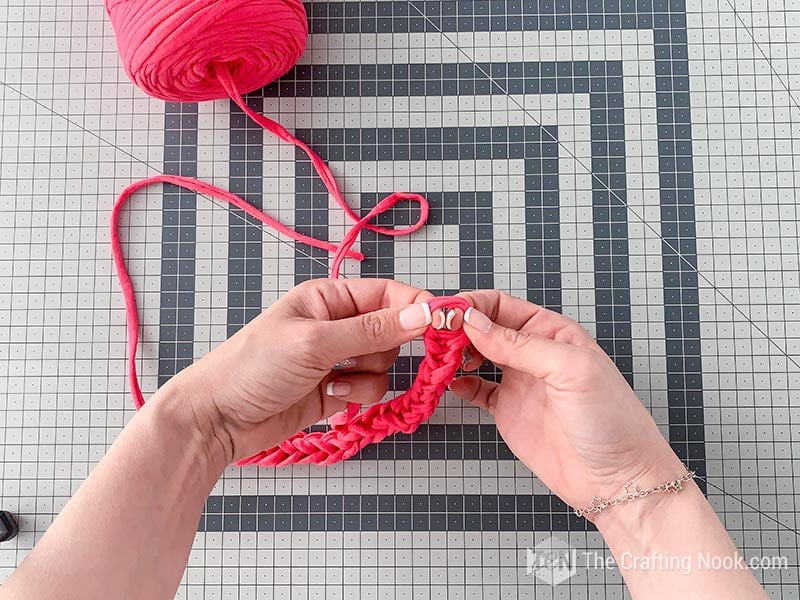
8. Every now and then, take your starting tail and gently pull, while your chain is still securely placed on your fingers so it makes the chain more defined and it gives you a better idea of how long you need to make your chain.
9. Keep checking out the length and see how long you need to make your chain, depending on your wrist size.
10. Once you’ve decided you have a long enough chain length, cut the yarn leaving a few centimeters, and carefully pull the loops off your fingers, making sure you don’t undo any of the chains by losing the loops.

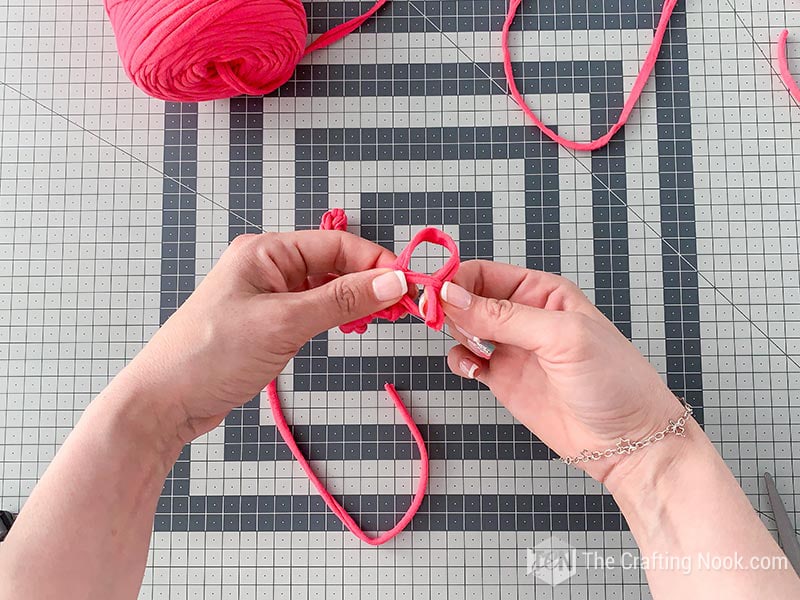
11. You are going to get 3 loops. Put them together.
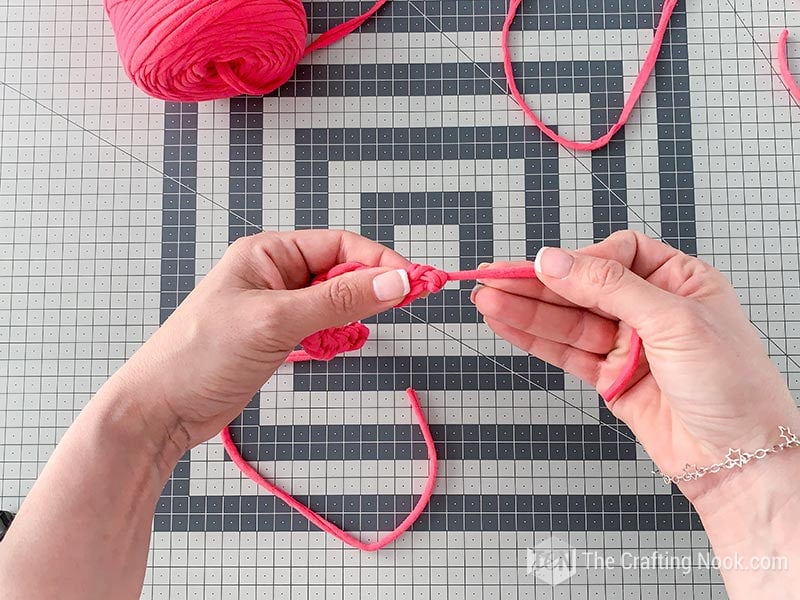
12. Take the end you just cut and slip it into both loops.
13. Pull all the way through, and carefully tug the end making a tight knot.
14. So you have the chain ready.
15. Lastly, tie off your bracelet with a knot.


16. Cut off excess tails!
14. You are done!!!!

This is what you get.
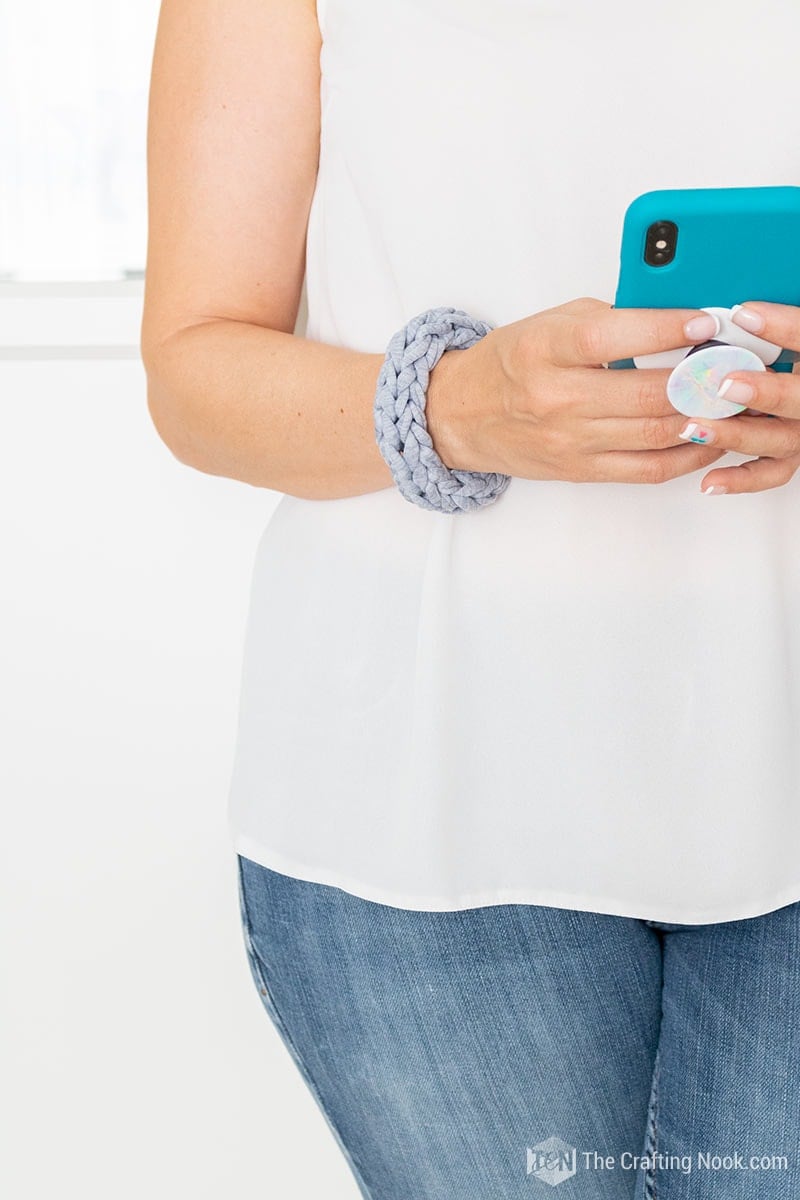
Method 3: Four Fingers.

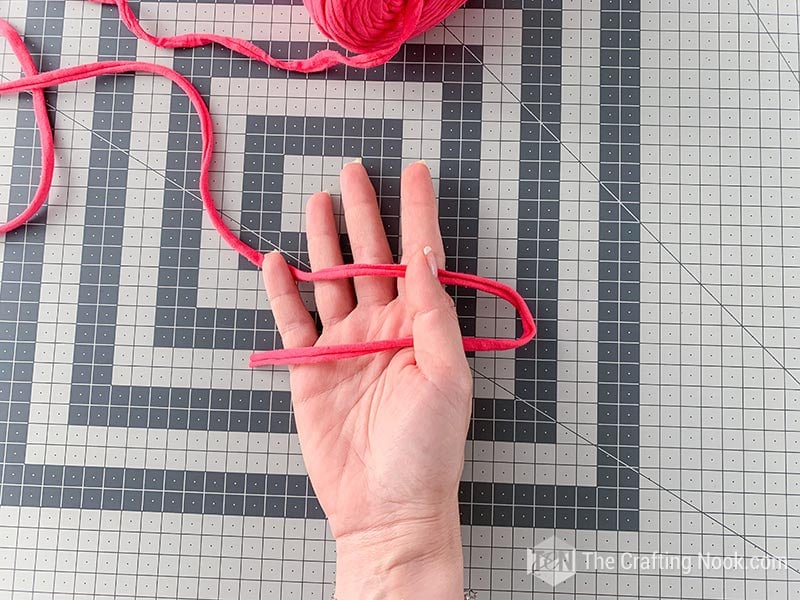
1. Again, the first thing we do is to secure one end of the yarn just like in the pic.

2. Then start off with weaving behind the pointer finger (first finger), in front of the middle, behind the ring, and in front of the pinky finger.
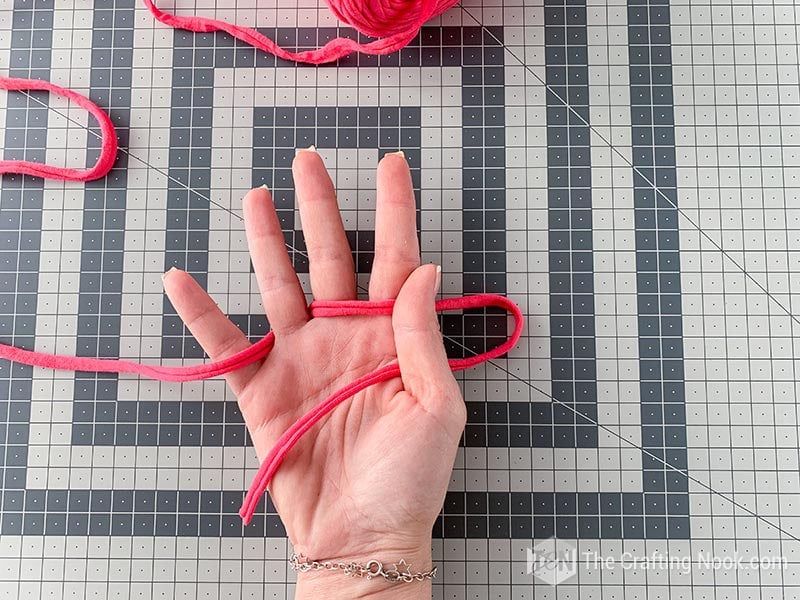
3. Then wrap it around and behind the pinky, then in front of the ring, and behind the middle, and then in front of the pointer.
4. Come back around from behind of the pinky side to the front to make a big loop (from the pinky to the pointer)
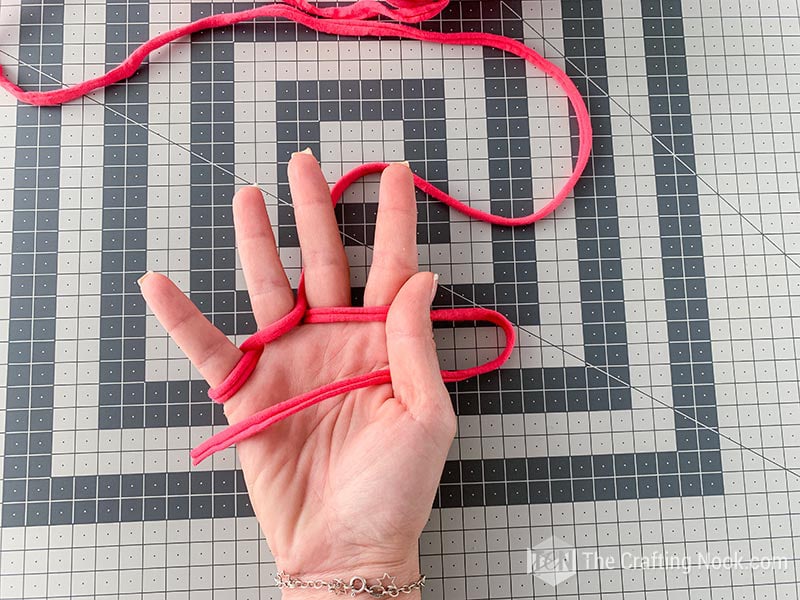
5. Now take your weaved loops and go over your finger and big loop like the picture below.
6. Then move to the next finger and then the next. Pull a little bit of the yarn to adjust it, It’s not necessary to make it too tight.
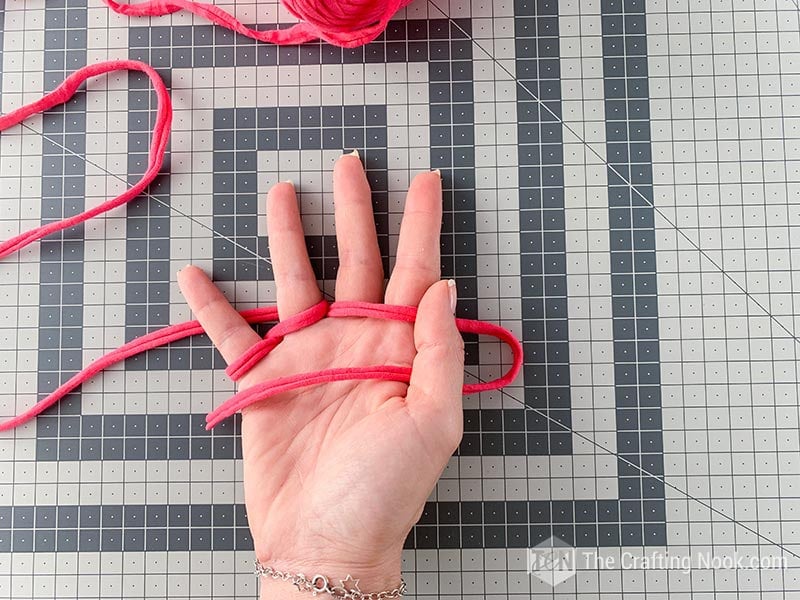
7. Make a new loop from behind of the pinky side to the front and start the process all over again!
8. Every now and then, take your starting tail and gently pull, while your chain is still securely placed on your fingers so it makes the chain more defined and it gives you a better idea of how long you need to make your chain.
9. Keep checking out the length and see how long you need to make your chain, depending on your wrist size.

10. Once you’ve decided you have a long enough chain length, cut the jersey yarn leaving a few centimeters, and carefully pull the loops off your fingers, making sure you don’t undo any of the chains by losing the loops.
11. You are going to get 4 loops. Put them together.
12. Take the end you just cut and slip it into both loops.
13. Pull all the way through, and carefully tug the end making a tight knot.
14. So you have the chain ready.
15. Lastly, tie off your bracelet with a knot.

16. Cut off excess tails!
17. You are done!!!!

This is what you get.
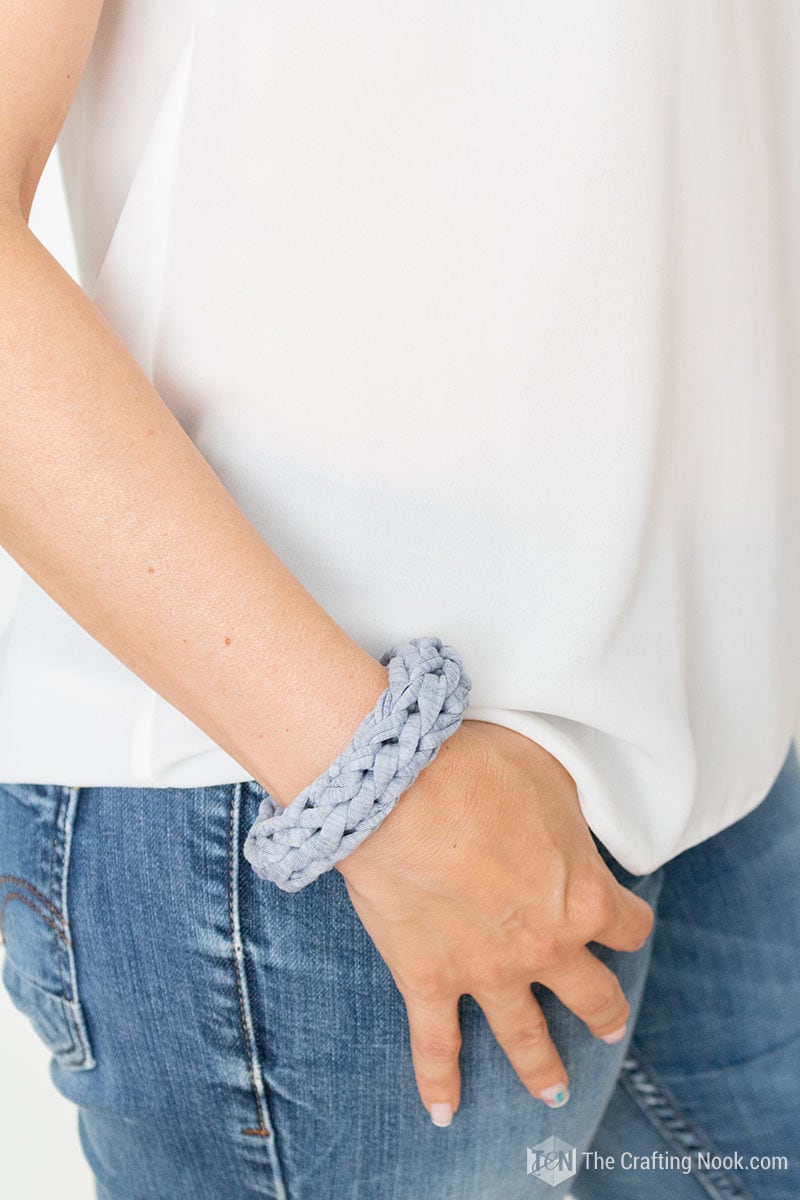
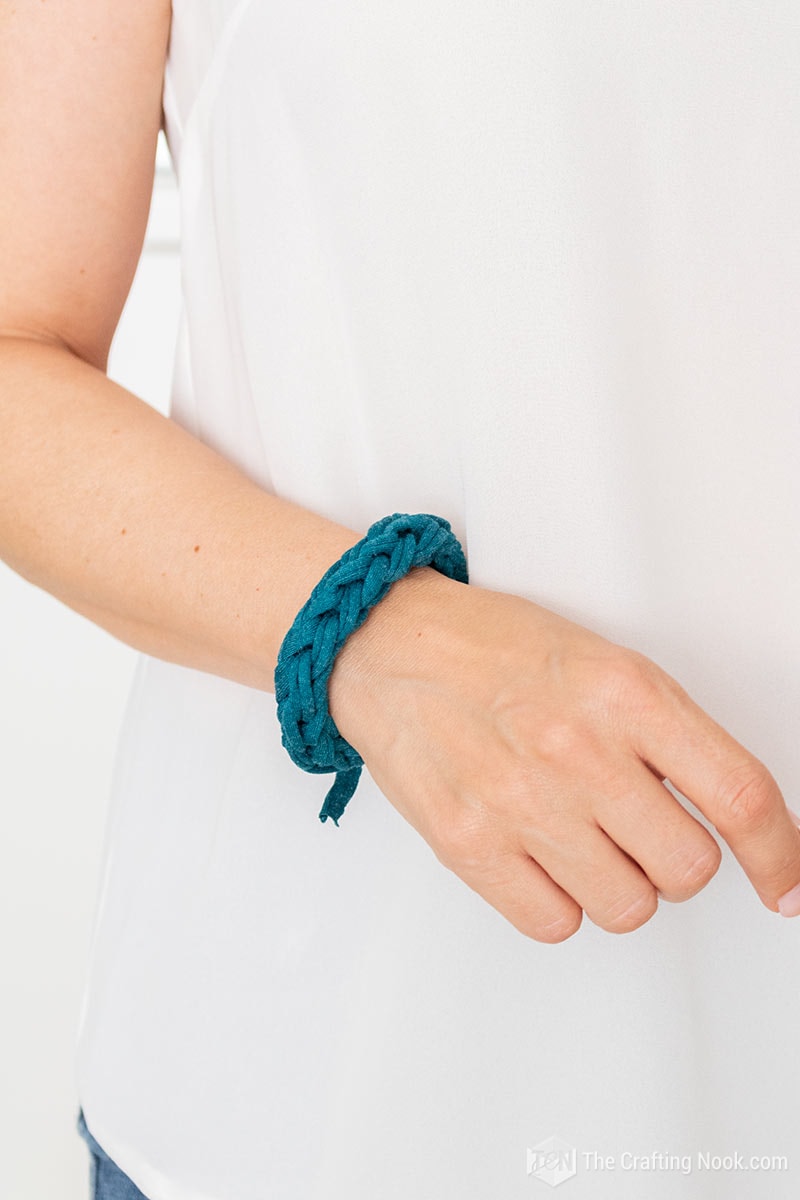
There you go. These super cute, easy, and fun to make jersey t-shirt finger knitted bracelets are ready to rock your outfit!
What do you think? Cute, isn’t it?
I definitely LOOOOVE it.

How about you? Let me know your thought in the comments down below!
Frequently Asked Questions
Finger knitting is one of the most fun and easy crafts you can do with your kids (children as young as 5 can do this, but younger children may also be able to do it). Unlike traditional knitting, it is much faster and easier to do, requires no experience or expertise, and doesn’t require any equipment other than yarn and scissors.
It helps us develop dexterity, strength, and flexibility in our hands, fingers, and thumbs – all of which play a key role in our writing abilities later on. Knitting also promotes eye-hand coordination, concentration, and perseverance, all of which contribute to the development of children.
Working with bulky yarn and t-shirt yarn produces the best results, but you can hold two strands of worsted weight yarn together for a similar look.
more crafty jewelry ideas to Try
If you enjoyed these cute finger-knitted bracelets, you might also love these other handmade jewelry projects:
✂️ Tutorial
5-min DIY Finger Knitted Bracelet with Jersey T-Shirt
Tools
- scissors
- Your hands!
Supplies
- Jersey T-Shirt Yarn or your favorite type of material, like yarn, your favorite fabric, cord, or anything yarn-like.
- * Ornaments or beads are optional.
Instructions
METHOD 1: TWO-FINGERS.
- Get your jersey t-shirt yarn and we are now going to weave the strip in and out of our fingers.
- Firstly, we hold one end of the jersey yarn on your palm and secure it with your thumb just like in the pic.
- Then weave the strip in and out of our fingers, first behind your ring finger and then in front of your pinky.
- Next, go around the pinky and come back and loop back in front of your ring finger.
- Come back around from behind of the pinky side to the front to make a big loop.
- Now, take your weaved loops and go over your finger and big loop like the picture below.
- Repeat with the ring finger. Pull a little bit of the t-shirt yarn to adjust it, It’s not necessary to make it too tight
- When you get to the end, or at the end of your first chain make a new loop from the back to the front and start the process all over again!
- Every now and then, take your starting tail and gently pull, while your chain is still securely placed on your fingers so it makes the chain more defined and it gives you a better idea of how long you need to make your chain.
- Once you’ve decided you have a long enough chain length, cut the t-shirt yarn leaving a few centimeters and carefully pull the loops off your fingers, making sure you don’t undo any of the chains by losing the loops.
- You are going to get 2 loops.
- Take the end you just cut and slip it into both loops.
- Pull all the way through, and carefully tug the end making a tight knot.
- Lastly, tie off your bracelet with a knot.
- Cut off excess tails!
- You are done!!!!
METHOD 2: THREE FINGERS.
- Again, the first thing we do is to secure one end of the jersey yarn just like in the pic.
- Then weave the strip in and out of our fingers, first behind your middle finger, in front of your ring finger, and then behind your pinky.
- Come back and loop back in front of your pinky finger, behind the ring finger, and in front of the middle finger.
- Come back around from behind of the pinky side to the front to make a big loop.
- Now take your weaved loops and go over your finger and big loop like the picture below.
- Then move to the next finger and then the next. Pull a little bit of the yarn to adjust it, It’s not necessary to make it too tight.
- Make a new loop from behind of the pinky side to the front and start the process all over again!
- Every now and then, take your starting tail and gently pull, while your chain is still securely placed on your fingers so it makes the chain more defined and it gives you a better idea of how long you need to make your chain.
- Keep checking out the length and see how long you need to make your chain, depending on your wrist size.
- Once you’ve decided you have a long enough chain length, cut the yarn leaving a few centimeters, and carefully pull the loops off your fingers, making sure you don’t undo any of the chains by losing the loops.
- You are going to get 3 loops. Put them together.
- Take the end you just cut and slip it into both loops.
- Pull all the way through, and carefully tug the end making a tight knot.
- So you have the chain ready.
- Lastly, tie off your bracelet with a knot.
- Cut off excess tails!
- You are done!!!!
METHOD 3: FOUR FINGERS.
- Again, the first thing we do is to secure one end of the yarn just like in the pic.
- Then start off with weaving behind the pointer finger (first finger), in front of the middle, behind the ring, and in front of the pinky finger.
- Then wrap it around and behind the pinky, then in front of the ring, and behind the middle, and then in front of the pointer.
- Come back around from behind of the pinky side to the front to make a big loop (from the pinky to the pointer)
- Now take your weaved loops and go over your finger and big loop like the picture below.
- Then move to the next finger and then the next. Pull a little bit of the yarn to adjust it, It’s not necessary to make it too tight.
- Make a new loop from behind of the pinky side to the front and start the process all over again!
- Every now and then, take your starting tail and gently pull, while your chain is still securely placed on your fingers so it makes the chain more defined and it gives you a better idea of how long you need to make your chain.
- Keep checking out the length and see how long you need to make your chain, depending on your wrist size.
- Once you’ve decided you have a long enough chain length, cut the jersey yarn leaving a few centimeters, and carefully pull the loops off your fingers, making sure you don’t undo any of the chains by losing the loops.
- The chain still attached to my fingers but long enough to finish
- You are going to get 4 loops. Put them together.
- Take the end you just cut and slip it into both loops.
- Pull all the way through, and carefully tug the end making a tight knot.
- So you have the chain ready.
- Lastly, tie off your bracelet with a knot.
- Cut off excess tails!
- You are done!!!!
- There you go. These super cute, easy, and fun to make jersey t-shirt finger knitted bracelets are ready to rock your outfit!
Other Cute finger knitting ideas from my favorite bloggers:
- Gorgeous Finger Knit Necklace by DIY & Crafts.
- DIY Finger Knit Infinity Scarf by Hello Glow.
Enjoyed this fun Finger knit bracelet tutorial? Don’t forget to PIN and share with friends!

Til’ next time…


FREE WORKBOOK
Keeping your Sweet Home Organized
Learn how to create intentional habits and simple routines to Keep Your Home Organized. Plus freebies, printables, exclusive content, and tips.
Disclaimer: By clicking on the “Yes” button above you are giving me your consent to collect and use your information according to the law and My Policy Privacy. Zero Spam I promise!
This is fantastic! I did finger knitting as a kid but never made anything out of it. I just had long, long tubes. I never knew what to do with it.
HI Patricia,
Thank you so much. Yesss making actual accessories with finger knitting is so much fun and useful, you can make not just bracelets, you can make necklaces, ankle bracelets, and so much more!
Ho happy you liked it!
Have a wonderful day and weekend!
Hugs.