Chain and Beads DIY Geometric Earrings (with Video Tutorial)
This post may contain affiliate links. Please read our Disclosure Policy.
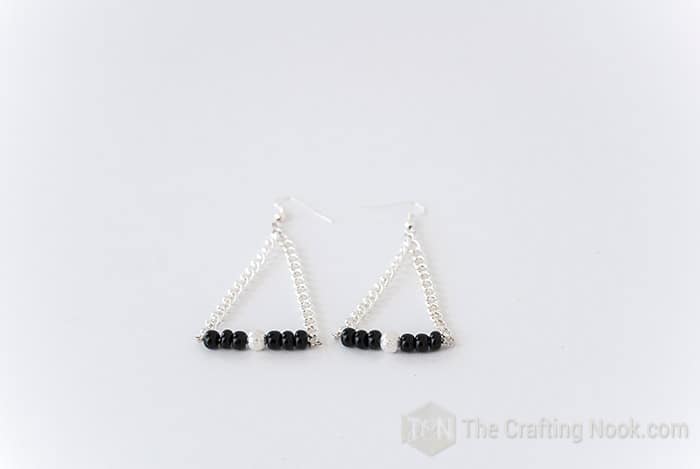
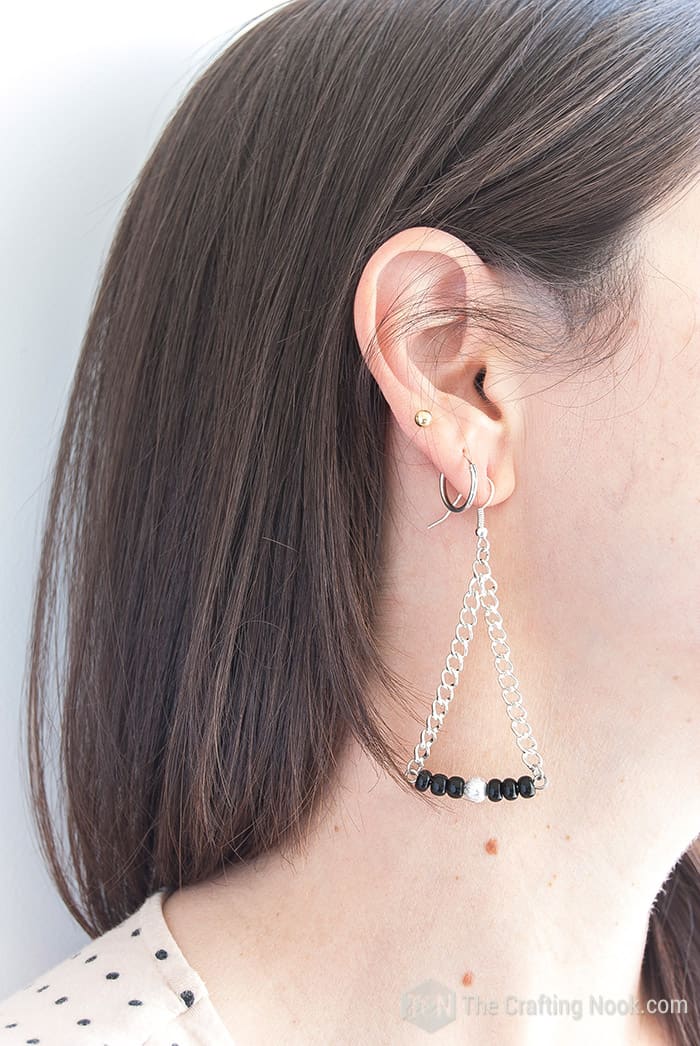
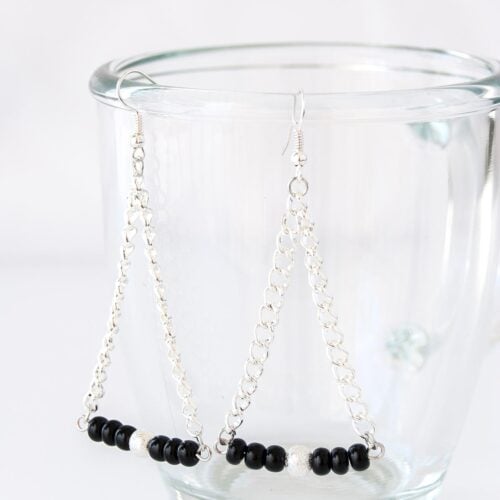
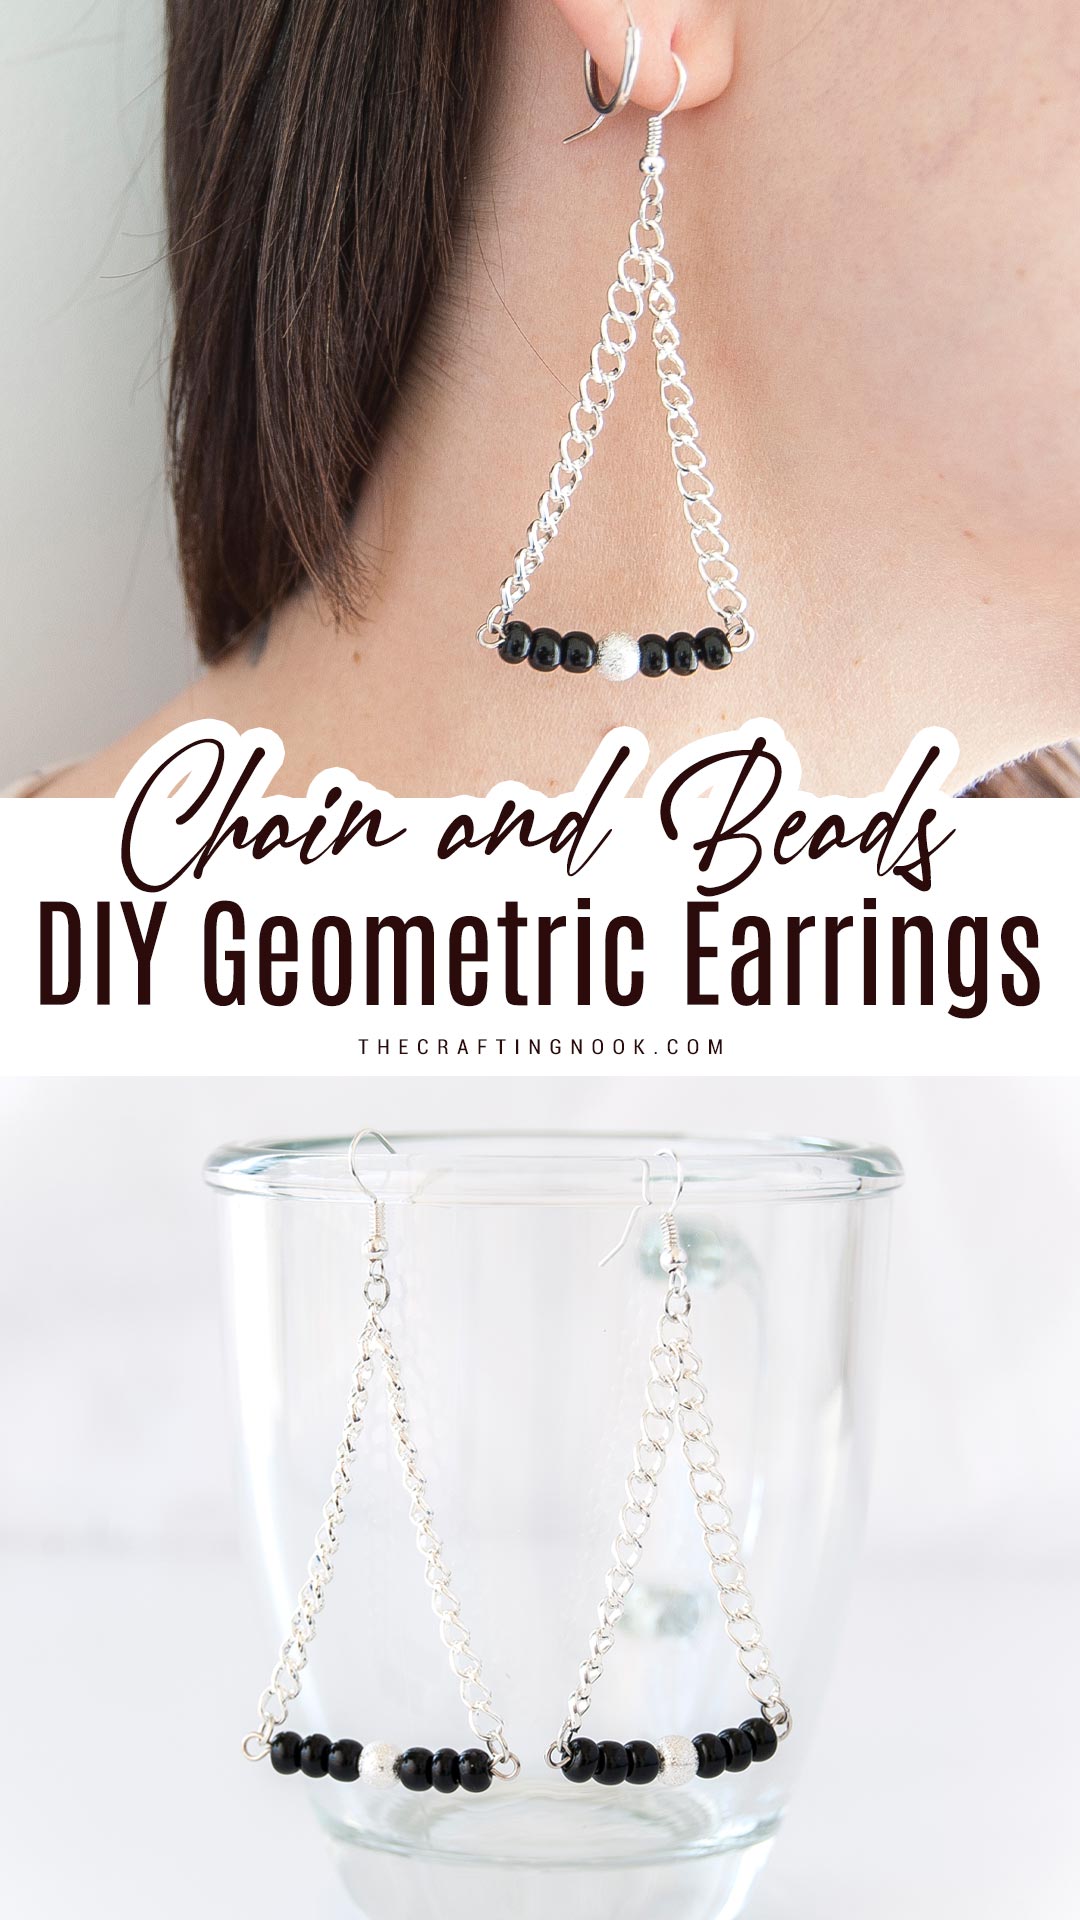
Wondering how to look glamorous and yet stick with a budget? These cute handcrafted Handmade Black and Silver DIY Geometric Earrings are fun, easy and so stylish. Make some for yourself or as gifts, no one will say no to these cuties!
When it comes to looking pretty and making gifts there’s nothing like handmade.

Jewelry making has something so special when you make it yourself or when you know it was made by someone special to you.
Table of Contents
Chain and Beads DIY Geometric Earrings Tutorial
I particularly love making crafty jewelry. I make them as often as life allows me and I must say I enjoy every second of it.
These cute Geometric Earrings were made for a special friend last year, I loved them so much that I made them again to share them with you all.
Making these took me about 20 minutes and they look so gorgeous. I kept the new ones for myself and I plan on using them this Christmas!
The other thing I love about this kind of jewelry is that even though it looks kind of expensive, it won’t break your bank and you can get lots of pretty gifts when you buy the supplies. Not bad, right?
I’m a huge fan of the minimal geometric jewelry trend that’s going on right now. Big earrings made with unusual supplies that look great? What’s not to love?
How to Make Geometric Earrings.
You will be surprised at how extremely easy it is to make these and of course, you can make your own jewelry with your own twist and any variation you like, such as size, number of beads, coolers, and so on. That’s the beauty of these. Your imagination is the limit.
Supplies:
- 12 black beads {about 6mm}
- 2 Silver sparkling beads {about 8mm}
- Silver chain
- 4 Jump rings {5mm}
- 2 Earring hooks
Tools:
- Wire cutter.
- Flat nose pliers
- Bend flat nose pliers
- Round nose Pliers

Sorry about the light in the photos, that day natural light was not helping at all!
Step-by-Step Instructions:
Before we begin, be sure to follow us on Pinterest, Facebook, Instagram, and YouTube, and also sign up for our email list (at the end of this post), so you’ll never miss a post!
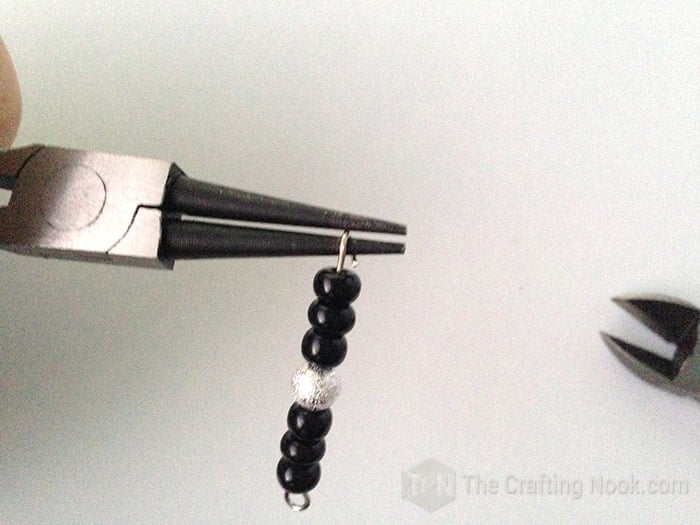
Step 1: The base of the earrings
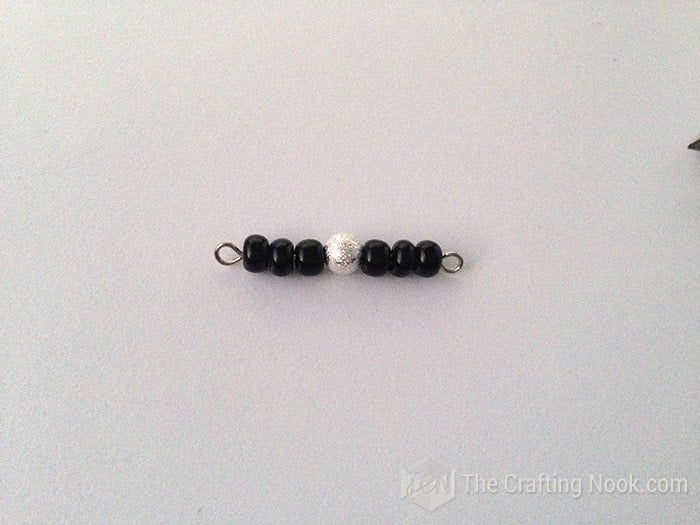
Take your eye pin and insert 3 black beads, 1 silver bead, and 3 black beads.

We need another eye on the other end so let’s do a wire loop.
Bend the wire at 90 away from you with your round nose pliers, and change the plier’s position to hold the other side of the wire.
Bring the wire all the way around to make a loop and trim with a cutter as close as possible to the main wire.
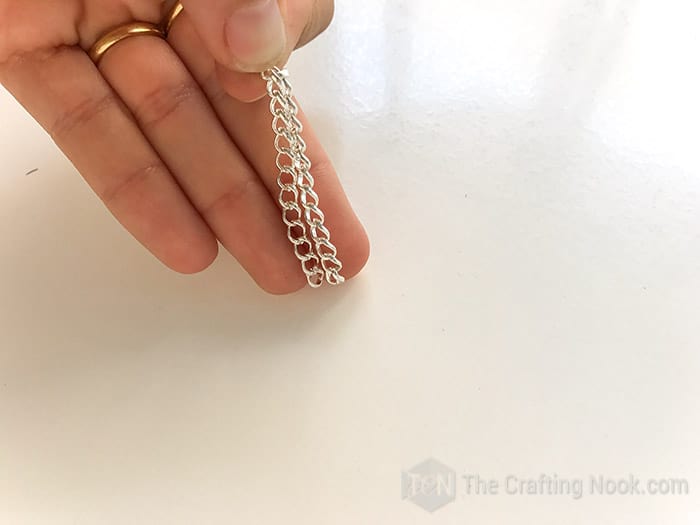
Step 2: Getting your chain ready
Now cut your chain by about 21 chain links {more or less depending on the chain you chose}. It’s supposed to be 10 links on each side and one for linking with the earn hook.

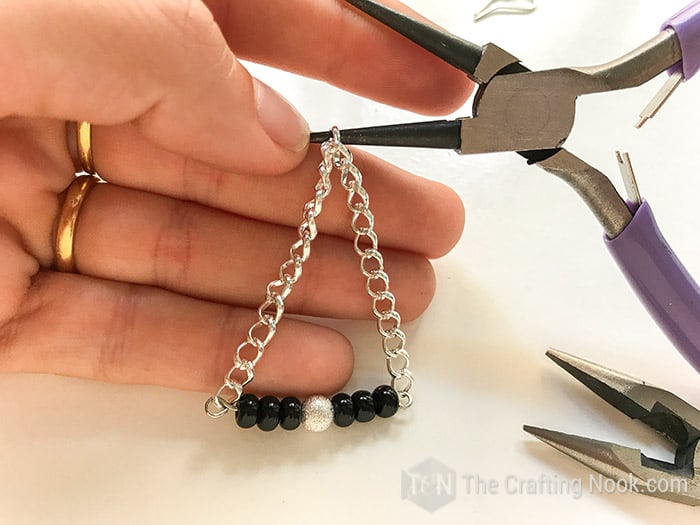
Step 3: Joining base and Chain
Slightly open the loop on your black and silver wire and insert one end of the chain.
Close the loop again carefully.
You can always use jump rings for this too.

Then do the same on the other end.

Step 4: Attaching your Earring hook
Then using your round nose pliers pick the eleventh chain link.
Using two of your pliers open a jump ring and insert the earring hook and your chain link.

Close the jump ring.
I always use double jumping to avoid falling off from the erring hook.
Repeat the process with the second earring and you are all done!
Crafting Tips
* Experiment with varying sizes of beads to create an eye-catching pattern. Combine large beads with smaller ones for a captivating visual effect. It’s like creating your own mini art installation for your ears!
* When it comes to beads, think outside the circle (pun intended). Sure, round beads are great, but how about incorporating some cool shapes like triangles, squares, or hexagons? Let your imagination run wild and pick beads that add that extra oomph to your geometric design.
* Add movement to your geometric earrings by incorporating dangles. Attach smaller chains or beads to the bottom of your design for that extra flirtatious flair. You’ll be turning heads and catching the light with every step you take.
* Don’t fret if you don’t have all the fancy-schmancy tools. Sometimes, you just need to channel your inner creativity! Use items you already have like a sturdy pen as a mandrel for shaping wire, or any pliers you might have in your tool box. Get creative and think outside the toolbox!
* Don’t limit yourself to the usual suspects—chain-nose and round-nose pliers. Explore the world of specialty pliers like bail-making pliers, crimping pliers, or even mandrel pliers. Each one has its own unique superpower that can level up your jewelry-making game. Embrace the plier party!
What do you think? Doesn’t it look so pretty and glamorous?
Frequently Asked Questions
If you are completely new to jewelry making you can start with only a few basic supplies and go from there. You will need Earring hooks, Glue, or a hot glue gun, jewelry wire, small pliers (round, flat, bent nose pliers), jump rings, flat and eye pins, and your min decorative element (beads, pendants, etc) among other things.
Besides this one in the tutorial. Handmade beaded jewelry can be some of the simplest or most intricate jewelry designs depending on which beads are used. Makers can use beads on a single strand of stringing material to create bracelets and necklaces.
Round nose pliers, chain nose pliers, flat nose pliers, bent nose pliers, crimping pliers, and side cutters are considered to be the most essential pliers that all beginners and advanced jewelers should own. Almost all jewelry projects can be executed with these pliers.
When it comes to chains for your earrings, you can go with any type of chain that you like! However, I recommend using a lightweight chain that won’t weigh down your earrings. Some popular options are cable chains, ball chains, and curb chains.
To determine the length of your chain, measure the desired length of your finished earring and then subtract the length of the ear wire. This will give you the length of your chain. Remember to cut your chain a little longer than your measurement to account for the jump rings and beads.
To make sure your earrings are symmetrical, we recommend making both earrings at the same time. Lay out all of your components for both earrings and work on them simultaneously, mirroring each step for both earrings. This will ensure that they turn out perfectly even.
More Handmade Jewelry Projects to try
If you enjoyed this cute geometric earrings tutorial, you might also love these other handmade jewelry project ideas too:

Other Cute Geometric Jewelry Ideas from my favorite bloggers
- Easy Geometric Shrink Film Earrings by Lia Griffith
- Faux Granite Geometric Earrings DIY by Tried and True
- DIY Geometric Hoop Earrings by Made in A Day
✂️ Tutorial
Chain and Beads DIY Geometric Earrings (with Video Tutorial)
Tools
- Wire cutter.
- Flat Nose Pliers
- Bend flat nose pliers
- Round nose pliers
Supplies
- 12 black beads {about 6mm}
- 2 Silver sparkling beads {about 8mm}
- Silver chain
- 4 Jump rings {5mm}
- 2 Earring hooks
Instructions
STEP 1: THE BASE OF THE EARRINGS
- Take your eye pin and insert 3 black beads, 1 silver bead, and 3 black beads.
- We need another eye on the other end so let’s do a wire loop.
- Bend the wire at 90 away from you with your round nose pliers, and change the plier’s position to hold the other side of the wire.
- Bring the wire all the way around to make a loop and trim with a cutter as close as possible to the main wire.
STEP 2: GETTING YOUR CHAIN READY
- Now cut your chain by about 21 chain links {more or less depending on the chain you chose}. It’s supposed to be 10 links on each side and one for linking with the earn hook.
STEP 3: JOINING BASE AND CHAIN
- Slightly open the loop on your black and silver wire and insert one end of the chain.
- Close the loop again carefully.
- You can always use jump rings for this too.
- Then do the same on the other end.
STEP 4: ATTACHING YOUR EARRING HOOK
- Then using your round nose pliers pick the eleventh chain link.
- Using two of your pliers open a jump ring and insert the earring hook and your chain link.
- Close the jump ring.
- I always use double jumping to avoid falling off from the erring hook.
- Repeat the process with the second earring and you are all done!
Share and PIN ME!
Til’ next time…


FREE WORKBOOK
Keeping your Sweet Home Organized
Learn how to create intentional habits and simple routines to Keep Your Home Organized. Plus freebies, printables, exclusive content, and tips.
Disclaimer: By clicking on the “Yes” button above you are giving me your consent to collect and use your information according to the law and My Policy Privacy. Zero Spam I promise!
This is PERFECT. I just spent way too much money on an outfit for my friend’s birthday bash, and realized I don’t have any jewelry for it! I always feel like a scrub if I don’t have some kind of sparkle. Not so sure the black will go with it, but I’m definitely gonna take this DIY idea and run with it! Plus, it saves money from having to buy anything else!
Thanks so much!