How To Make A Pillowcase Farmhouse Grain Sack Style
This post may contain affiliate links. Please read our Disclosure Policy.
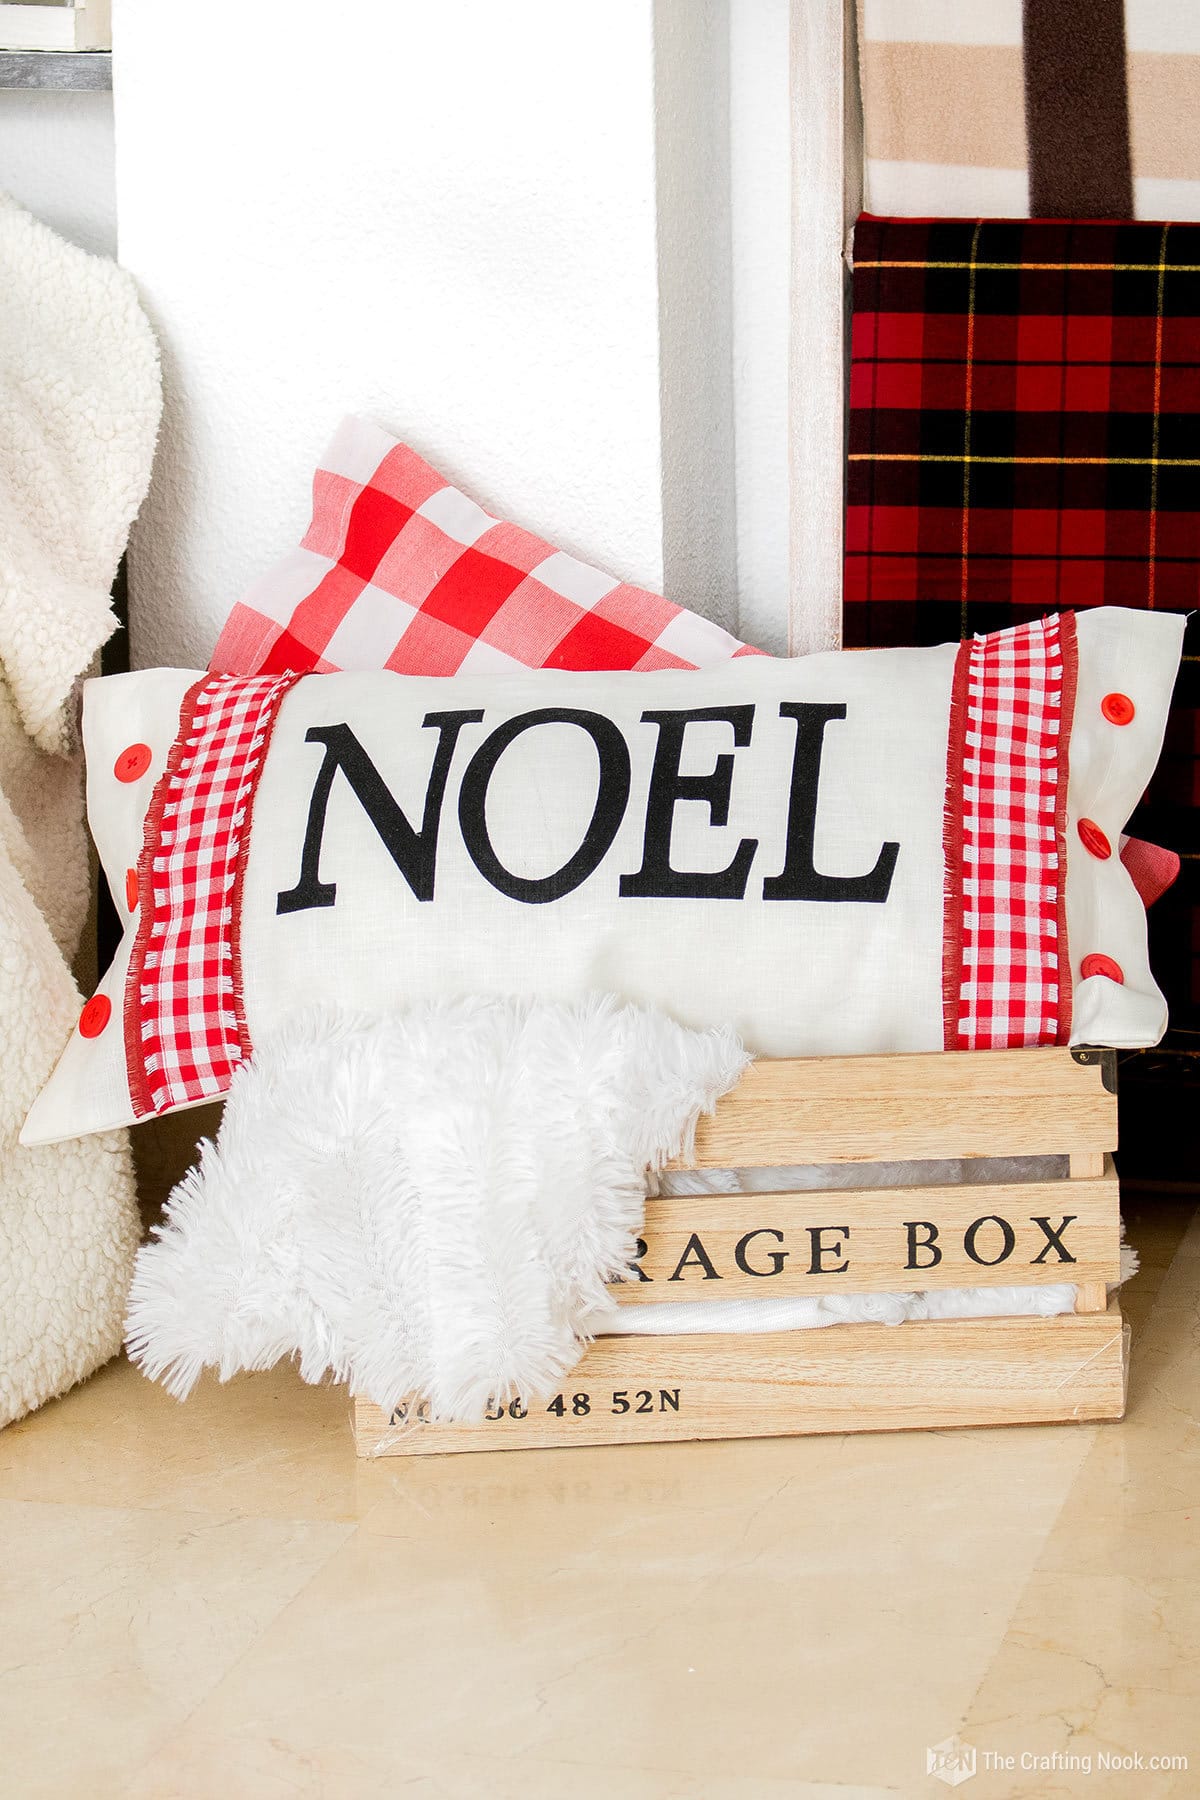
Learn how to make a pillowcase farmhouse grain sack style in a fun and easy way. It’s a perfect project to add some farmhouse style to our Christmas decor. A fun and easy tutorial that will only need a few supplies and all your love!
Farmhouse is still my favorite home decor style. For some reason, it brings a cozy and homey feeling to the home.

Table of Contents
Make A Pillowcase Farmhouse Grain Sack Style
Actually, pillows are an obsession and also my favorite item of any decor but if you add the farmhouse style to it then in my book that’s called perfection.
Being Christmas my favorite time of the year, I thought why not put it all together, right?
This farmhouse grain sack pillowcase tutorial is easy to put together and you don’t need to be an expert sewer to accomplish it. It’s perfect for beginners.
I love the look of grain sack pillows. They are so rustic and yes with a bit of modern style, they look amazing within your farmhouse decor.
Even if you don’t have a cutting machine for the painted word, you can find stencils and still be able to create your own.
So don’t let this tutorial scare you. Imagination is the limit.
Best part?
You can machine wash them (in a gentle cycle) and then dry them as long as it’s tumble dry low.
How To Make A GRAIN SACK Pillowcase
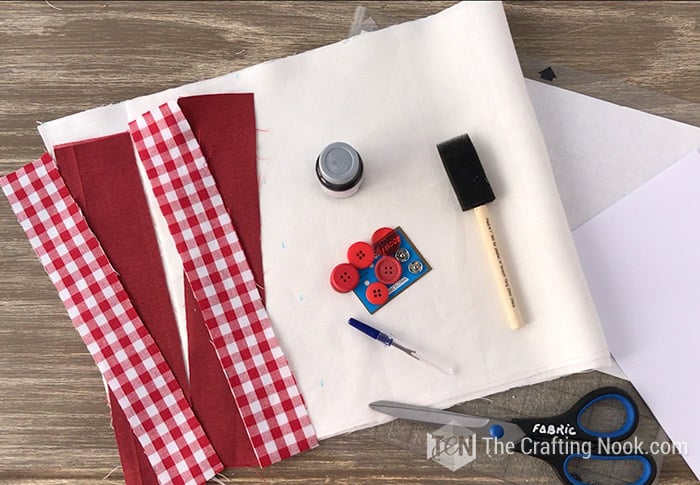
Supplies:
- White linen (size should be your pillow size + 1/2 inch seam allowance (1 cm) lengthwise, +10cm (4 Inches) widthwise)
- 2 Red fabric Strips (width same as white linen and length about 2.5 Inches)
- Buffalo Plaid Red/white fabric (width same as white linen and length about 2 Inches)
- Press Snaps
- Buttons
- A Pillow Insert.
- Coordinating threads
- Freezer Paper (or a stencil of your choice if you don’t have a cutting machine)
- Black fabric paint
- Foam brush
Tools:
- Sewing Machine – although you can still do this if you know hand-sewing.
- Cutting machine – Silhouette or Cricut. You can still do it without a cutting machine just print out your work in a simple and easy-to-cut font and use it as your stencil.
- Pins and measuring tape
- Household iron – or heat press if you have one.
- Scissors.
Instructions:
Before we begin, be sure to follow us on Pinterest, Facebook, Instagram, and YouTube, and also sign up for our email list (at the end of this post), so you’ll never miss a post!
Prep Work
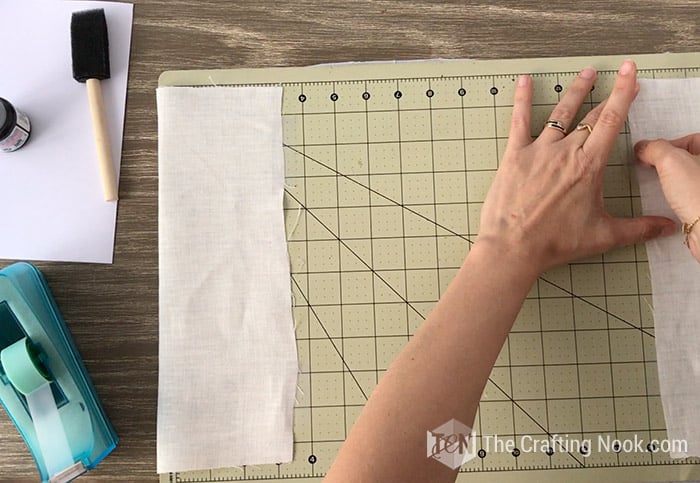
Firstly, wash your fabric to remove any chemical coatings or creases as well as get any shrinking happening before the pillowcase is finished. Then iron it so you can measure and cut the fabric more easily.
I like to cut my fabric to the dimensions of my pillow insert + 1 cm seam allowance. This way it fits the pillow form nicely and slightly snugly. If you like it tighter, don’t add the 1cm and just cut to the exact dimensions of my pillow insert.
I just adjusted the design size to the maximum my cutting machine could cut (12 inches wide) because of the size of my pillow.
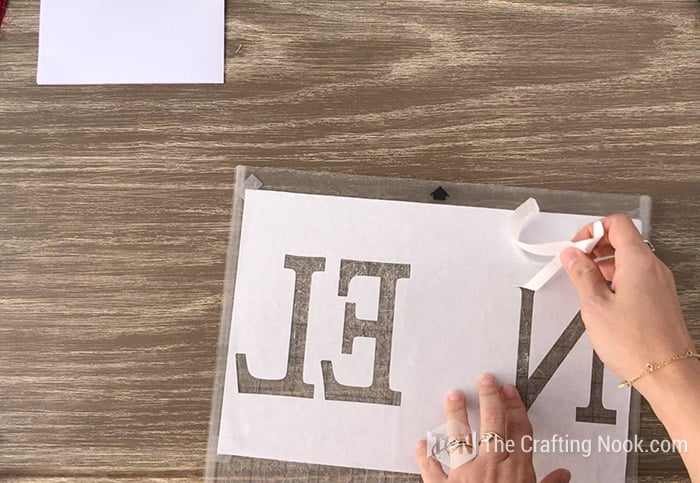
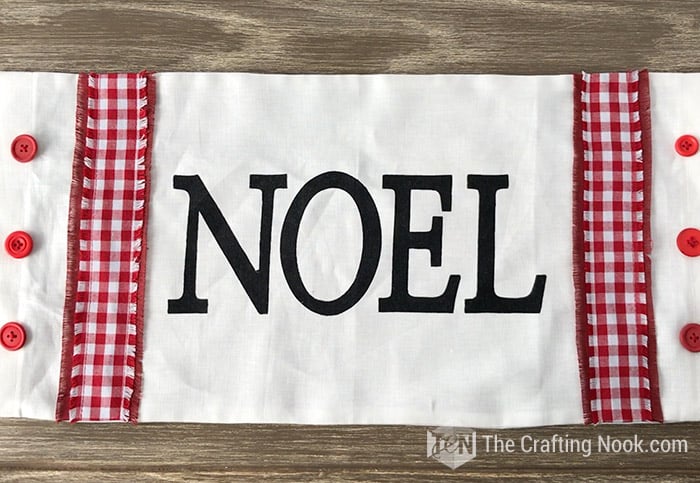
Now create your design. I wrote Noel with a pretty but simple serif font to give the farmhouse vibe.
You can write whatever you want or just use graphics. Imagination is the limit. Just make sure it fits your available space in the pillow cover.
Once your design is ready and you are happy with it, it’s time to cut it.
When using Freezer paper it’s important to remember that the waxed side should always be facing up on the cutting mat.
For this reason, is critical to also remember to flip (mirror) the design before cutting. To do this, you just need to select the whole design and go to Object > Mirror > Flip Horizontally on the top menu on your silhouette studio app.

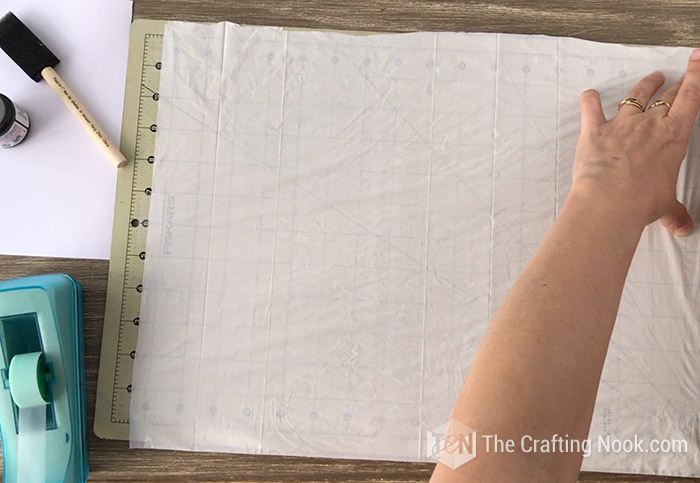
Lay your freezer paper on your mat wax side facing up covering the whole sticky area of your mat.
Load your mat in your cutting machine.
Set your app to print paper and adjust your knife accordingly. BUT I set the blade to 1 since freezer paper is really light.
Send to cut.
Using and Applying Freezer Paper
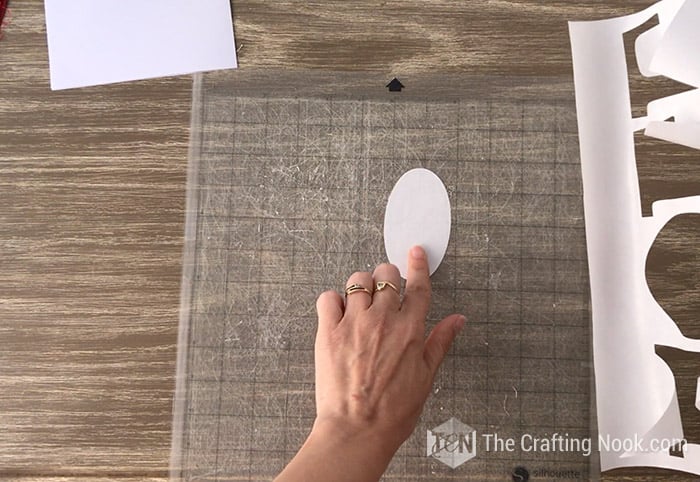
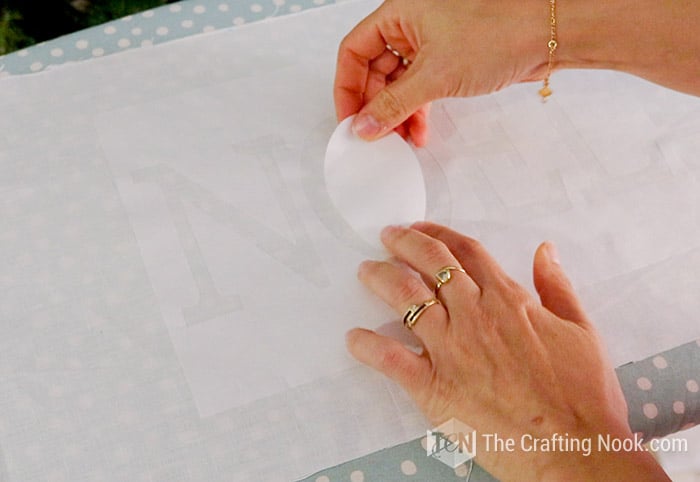
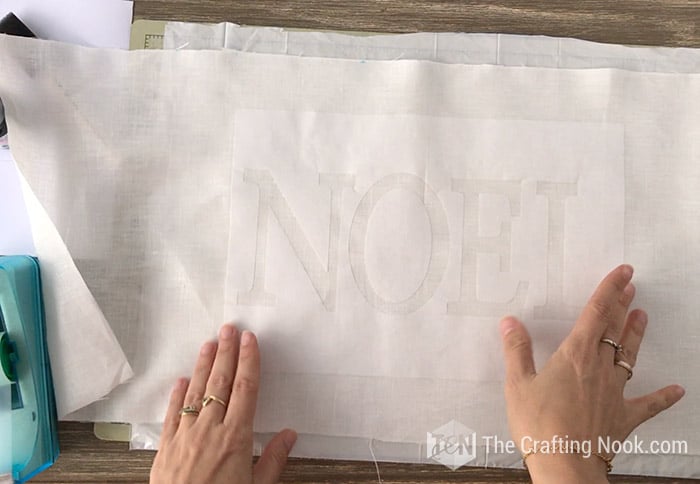
Once cut is done, carefully remove from the mat the inner parts of the design, leaving only the inner parts that actually belong to your design. Like in this case, would be the inner part of the letter “O”.
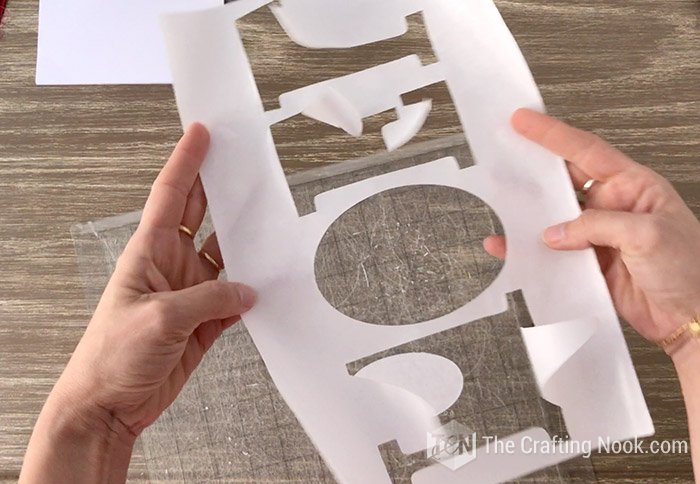
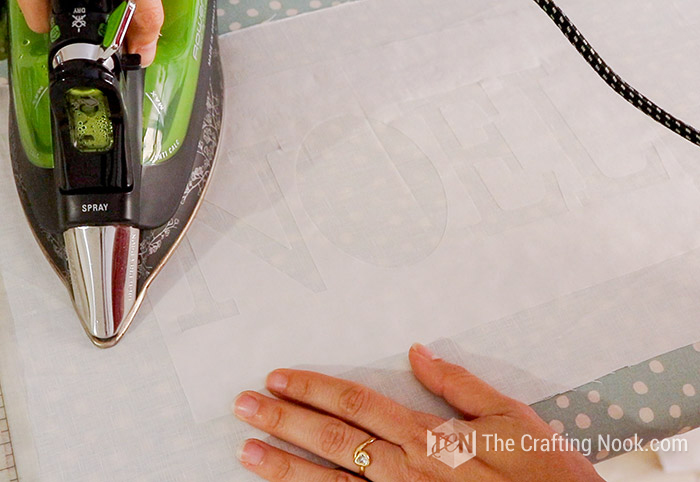
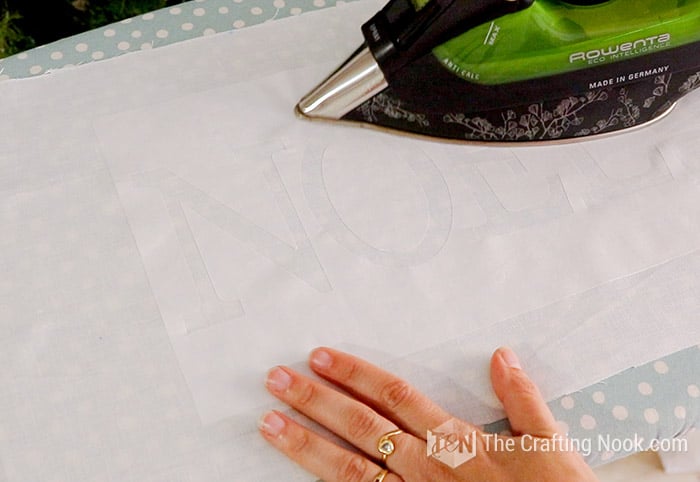
Take one piece of your fabric, iron it well, and mark the center. Also, mark the center of your stencil.
Place carefully your freezer paper stencil waxy side facing down onto the fabric as centered as you can following your center marks.
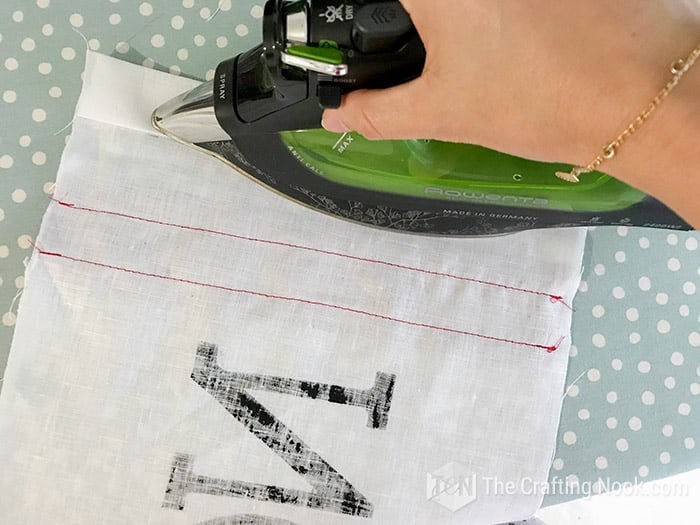
Use an iron without steam at a medium-high temperature to evenly heat the stencil for about 10-15 seconds. When the fabric gets heated, the waxy side will stick to it.
Then add those little inner shapes (like the inner “O” in my case) to the correct places and iron them down.
Painting your Farmhouse Christmas Pillow
I protected a small cutting mat with plastic and taped the fabric to it. You can use cardboard too but always protect it with plastic. You don’t want the cardboard to stick to your pretty pillow cover.
Place your stenciled piece of fabric on top of your mat or base.
Secure the fabric either on the back on around it with adhesive tape.
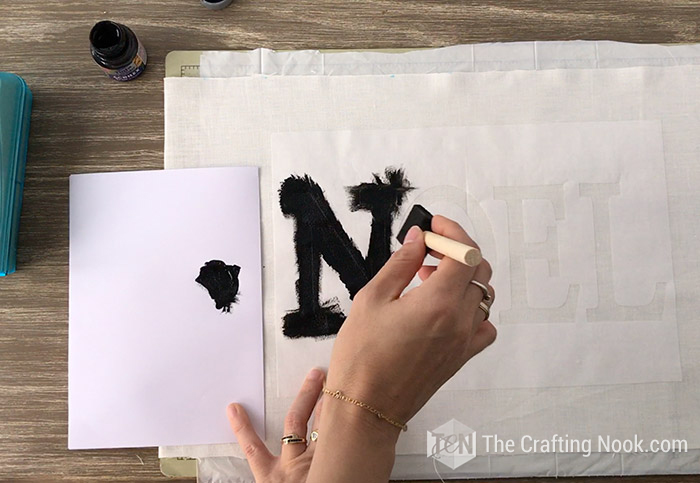
Start adding some paint on a paper plate or piece of paper.
With your foam brush spread the paint all over your design making sure you don’t paint making strokes toward the edges. I recommend painting doing gentle taps to avoid the paint bleeding through the stencil edges.
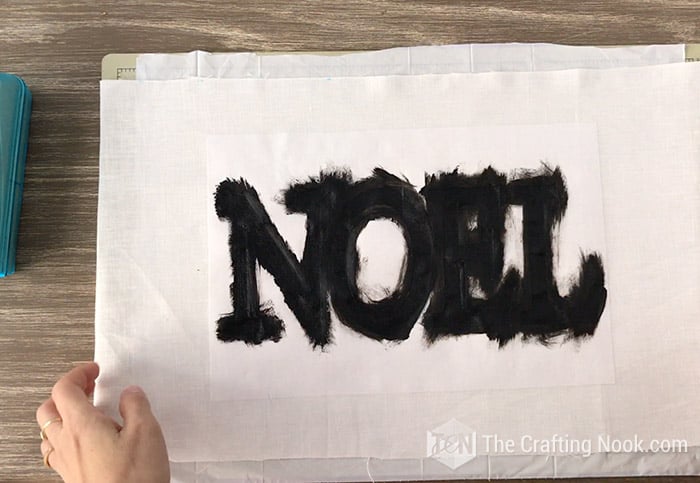
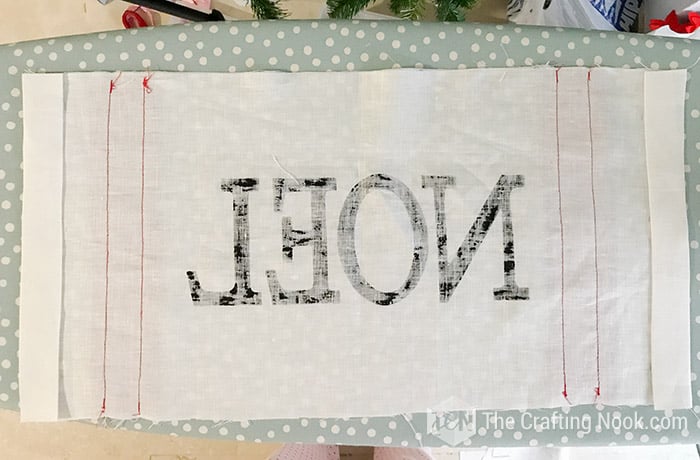
Let it dry for a few minutes and peel off the stencil gently and all the inner parts.
Doing this very carefully and gently, will help prevent the paint from smearing.
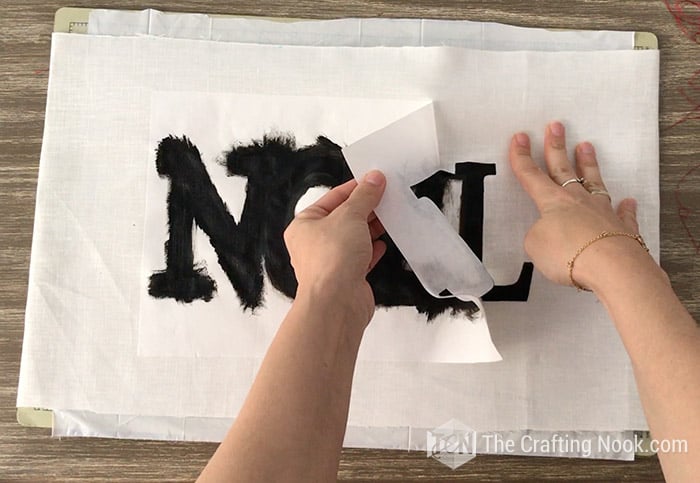
Let it dry completely now. Usually, it takes about 30 minutes to an hour but still, make sure you read the paint directions just in case.
To protect the design, apply a fabric sealer after you finish painting and the paint dries. This layer of protection will stop the paint on your pillowcase from fading or coming off and make sure it lasts for a long time.
while it all dries well, let’s work on the pillow decoration.
Grain Sack Pillowcase Decoration
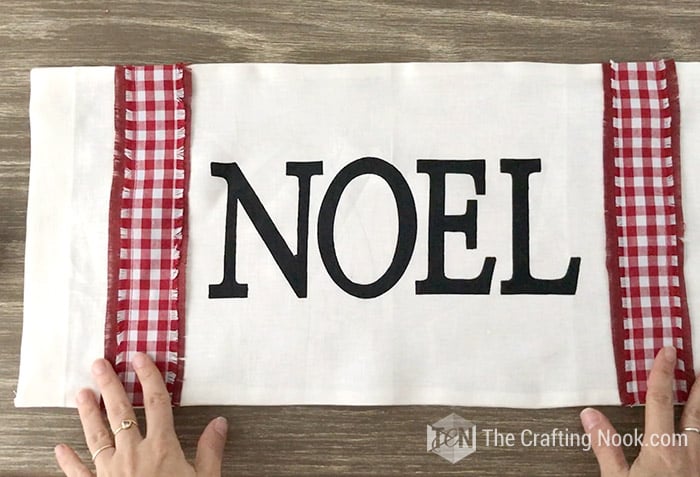
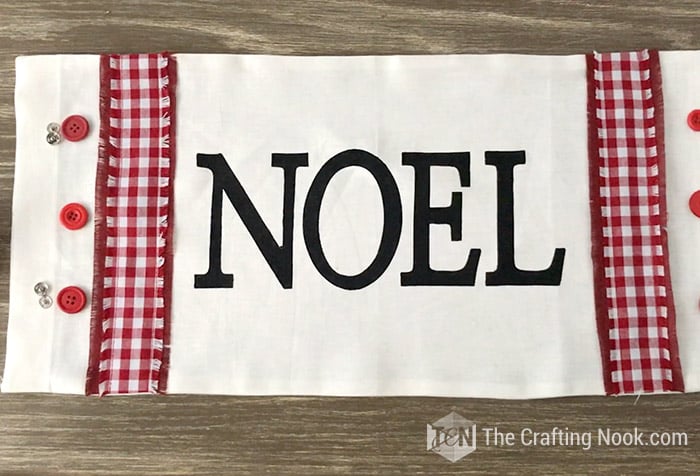
I wanted to create 2 stripes, one on each end of the pillow cover to give that farmhouse look.
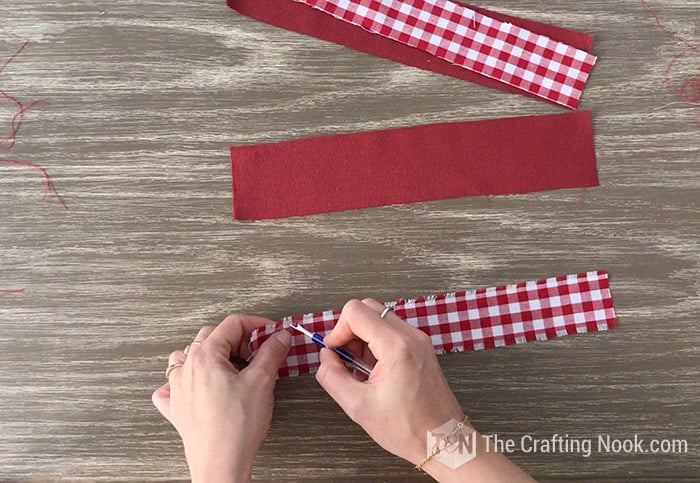
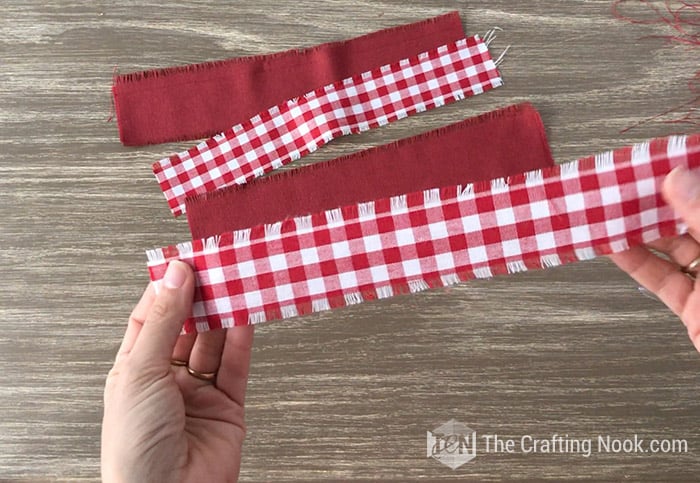
Take your fabric strips and let’s fringe it! Fun huh!
Before you start fringing the edge, it’s important to square off the raw edges so the fringe is straight, and even
With buffalo check it’s easier, just trim fabric along the square lines. You could trim it later, but it’s much easier to begin with good edges.
Carefully start pulling threads out from one side to the other until desired fringe length. Repeat for both sides.
I used a seam ripper to help pull threads from the fabric and then pull the rest by hand.
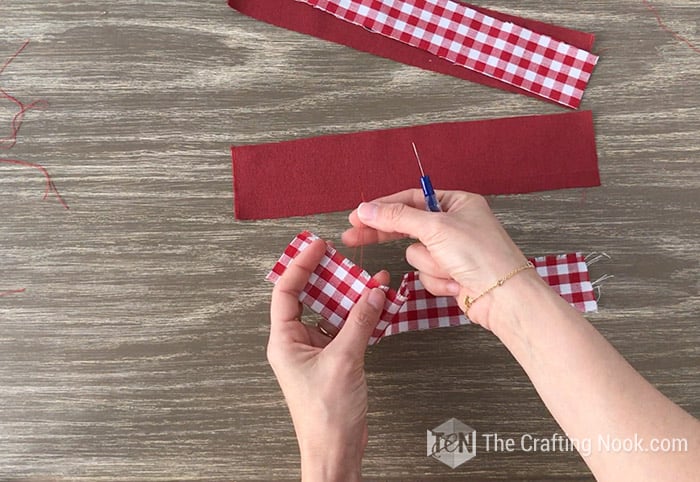
Repeat the process on all 4 strips.
Thread Pulling Tips
- If you find it tricky to get the thread pulled, use a seam ripper to reach the thread and then a tweezer may help get it out.
- Pull gently to avoid breaking the threads.
- If a thread does break, use a needle or the seam ripper to work the end out and begin pulling again.
- Ironing the fabric after you’re finished keeps the threads aligned and easier to work with.
- If your painted fabric is dry, it’s time to assemble the sack Pillow cover.
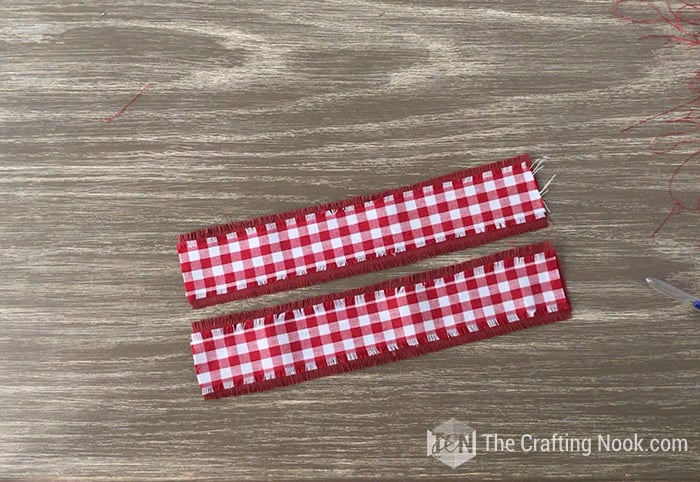
Place buffalo check fabric on top of the red fabric strip and then place them on both sides of your painted word main fabric as shown in the photo below.
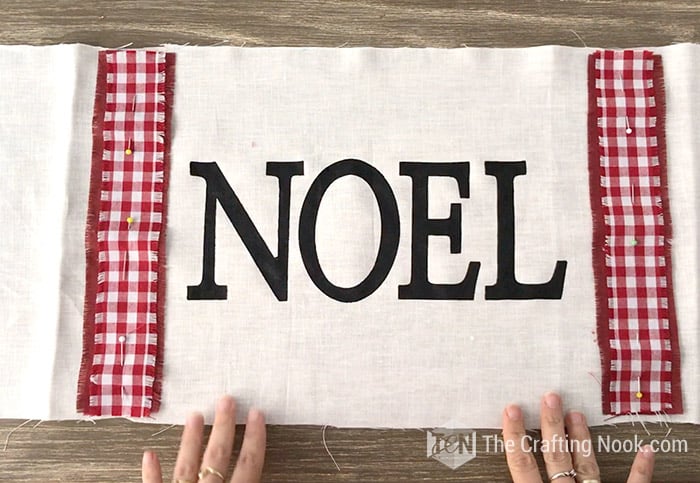
When you are happy with the placement pin in place and stitch each stripe on both long sides of each strip as close as possible to the fringed edges.
Assembling the Christmas grain sack Pillowcase
Now, create a double-fold hem on each short side end of your pillowcase pieces.
Fold up the bottom of your fabric by 1 Inch, and press it into place.
Fold up again by 1 Inch and press again.
Repeat with the other 3 ends.
By now, you should have something like the following photo.
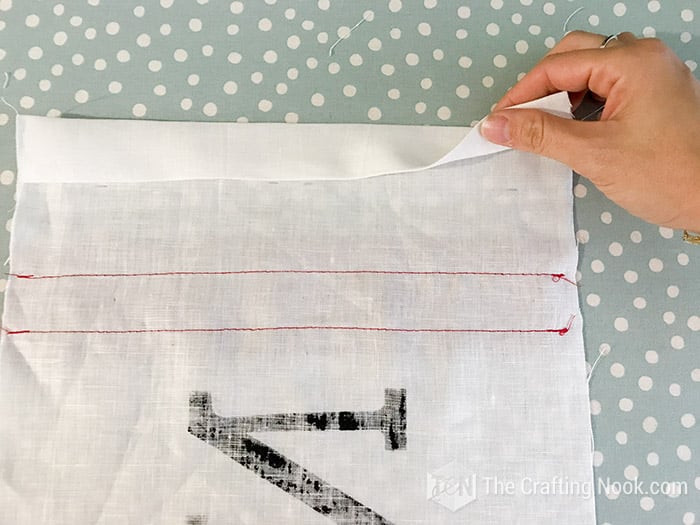
With right sides together and edges aligned, stitch along both long sides.
Then zig zag stitch between the seam and edges to avoid fraying with washes.
Turn your pillowcase inside out and press.
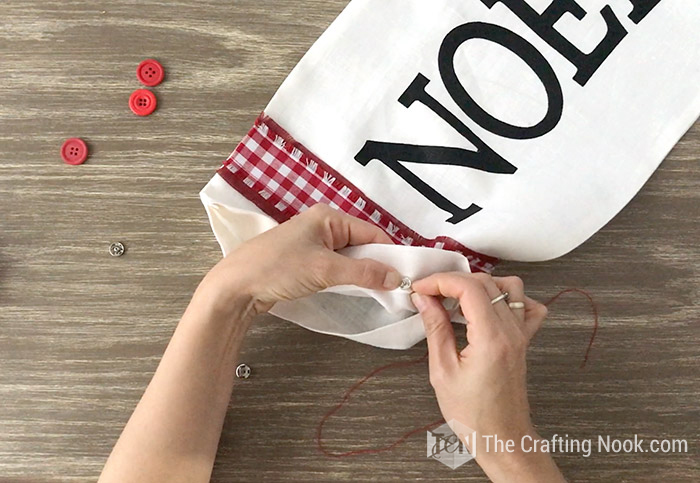
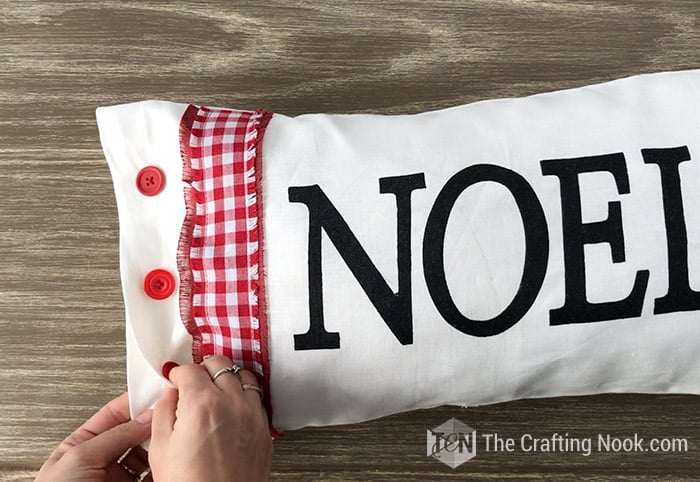
I made one fake buttoned side and a real one where you insert the pillow.
On the fake side, just stitch your buttons in place joining both sides of the pillowcase.
On the other side, I didn’t want to make buttonholes so I used press snaps for the inside and normal 4-hole buttons.
For this project, I used different buttons all red-colored.
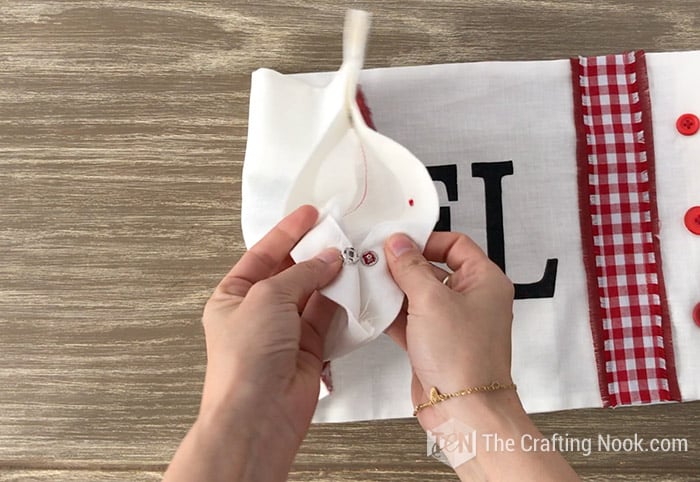
So here’s the deal. Press snaps have 4 holes, and so do the buttons I chose. So what I did was match the holes from snaps on the inside to the normal button on the outside.
Define where your buttons will go, start with the snap inside, and then stitch through to the outside.
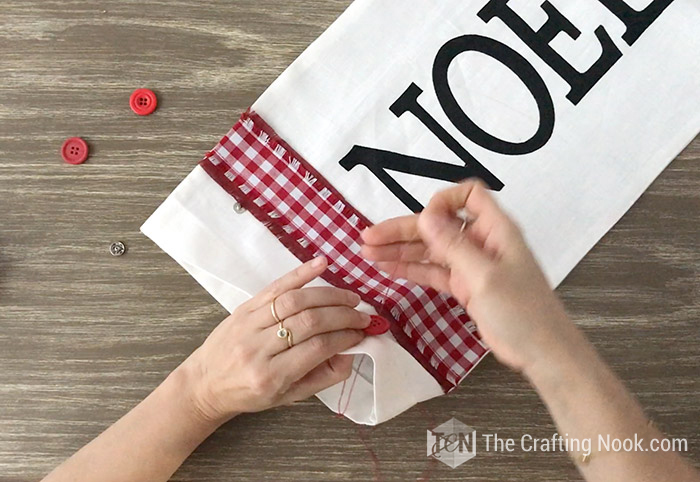
Insert the needle through the red button and then stitch back inside making sure the needle goes through another snap hole and so on and so forth.
Repeat this a few times and then finish it with a knot on the inside.
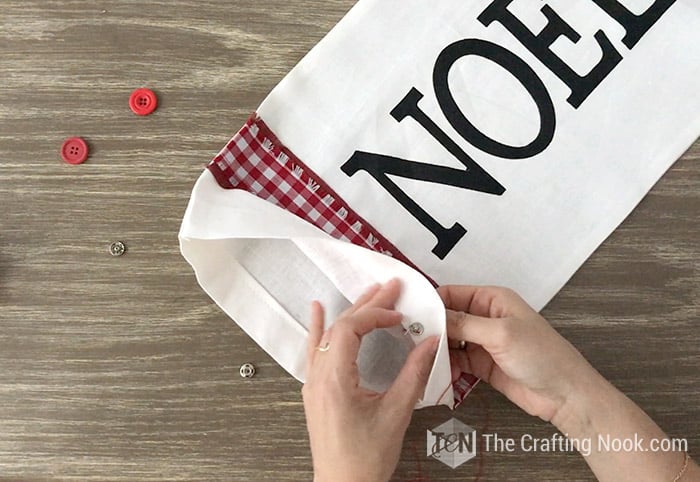
Stitch the back of the snap in the inner side of the back of the pillowcase piece making sure the stitches stay within the hem and not go through the other side of the pillowcase.
Repeat with the other buttons.
There you go!
Stuff your Pillow
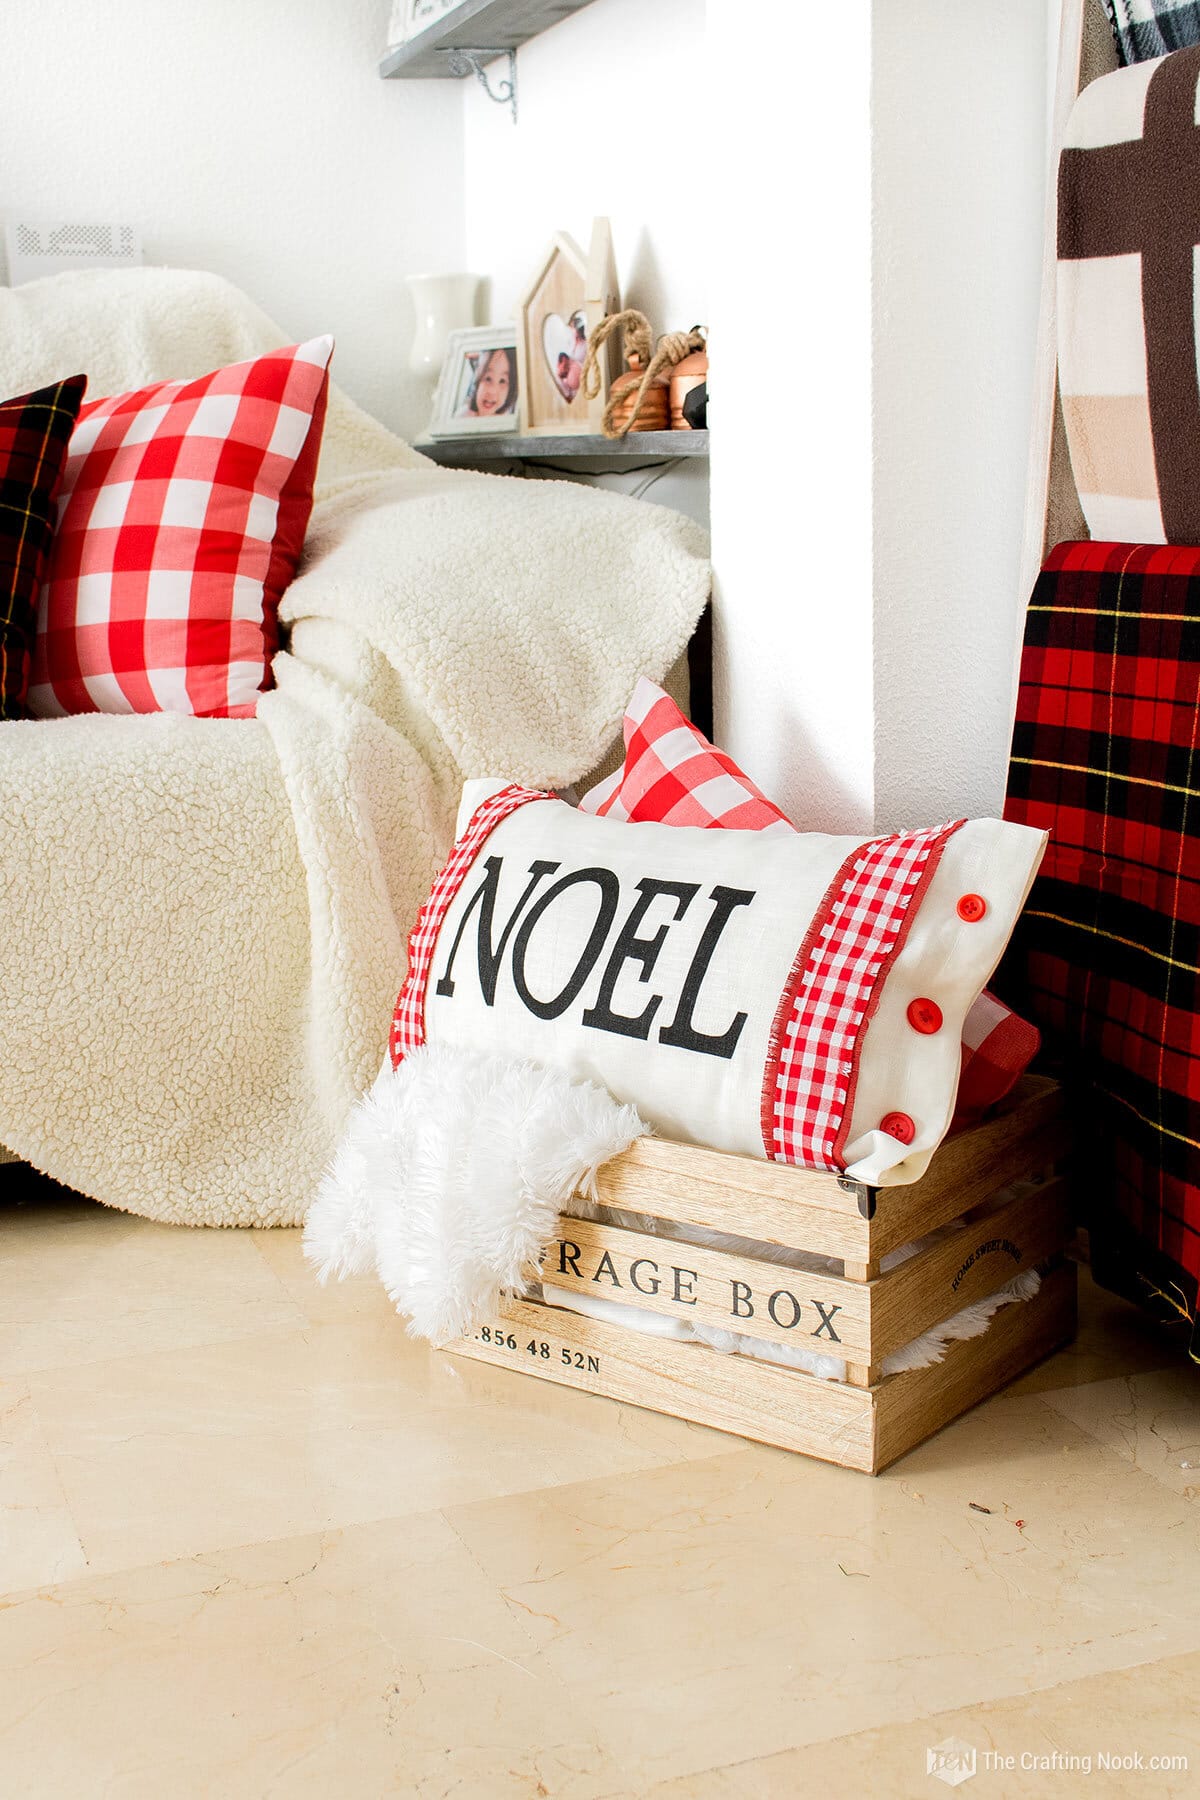
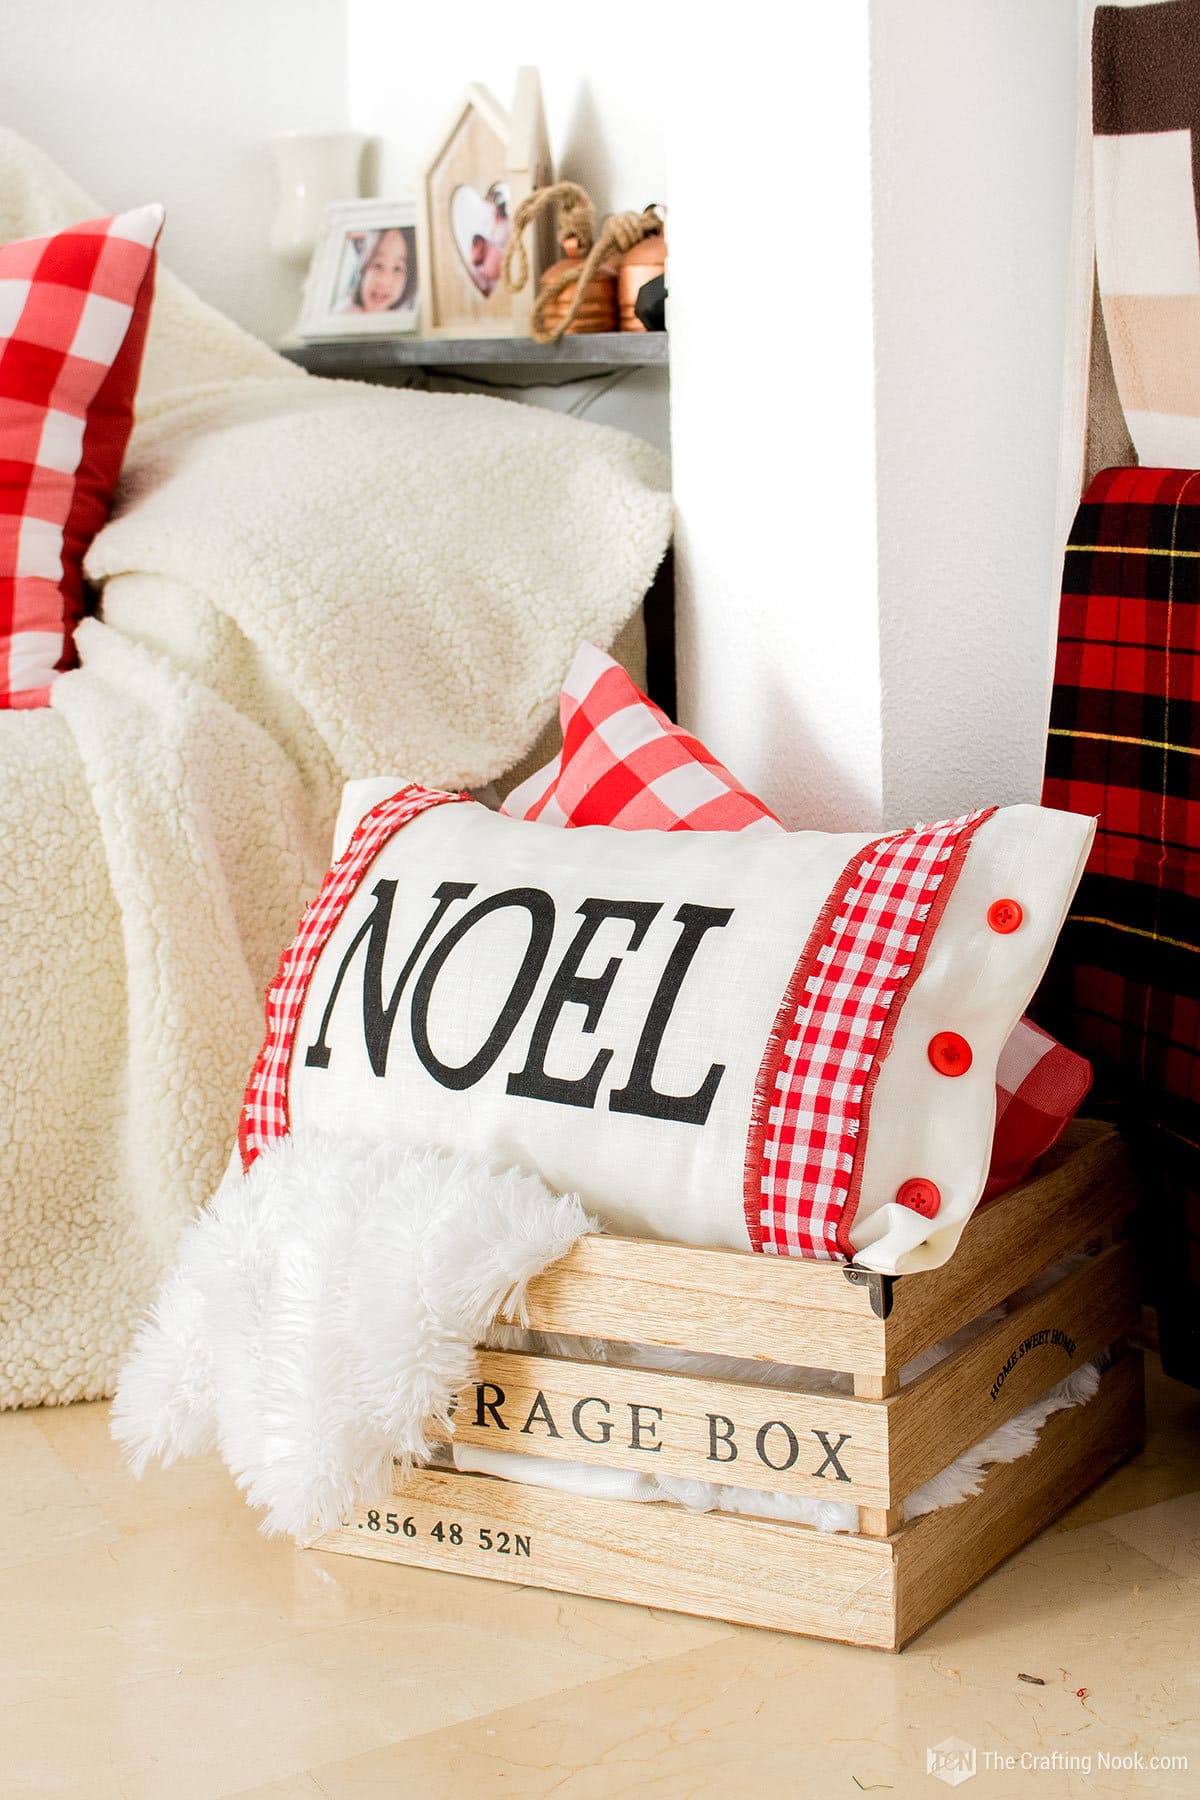
Now get your pillow insert in there and enjoy your super cute Noel Pillowcase Farmhouse Grain Sack Style!
This is how my lovely Noel Christmas Pillowcase Farmhouse Grain Sack Style looks in my living room!

Crafting Tips
- I recommend a medium-weight cotton or linen fabric for an authentic grain sack look. This type of fabric will have a nice texture and durability and it’s very good for painting.
- Before you begin your project, always wash and iron the fabric to get rid of any chemical coatings or creases as well as we get any shrinking happening before the pillowcase is finished. This will also make sure the surface is clean and smooth for painting.
- When you use the Silhouette Cameo to cut your design, make sure to flip or mirror the image horizontally. This is an important step because when you place the stencil on the fabric, it will be facing the correct way.
- Buy high-quality paint that is made specifically for painting on fabric. Follow the directions provided by the manufacturer for how to apply and let the product cure correctly.
- Use a little bit of paint at a time when you’re painting. Don’t put too much paint on your brush or sponge. Put thin layers of paint to prevent bleeding under the stencil edges of the stencil. Wait for each layer to dry before adding another one. This will make your lines look sharp and neat.
- Don’t wash your pillowcase at least 24-48 hours after finishing.
- Experiment with alternative stencil materials: While freezer paper is my favorite material for stenciling, don’t be afraid to explore other materials for your stencil. Materials like adhesive vinyl, mylar sheets, or even acetate can provide different stencil effects and allow for more intricate designs.
Frequently Asked Questions
A grain sack-style pillowcase is a pillowcase that looks like old sacks used to hold grains. Usually, it has lines, a worn-out feeling, and a word or phrase that is painted.
Put the fabric down, and then put the freezer paper stencil on top of it, with the waxy side facing down. Use an iron with the steam off on a medium to high temperature to spread heat evenly over the stencil for about 10 to 15 seconds. The heat makes the waxy side sticky and sticks to the fabric.
I recommend using fabric paints specifically formulated for use on textiles. These paints are made to stick to fabric and stay on even when washed. Do what the manufacturer suggests for how to use it, how long to let it dry, and how to set it with heat.
Yes, most fabric paints can be washed after being heated or cured correctly. You should always do what the fabric paint maker says about washing and taking care of your item.
I’ve heard that it’s possible, however, in my experience, you can’t. The freezer paper loses a lot of its stickiness after being peeled off and also the paint left off could easily get mixed with the new paint and damage your new design. I recommend always making a new stencil with freezer paper.
More Christmas Pillows To Try
If you enjoyed learning how to make a pillowcase for Christmas, you might also love these other Christmas project ideas too:

Are there other methods to create a Grain Sack Inspired Farmhouse Christmas Pillow cover?
There are so many ways to get that look. Aimee from The Crazy Craft Lady has one super cute and fun method. She uses Sharpies and drop cloth to create a grain sack effect. Cassity from Remodelaholic shares another idea to create that effect with paint and heat n’ bond tape. So there’s no sewing involved!
✂️ Tutorial

How To Make A Pillowcase Farmhouse Grain Sack Style
Tools
- Sewing Machine – although you can still do this if you know hand-sewing.
- Cutting machine – Silhouette or Cricut. You can still do it without a cutting machine just print out your work in a simple and easy-to-cut font and use it as your stencil.
- Pins and measuring tape
- Household iron – or heat press if you have one.
- scissors
Supplies
- White linen size should be your pillow size + 1/2 inch seam allowance (1 cm lengthwise, +10cm (4 Inches) widthwise)
- 2 Red fabric Strips width same as white linen and length about 2.5 Inches
- Buffalo Plaid Red/white fabric width same as white linen and length about 2 Inches
- Press Snaps
- Buttons
- A Pillow Insert.
- Coordinating threads
- Freezer Paper or a stencil of your choice if you don’t have a cutting machine
- Black fabric paint
- Foam brush
Instructions
PREP WORK
- Firstly, wash your fabric to remove any chemical coatings or creases as well as get any shrinking happening before the pillowcase is finished. Then iron it so you can measure and cut the fabric more easily.
- I like to cut my fabric to the dimensions of my pillow insert + 1 cm seam allowance. This way it fits the pillow form nicely and slightly snugly. If you like it tighter, don’t add the 1cm and just cut to the exact dimensions of my pillow insert.
- I just adjusted the design size to the maximum my cutting machine could cut (12 inches wide) because of the size of my pillow.
- Now create your design. I wrote Noel with a pretty but simple serif font to give the farmhouse vibe.
- You can write whatever you want or just use graphics. Imagination is the limit. Just make sure it fits your available space in the pillow cover.
- Once your design is ready and you are happy with it, it’s time to cut it.
- When using Freezer paper it’s important to remember that the waxed side should always be facing up on the cutting mat.
- For this reason, is critical to also remember to flip (mirror) the design before cutting. To do this, you just need to select the whole design and go to Object > Mirror > Flip Horizontally on the top menu on your silhouette studio app.
- Lay your freezer paper on your mat wax side facing up covering the whole sticky area of your mat.
- Load your mat in your cutting machine.
- Set your app to print paper and adjust your knife accordingly. BUT I set the blade to 1 since freezer paper is really light.
- Send to cut.
USING AND APPLYING FREEZER PAPER
- Once cut is done, carefully remove from the mat the inner parts of the design, leaving only the inner parts that actually belong to your design. Like in this case, would be the inner part of the letter “O”.
- Take one piece of your fabric, iron it well, and mark the center. Also, mark the center of your stencil.
- Place carefully your freezer paper stencil waxy side facing down onto the fabric as centered as you can following your center marks.
- Use an iron without steam at a medium-high temperature to evenly heat the stencil for about 10-15 seconds. When the fabric gets heated, the waxy side will stick to it.
- Then add those little inner shapes (like the inner “O” in my case) to the correct places and iron them down.
PAINTING YOUR FARMHOUSE CHRISTMAS PILLOW
- I protected a small cutting mat with plastic and taped the fabric to it. You can use cardboard too but always protect it with plastic. You don’t want the cardboard to stick to your pretty pillow cover.
- Place your stenciled piece of fabric on top of your mat or base.
- Secure the fabric either on the back on around it with adhesive tape.
- Start adding some paint on a paper plate or piece of paper.
- With your foam brush spread the paint all over your design making sure you don’t paint making strokes toward the edges. I recommend painting doing gentle taps to avoid the paint bleeding through the stencil edges.
- Let it dry for a few minutes and peel off the stencil gently and all the inner parts.
- Doing this very carefully and gently, will help prevent the paint from smearing.
- Let it dry completely now. Usually, it takes about 30 minutes to an hour but still, make sure you read the paint directions just in case.
- To protect the design, apply a fabric sealer after you finish painting and the paint dries. This layer of protection will stop the paint on your pillowcase from fading or coming off and make sure it lasts for a long time.
- While it all dries well, let’s work on the pillow decoration.
GRAIN SACK PILLOWCASE DECORATION
- I wanted to create 2 stripes, one on each end of the pillow cover to give that farmhouse look.
- Take your fabric strips and let’s fringe it! Fun huh!
- Before you start fringing the edge, it’s important to square off the raw edges so the fringe is straight, and even
- With buffalo check it’s easier, just trim fabric along the square lines. You could trim it later, but it’s much easier to begin with good edges.
- Carefully start pulling threads out from one side to the other until desired fringe length. Repeat for both sides.
- I used a seam ripper to help pull threads from the fabric and then pull the rest by hand.
- Repeat the process on all 4 strips.
- Place buffalo check fabric on top of the red fabric strip and then place them on both sides of your painted word main fabric as shown in the photo below.
- When you are happy with the placement pin in place and stitch each stripe on both long sides of each strip as close as possible to the fringed edges.
ASSEMBLING THE CHRISTMAS GRAIN SACK PILLOWCASE
- Now, create a double-fold hem on each short side end of your pillowcase pieces.
- Fold up the bottom of your fabric by 1 Inch, and press it into place.
- Fold up again by 1 Inch and press again.
- Repeat with the other 3 ends.
- By now, you should have something like the following photo.
- With right sides together and edges aligned, stitch along both long sides.
- Then zig zag stitch between the seam and edges to avoid fraying with washes.
- Turn your pillowcase inside out and press.
- I made one fake buttoned side and a real one where you insert the pillow.
- On the fake side, just stitch your buttons in place joining both sides of the pillowcase.
- On the other side, I didn’t want to make buttonholes so I used press snaps for the inside and normal 4-hole buttons.
- For this project, I used different buttons all red-colored.
- So here’s the deal. Press snaps have 4 holes, and so do the buttons I chose. So what I did was match the holes from snaps on the inside to the normal button on the outside.
- Define where your buttons will go, start with the snap inside, and then stitch through to the outside.
- Sewing the buttons to the Farmhouse Christmas Pillow
- Insert the needle through the red button and then stitch back inside making sure the needle goes through another snap hole and so on and so forth.
- Repeat this a few times and then finish it with a knot on the inside.
- Stitch the back of the snap in the inner side of the back of the pillowcase piece making sure the stitches stay within the hem and not go through the other side of the pillowcase.
- Repeat with the other buttons.
STUFF YOUR PILLOW
- Now get your pillow insert in there and enjoy your super cute Noel Pillowcase Farmhouse Grain Sack Style!
Notes
If you find it tricky to get the thread pulled, use a seam ripper to reach the thread and then a tweezer may help get it out. Pull gently to avoid breaking the threads. If a thread does break, use a needle or the seam ripper to work the end out and begin pulling again. Ironing the fabric after you’re finished keeps the threads aligned and easier to work with. If your painted fabric is dry, it’s time to assemble the sack Pillow cover.
Share and PIN ME!!!

Til’ next time…


FREE WORKBOOK
Keeping your Sweet Home Organized
Learn how to create intentional habits and simple routines to Keep Your Home Organized. Plus freebies, printables, exclusive content, and tips.
Disclaimer: By clicking on the “Yes” button above you are giving me your consent to collect and use your information according to the law and My Policy Privacy. Zero Spam I promise!