Personalized DIY Glitter Christmas Ornaments
This post may contain affiliate links. Please read our Disclosure Policy.
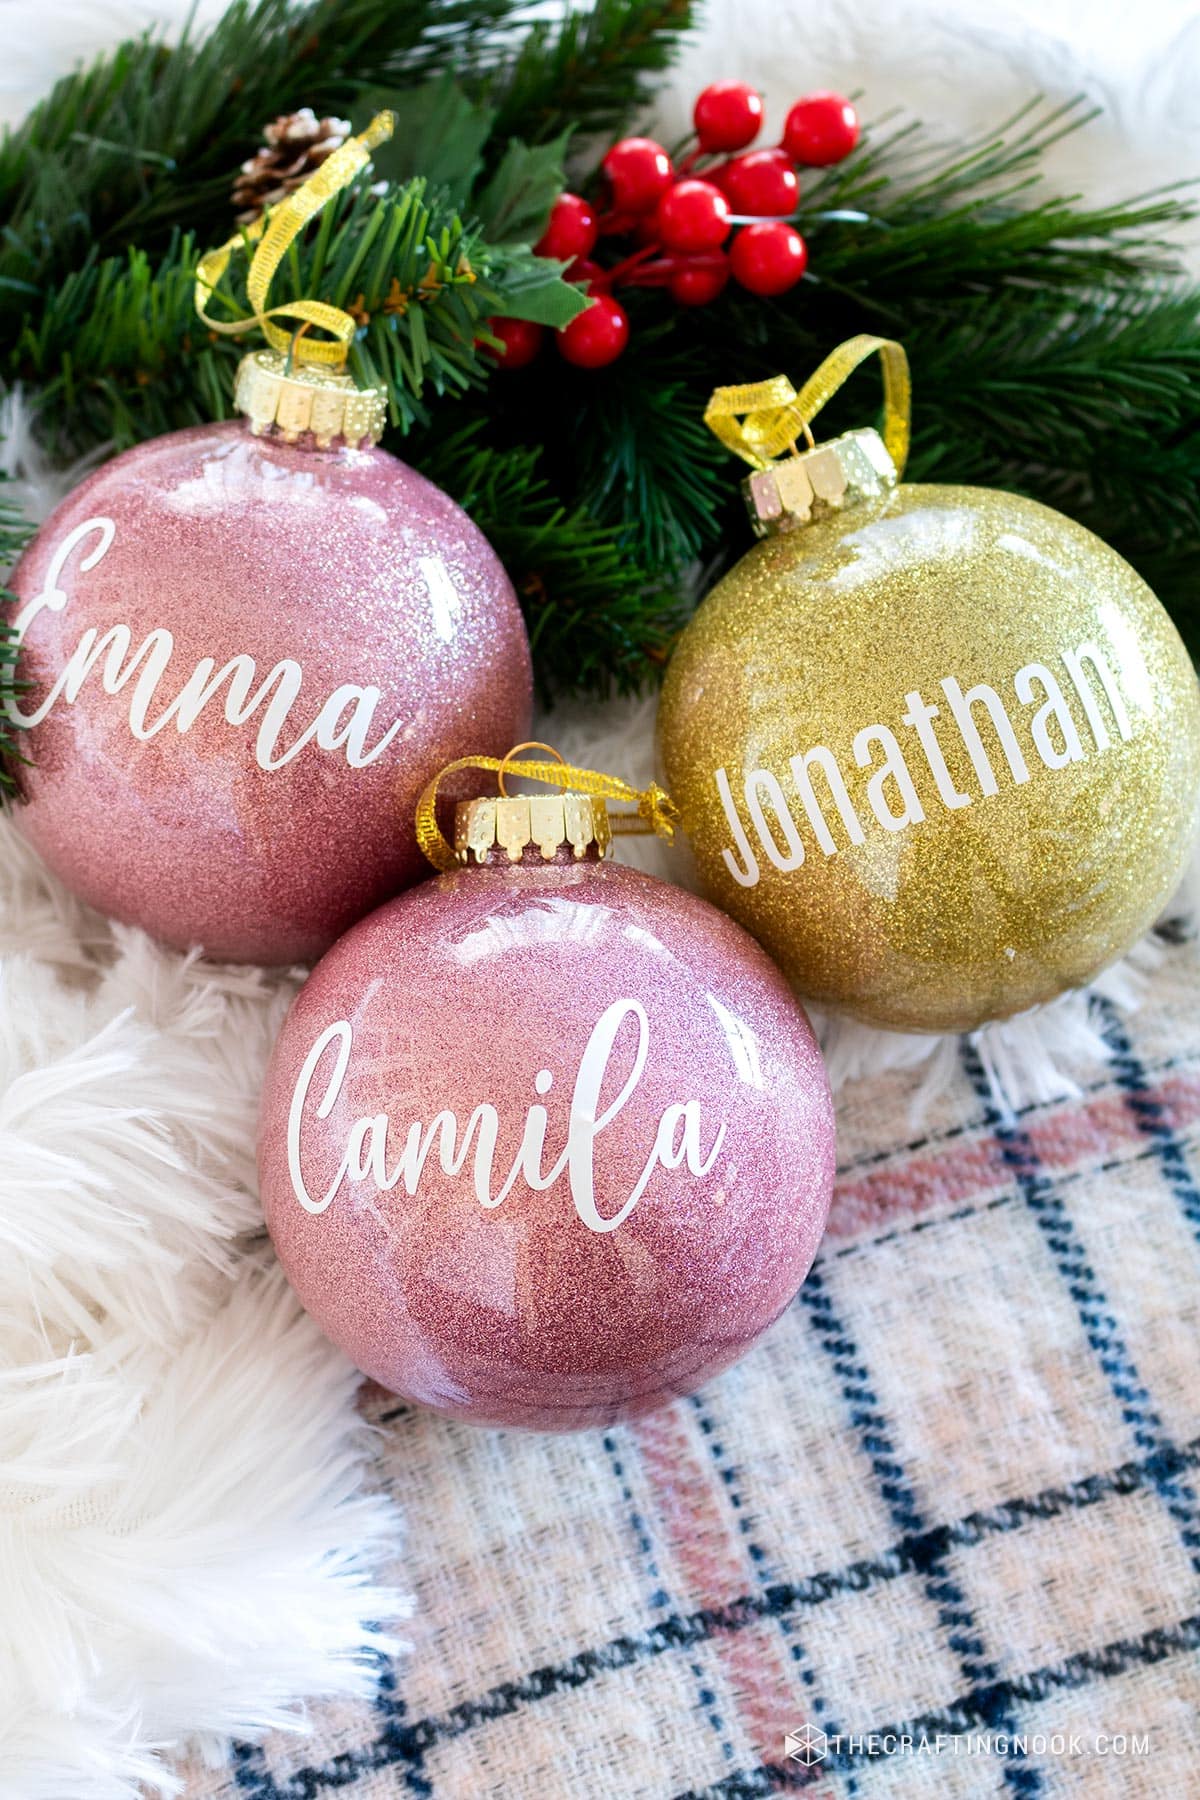
Craft holiday magic with our Easy DIY Glitter Christmas Ornaments tutorial! Dive into a world of sparkle and personal touch—perfect for festive memories.
If you want to make your Christmas tree more special, you’re in for a fun surprise. Today, we’re going to make beautiful Christmas glitter ornaments that sparkle and have a special touch from your family. Get ready to make your home feel festive with these special glittery Christmas ornaments.

Table of Contents
The Easiest Way to Make Glitter Ornaments Personalized
These DIY Glitter Christmas Ornaments are super special because I’ve wanted to make them for a long time. It was inspired by my bestie from Living and Crafting who make them every year and they are absolutely adorable.
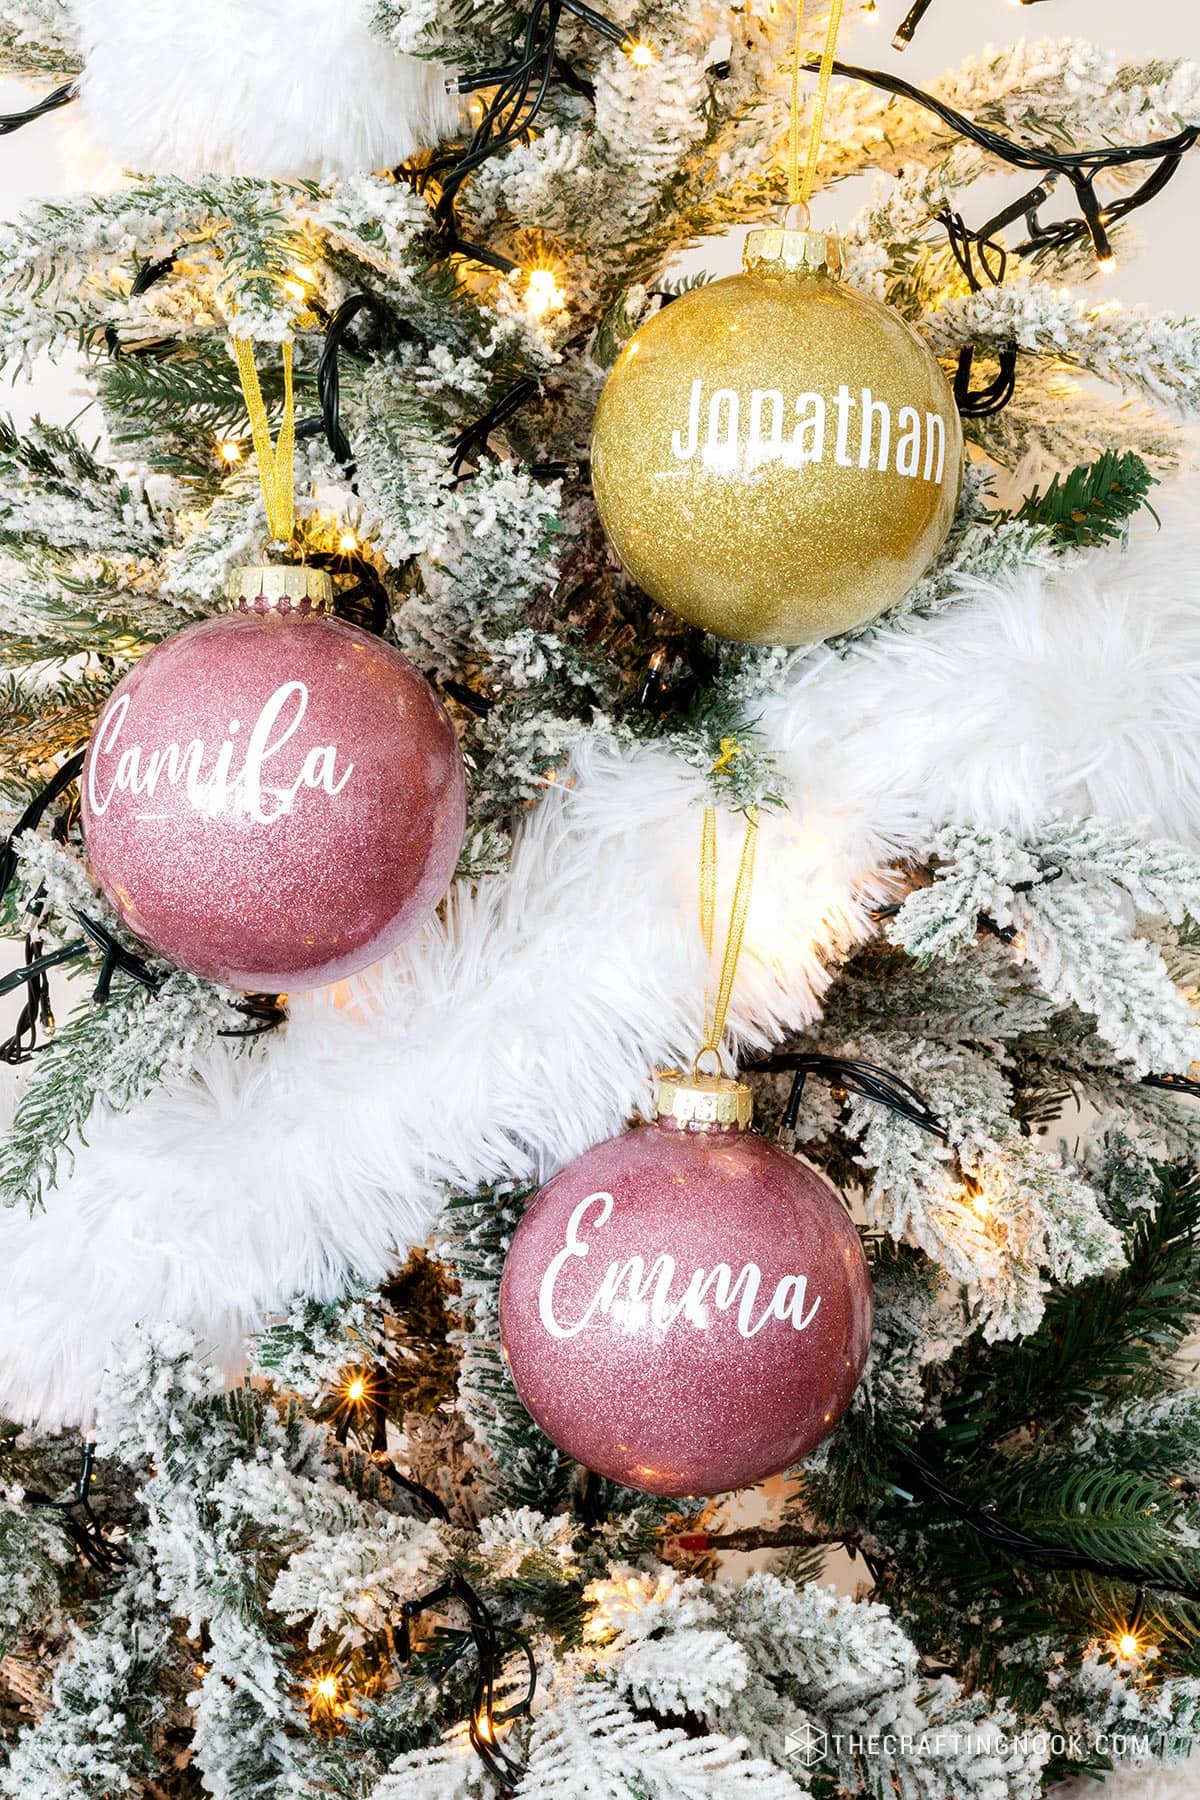
One of my biggest goals for my Christmas trees every year is to gather my family to keep them present in a more significant way. This year my parents and brother are away and my mother-in-law is with us. So I decided to make these super cute homemade ornaments with all my family members’ names on them.
I love how they turned out and it really feels like we are all together present this Holiday.
This is definitely a great Christmas craft for all ages and can even be done with kids.
How to Make Custom DIY Glitter Christmas Ornaments
Supplies:
- Clear plastic ornaments – You can use clear glass ornaments too.
- Glitter (in your favorite festive colors) _ I used extra fine glitter.
- Vinyl sheets (for the names in your favorite colors that contrast with the chosen glitter)
- Transfer tape or contact paper.
- Polyurethane varnish
- Small funnel or paper funnel
- Ribbon or twine
- Rubbing alcohol
- Syringe
- Paper towels
- Glass or plastic cups
- Patience (the most important ingredient!)
Tools:
- Cutting Machine – Silhouette or Cricut will work
- Weeding Tool
- Squeegee or scrapper
Instructions:
A few notes
I tested a few different glues before starting this project. I used white glue, clear glue and polyurethane. Although I got similar results with all 3, the very best one was achieved with polyurethane.
The white and clear glue were too dense so it was taking forever to cover the ornaments and then to dry, the white one took forever to get clear so I could see the glitter. The clear glue was fine.
With the polyurethane, my challenge was that because it was denser than the Minwax brand, I had to let the ornaments sit for almost 60 minutes so I could add the glitter. However, the final result was absolutely amazing and way long-lasting.
I lost around 3 ornaments because I was letting it set enough time. So when I poured the glitter, it would run to the bottom opening cracks in the glitter and sucking up way too much glitter.
Talking to my bestie, we compared her timing using Minwax in the USA and she let it sit for around 5-10 minutes while I tested 10, 30 and 45 minutes. In Spain, the brand Isaval required 45-60 minutes sitting.
Step 1: Clean the Ornaments
Start by cleaning the inside of the clear plastic ornaments with rubbing alcohol. This ensures a clean surface for the glitter and polyurethane to adhere to. Let it dry completely
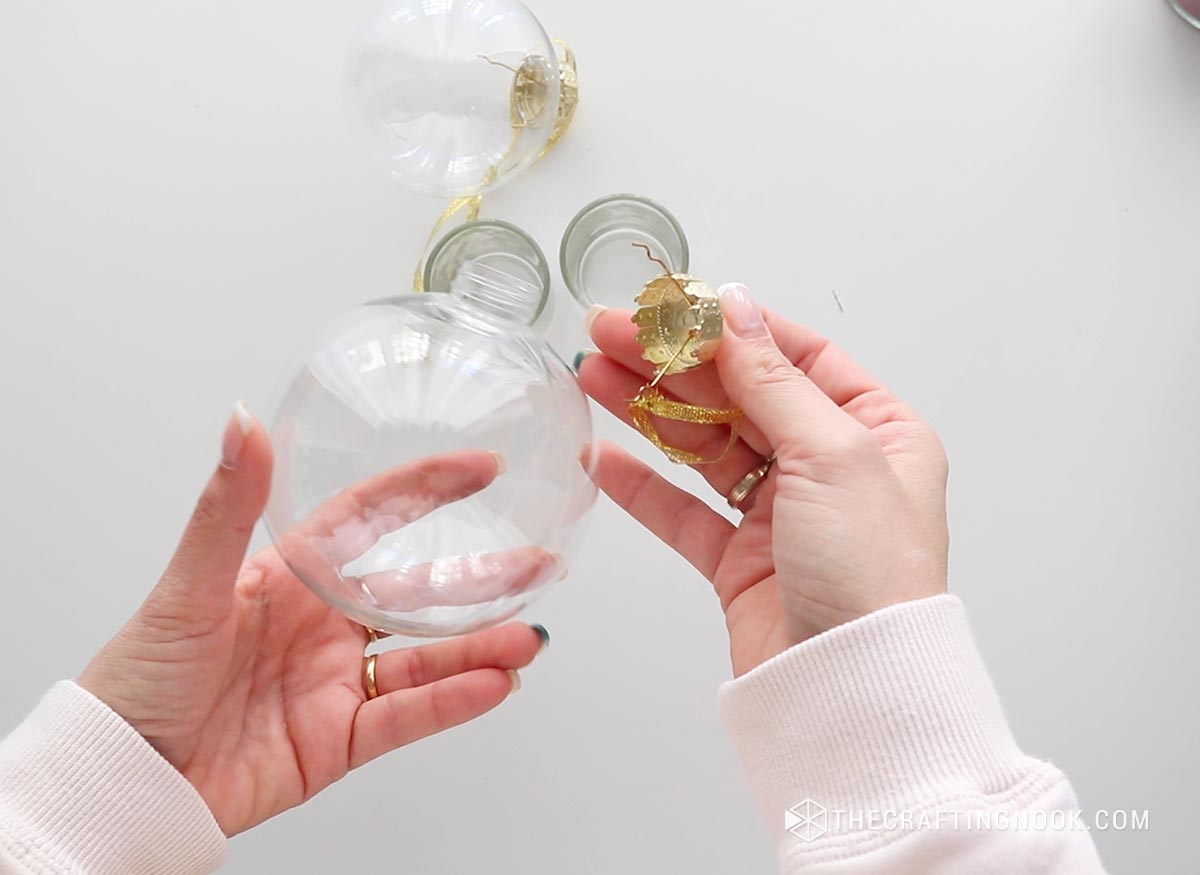
Remove the ornament cap.
Step 2: Apply glue
Place your ornament on a plastic or glass cup so it stays put.
Load the polyurethane glue into a syringe. This allows for precise application without making a mess.
Carefully insert the syringe into the ornament and inject the polyurethane. Depending on your ornament’s size and your polyurethane density, you might need more or less glue. I added 5 syringes to the large ones and 4, to the smaller ones. Your should test to see how much you need.
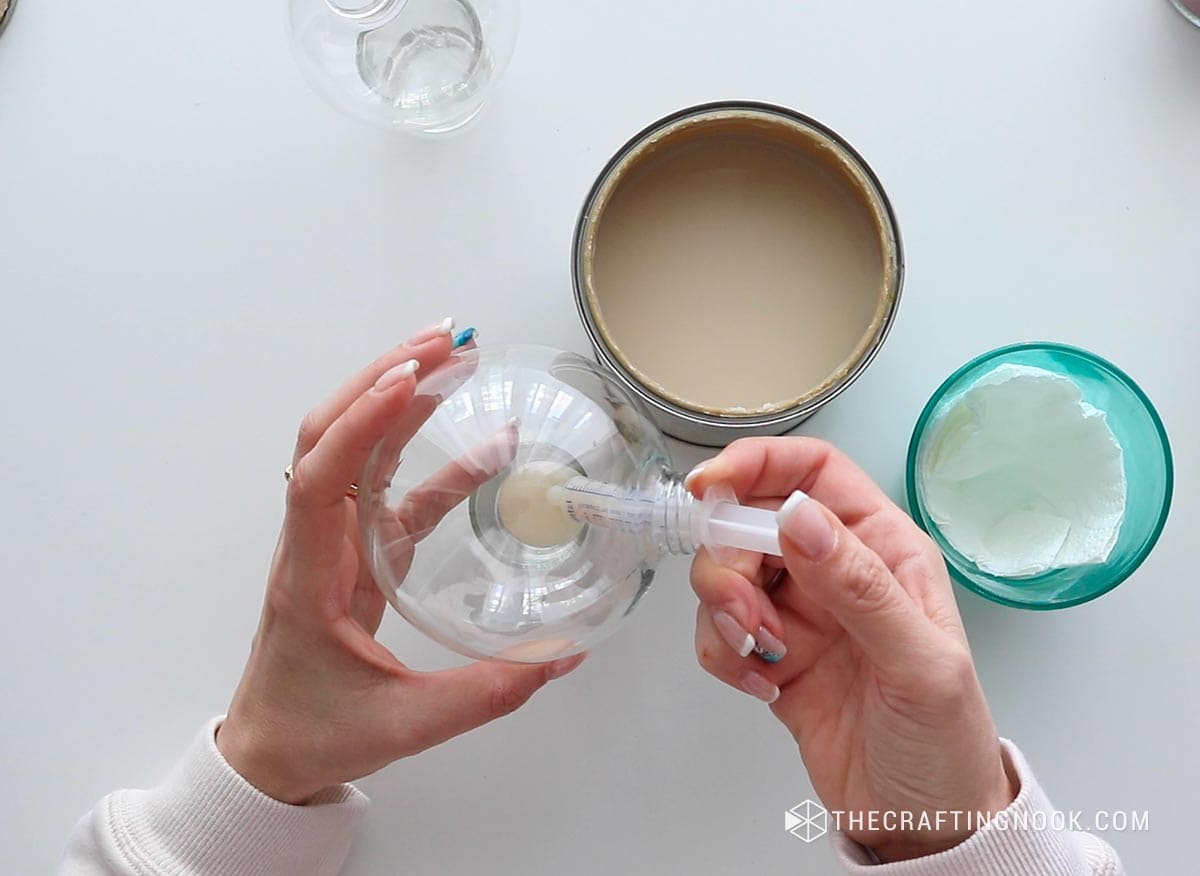
Rotate the ornament to ensure complete and even coverage.

Step 3: Drip Excess Glue
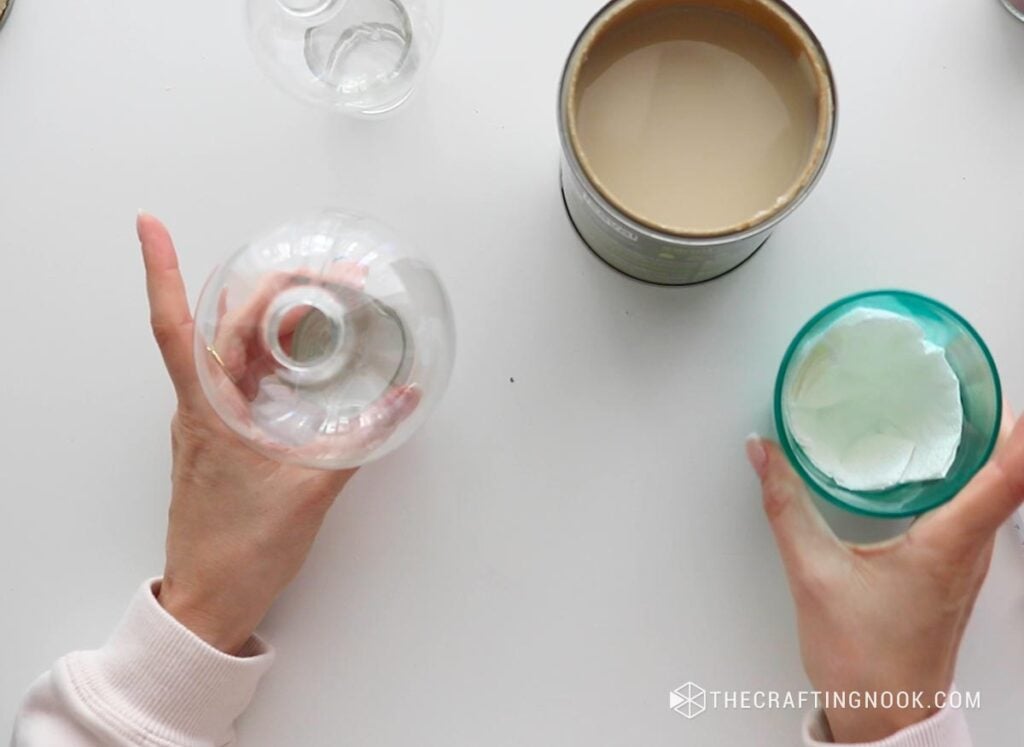
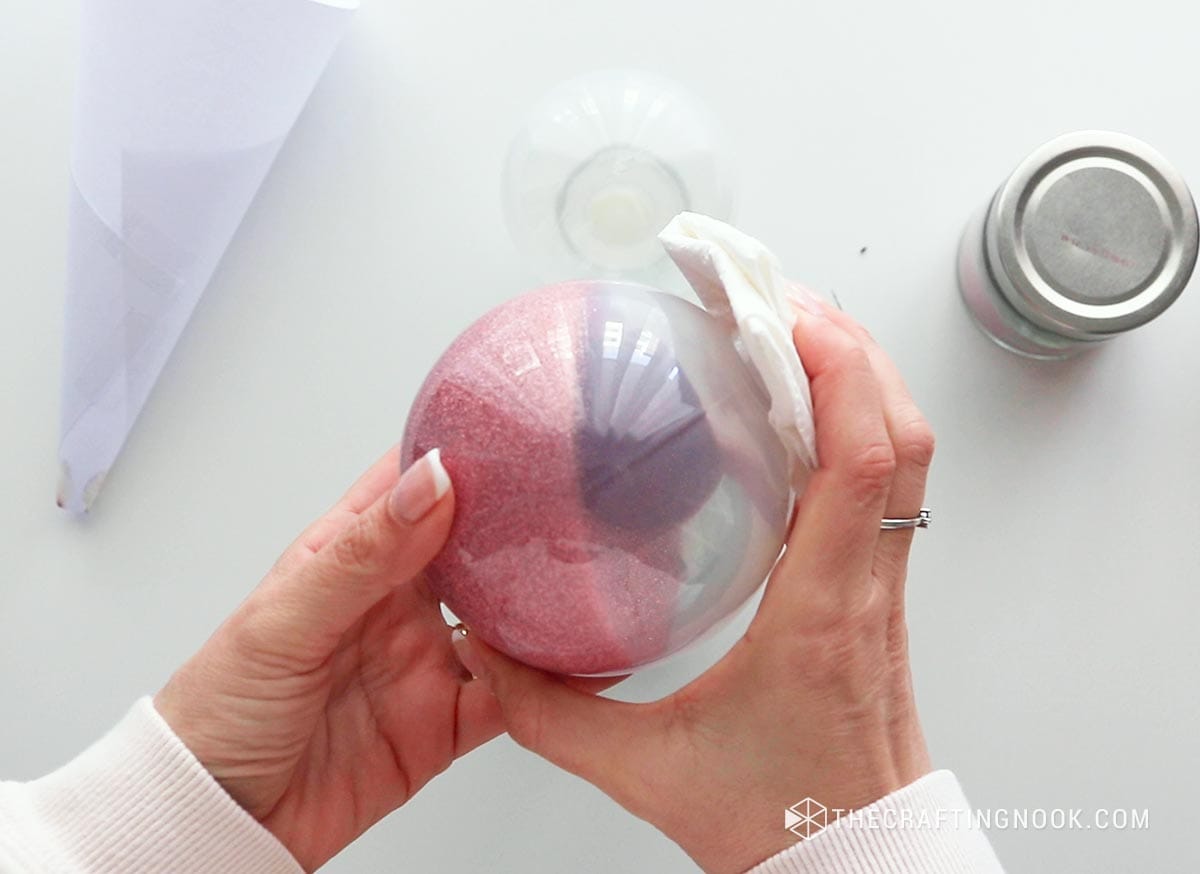
Allow the excess polyurethane to drip out by placing the ornament upside down on the polyurethane can (hold it with a knife) or on a paper towel.
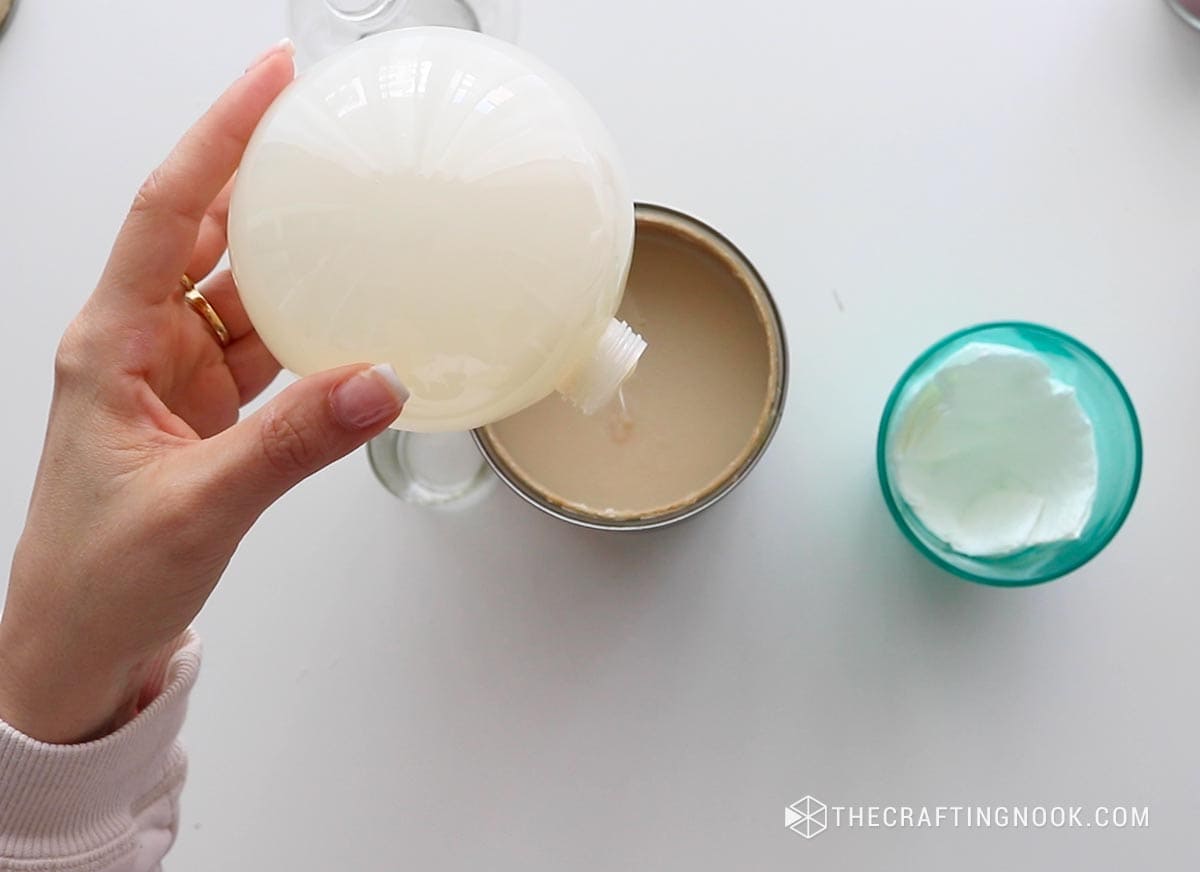
You can use a plastic or glass cup with the paper towel inside to let it drip while you apply polyurethane to the other ornaments.
This step prevents clumps and ensures a smooth application.
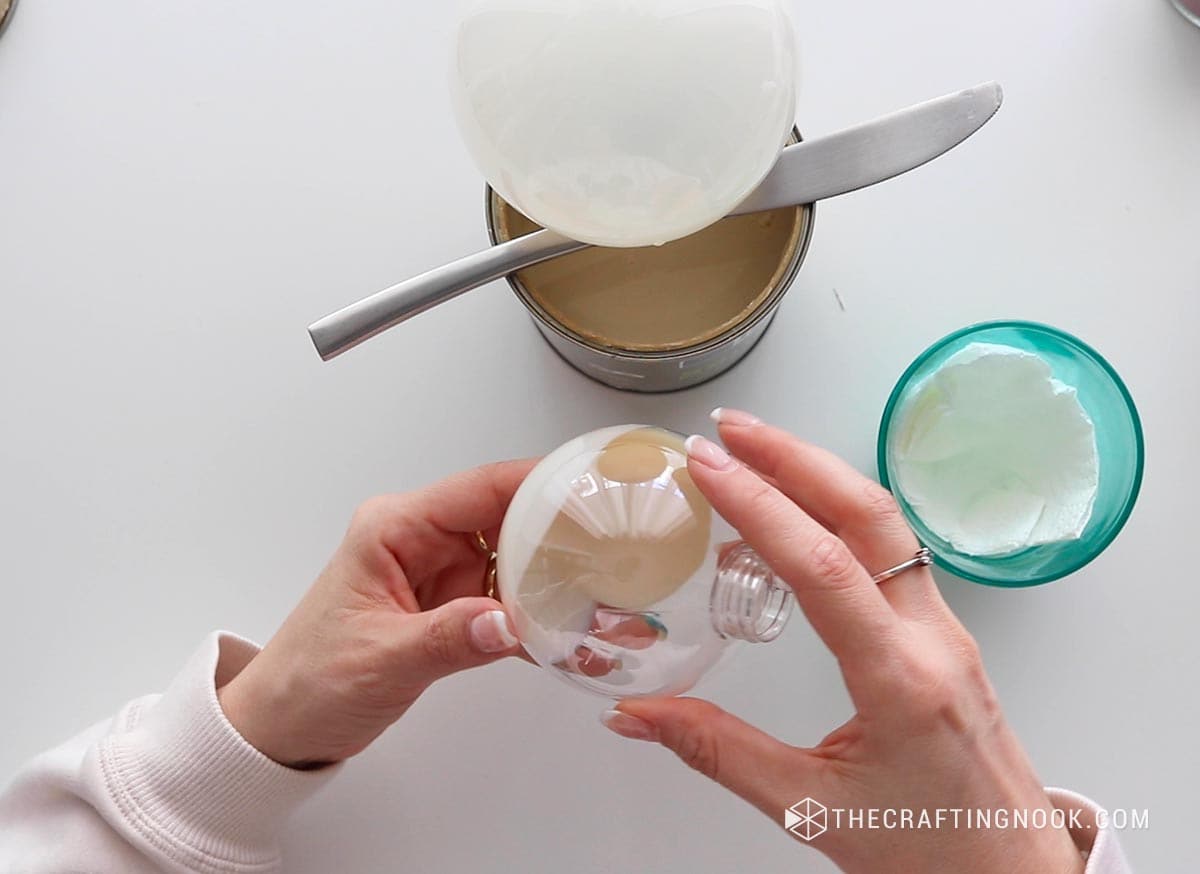
Step 4: Let it Set
Allow the polyurethane to sit for a few minutes. This brief waiting period allows the glue to reach the right consistency for the glitter application.
Then you can move on to the next ornament while the others drip and set.
Note: Each polyurethane brand in each country may vary in density. So make sure you test with one ornament to figure out how long you should let the polyurethane sit. In my case, in Spain with the brand Isaval, I had to wait for an hour before adding the glitter. The brand Minwax in the USA, it takes around 5-10 minutes.
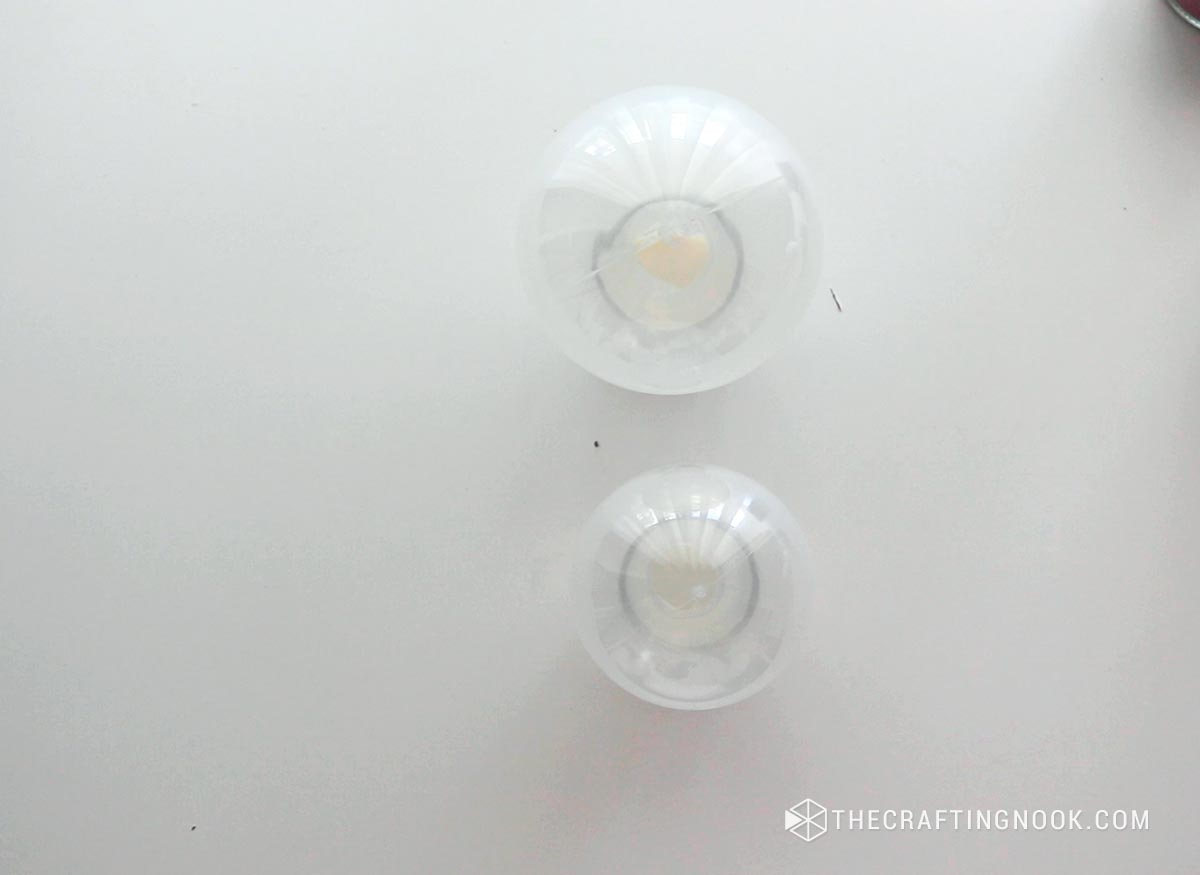
Step 5: Add Glitter
Use a funnel or paper funnel to pour the glitter inside of the ornament. Add abundant glitter to make sure you cover it all and the excess glitter can go back to the container.

Swirl and shake the glitter around, covering the entire interior.
Adjust the amount based on your desired level of sparkle.
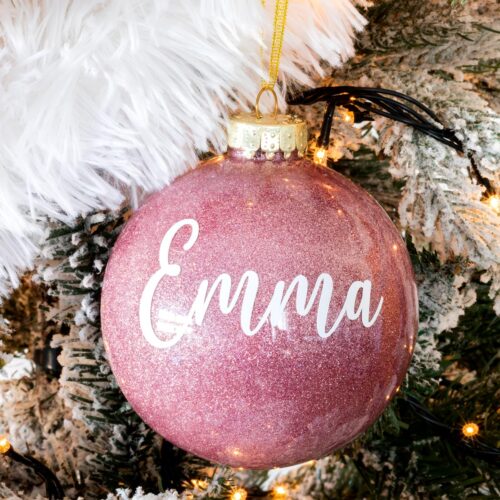
You can make them all in the same color or color combinations. I made mine some in pink and some in gold.
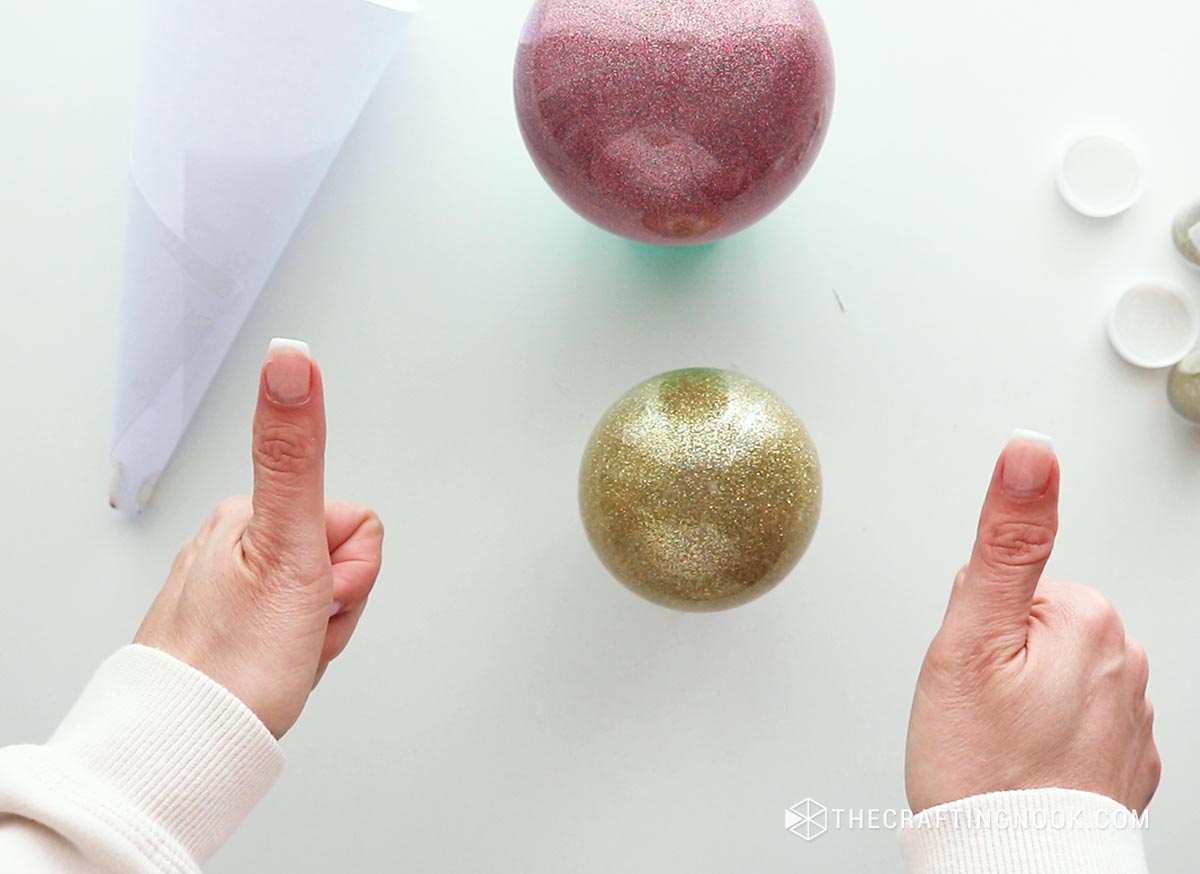
Let all the ornaments dry.
Step 6: Prepare Vinyl Names
Open your design software (like Silhouette Studio). Type the names using your chosen font and size. Adjust spacing and alignment as needed.
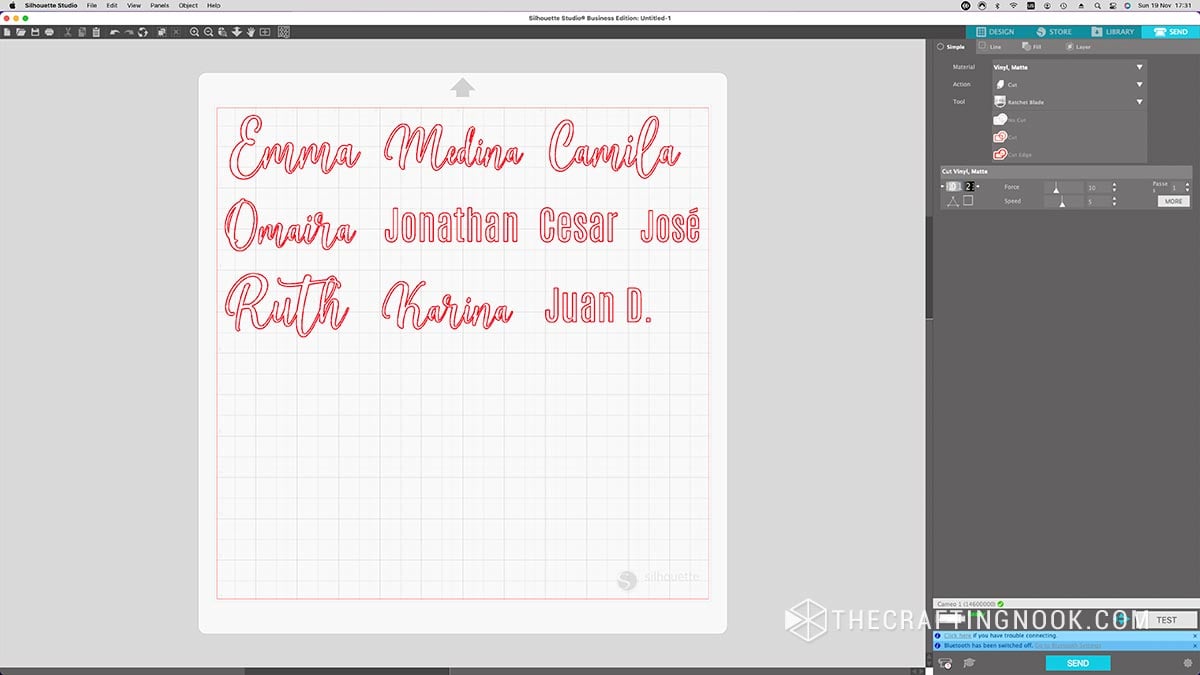
Step 7: Load Vinyl
Choose your vinyl colors that would match and contrast with your glitter color. I used white because my Christmas theme this year was white, pink and gold.
Place a sheet of vinyl onto the cutting mat making sure it’s the right size for all the names you are cutting. Smooth out any air bubbles or wrinkles to ensure accurate cutting.
In the software, select the material settings for vinyl. On the machine, use the recommended settings for vinyl or consult your machine’s manual.
Load the cutting mat with vinyl into the Silhouette Cameo. Align it properly and secure it in place.
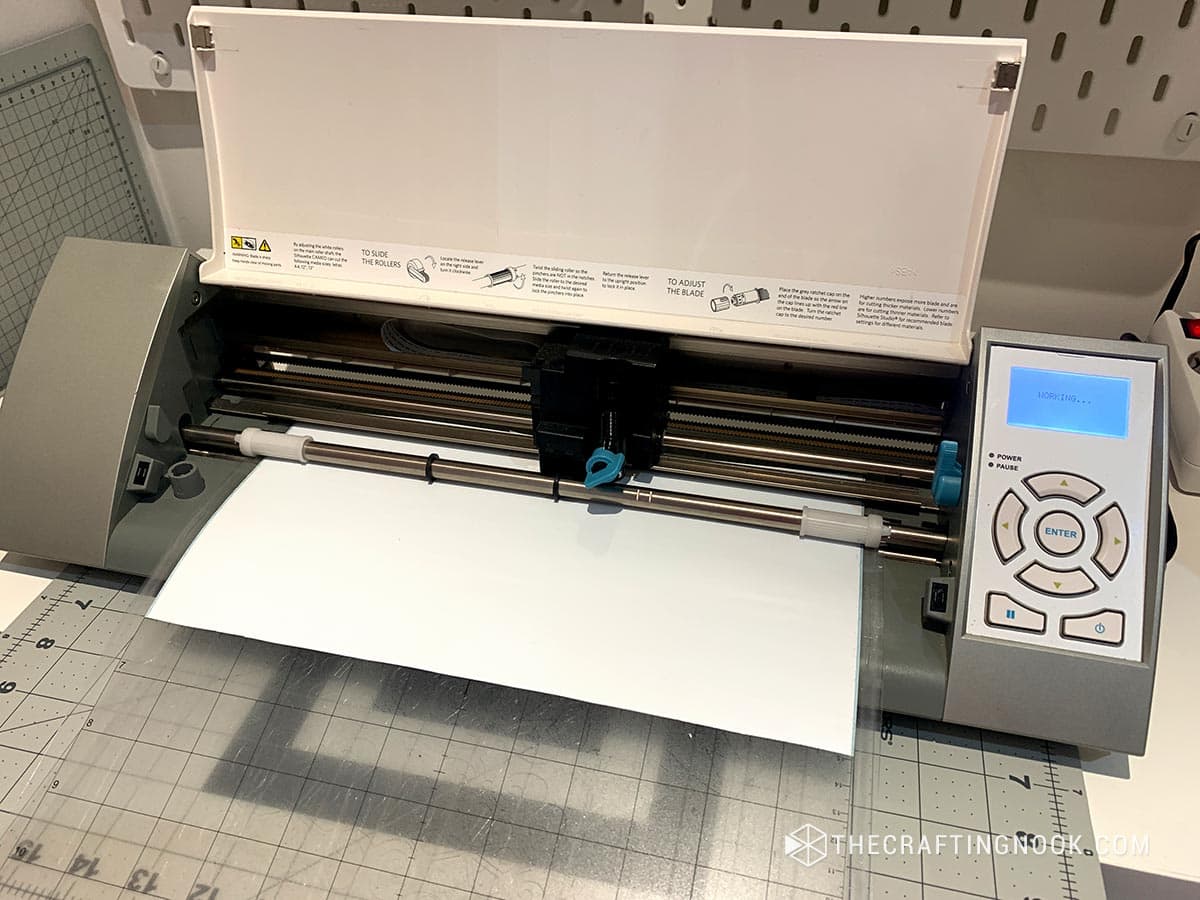
Step 8: Send to Cut
Send the design to cut. The Silhouette Cameo will precisely cut the vinyl, creating your personalized cute names.
Step 9: Weeding and Transfer Tape
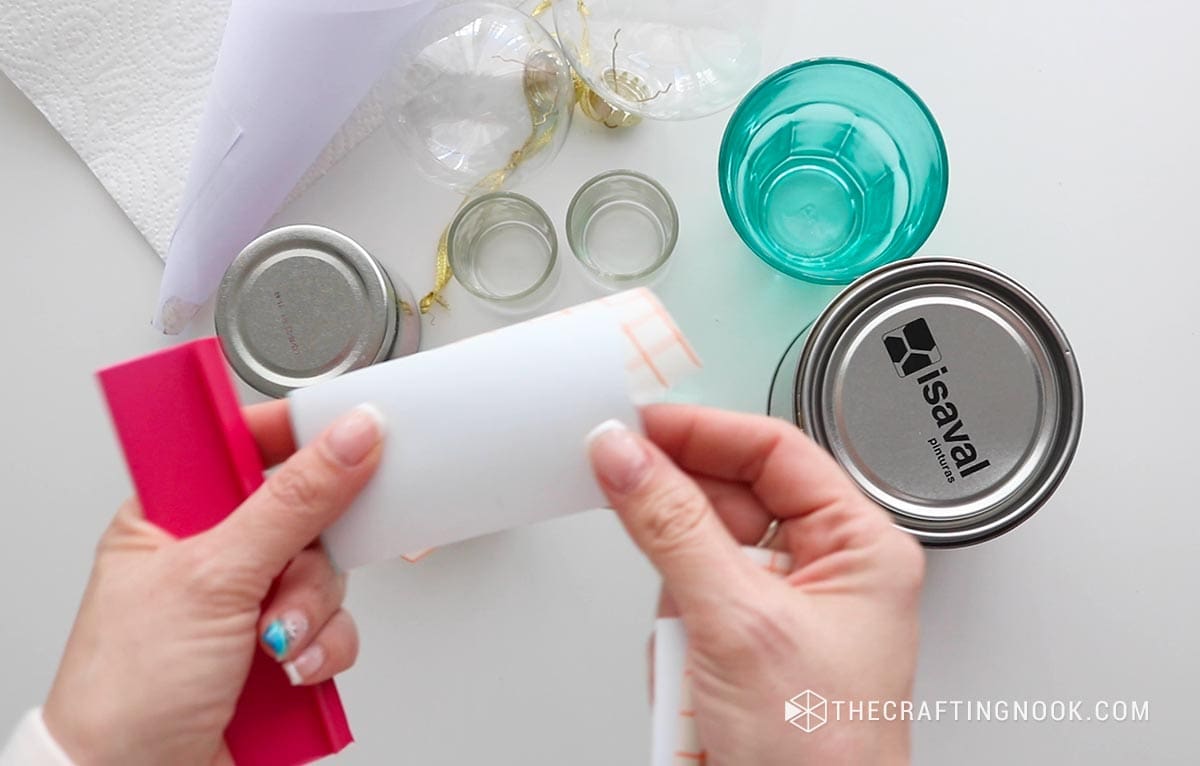
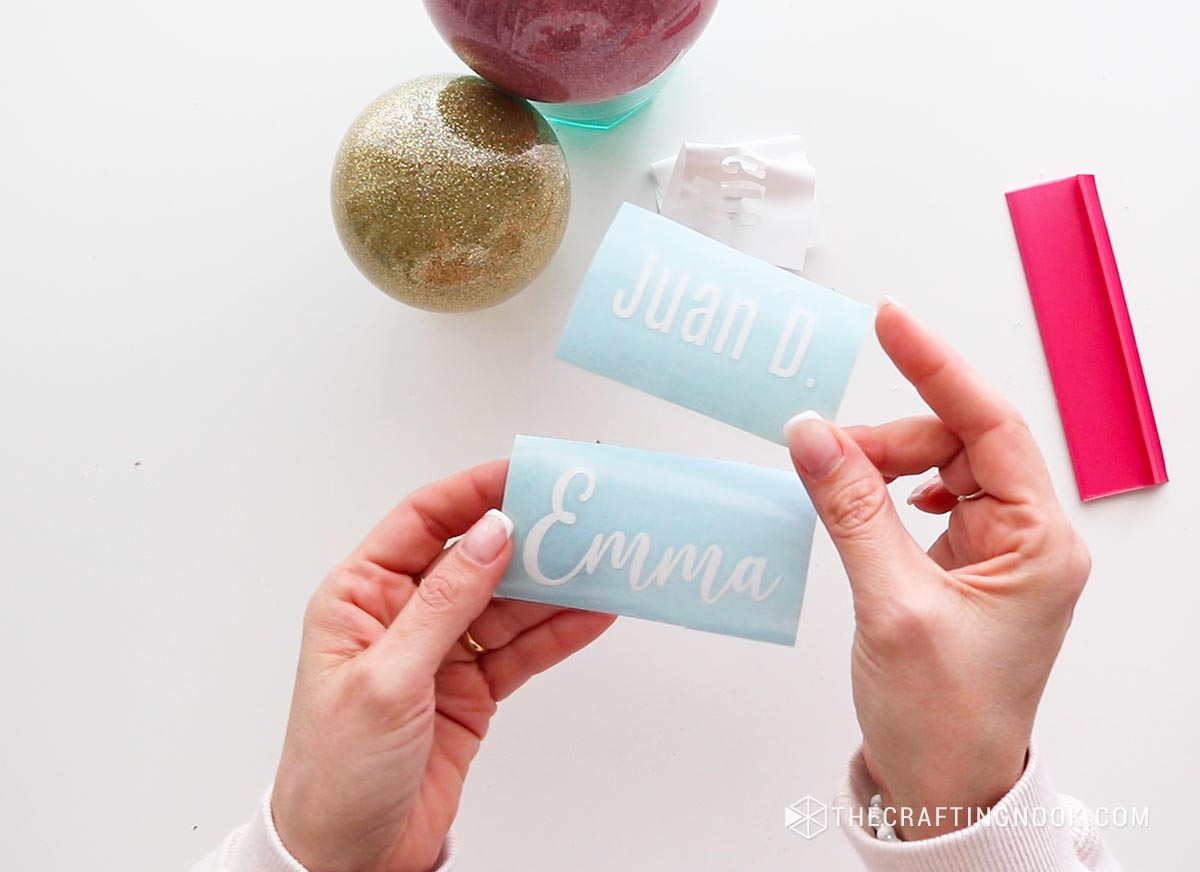
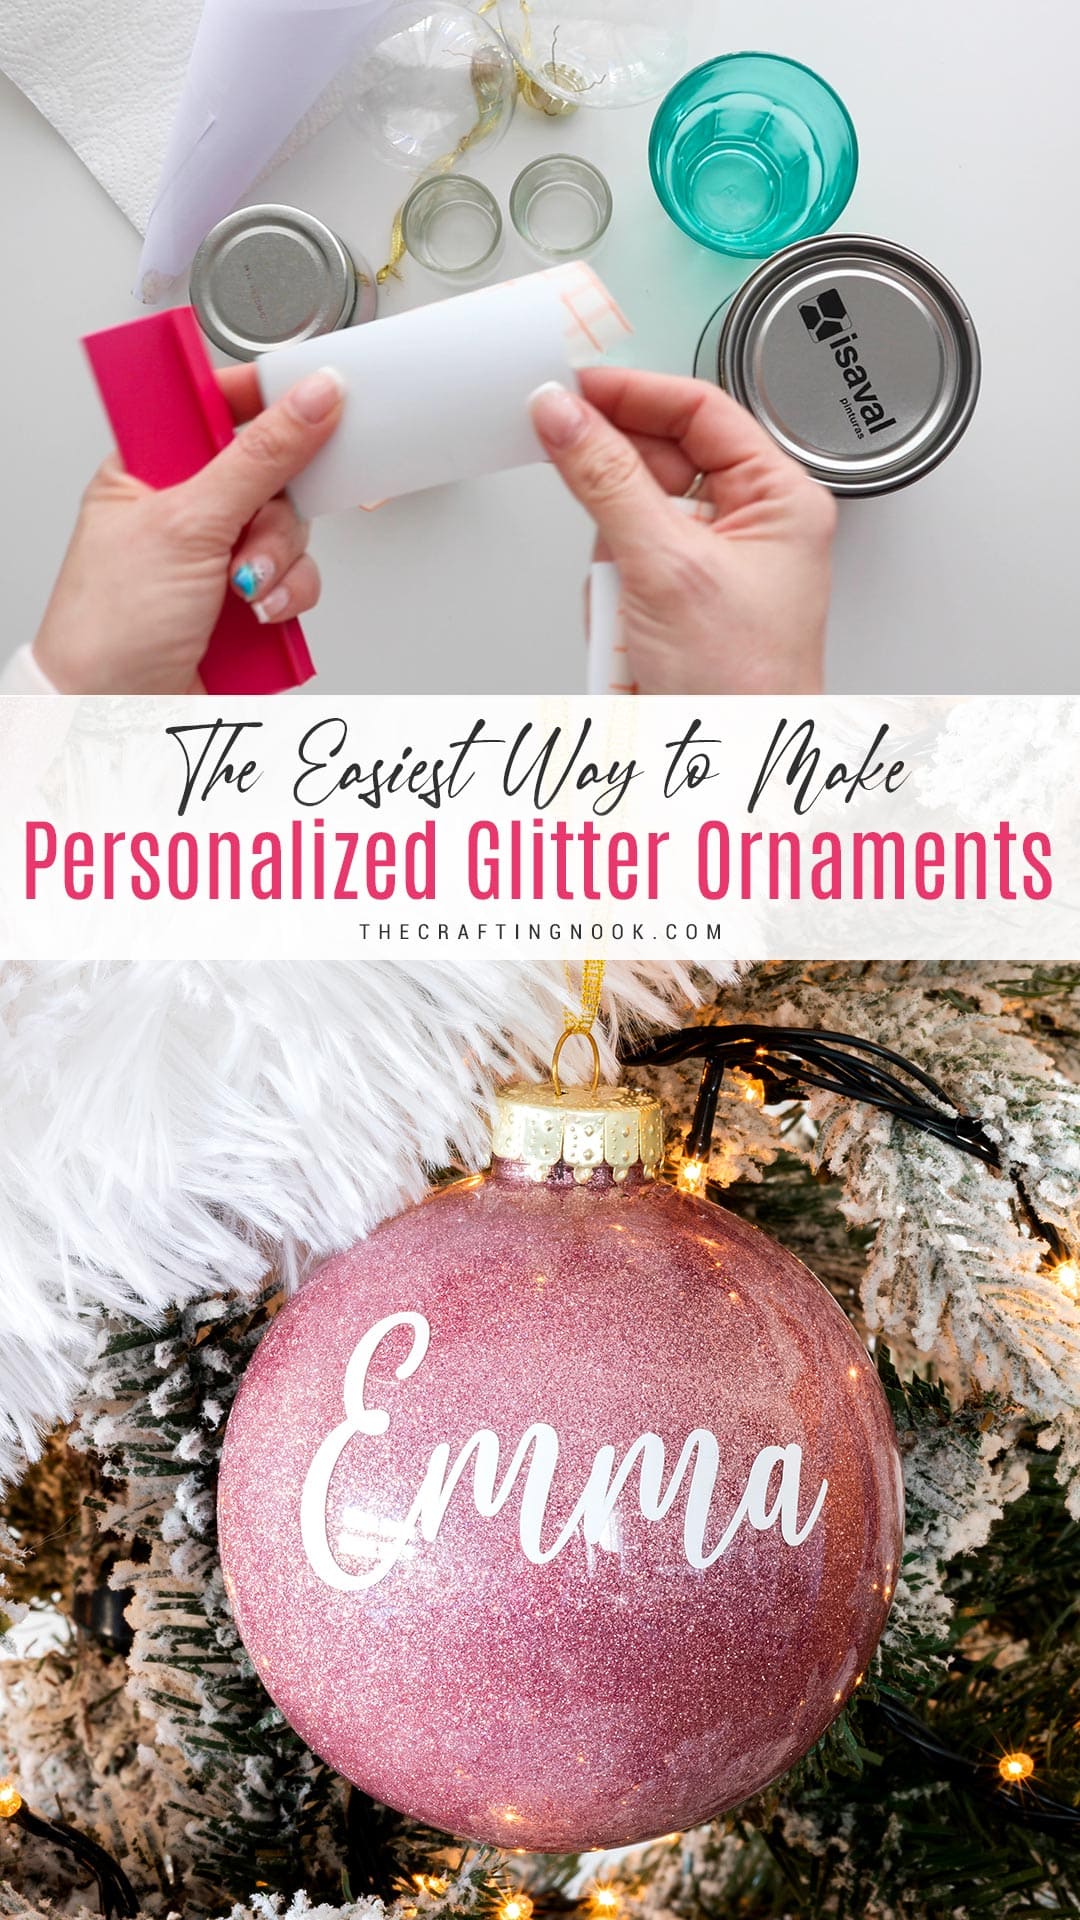
Carefully weed (remove) the excess vinyl around and inside the letters. A weeding tool is handy for intricate designs.

Cut a piece of transfer tape slightly larger than the vinyl names. You can also use cheap contact paper like I did. It works perfectly!
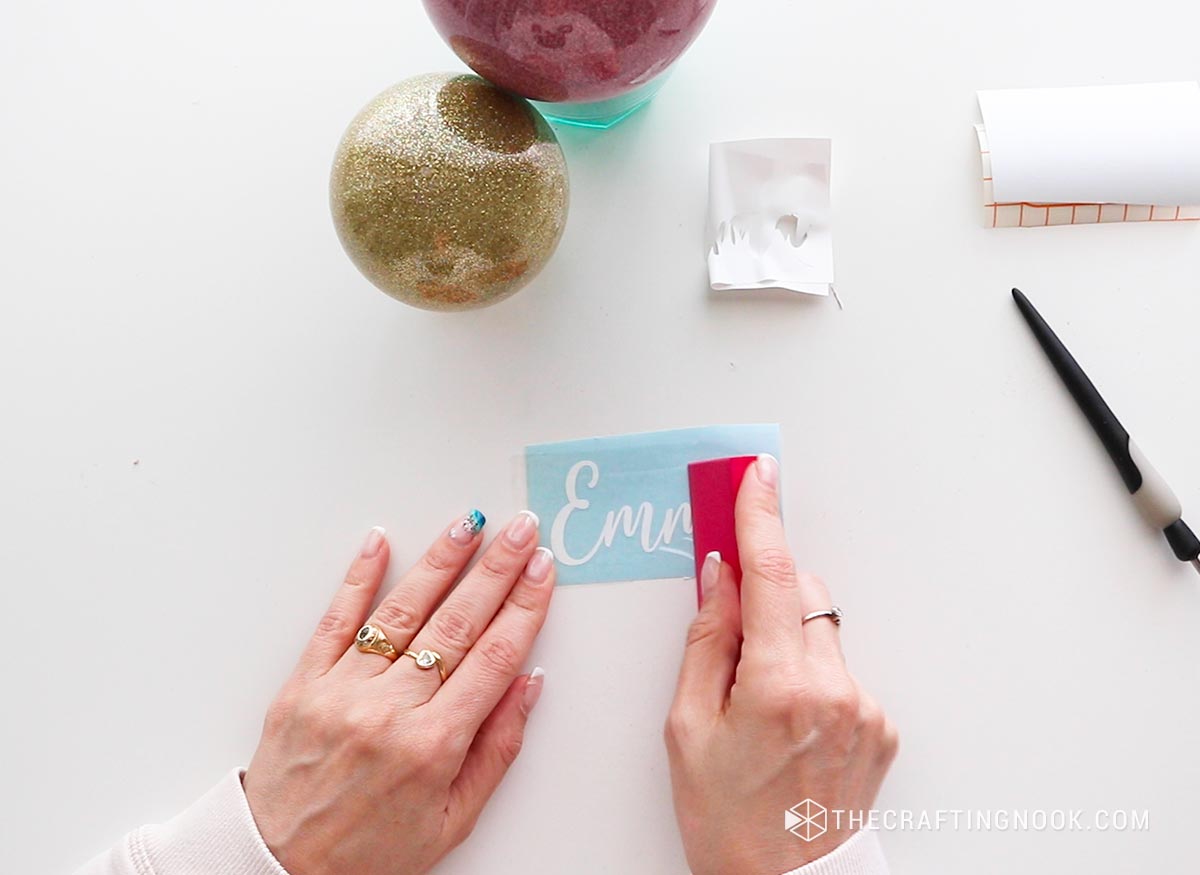
Peel the backing off the transfer tape and carefully place it over the vinyl names.
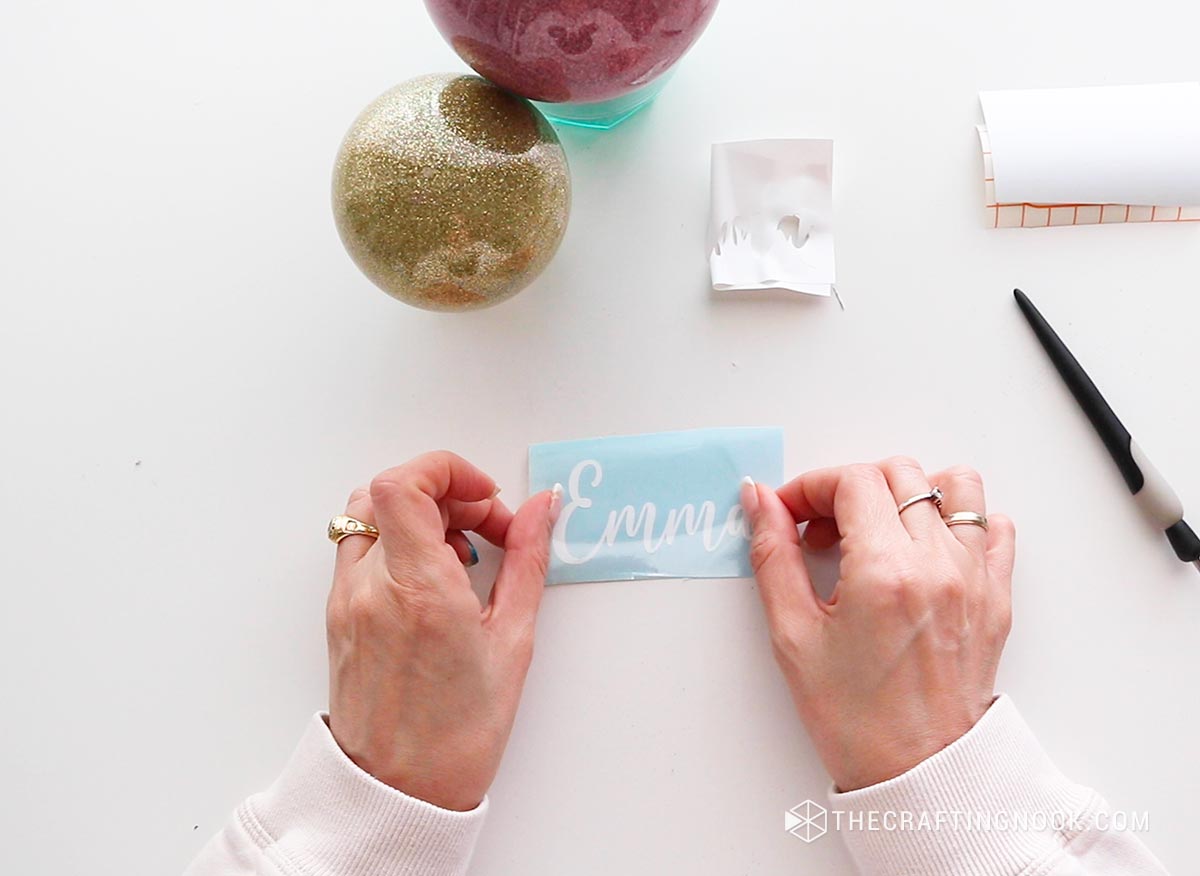
Use a scraper tool to ensure good adhesion.
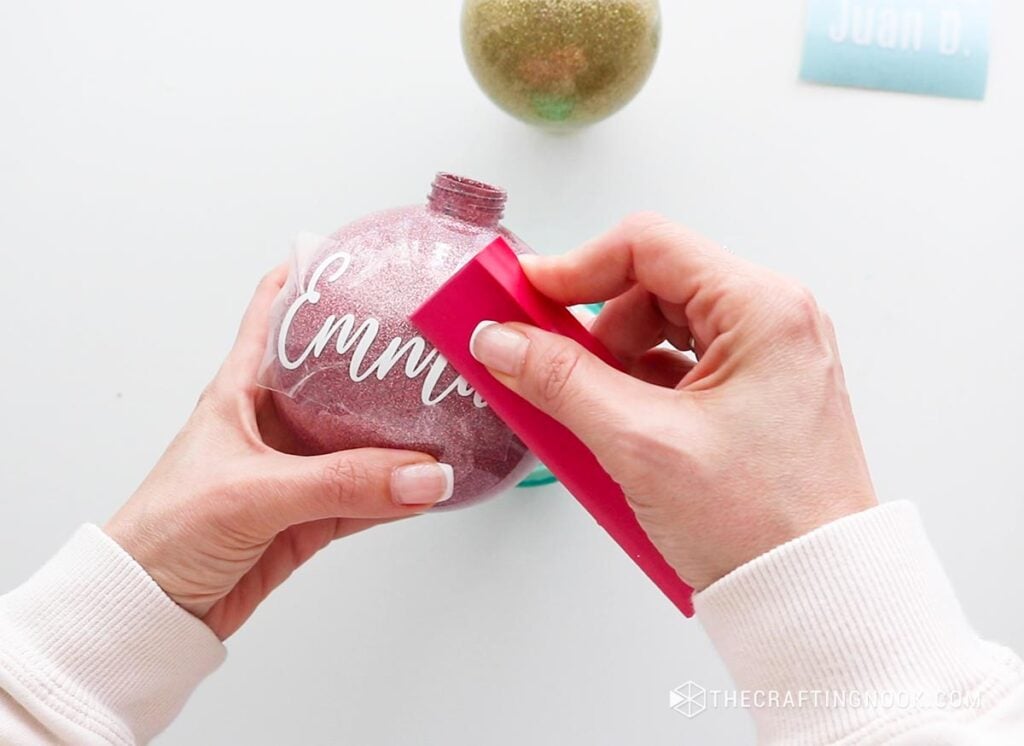
Step 11: Applying Vinyl Names on the Ornaments
Make sure the exterior of the ornament is clean and dry. Wipe it down with rubbing alcohol for optimal adhesion.
Lift the transfer tape with the vinyl names attached from the backing.
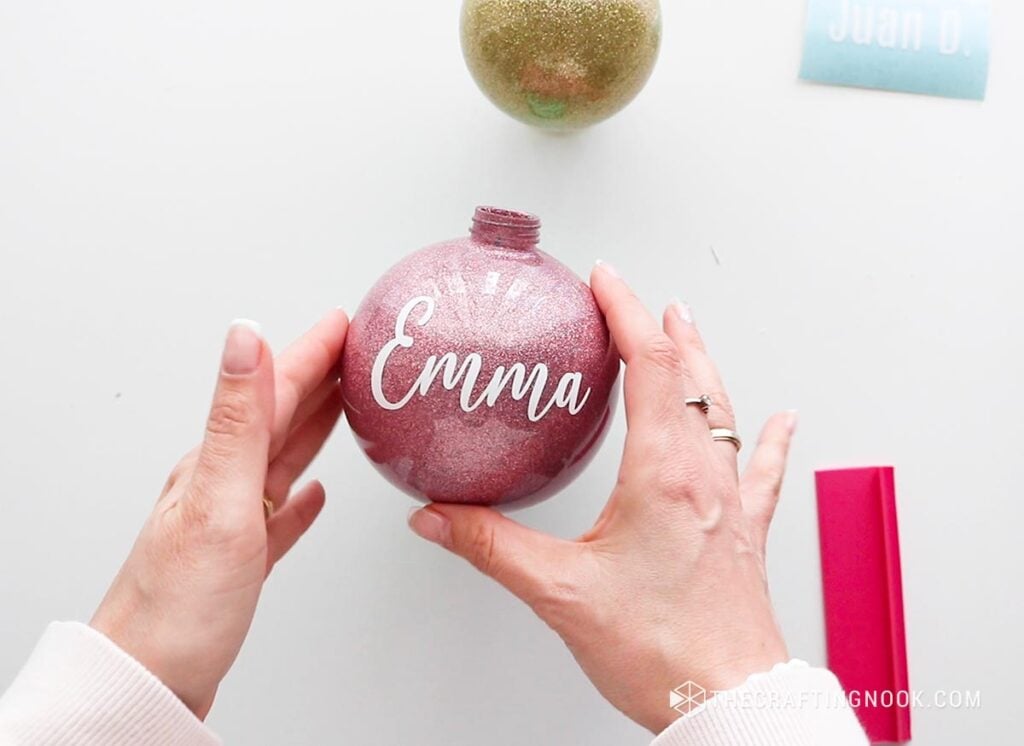
Position it on the outside of the ornament where you want the names.

I recommend starting with the center of the name and then smoothing it out to the right and then to the left. This helps avoid distortions, wrinkles, and bubbles.


Use the scraper tool to smooth out the vinyl, ensuring it adheres well to the ornament’s surface.
Slowly peel off the transfer tape at a sharp angle. This leaves the vinyl names securely on the ornament.
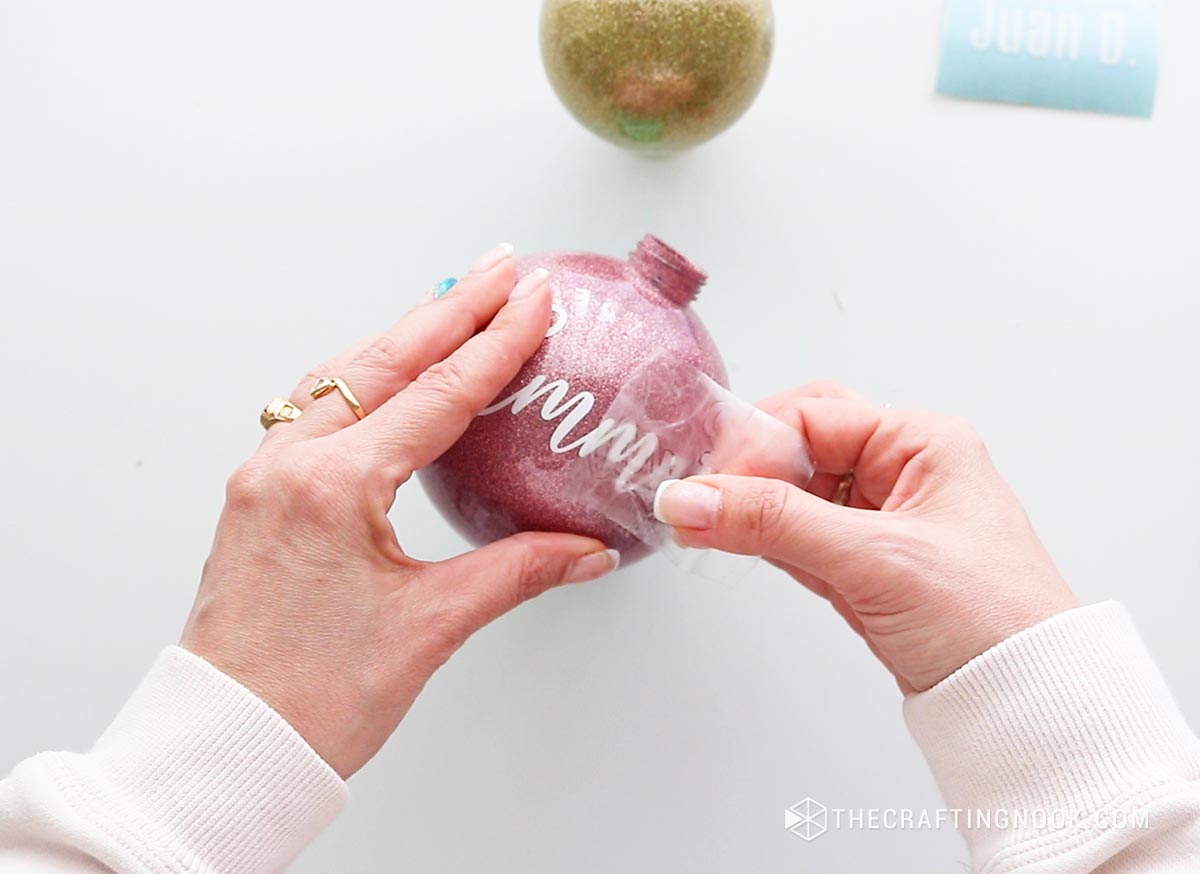
Gently press down any edges or corners that might need extra attention. Ensure the vinyl is securely applied.
Step 12: Let it Dry Completely
Let the ornament sit for several hours to ensure everything is completely dry. If possible leave them near a window or where fresh air flows.
Patience is key!
Step 13: Put the Cap back on
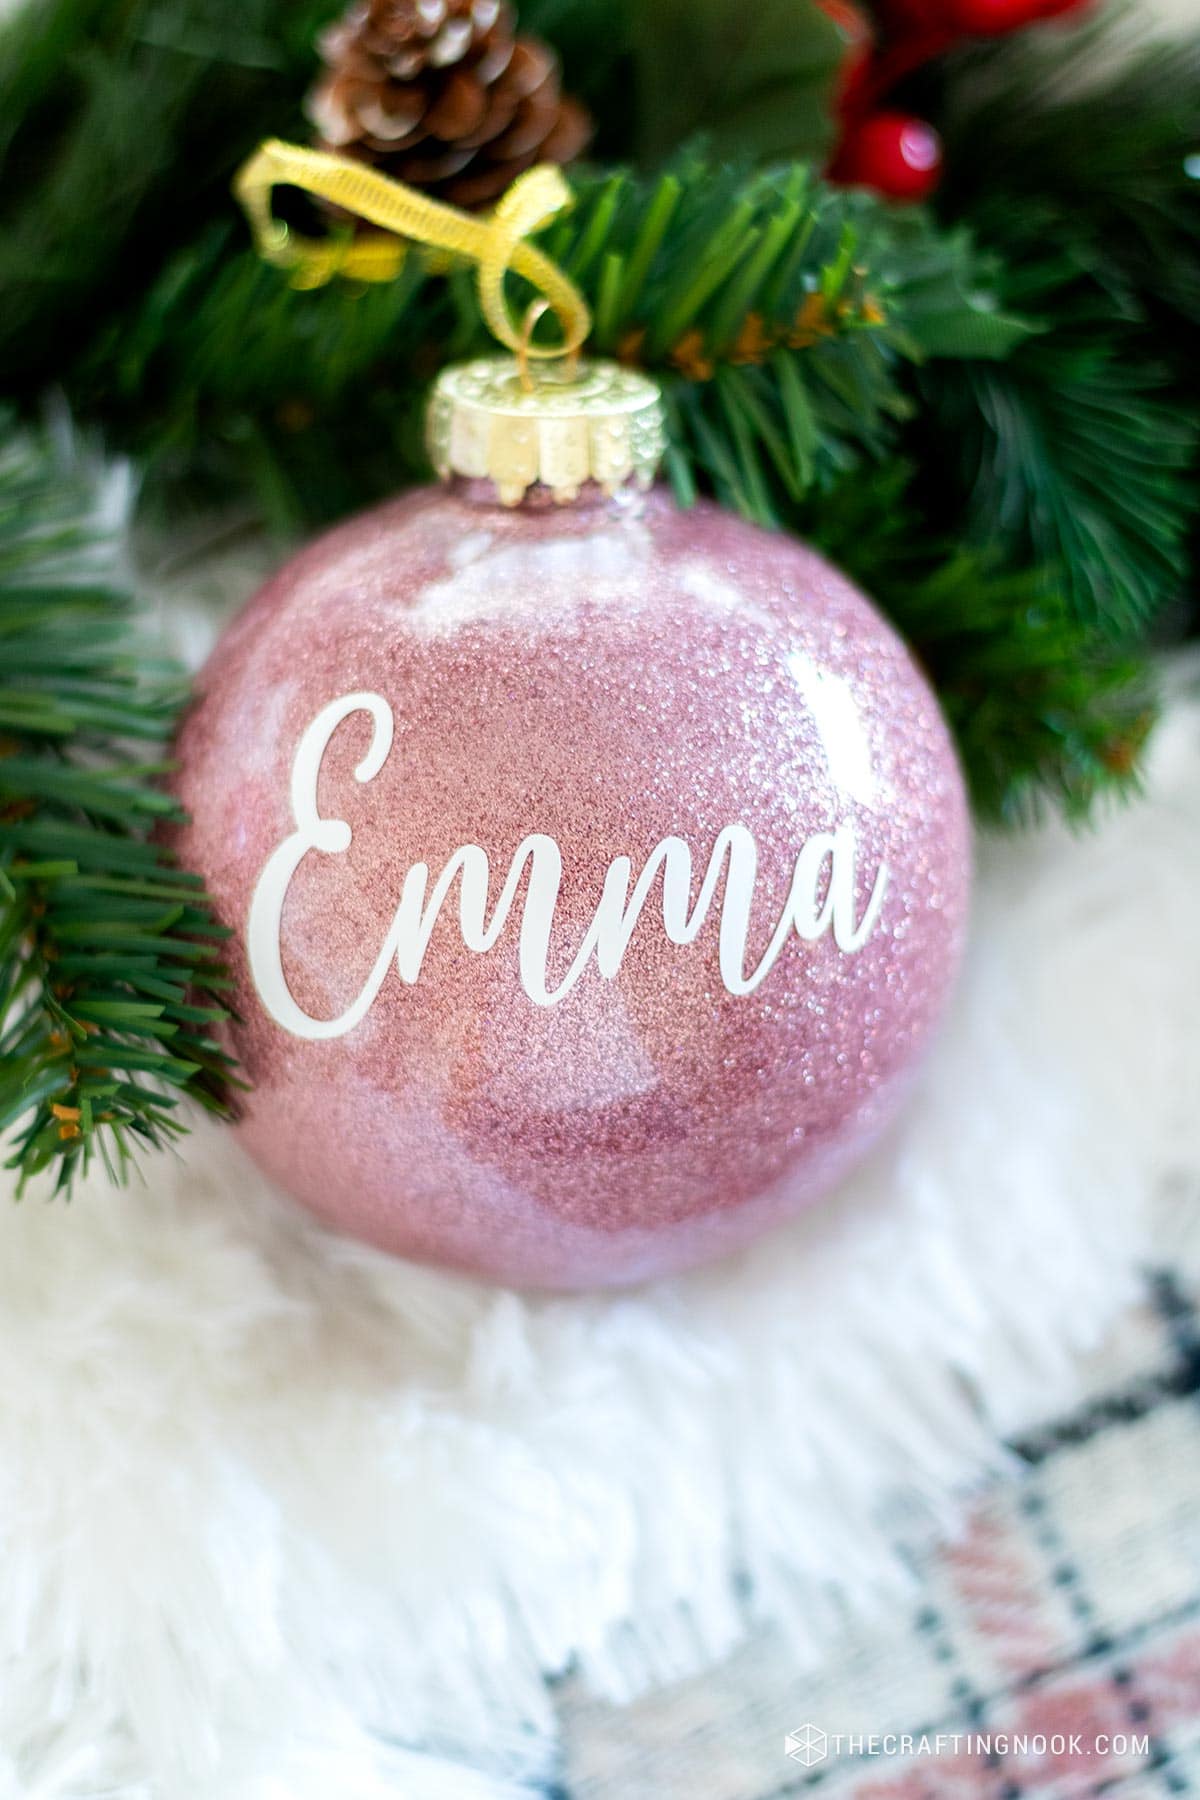
Once the ornaments are completely dry, put the ornament cap back on. This step completes the process.
Step 14: Add Ribbon or Twine if needed
Tie a festive ribbon or twine around the top of the ornament for hanging.
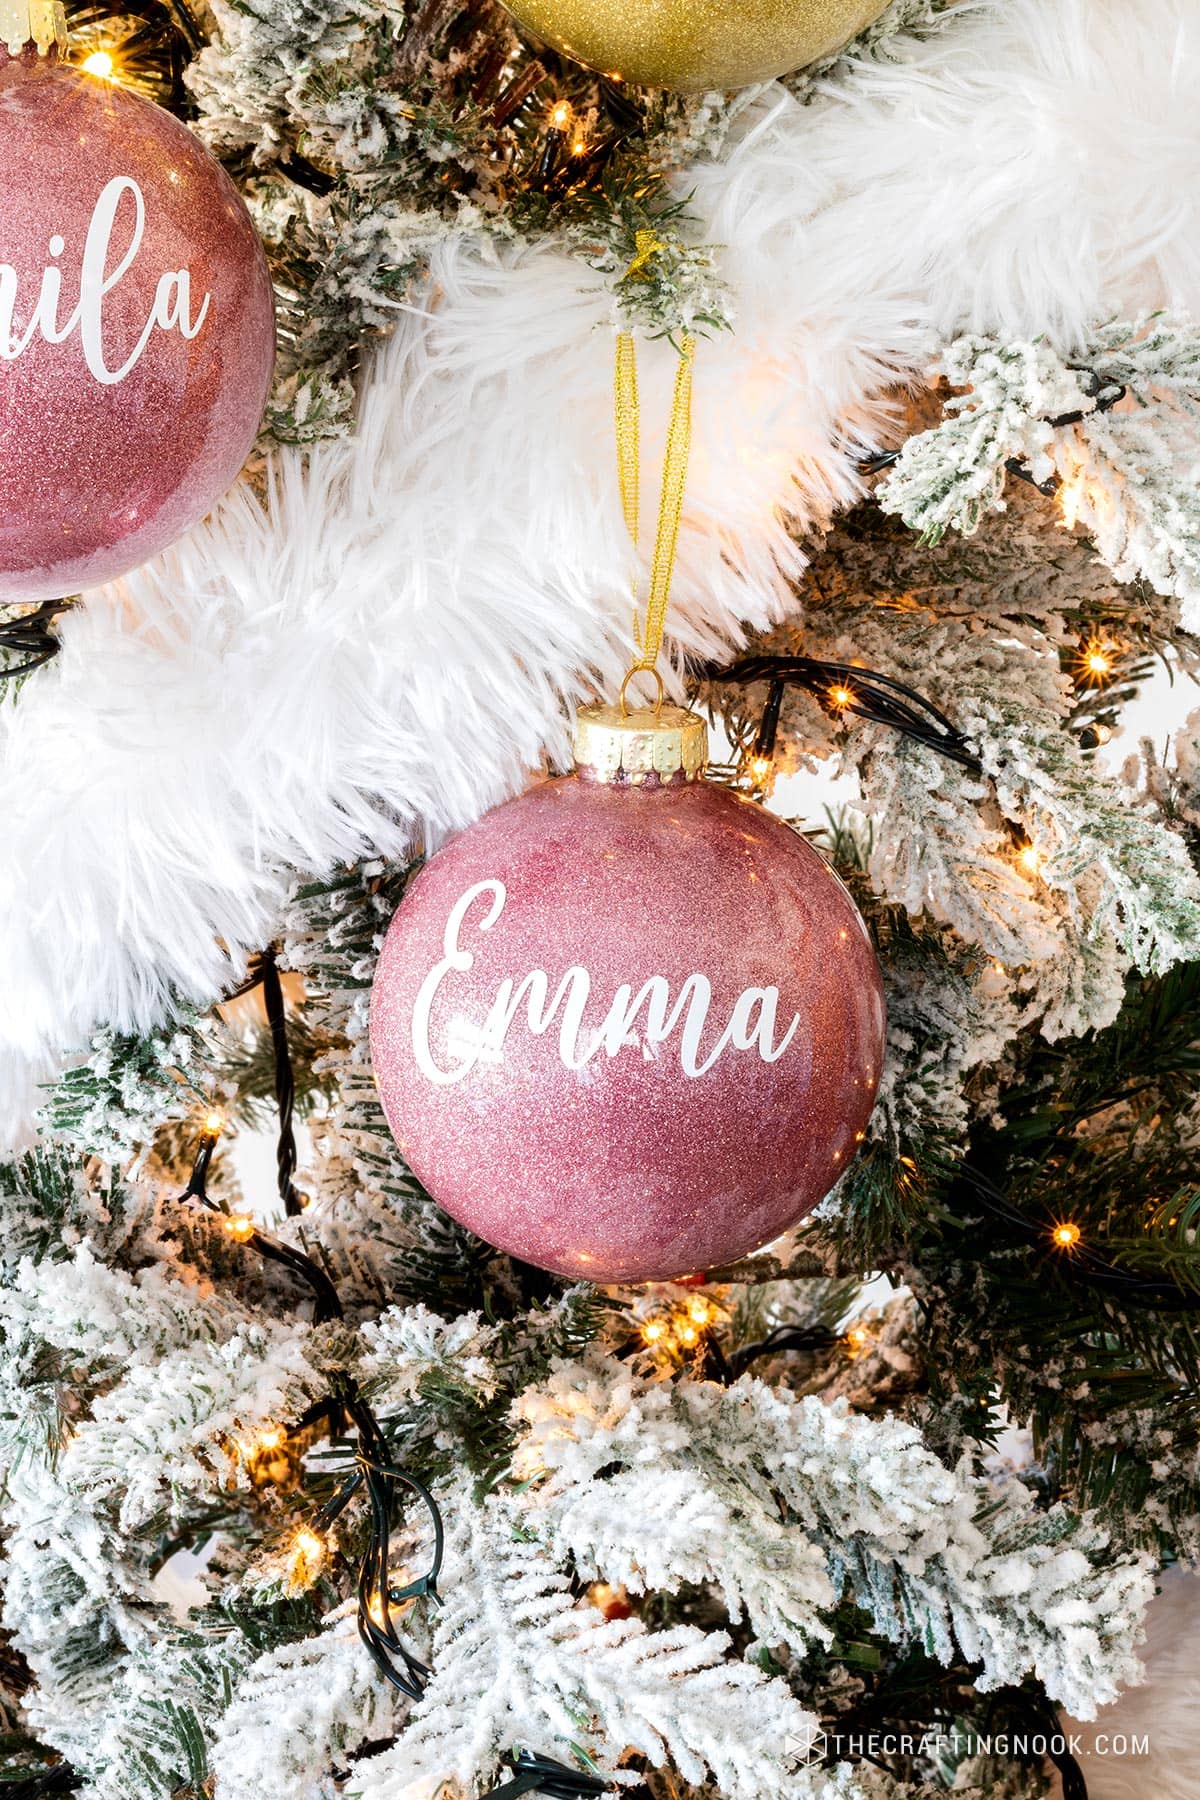
Step 15: Hang your adorable Ornaments
We couldn’t just make the ornaments and leave them around! It’s time to hang them on your tree and make it magical and gorgeous!
Crafting Tips
- Mix a pinch of glow-in-the-dark glitter with your festive shades for a cosmic surprise when the lights go down.
- Swirl two or more colors of glitter together for a marbled effect. Each ornament becomes a unique work of art!
- Place your glitter in the freezer before using it. Cold glitter sticks to the glue more effectively, giving you better coverage.
- Create a simple drying rack by poking the ornament cap through a piece of cardboard. This way, excess glue can drip away freely.
- Place a small packet of silica gel inside the ornament before sealing. It helps absorb any residual moisture, keeping your glitter intact.
- To avoid air bubbles in the polyurethane, rotate the ornament slowly and continuously while the glue is setting.


Frequently Asked Questions
Nope! Just grab clear ornaments, glitter, polyurethane glue, and your creative spirit. Easy peasy! If you want to personalize it with custom font names, then you would need a cutting machine.
Absolutely! Choose fine glitter for an elegant finish or go bold with chunky glitter for extra sparkle. It’s all about your style!
Not at all! Cut the vinyl, peel, and position it on the ornament. Precision is the key, but it’s easier than you think once you get the hang of it.
It can take a few hours to ensure everything is perfectly dry and secure. However, I recommend leaving it for 24 hours or more depending on your glue.
Absolutely! These glittery ornaments make fantastic personalized gifts to make your loved ones feel special.
You can find both plastic and glass clear ornaments at your local craft store, Michaels, JoAnn, Dollar Store, and also online on Amazon.
More Christmas Projects to Try
If you like this DIY Glitter Christmas Ornaments tutorial, you might also love these other Christmas Project ideas too:


Family Rustic DIY Monogram Christmas Ornaments
✂️ Tutorial
Personalized DIY Glitter Christmas Ornaments
Tools
- Cutting Machine – Silhouette or Circuit will work
- Weeding tool
- Squeegee or scrapper
Supplies
- Clear plastic ornaments
- Glitter in your favorite festive colors
- Vinyl sheets for the names in your favorite colors that contrast with the chosen glitter
- Transfer tape or contact paper.
- Polyurethane varnish
- Funnel or paper funnel
- Ribbon or twine
- Rubbing alcohol
- Syringe
- Paper towels
- Plastic or glass cups
- Patience the most important ingredient!
Instructions
STEP 1: CLEAN THE ORNAMENTS
- Start by cleaning the inside of the clear plastic ornaments with rubbing alcohol. This ensures a clean surface for the glitter and polyurethane to adhere to. Let it dry completely
- Remove the ornament cap.
STEP 2: APPLY GLUE
- Place your ornament on a plastic or glass cup so it stays put.
- Load the polyurethane glue into a syringe. This allows for precise application without making a mess.
- Carefully insert the syringe into the ornament and inject the polyurethane. Depending on your ornament’s size and your polyurethane density, you might need more or less glue. I added 5 syringes to the large ones and 4, to the smaller ones. Your should test to see how much you need.
- Rotate the ornament to ensure complete and even coverage.
STEP 3: DRIP EXCESS GLUE
- Allow the excess polyurethane to drip out by placing the ornament upside down on the polyurethane can (hold it with a knife) or on a paper towel.
- You can use a plastic or glass cup with the paper towel inside to let it drip while you apply polyurethane to the other ornaments.
- This step prevents clumps and ensures a smooth application.
STEP 4: LET IT SET
- Allow the polyurethane to sit for a few minutes. This brief waiting period allows the glue to reach the right consistency for the glitter application.
STEP 5: ADD GLITTER
- Use a funnel or paper funnel to pour the glitter into the ornament. Add abundant glitter to make sure you cover it all and the excess can go back to the container.
- Swirl and shake the glitter around, covering the entire interior.
- Adjust the amount based on your desired level of sparkle.
- You can make them all in the same color or color combinations. I made mine some in pink and some in gold.
- Let all the ornaments dry.
STEP 6: PREPARE VINYL NAMES
- Open your design software (like Silhouette Studio). Type the names using your chosen font and size. Adjust spacing and alignment as needed.
STEP 7: LOAD VINYL
- Choose your vinyl colors that would match and contrast with your glitter color. I used white because my Christmas theme this year was white, pink and gold.
- Place a sheet of vinyl onto the cutting mat making sure it’s the right size for all the names you are cutting. Smooth out any air bubbles or wrinkles to ensure accurate cutting.
- In the software, select the material settings for vinyl. On the machine, use the recommended settings for vinyl or consult your machine’s manual.
- Load the cutting mat with vinyl into the Silhouette Cameo. Align it properly and secure it in place.
STEP 8: SEND TO CUT
- Send the design to cut. The Silhouette Cameo will precisely cut the vinyl, creating your personalized cute names.
STEP 9: WEEDING AND TRANSFER TAPE
- Carefully weed (remove) the excess vinyl around and inside the letters. A weeding tool is handy for intricate designs.
- Cut a piece of transfer tape slightly larger than the vinyl names. You can also use cheap contact paper like I did. It works perfectly!
- Peel the backing off the transfer tape and carefully place it over the vinyl names.
- Use a scraper tool to ensure good adhesion.
STEP 11: APPLYING VINYL NAMES ON THE ORNAMENTS
- Make sure the exterior of the ornament is clean and dry. Wipe it down with rubbing alcohol for optimal adhesion.
- Lift the transfer tape with the vinyl names attached from the backing.
- Position it on the outside of the ornament where you want the names.
- I recommend starting with the center of the name and then smoothing it out to the right and then to the left. This helps avoid distortions, wrinkles, and bubbles.
- Use the scraper tool to smooth out the vinyl, ensuring it adheres well to the ornament’s surface.
- Slowly peel off the transfer tape at a sharp angle. This leaves the vinyl names securely on the ornament.
- Gently press down any edges or corners that might need extra attention. Ensure the vinyl is securely applied.
STEP 12: LET IT DRY COMPLETELY
- Let the ornament sit for several hours to ensure everything is completely dry. If possible leave them near a window or where fresh air flows.
- Patience is key!
STEP 13: PUT THE CAP BACK ON
- Once the ornaments are completely dry, put the ornament cap back on. This step completes the process.
STEP 14: ADD RIBBON OR TWINE IF NEEDED
- Tie a festive ribbon or twine around the top of the ornament for hanging.
STEP 15: HANG YOUR ADORABLE ORNAMENTS
- We couldn’t just make the ornaments and leave them around! It’s time to hang them on your tree and make it magical and gorgeous!
Notes
Share and PIN ME!!!
Til’ next time…


FREE WORKBOOK
Keeping your Sweet Home Organized
Learn how to create intentional habits and simple routines to Keep Your Home Organized. Plus freebies, printables, exclusive content, and tips.
Disclaimer: By clicking on the “Yes” button above you are giving me your consent to collect and use your information according to the law and My Policy Privacy. Zero Spam I promise!