DIY Christmas Paper Garland + Socks and Mittens Cut Files
Get into the holiday spirit with our adorable DIY Christmas Paper Garland! Learn how to make cute socks and mittens in a super easy and fun way. Let’s spread some festive cheer together!
Who doesn’t like garlands? I just love them and I also love those cute little mittens and Christmas socks. So today I’m showing you how to make this simple and cute Christmas diy garland for your holiday decor and hope you like it too!

Table of Contents
DIY Christmas Paper Garland with Socks and Mittens
Are you as excited as I am to celebrate Christmas with a fun project that will make you feel super duper happy? Let’s make a simple and fun DIY Christmas garland made with paper socks and mittens using sturdy paper and a hint of shine.
This post may contain affiliate links. Please read our Disclosure Policy.
Let’s not forget that crafting is not just about making pretty decorations. It is also a way to form close connections and happy memories, especially with children. When you craft, it’s really fun to get the kids involved.
The whole family can have fun together with the free printouts and templates that you can cut.
But making things with our hands is not only about what we create in the end; it also has amazing advantages for our mental health. As we enjoy creating something special, our worries go away.

Crafting can help us relax and concentrate on what we are doing at the moment. When you make this pretty paper garland, it’s not just making your home look nice. It’s also making you feel good inside.
So, let’s get to work, gather the things we need, and prepare to bring Christmas cheer to your home through crafting. Get ready, we’re starting the holiday crafting adventure.
How to make Socks and Mittens DIY Christmas Paper Garland
This is a craft super easy so feel free to get your kiddos involved. Once you have all cut out you can enjoy gluing and putting the garland together.
Here is how I made it:
Supplies:
- Red, white and green cardstock or construction paper – Or your favorite colors
- Printed patterned paper or scrapbook paper
- Double-sided tape
- Glue – I used UHU universal glue or hot glue gun
- White-transparent and red self-adhesive rhinestones
- Any extra decoration you want to use – I used cute snowflakes.
- Yarn
- Different colors of mini clothespins.
Tools:
- Cutting Machine – Silhouette Cameo Or Cricut. You can also cut by hand.
- Scissors
- Craft Knife
- Tweezers – for the rhinestones
Instructions:
Prep Work
1. Firstly I created my designs. I wanted mittens and socks with details, so I prepared separate pieces for each like the mitten cuffs, the sock tip toes, and the heel. Also, some leaf decorations.
2. Once the design was ready the fun begins. You can snag the free cut files or the printable if you are cutting it by hand in the link below.

You can get the cut files HERE.
3. So, print out the template or upload the cut files to your cutting machine app.
4. Prepare your mat with the different cardstocks in the right places according to your design.
5. Define the right settings according to the material you are using and load your mat.
6. Send to cut the shapes.

7. Organize and lay out all the pieces according to the final designs.

Let’s start with the mittens.
8. Use double-sided tape to stick the white part (cuffs) and stick the snowflake too (or your chosen mitten decor).

9. Stick in the center of the snowflake a cute white-transparent rhinestone or your favorite color. This brings a little shine to your mittens.

10. Repeat the process with as many mittens as you like and set them aside.

Now let’s make the socks
11. Same as before, first the white cuff pieces stick with double-sided tape to the base and then stick the toes and heels with glue or the same double-sided tape.

12. The final touch is adding some mistletoes to the socks made with green cardstock and 3 red rhinestones.
13. Add a dab of glue to the top corner of the socks (the side that would be the back of the leg).
14. Put 3 green leaves over the glue slightly overlapping and pointing in different directions as shown below.

15. Then stick 3 red rhinestones as the berries.
16. Repeat the process with as many socks as you like. I did 3 and 3.
All the mittens and socks are done.

The Garland
17. Take a long string of green yarn and some clothespins (you can use your favorite colors). I used more or less 2 yards.
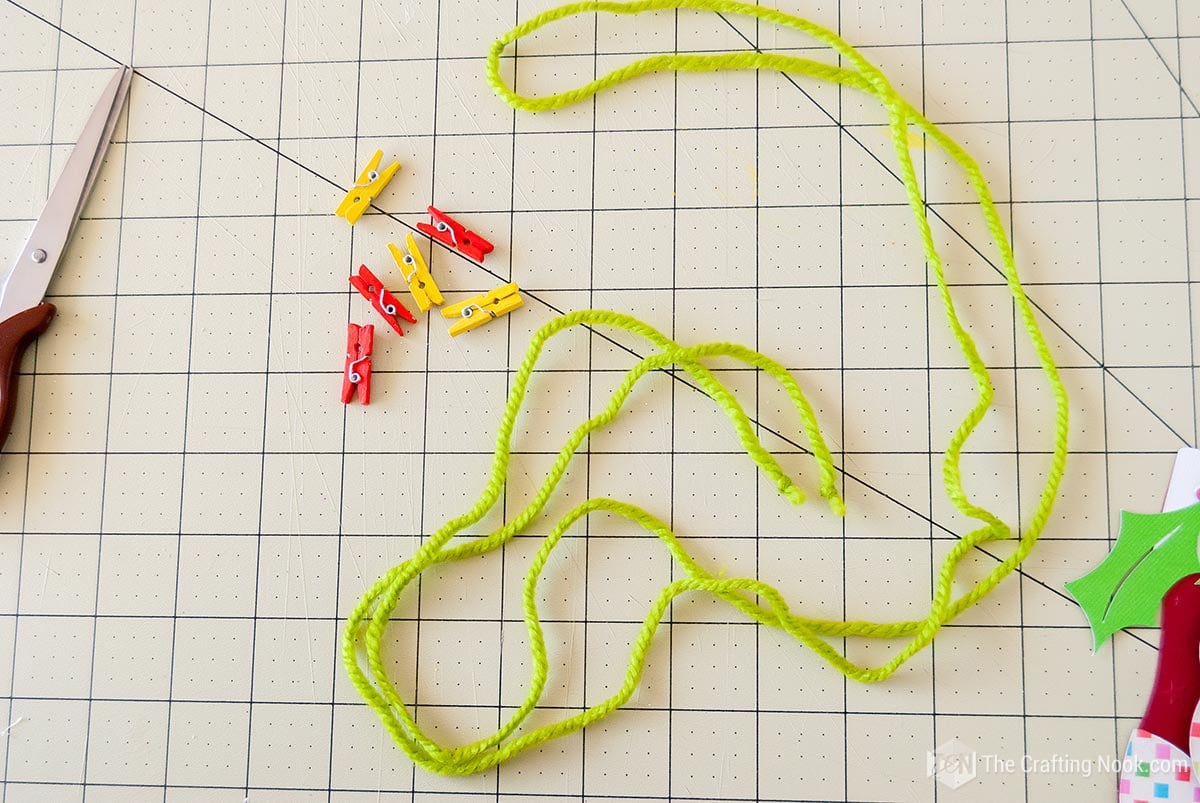
18. Hang the socks and mittens alternating them with even space between them using the mini clothespins just like clothes. I didn’t use glue but you can if you want.

19. Hang it on your fireplace mantel, staircase, doorways, your preferred wall, or anywhere you want, and Tadaaaaa!!!!!

Your Diy Christmas Paper Garland is finished.
Crafting Tips
- Make your cardstock cutouts shine by adding more rhinestones for an extra sparkly effect.
- Try using different colors instead of just the usual Christmas colors. Try using bright colors for your cardstock. Mix colors like teal, coral, and gold. This surprising change will make your garland stand out and look beautiful.
- To make your garland look nice from every side, use paper that has designs on both sides. In simpler terms, if the garland moves, you can still see the cute design from every part of the room.
- Make your garland special by putting names or initials on some of the socks and mittens.
- Use pretty paper with patterns or make your own designs with stamps, stencils, or by drawing. Combine lines, circles, and snowflakes to create a playful and delightful outcome.
- Use twine or baker’s twine instead of yarn to connect your garland pieces.
- Layering depth makes the garland look more three-dimensional. This can be done by putting multiple cutouts on top of each other. You can use small foam dots or glue dots to make your garland look raised and give it a 3D appearance. This method will make your garland look interesting and fun.
- If you have an embossing machine, make your cardstock cutouts look fancy by using embossing folders to add texture and elegance.
- Make your garland look even cozier by adding pieces that feel soft and fuzzy. Put little fluffy balls on the ends of the mittens or socks. This is a nice way to add a touchable aspect to your garland and make it extra cuddly.
- You can never go wrong with glitter. Add glitter to your cutouts to certain parts, like the cuffs or the front toes to make them sparkle.
- Brighten up your garland by adding small LED lights to make it more cozy and inviting.


Frequently Asked Questions
Although a Silhouette Cameo machine can make cutting easier and more accurate, you can still make this garland using regular scissors. Just print the templates, cut along the lines, and you’re ready to go.
You can get the free printouts and patterns for the Socks and Mittens DIY Christmas Paper Garland on our website. Find the link above at the beginning of the instructions.
I recommend using a strong type of paper for this project so that the garland stays in shape. Try to find cardstock that weighs between 65-80 pounds (or 176-216 grams per square meter) to get the best results. This will last for a long time and can be easily cut and changed.
Yes, definitely. Rhinestones make things shiny, but you can also use other decorations to be creative. You can use shiny things like sequins, small buttons, or tiny beads to pretty up your garland. You can choose and use your imagination to think of anything you want.
The time it takes depends on different things, like how hard the design is, how many cutouts there are, and how much experience you have with crafting. Usually, plan to use a couple of hours working on this task. But it is a fun and enjoyable thing to do that can be done in multiple times.
Absolutely! This project is a great way to include children. You can give them easier jobs like picking colors, using glue or putting stickers on things. It’s a great chance to spend a good time with loved ones and make special memories during the holidays.
Yes, you can change the size of the garland pieces to suit your liking. You can make the templates smaller or bigger using special computer programs, or change the settings on your printer. Just remember to keep the sizes of the different parts of the original design the same to have a well-proportioned appearance.
More Christmas Projects To Try
If you enjoyed this DIY Christmas Paper Garland tutorial, you might also love these other Christmas project ideas too:

✂️ Tutorial

DIY Christmas Paper Garland + Socks and Mittens Cut Files
Tools
- Cutting Machine – Silhouette Cameo Or Cricut. You can also cut by hand.
- scissors
- Craft knife
- Tweezers – for the rhinestones
Supplies
- Red white and green cardstock – Or your favorite colors
- Printed patterned paper or scrapbook paper
- Double-sided tape
- Glue – I used UHU universal glue
- White-transparent and red self-adhesive rhinestones
- Any extra decoration you want to use – I used cute snowflakes.
- Yarn
- Different colors of mini clothespins.
Instructions
PREP WORK
- Firstly I created my designs. I wanted mittens and socks with details, so I prepared separate pieces for each like the mitten cuffs, the sock tip toes, and the heel. Also, some leaf decorations.
- Once the design was ready the fun begins. You can snag the free cut files or the printable if you are cutting it by hand in the link below.
- So, print out the template or upload the cut files to your cutting machine app.
- Prepare your mat with the different cardstocks in the right places according to your design.
- Define the right settings according to the material you are using and load your mat.
- Send to cut the shapes.
- Organize and lay out all the pieces according to the final designs.
LET’S START WITH THE MITTENS.
- Use double-sided tape to stick the white part (cuffs) and stick the snowflake too (or your chosen mitten decor).
- Stick in the center of the snowflake a cute white-transparent rhinestone or your favorite color. This brings a little shine to your mittens.
- Repeat the process with as many mittens as you like and set them aside.
NOW LET’S MAKE THE SOCKS
- Same as before, first the white cuff pieces stick with double-sided tape to the base and then stick the toes and heels with glue or the same double-sided tape.
- The final touch is adding some mistletoes to the socks made with green cardstock and 3 red rhinestones.
- Add a dab of glue to the top corner of the socks (the side that would be the back of the leg).
- Put 3 green leaves over the glue slightly overlapping and pointing in different directions as shown below.
- Then stick 3 red rhinestones as the berries.
- Repeat the process with as many socks as you like. I did 3 and 3.
THE GARLAND
- Take a long string of green yarn and some clothespins (you can use your favorite colors). I used more or less 2 yards.
- Hang the socks and mittens alternating them with even space between them using the mini clothespins just like clothes. I didn’t use glue but you can if you want.
- Hang it on your fireplace, your preferred wall, or anywhere you want, and Tadaaaaa!!!!!
- Your Diy Christmas Paper Garland is finished.
What do you think??? Fun and cute or what???? Tell me your thoughts!!!
Share and PIN ME!!!

Til’ next time…


FREE WORKBOOK
Keeping your Sweet Home Organized
Learn how to create intentional habits and simple routines to Keep Your Home Organized. Plus freebies, printables, exclusive content, and tips.
Disclaimer: By clicking on the “Yes” button above you are giving me your consent to collect and use your information according to the law and My Policy Privacy. Zero Spam I promise!
