DIY Rustic Wooden Sign Electrical Panel Cover
Make this DIY Rustic Wooden Sign Electrical Panel Cover to cover up your electrical control box or an exposed electrical wire. This is perfect to hide unpleasant areas with a touch of rustic decor.
Do you have those ugly breaker boxes in plain sight? I do and I don’t like it at all. This Rustic Wooden Sign Electrical Panel Cover is pretty, is easy to make, and will fix that problem forever!!!

Would you believe me if I tell you that I have my Electrical Panel right in my entryway next to the front door? Well yeah, I do and I swear I have no idea what is up with that.
This post may contain affiliate links. Please read our Disclosure Policy.
You might also love these other wood sign ideas: DIY Oversized Rustic Wood Sign (also reversible), DIY Inspirational Farmhouse Wood Signs, and DIY Mini Pallet Wood Sign for Valentine’s Day
Table of Contents
DIY Rustic Wooden Sign Electrical Panel Cover
It seems a pattern here since the 2 previous apartments I have lived in also have the electrical panel right there in the entryway.
It hurts my eyes.
I wasn’t lucky that those circuit breakers would be placed in the laundry room or basement.
I had to do something…
…and I thought maybe a mirror or a wall art but then there is the intercom placed in a really hard place which doesn’t give me much room to play with.
I was sure it had to be farmhouse related so I thought of a pretty and rustic wooden sign electrical panel cover that would fit there perfectly since I could make it in the right size.
This idea came up while working on another project. I was planning a pallet backdrop for a mantel. I was getting a few boards left and my husband asked me how about using those boards to make a rustic Cover for that ugly electrical panel box.
Seriously, it was the best idea ever. I said yes right away.

We even put it together quickly to see if it would work. We tried a few things and another project came to my to-do list. It took me a while to actually start making this project but I’m so happy with how it turned out.
Now every time I come to the entryway or I see it from the hallway, it actually makes me smile.
That space right there it’s a work in progress. We did the first step making the cover and now I have a few plans to make that space the actual entryway.
I want to put my into wait table underneath the cover and probably a key holder below the electrical panel and next to the intercom.
I’m crazy in love with how this rustic wooden sign electrical panel cover turned out.
The best part?
It was super easy to put together.
And to be honest, it was super fun to make too.
I don’t really understand why would anyone put a breaker box right at the entrance of the house but I guess it’s probably this country’s rules for this type of feature. So I can only try to make it a bit prettier.
")
How to make Wooden Sign Cover
NOTE: Keep in mind that breaker box panels, air conditioners, and outlets are necessary and should be easily accessible at all times. Avoid covering your electrical panel box with a complicated frame, enclosed cabinet, or heavy piece of art. When the power goes out, the last thing you want to worry about is an overly complicated situation keeping you from getting to it.
Supplies:
- Walnut wood stain.
- White latex paint
- Grey latex paint
- Brushes
- Lint-free cloth
- Plastic plate
- Steel wool (grade 2-coarse)
- Pine boards (I used shiplap leftovers -about 4 boards)
- 3 Pine lumbers (for the frame. Length depends on your sign size)
- Wood lettering (Paint if you need a specific color)
- Wood glue
- Nails & screws
- Hammer
- Clamps
- Gloves
- Protective eye ware
Instructions:
Before we begin, be sure to follow us on Pinterest, Facebook, Instagram, and YouTube, and also sign up for our email list (at the end of this post), so you’ll never miss a post!
Step 1: PREP WORK
Firstly, measure well your electrical panel and add about 2 to the width and height.
Cut your wood board pieces to the necessary width and use as many boards as you need to meet the height. Don’t worry if it’s not the exact height, it can be a bit taller if you have the space.
I used pinewood shiplap but you can use pinewood boards, plywood, or to be honest any scrap wood you might have that meets the size requirements.
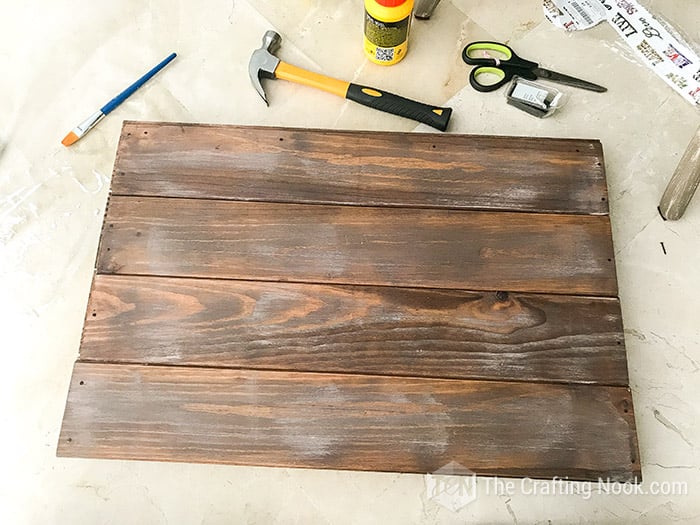
Step 2: Staining and dry brushing your wood pieces
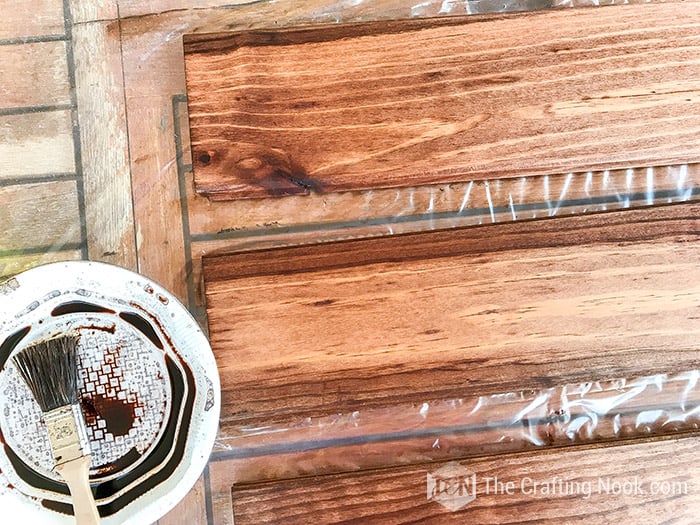
So first you are going to stain your wood with the Walnut stain using your cloth (or brush) and let them dry.
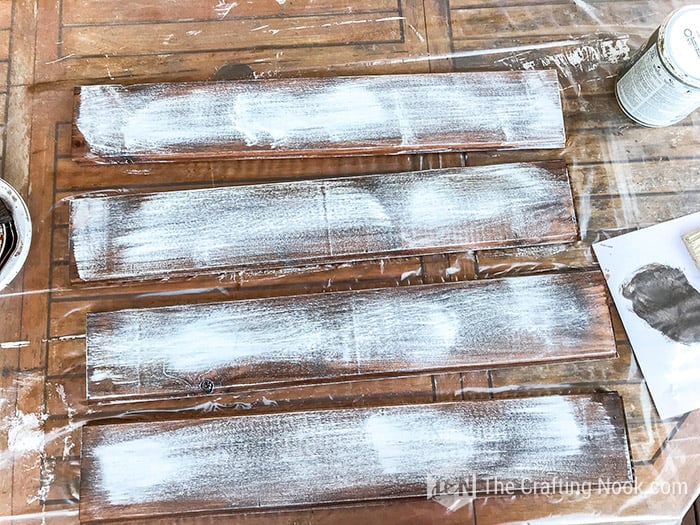
Once the boards have dried (and sanded if necessary) you are going to dry brush on a thin coat of grey latex paint.
If you aren’t familiar with the dry brush technique, just put some paint on a plastic or paper plate and spread it out, then take a dry brush and get a tiny bit of paint on the end of the bristles.
Now you are going to just brush this along your wood, re-dip in the paint as necessary, but don’t overdo this because you want your brush to remain slightly dry, so get every bit of paint off you can before you get more on there. When you are done it should look like this.
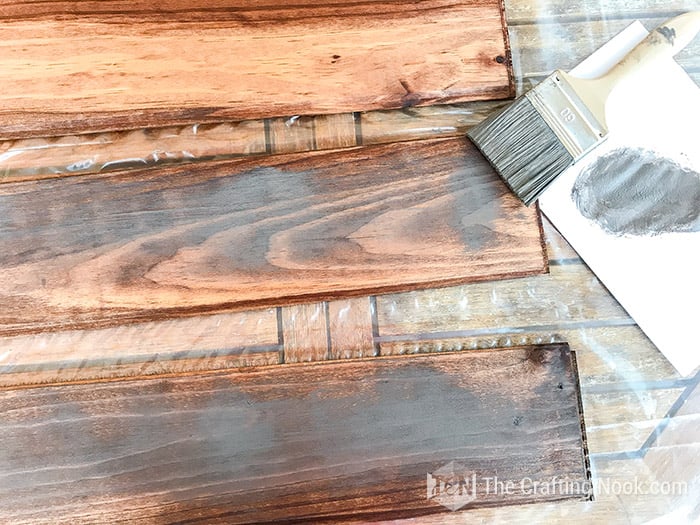
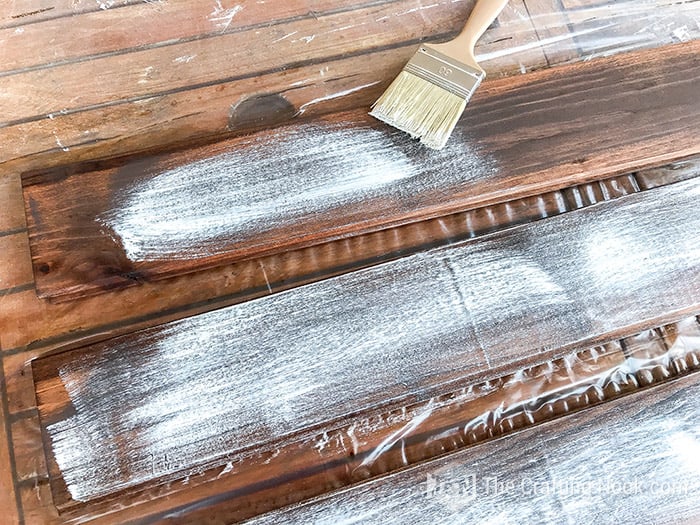
Let them dry for a little while and then repeat this process with white paint. Let them dry well this time.
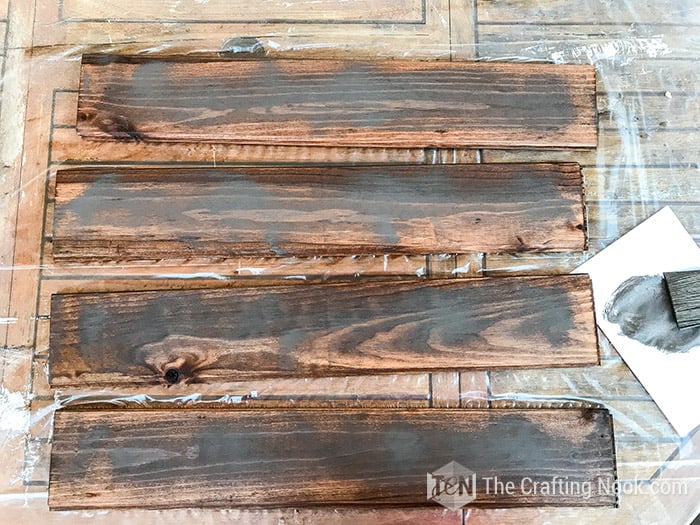
Once the boards are completely dry, you are going to sand and distress them with your Grade 2 Steel Wool. Here is when I suggest you wear your gloves and wear protective eyewear. Steel wool will be sticking out of your fingers and that’s not fun! Keep sanding until you are happy with the result.
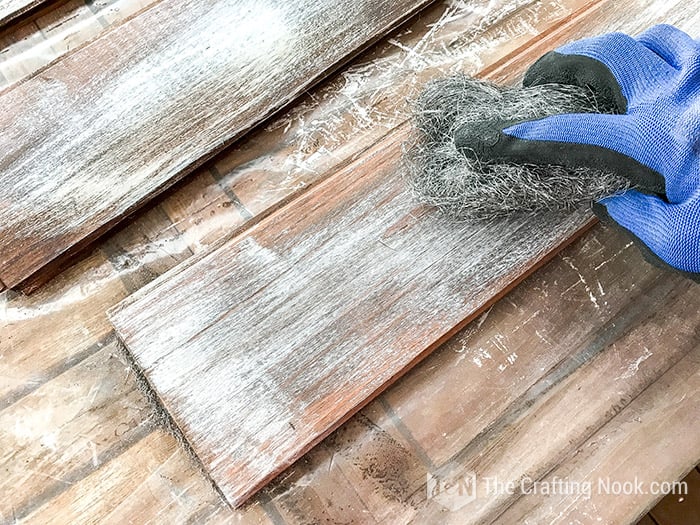
Then If you want you can sand with 80 grit sandpaper to remove any hard splinters.

Clean off any dust residue on your wood boards, and you are going to apply another coat of the wood stain but this time clean off the excess of stain with a clean cloth. Let fully dry.
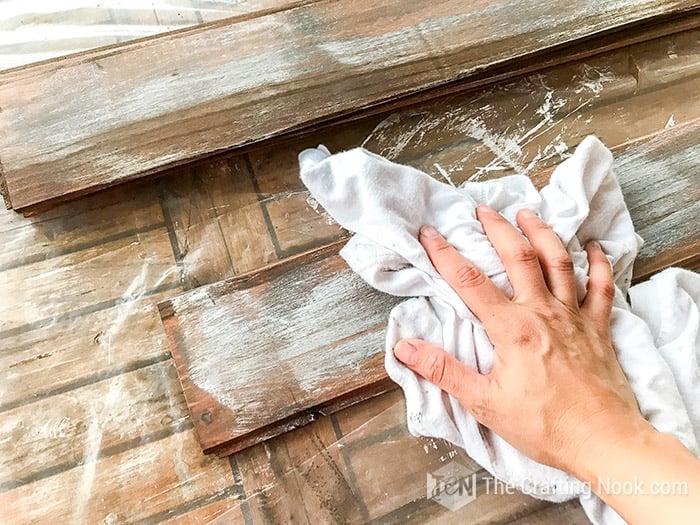
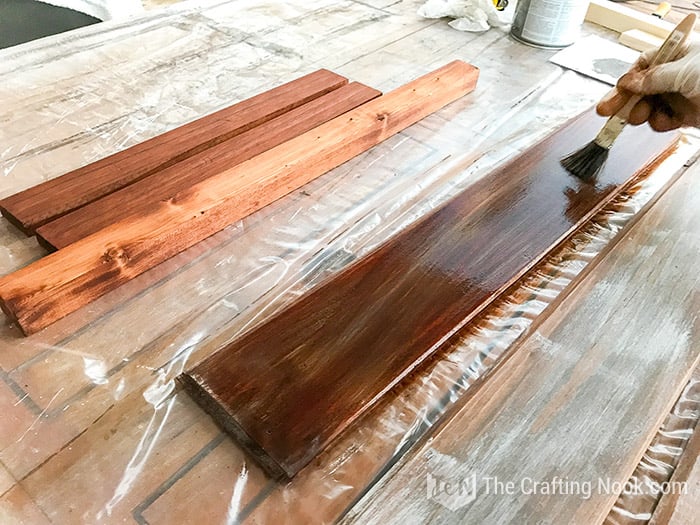
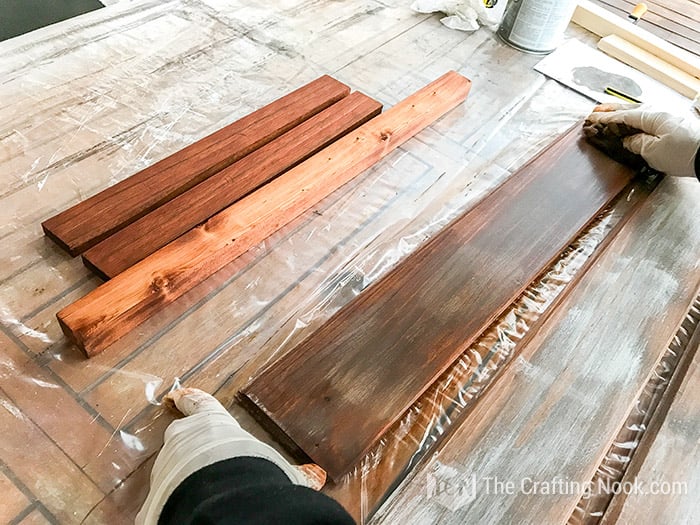
When you are happy with how it looks, give it a light sanding with a dry piece of steel wool or sandpaper.
In the meanwhile…
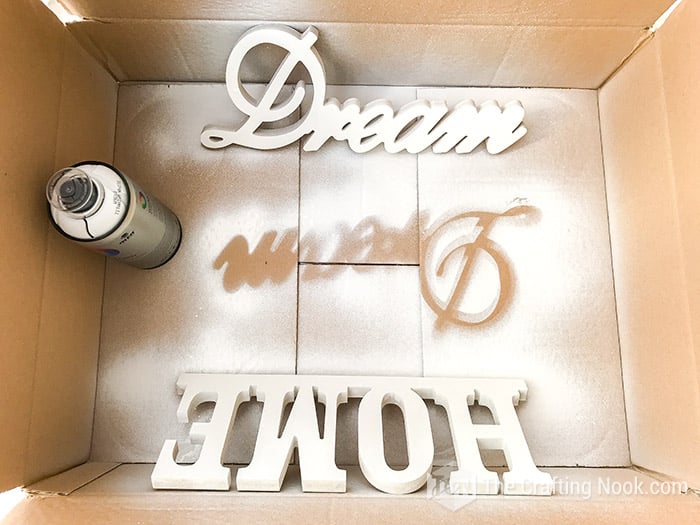
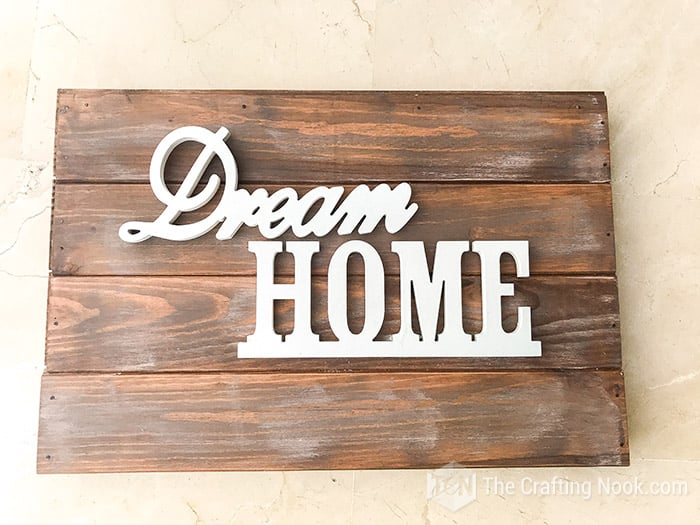
My wood letters were made with MDF and without any paint so I spray painted in matte white and let them dry.
Step 3: Assembling the Wooden Sign Cover.
Once all your wood pieces are finished and dry it’s time to put them together.
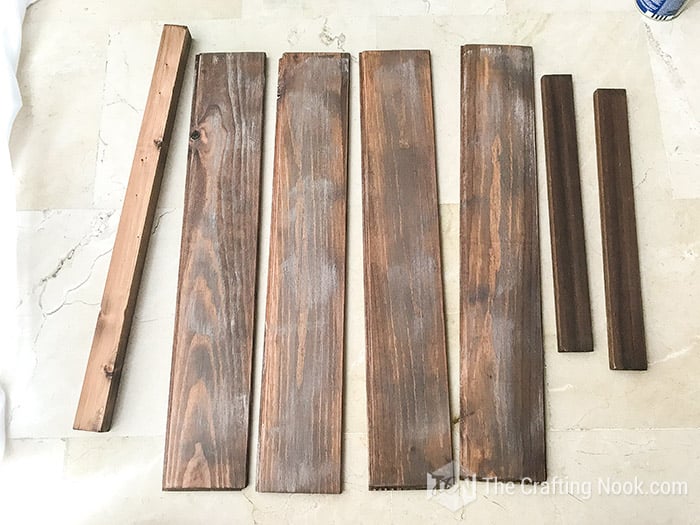
At this point you have your mainboards for the sign, 3 or 4 (up to you) pine lumbers and your lettering ready.
2 of your lumbers should measure your sign height minus a few millimeters and the other 2 lumber should measure the width minus the 2 side lumbers. You will see what I mean in a bit.
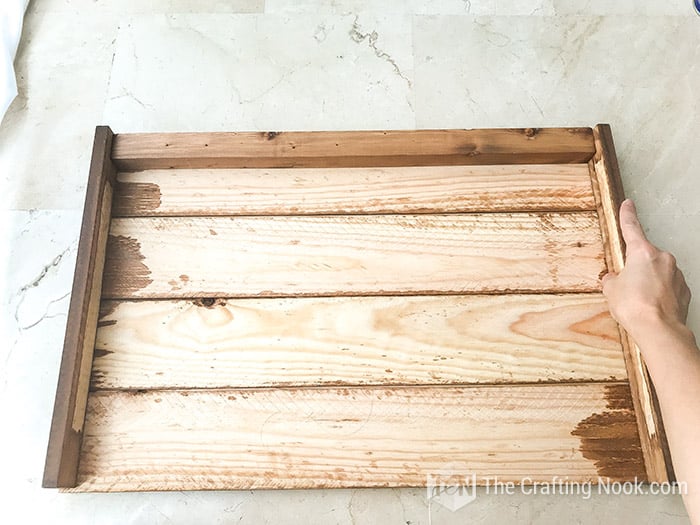
Align together your mainboards with the right side facing down (trust me I didn’t and it was a bit annoying to turn them after LOL). In my case since I used shiplap, I fitted them together and aligned the edges.
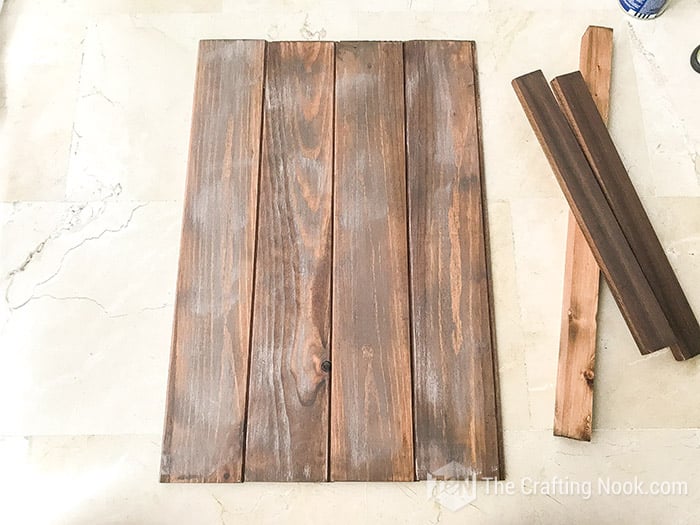
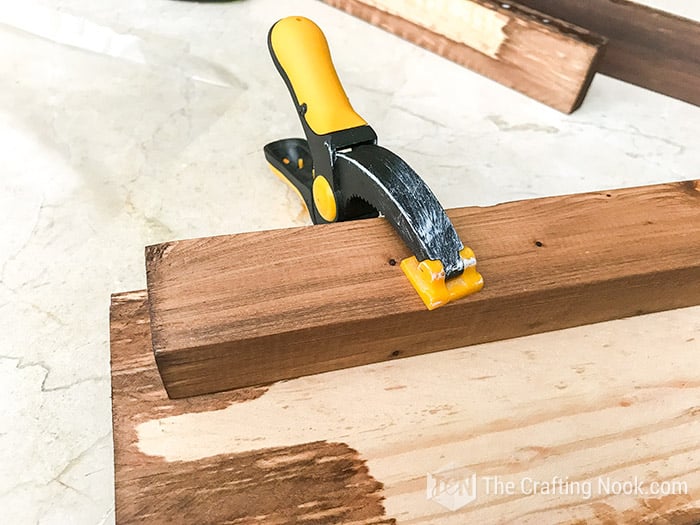
Apply a line of wood glue along the lumber and place them along the edges.
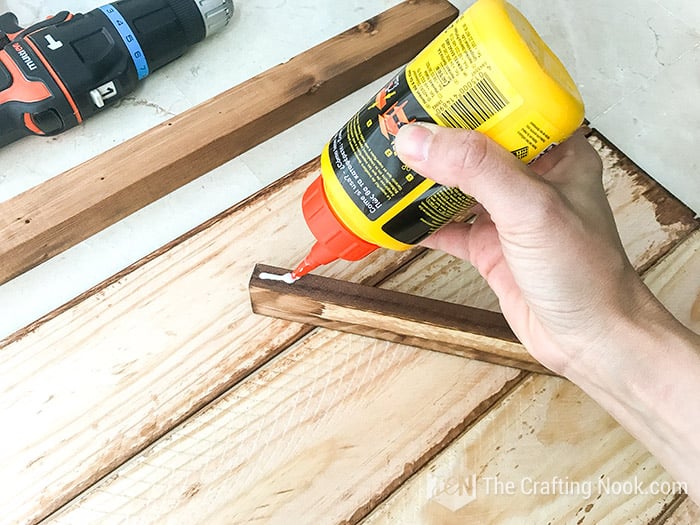
Secure them with clamps to make sure they don’t move and stick well. Let it dry for a little while.
Turn your board facing up and remove the clamps. If you notice the glue is still not completely dry put clamps back and let dry a few more minutes.
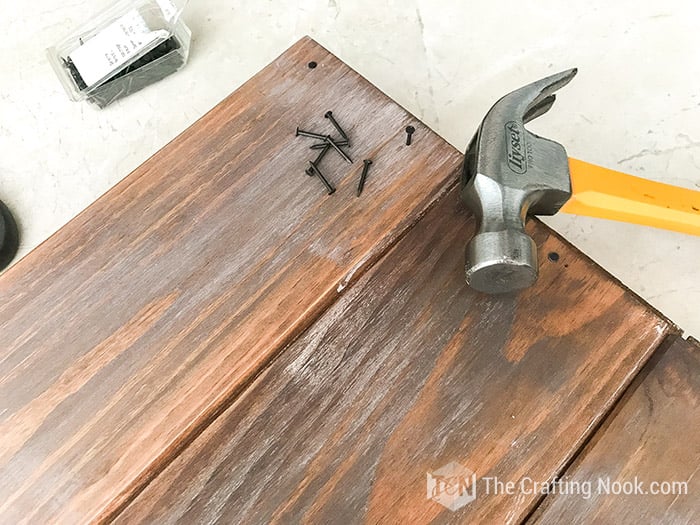
Once your board is completely dry, put some nails along the edges making sure you get the pine lumbers. I put about 2 nails on each board.
Step 4: Installing the Wooden Words
Place your lettering where you like them the most.
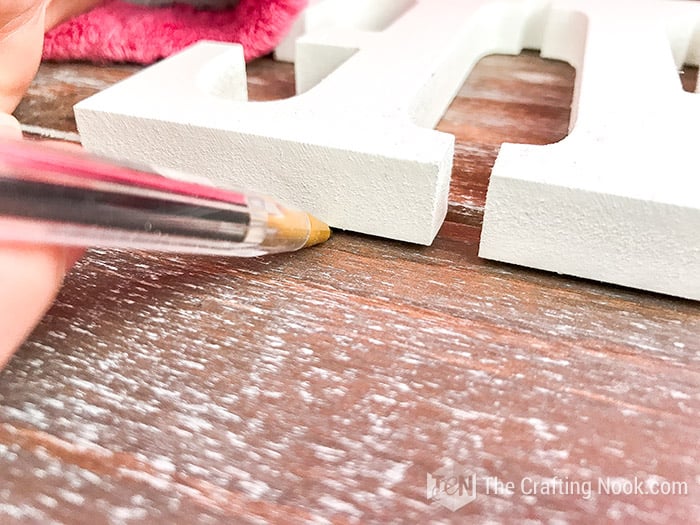
SIDE NOTE: At this point, I felt like my sign needed more aging signs so I applied a few more strokes with white latex paint randomly along with the sign and then sanded a little bit again. This step is optional of course if you like your initial results.

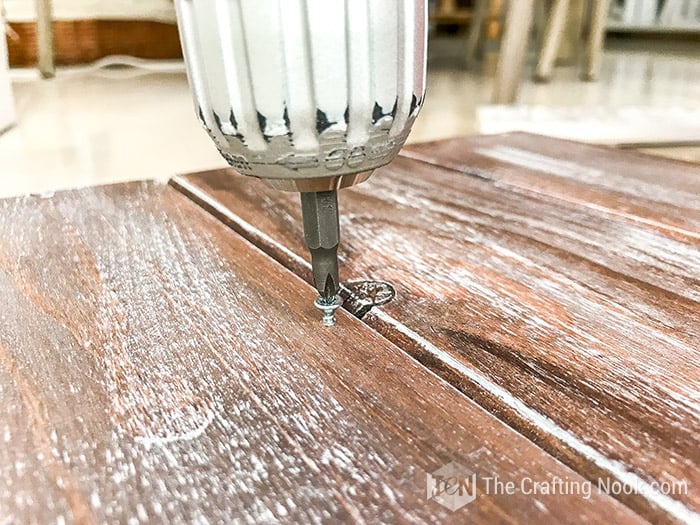
In my case, the lettering words came with hangers so it made it easy for me and I can even switch words every now and then. But if yours don’t have this, then my suggestion is to set the place where you want the words and mark some wide spaces to drill a hole (make sure you use a really thin drill bit).
Once you have the hole just screw it from the back of the sign. Another option can always be using glue (but I don’t trust it, you don’t want to be woken up at the middle of the night with the noise of the words falling)
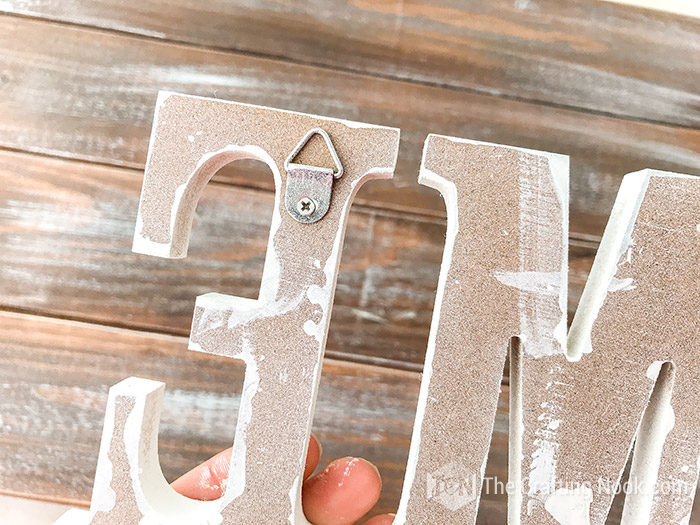
Anyways, what I did was mark where the hangers should be and screwed in a screw.
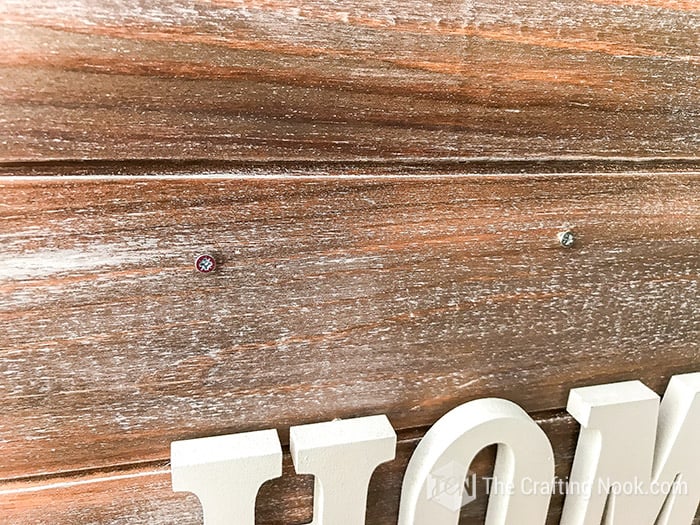
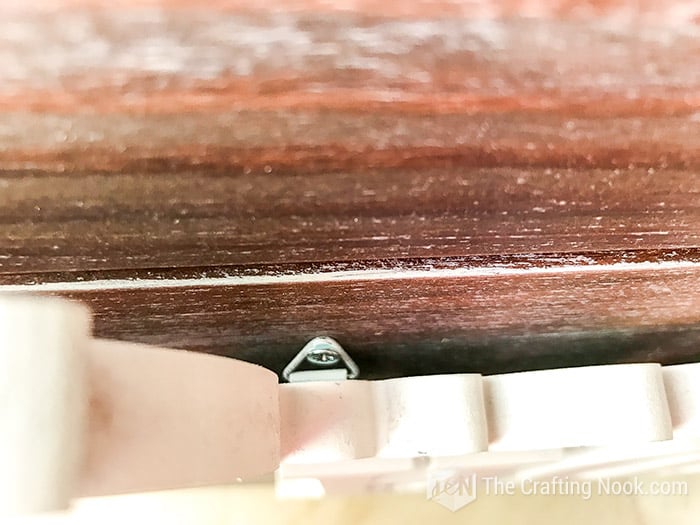
Hang the words and voila!
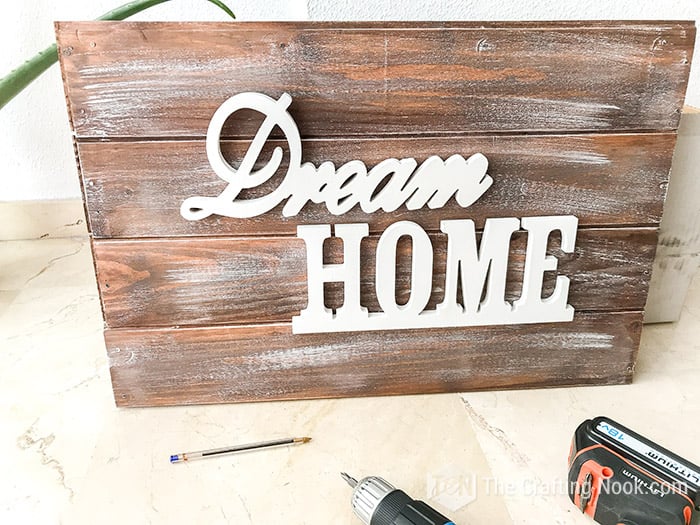
There you go! A super pretty and functional Electrical Panel Cover to hide these ugly breakers.
Step 5: Hanging the Wooden Sign Electrical Panel Cover
Now it’s the most desired moment…
Let’s hang it.


I put a couple of nails on the wall right above the electrical panel and hung my pretty wooden sign!!!
Doesn’t it look much better? I just love it.


Now just give me some time to make the whole space a cozy entryway!
Frequently Asked Questions
Well, creativity and, in some cases, a toolbox can make those unsightly necessities “disappear”. You can use artwork, framed message boards, a vintage window, picture frame, pegboard, chalkboard, or weaving or tapestry are all viable options for covering up obtrusive electrical eyesores. Whatever you do, make it easy to have full access to the electrical panel. Make it either completely and easily removable or use hinges to open it and access it.
It is dangerous if the way you cover it doesn’t give you the freedom to access it easily and quickly. Whatever you do, make it easy to have full access to the electrical panel. Make it either completely and easily removable or use hinges to open it and access it.
That would be entirely up to you. One big reason to cover it is when the brake box is in plain sight in our homes and looks really bad. Like in my case it was really awful and right at the entrance of my home. Some people have in in the living room or in a hall. If it doesn’t bother you, then leave it.
More Rustic Projects to Try
If you like this fun Rustic Wooden Sign electrical panel Cover tutorial, you might also love these other rustic project ideas too:


✂️ Tutorial

DIY Rustic Wooden Sign Electrical Panel Cover Tutorial
Tools
- Hammer
- Clamps
- Gloves
- Protective eye ware
- Drill
Supplies
- Walnut wood stain.
- White latex paint
- Grey latex paint
- Brushes
- Lint-free cloth
- Plastic plate
- Steel wool grade 2-coarse
- Pine boards I used shiplap leftovers -about 4 boards
- 3 Pine lumbers for the frame. Length depends on your sign size
- Wood lettering Paint if you need a specific color
- Wood glue
- Nails & screws
Instructions
- Firstly, measure well your electrical panel and add about 2 to the width and height.
- Cut your wood board pieces to the necessary width and use as many boards as you need to meet the height. Don’t worry if it’s not the exact height, it can be a bit taller if you have the space.
- I used pinewood shiplap but you can use pinewood boards, plywood, or to be honest any scrap wood you might have that meets the size requirements.
STAINING AND DRY BRUSHING YOUR WOOD PIECES
- So first you are going to stain your wood with the Walnut stain using your cloth (or brush) and let them dry.
- Once the boards have dried (and sanded if necessary) you are going to dry brush on a thin coat of grey latex paint.
- If you aren’t familiar with the dry brush technique, just put some paint on a plastic or paper plate and spread it out, then take a dry brush and get a tiny bit of paint on the end of the bristles.
- Now you are going to just brush this along your wood, re-dip in the paint as necessary, but don’t overdo this because you want your brush to remain slightly dry, so get every bit of paint off you can before you get more on there. When you are done it should look like this.
- Let them dry for a little while and then repeat this process with white paint. Let them dry well this time.
- Once the boards are completely dry, you are going to sand and distress them with your Grade 2 Steel Wool. Here is when I suggest you wear your gloves and wear protective eyewear. Steel wool will be sticking out of your fingers and that’s not fun! Keep sanding until you are happy with the result.
- Then If you want you can sand with 80 grit sandpaper to remove any hard splinters.
- Clean off any dust residue on your wood boards, and you are going to apply another coat of the wood stain but this time clean off the excess of stain with a clean cloth. Let fully dry.
- When you are happy with how it looks, give it a light sanding with a dry piece of steel wool or sandpaper.
- In the meanwhile…
- Paint your letters or wood sign if needed and let them dry.
ASSEMBLING THE WOODEN SIGN ELECTRICAL PANEL COVER.
- Once all your wood pieces are finished and dry it’s time to put them together.
- At this point you have your mainboards for the sign, 3 or 4 (up to you) pine lumbers and your lettering ready.
- 2 of your lumbers should measure your sign height minus a few millimeters and the other 2 lumber should measure the width minus the 2 side lumbers. You will see what I mean in a bit.
- Align together your mainboards with the right side facing down (trust me I didn’t and it was a bit annoying to turn them after LOL). In my case since I used shiplap, I fitted them together and aligned the edges.
- Apply a line of wood glue along the lumber and place them along the edges.
- Secure them with clamps to make sure they don’t move and stick well. Let it dry for a little while.
- Turn your board facing up and remove the clamps. If you notice the glue is still not completely dry put clamps back and let dry a few more minutes.
- Once your board is completely dry, put some nails along the edges making sure you get the pine lumbers. I put about 2 nails on each board.
- Place your letters where you like them the most.
- In my case, the lettering words came with hangers so it made it easy for me and I can even switch words every now and then. But if yours don’t have this, then my suggestion is to set the place where you want the words and mark some wide spaces to drill a hole (make sure you use a really thin drill bit).
- Once you have the hole just screw it from the back of the sign. Another option can always be using glue (but I don’t trust it, you don’t want to be woken up at the middle of the night with the noise of the words falling)
- Mark where the hangers should be and screw in a screw.
- Hang the words and voila! The wood sign cover is ready!
These are some more Wooden Sign Projects I love from my favorite bloggers!
- How to Build and Paint a Wood Sign by Sarah over at Creative Ramblings.
- Wood Pallet Sign Tutorial by Lauren over at The Thinking Closet.
- DIY Wood Pallet Sign AND free printable! by the 6 Clever Sisters.
Hope you enjoyed this tutorial and found it helpful and inspirational!!!
What do you think? Do you have your electrical panel in plain sight? What did you do? Tell me everything in the comments!
If you did, please don’t forget to PIN IT and share with friends!

Til’ next time…


FREE WORKBOOK
Keeping your Sweet Home Organized
Learn how to create intentional habits and simple routines to Keep Your Home Organized. Plus freebies, printables, exclusive content, and tips.
Disclaimer: By clicking on the “Yes” button above you are giving me your consent to collect and use your information according to the law and My Policy Privacy. Zero Spam I promise!
